

Overview
Last Update: March 2025
This article is an update version of my old How to set up and run Python Data Science Development Environment with Jupyter on Docker article because that library is outdated. This updated article aims to use the strategic LSEG Data Library for Python (Data Library version 2) with the Delivery platform.
The Data Scientists and Financial coders need to interact with various Data Science/Financial development tools such as the Anaconda (or Miniconda) Python distribution platform, the Python programming language, the R programming language, Matplotlib library, Pandas Library, the Jupyter application, and much more.
One of the hardest parts of being Data Developers is the step to set up those tools. You need to install a lot of software and libraries in the correct order to set up your Data Science development environment. The example steps are the following:
- Install Python or Anaconda/Miniconda
- Create a new virtual environment (It is not recommended to install programs into your base environment)
- Install Jupyter
- Install Data Science libraries such as Matplotlib, Pandas, Plotly, Bokeh, etc.
- If you are using R, install R and then its libraries
- If you are using Julia, Install Julia and then its libraries
- ... So on.
If you need to share your code/project with your peers, the task to replicate the above steps in your collogues environment is very complex too.
The good news is you can reduce the effort to set up the workbench with the Docker containerization platform. You may think Docker is for the DevOps or the hardcore Developers only, but the Jupyter Docker Stacks and Docker Compose tools simplify how to create a ready-to-use Jupyter application with Data Science/Financial libraries in a few commands.
This article demonstrates how to set up Jupyter Notebook environment with Docker to consume and display financial data from Data Platform using the strategic Data Library without the need to install the steps above.
Introduction to Jupyter Docker Stacks
Let’s start with introduction to Jupyter Docker Stacks.The Jupyter Docker Stacks are a set of ready-to-run Docker images containing JupyterLab applications and interactive computing tools with build-in scientific, mathematical and data analysis libraries pre-installed. With Jupyter Docker Stacks, the setup environment part is reduced to just the following steps:
- Install Docker and sign up for DockerHub website.
- Run a command to pull an image that contains Jupyter and preinstalled packages based on the image type.
- Work with your notebook file
- If you need additional libraries that are not preinstalled with the image, you can create your image with a Dockerfile to install those libraries.
Docker also helps the team share the development environment by letting your peers replicate the same environment easily. You can share the notebooks, Dockerfile, dependencies-list files with your colleagues, then they just run one or two commands to run the same environment.
Jupyter Docker Stacks provide various images for developers based on their requirement such as:
- jupyter/base-notebook: The based Jupyter applications set (JupyterLab, Jupyter Notebook, JupyterHub, and NBClassic) with minimal functions. The basic HTTP REST API like requests is included.
- jupyter/scipy-notebook: Jupyter applications with conda/mamba , ipywidgets and popular packages from the scientific Python ecosystem (Pandas, Matplotlib, Seaborn, Requests, etc.)
- jupyter/r-notebook: Jupyter Notebook/JupyterLab wit R interpreter, IRKernel and devtools.
- jupyter/datascience-notebook: Everything in jupyter/scipy-notebook and jupyter/r-notebook images with Julia support.
- jupyter/tensorflow-notebook: Everything in jupyter/scipy-notebook image with TensorFlow.
- and much more.

That covers the Jupyter Docker Stacks overview. Please see more detail about all image types on Selecting an Image page.
The jupyter/scipy-notebook Image for Delivery Platform
My next point is demonstrating the jupyter/scipy-notebook image. I am demonstrating with example data set from the Delivery Platform (RDP).
What is Delivery Platform APIs?
The Delivery/Data Platform (RDP) APIs provide various LSEG data and content for developers via easy to use Web-based API.
RDP APIs give developers seamless and holistic access to all of the LSEG content such as Historical Pricing, Environmental Social and Governance (ESG), News, Research, etc and commingled with their content, enriching, integrating, and distributing the data through a single interface, delivered wherever they need it. The RDP APIs delivery mechanisms are the following:
- Request - Response: RESTful web service (HTTP GET, POST, PUT or DELETE)
- Alert: delivery is a mechanism to receive asynchronous updates (alerts) to a subscription.
- Bulks: deliver substantial payloads, like the end-of-day pricing data for the whole venue.
- Streaming: deliver real-time delivery of messages.
This example project is focusing on the Request-Response: RESTful web service delivery method only.
For more detail regarding the Platform, please see the following APIs resources:
- Quick Start page.
- Tutorials page.
- RDP APIs: Introduction to the Request-Response API page.
- RDP APIs: Authorization - All about tokens page.
That’s all I have to say about Delivery Platform.
jupyter/scipy-notebook image preparation
Now we come to preparing the jupyter/scipy-notebook image for RDP data. The first step is create a file name docker-compose.yml with the following content:
services:
jupyter:
image: jupyter/scipy-notebook:python-3.11.6@sha256:fca4bcc9cbd49d9a15e0e4df6c666adf17776c950da9fa94a4f0a045d5c4ad33
ports:
- 8888:8888
volumes:
- <project /python/notebook/ directory>:/home/jovyan/work
env_file:
- .env
The file above sets the following container options.
- image: Set Docker pulls jupyter/scipy-notebook:python-3.11.6 version digest - bf4de44b0fa8 image.
- ports 8888:8888: Exposes the server port 8888 on host port 8888.
- -v <your working directory>:/home/jovyan/work: Mounts the working directory on the host as /home/jovyan/work folder in the container to save the files between your host machine and a container.
- env_file: Pass a .env file to a container. This .env file contains your RDP credential and RDP endpoints information (see env_file)
Note:
- Docker destroys the container and its data when you remove the container, so you always need the mount volume (volumes) option.
- The default notebook username of a container is always jovyan (but you can change it to something else -- see Example 2).
Alternatively, if you needs to run a docker command manually, a docker-compose.yml file above can be loosely translated to the following docker run command:
docker run -p 8888:8888 --name jupyter -v <project /python/notebook/ directory>:/home/jovyan/work -it jupyter/scipy-notebook:python-3.11.6
Next, create a file name .env file with the following RDP content:
# RDP Core Credentials
RDP_USER=RDP_MACHINE_ID
RDP_PASSWORD=RDP_PASSWORD
RDP_APP_KEY=RDP_APP_KEY
# RDP Core Endpoints
RDP_BASE_URL=https://api.refinitiv.com
RDP_AUTH_URL=/auth/oauth2/v1/token
RDP_ESG_URL=/data/environmental-social-governance/v2/views/scores-full
RDP_HISTORICAL_PRICE_URL=/data/historical-pricing/v1
RDP_HISTORICAL_INTERDAY_SUMMARIES_URL=/views/interday-summaries/
RDP_HISTORICAL_EVENT_URL=/views/events/
Caution:
You should not share this .env file to your peers or commit/push it to the version control. You should add the file to the .gitignore file to avoid adding it to version control or public repository accidentally.
Now your environment is ready to run the jupyter/scipy-notebook docker container.
Running jupyter/scipy-notebook container
That brings us to run a container from the previous steps. You can build and run this image with the following command.
docker compose up
The running result with the notebook server URL information is the following.
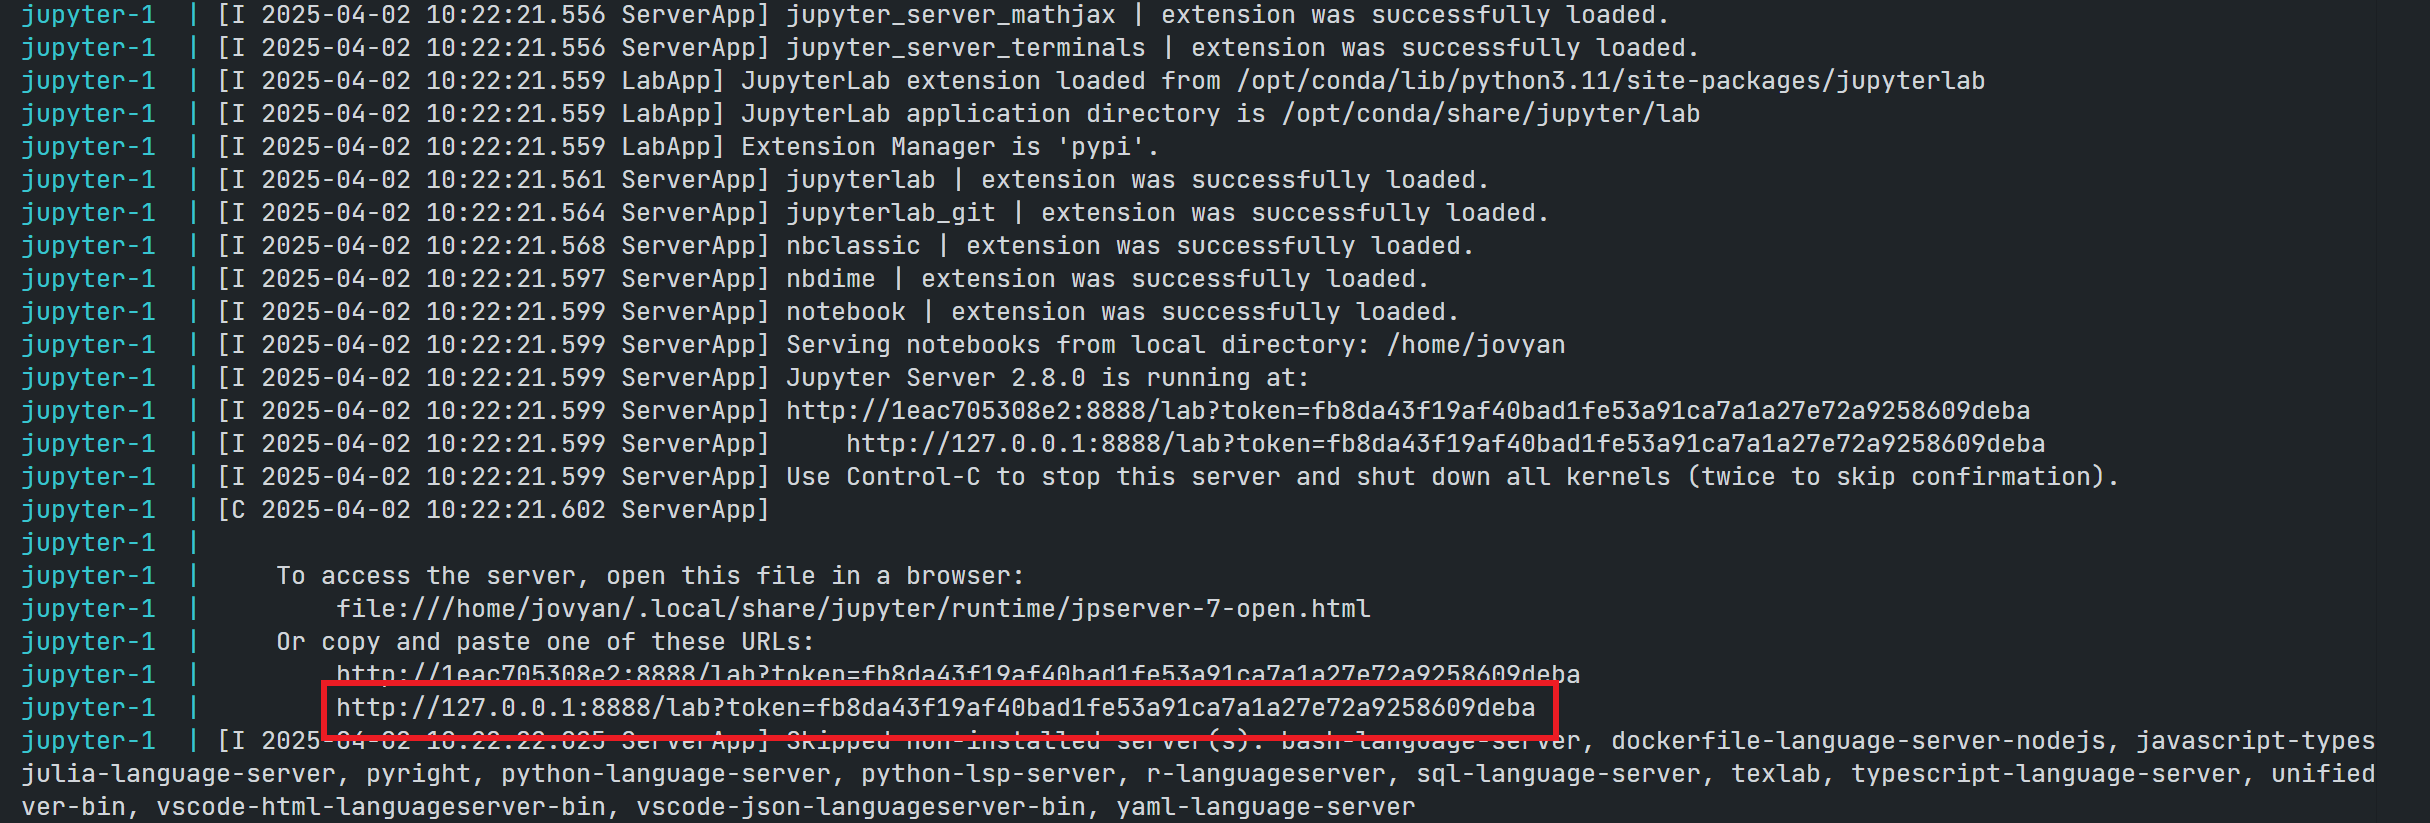
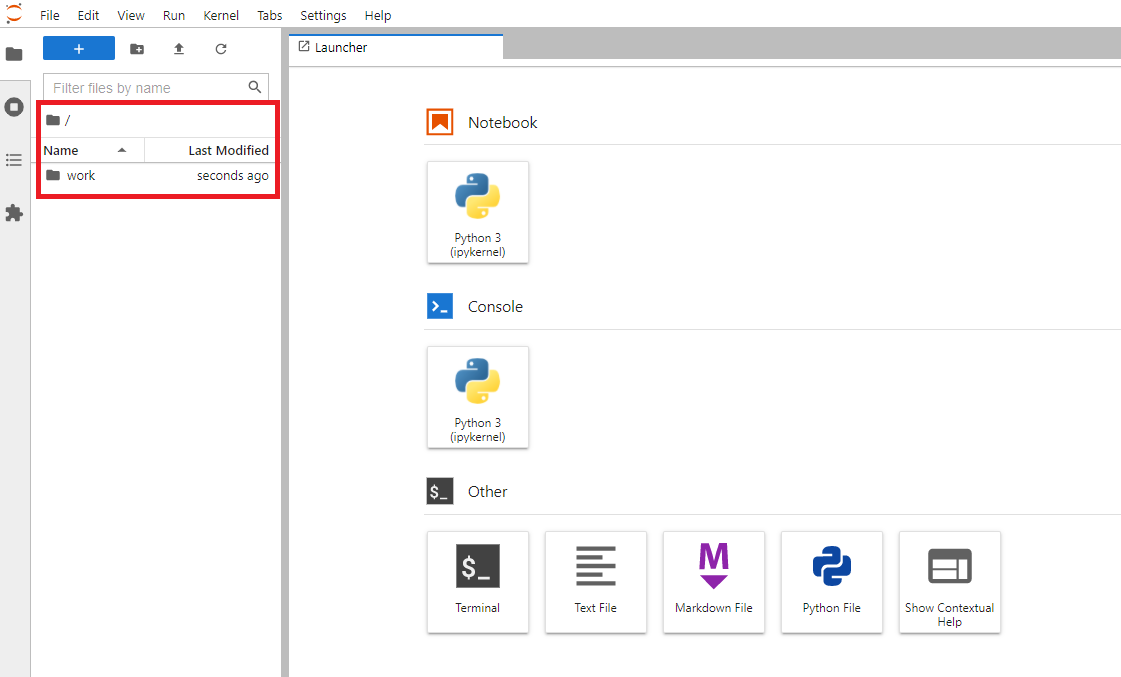
You can access the JupyterLab application by opening the notebook server URL in your browser. It starts with the /home/jovyan/ location. Please note that only the notebooks and files in the work folder can be saved to the host machine (your <your working directory> folder).
The jupyter/scipy-notebook image has built-in useful Python libraries such as requests, Matplotlib, Pandas, NumPy, etc for you.
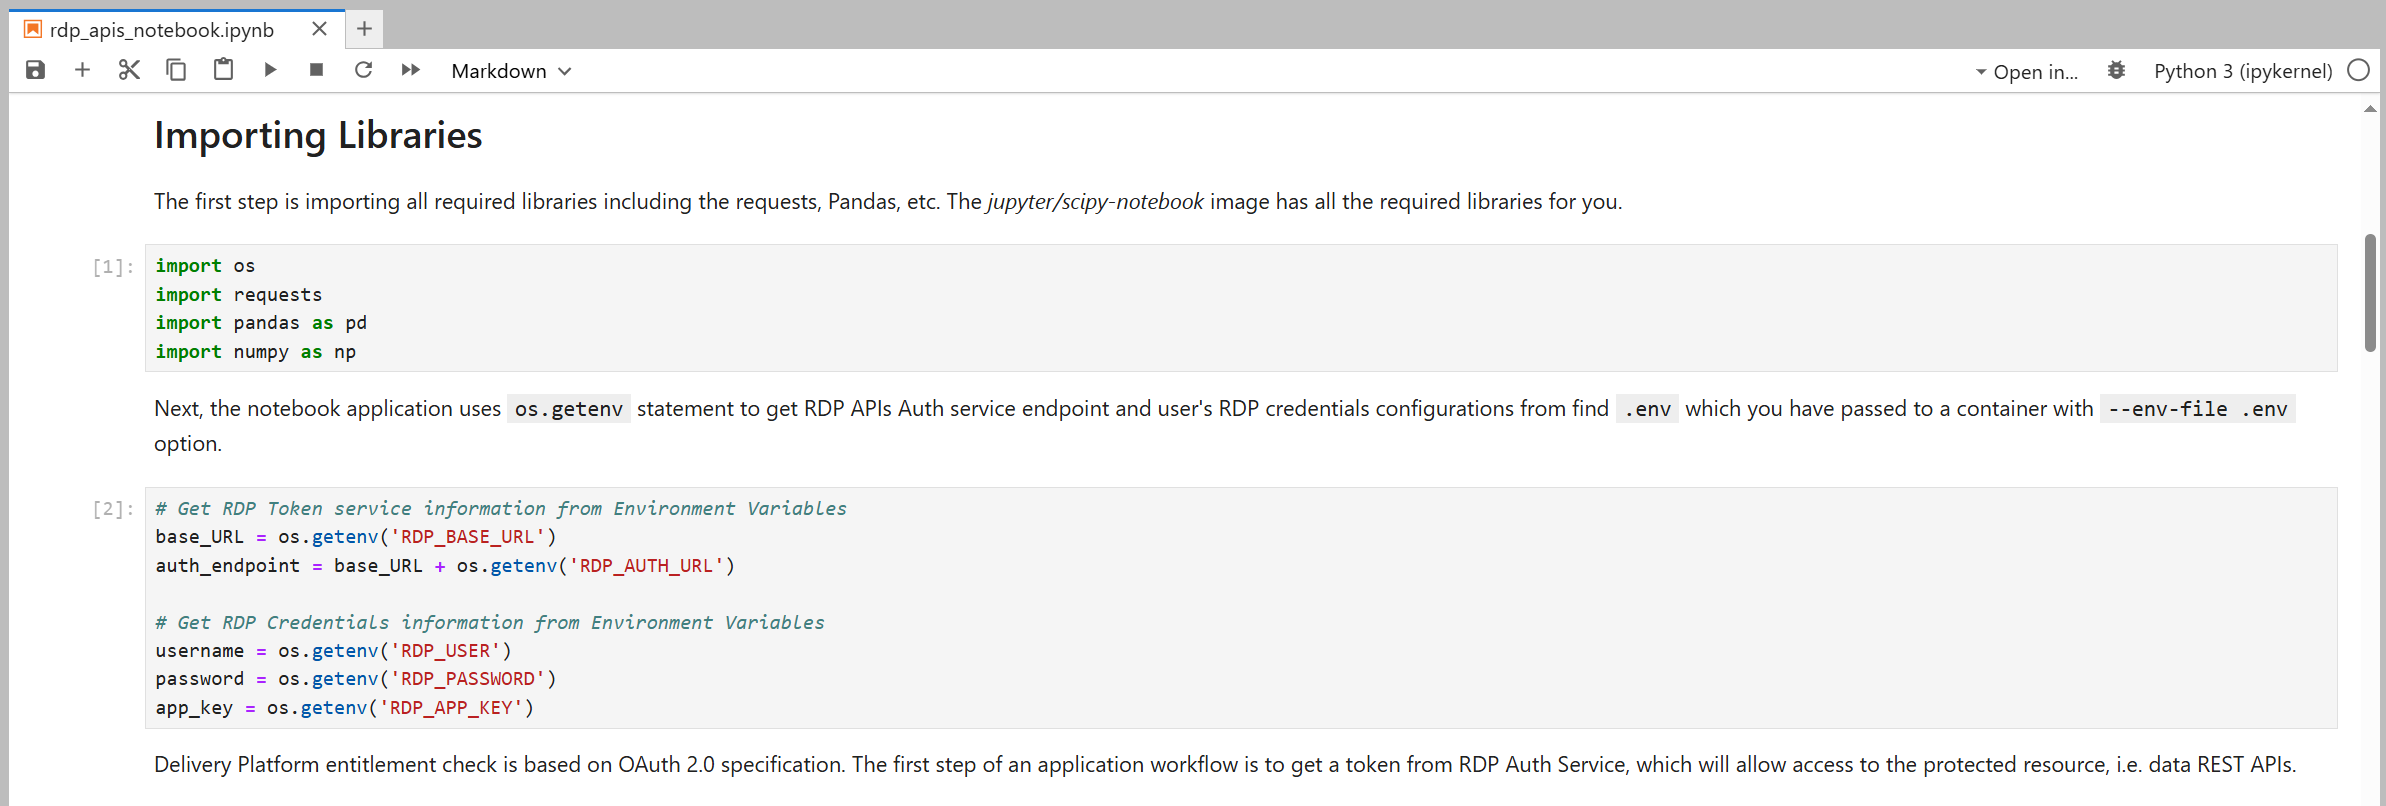
You may noticed that you can access all information you have putted on a .env file using os.getenv() method. Developers do not need to keep credentials information in the notebook source code.
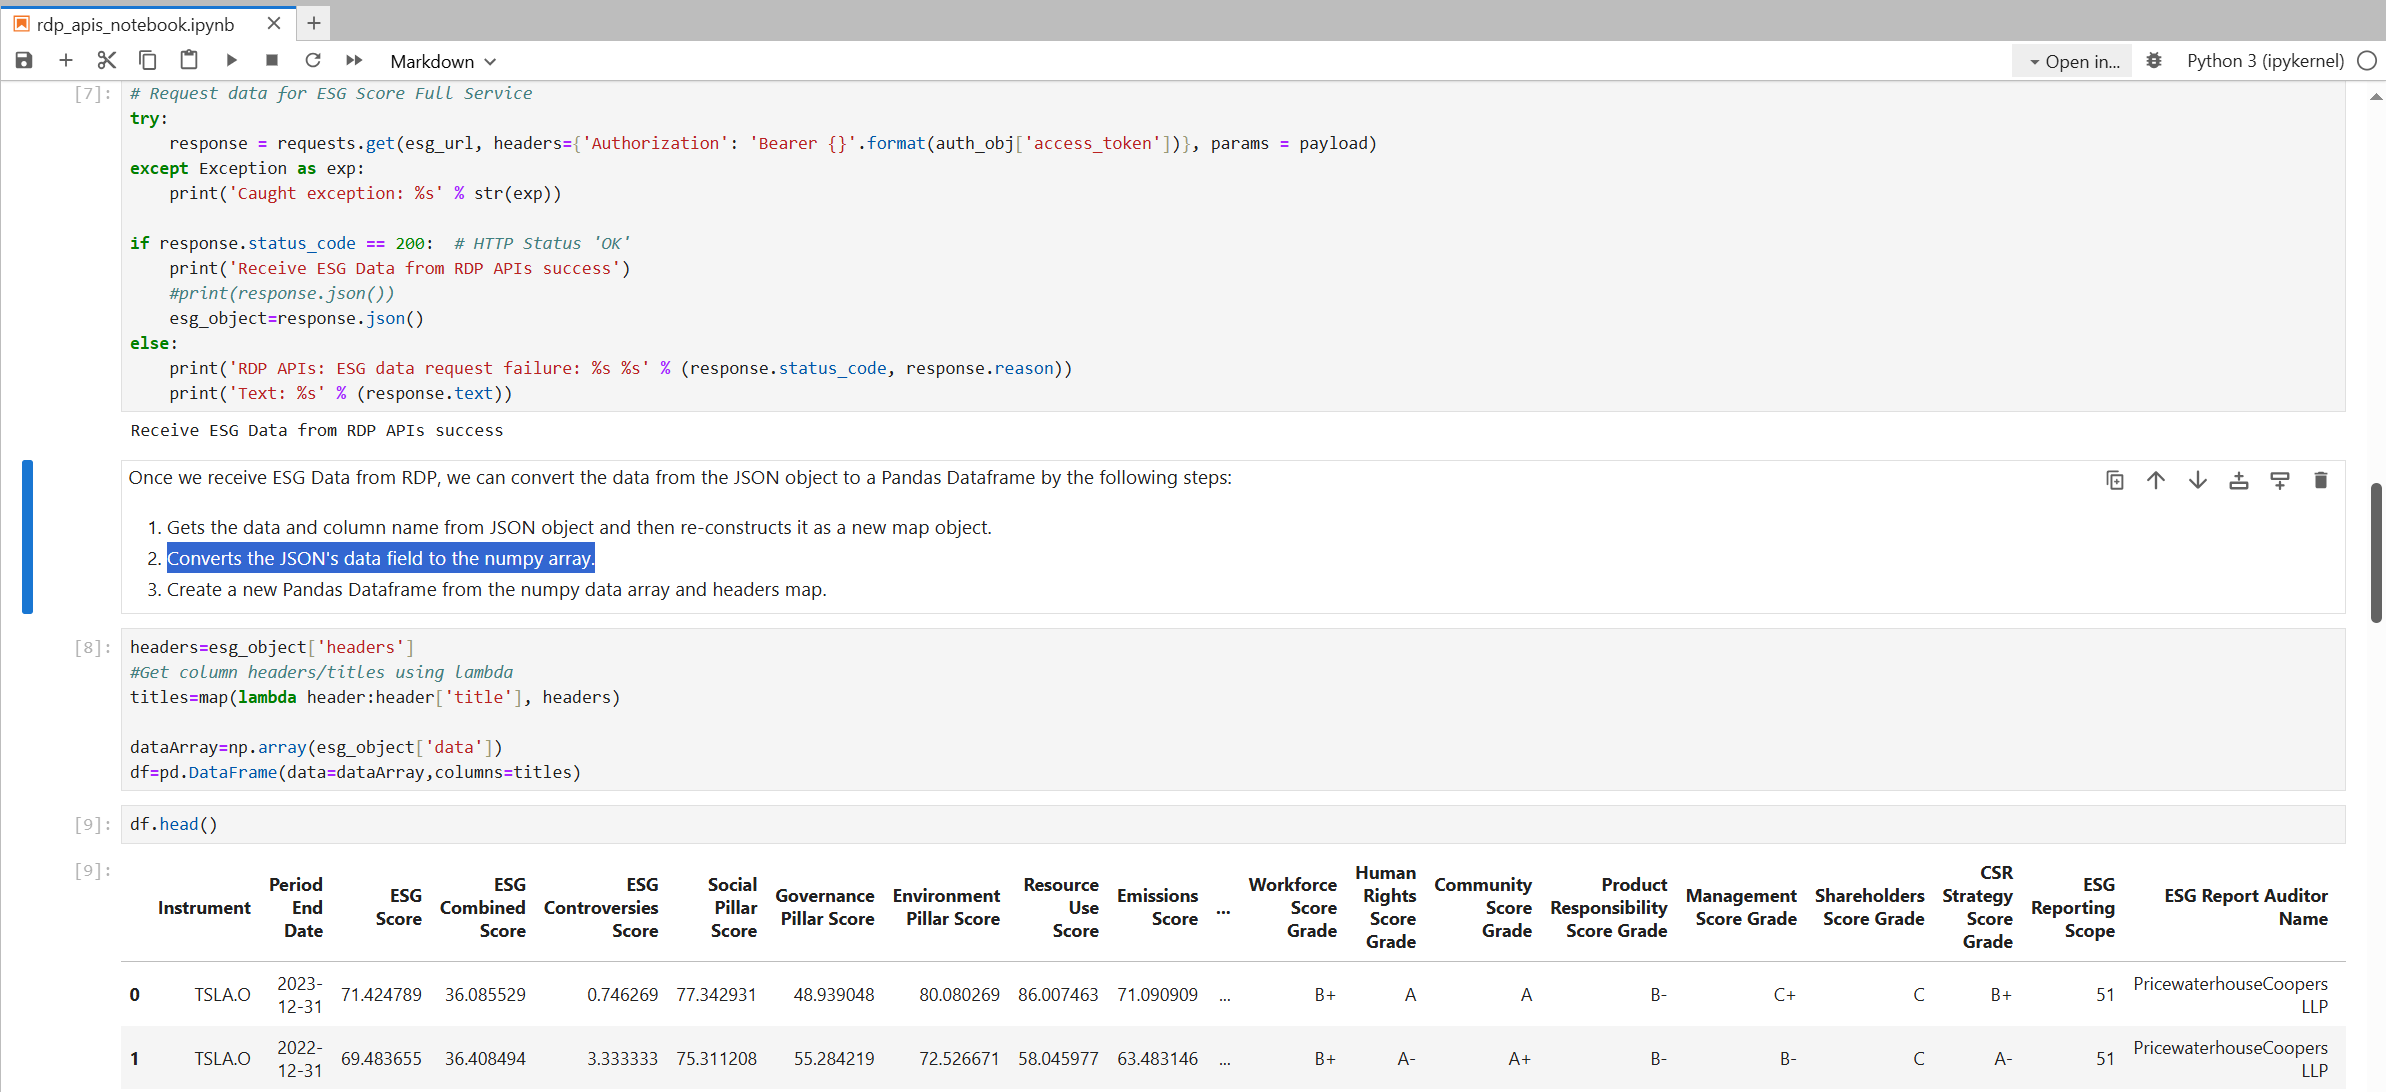
Since a container has built-in requests, Pandas, Matplotlib, etc libraries, you can performs the following tasks without additional libraries requires.
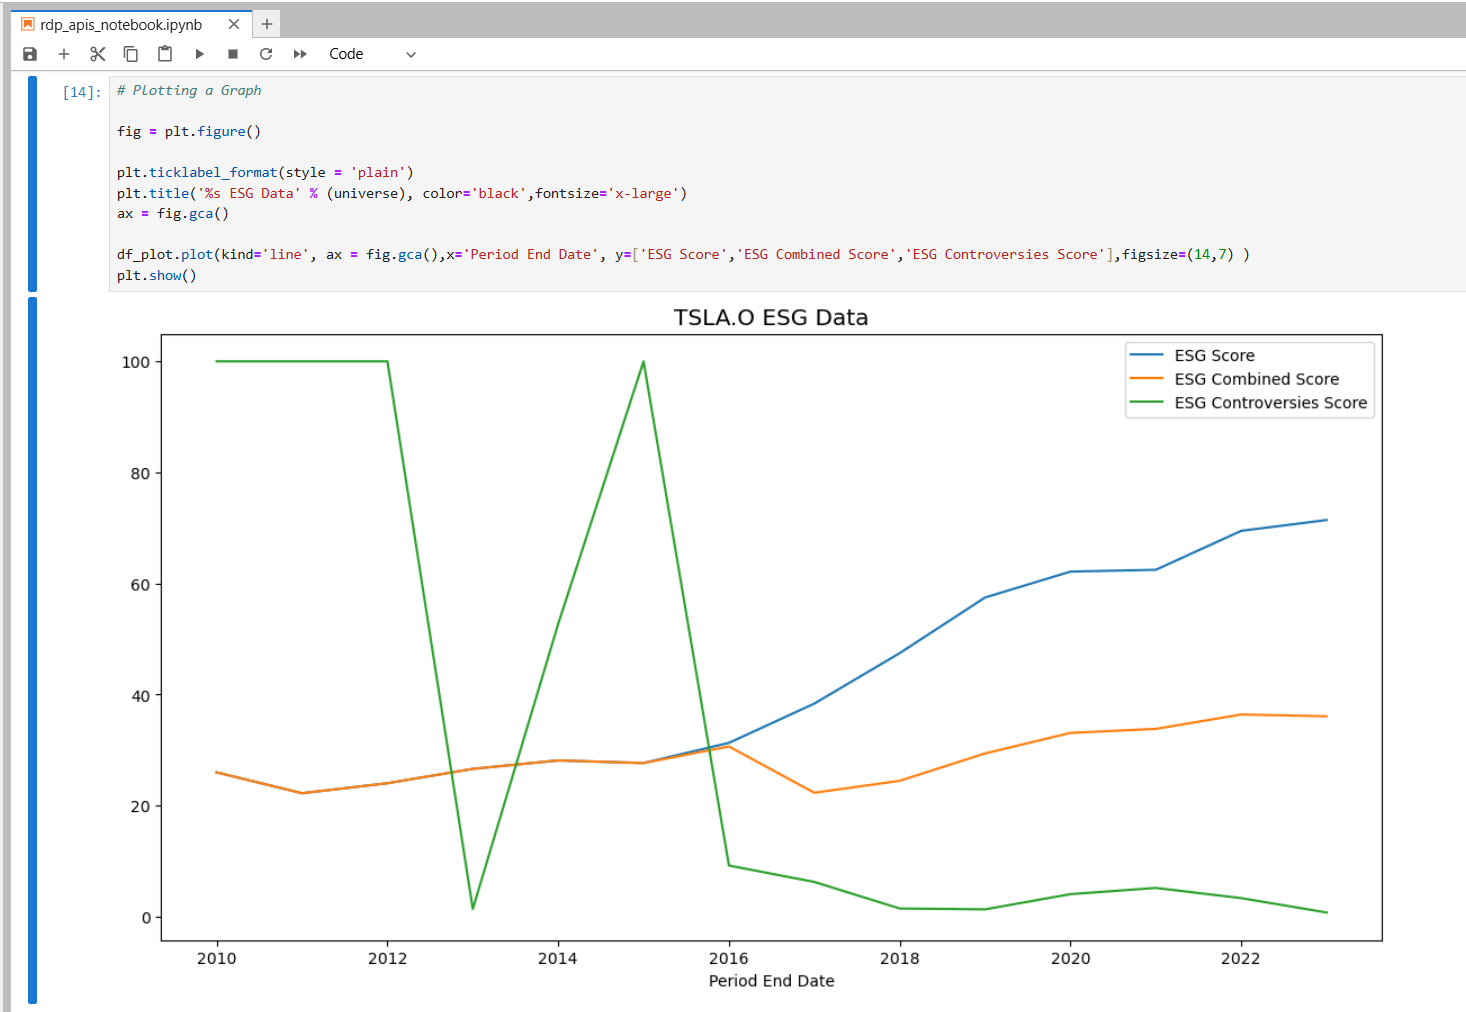
Send HTTP request to get data from RDP and converts response JSON message to Pandas Dataframe object
Then plot a graph.
The files in <your working directory> folder will be available in the JupyterLab application the next time you start a container, so you can work with your files as a normal JupyterLab/Anaconda environment.
To stop and delete the container, just run a following command to stop and delete the container.
docker compose down
Please note that after docker compose down, a Docker image is still available. You can use docker rmi command to delete an image if you need.
That’s all I have to say about jupyter/scipy-notebook with Delivery Platform. Please see more detail in the rdp_apis_notebook.ipynb example notebook file on the GitHub repository.
The jupyter/scipy-notebook Image for Data Library (or other Python Libraries)
Now, what about other Python libraries that do not come with an image? If you are using the libraries that do not come with the jupyter/scipy-notebook Docker image such as the Plotly Python library , you can install them directly via the notebook shell with both pip and conda/mamba tools.
Example with pip:
import sys
!$sys.executable -m pip install plotly
Example with conda:
import sys
!conda install --yes --prefix {sys.prefix} plotly
However, this solution installs the package into the currently-running Jupyter kernel which is always destroyed every time you stop a Docker container. A better solution is to create a new Docker image from Jupyter Docker Stacks that contains the required libraries, and then all containers generated from the image can use the libraries without any manual installation. You can share Dockerfile, docker-compose.yml, and all configuration files to your peer to create the same environment too.
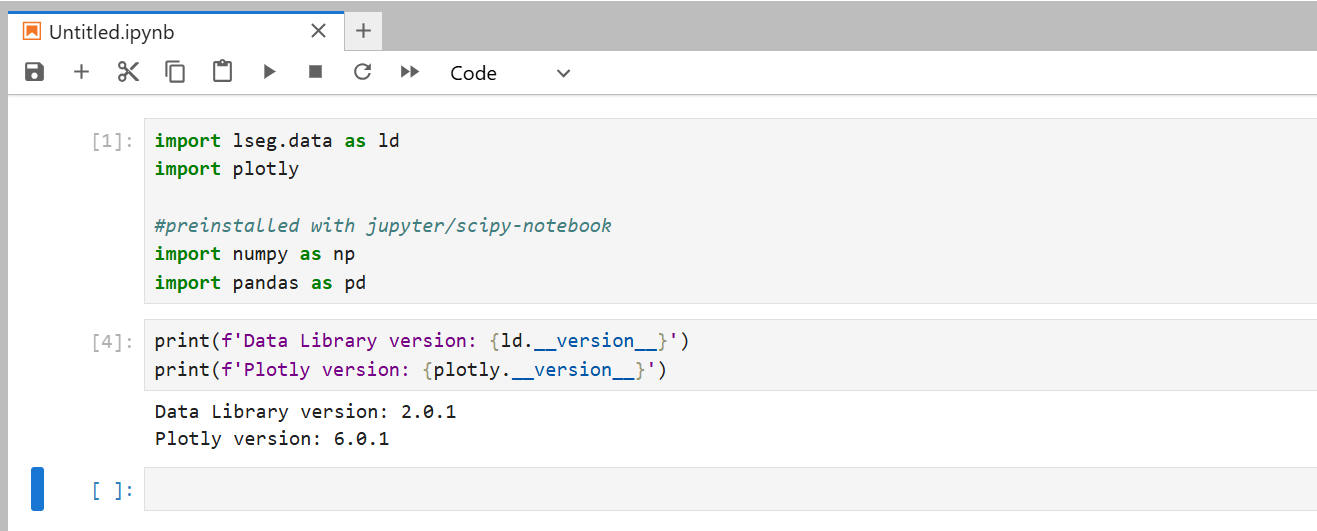
I am demonstrating with the Data Library and Plotly.
Introduction to the Data Library for Python
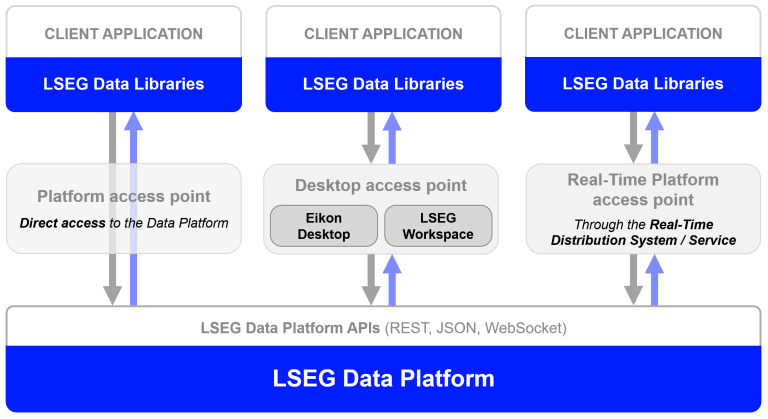
That brings us to the Data Library. The Data Library for Python (aka LSEG Data Library for version 2) provides a set of ease-of-use interfaces offering coders uniform access to the breadth and depth of financial data and services available on the Workspace, RDP, and Real-Time Platforms. The API is designed to provide consistent access through multiple access channels and target both Professional Developers and Financial Coders. Developers can choose to access content from the desktop, through their deployed streaming services, or directly to the cloud. With the Data Library, the same Python code can be used to retrieve data regardless of which access point you choose to connect to the platform.
The Data Library are available in the following programming languages:
For more deep detail regarding the Data Library for Python, please refer to the following articles and tutorials:
Disclaimer
This project is based on Data Library Python versions 2.0.1 using the Platform Session only.
How to create new Jupyter Docker Image for Data Library and Plotly
Firstly create a requirements.txt file in a /python/ folder with the following content:
plotly==6.0.1
lseg-data==2.0.1
anywidget==0.9.18
Please be noticed that you do not need to specify jupyterlab dependencies in a file.
Next, create a Dockerfile file in a /python/ folder with the following content:
# Start from a core stack version
FROM jupyter/scipy-notebook:python-3.11.6
LABEL maintainer="Your name and email address"
# Install from requirements.txt file
COPY --chown=${NB_UID}:${NB_GID} requirements.txt /tmp/
RUN pip install --quiet --no-cache-dir --requirement /tmp/requirements.txt && \
fix-permissions "${CONDA_DIR}" && \
fix-permissions "/home/${NB_USER}"
Now we come to a docker-compose.yml file, we need to update it to build and run local image from a Dockerfile above.
services:
jupyter:
build:
dockerfile: Dockerfile
ports:
- 8888:8888
volumes:
- <project /python/notebook/ directory>:/home/jovyan/work
env_file:
- .env
And then build and run this image with the following command
docker compose up
Once the Docker image is built successful, you can the following command to starts a container running a Jupyter Notebook server with all Python libraries that are defined in a requirements.txt file and jupyter/scipy-notebook in your machine.
You can perform data-sci tasks with Data Library and Plotly such as:
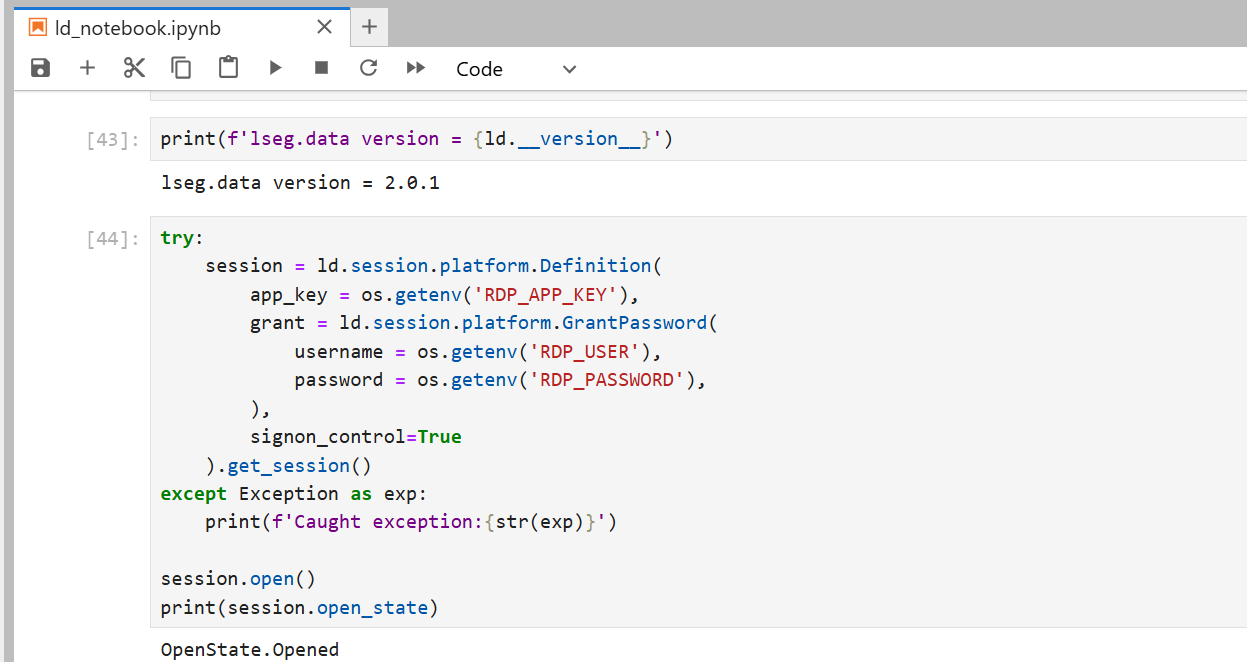
Login and Open session to RDP:
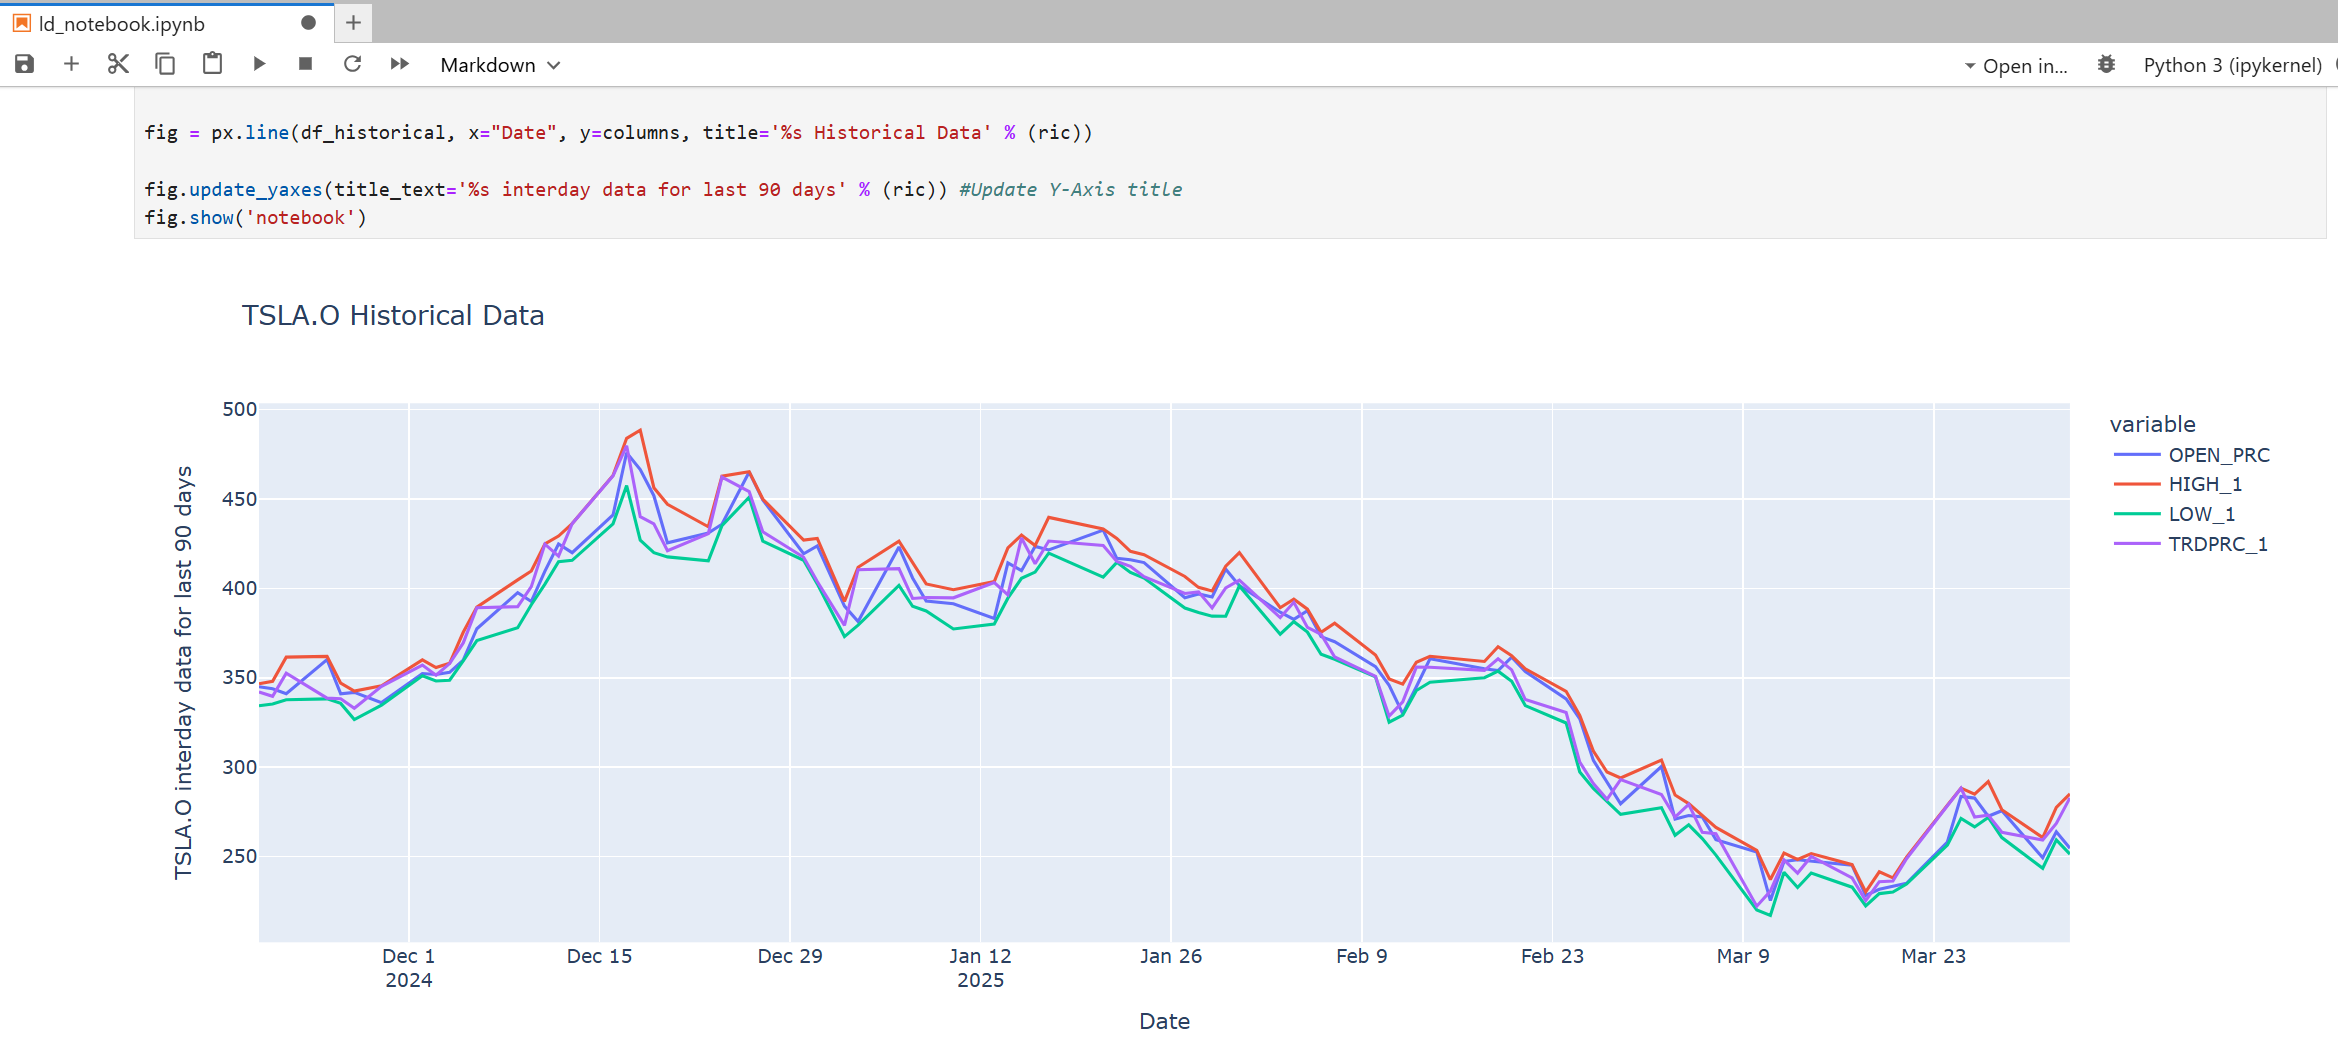
Then you can start to create notebook applications that consume content from LSEG with the Data Library API, and then plot data with the Plotly library. Please see more detail in the ld_notebook.ipynb example notebook file on the GitHub repository.
Request Historical data from RDP
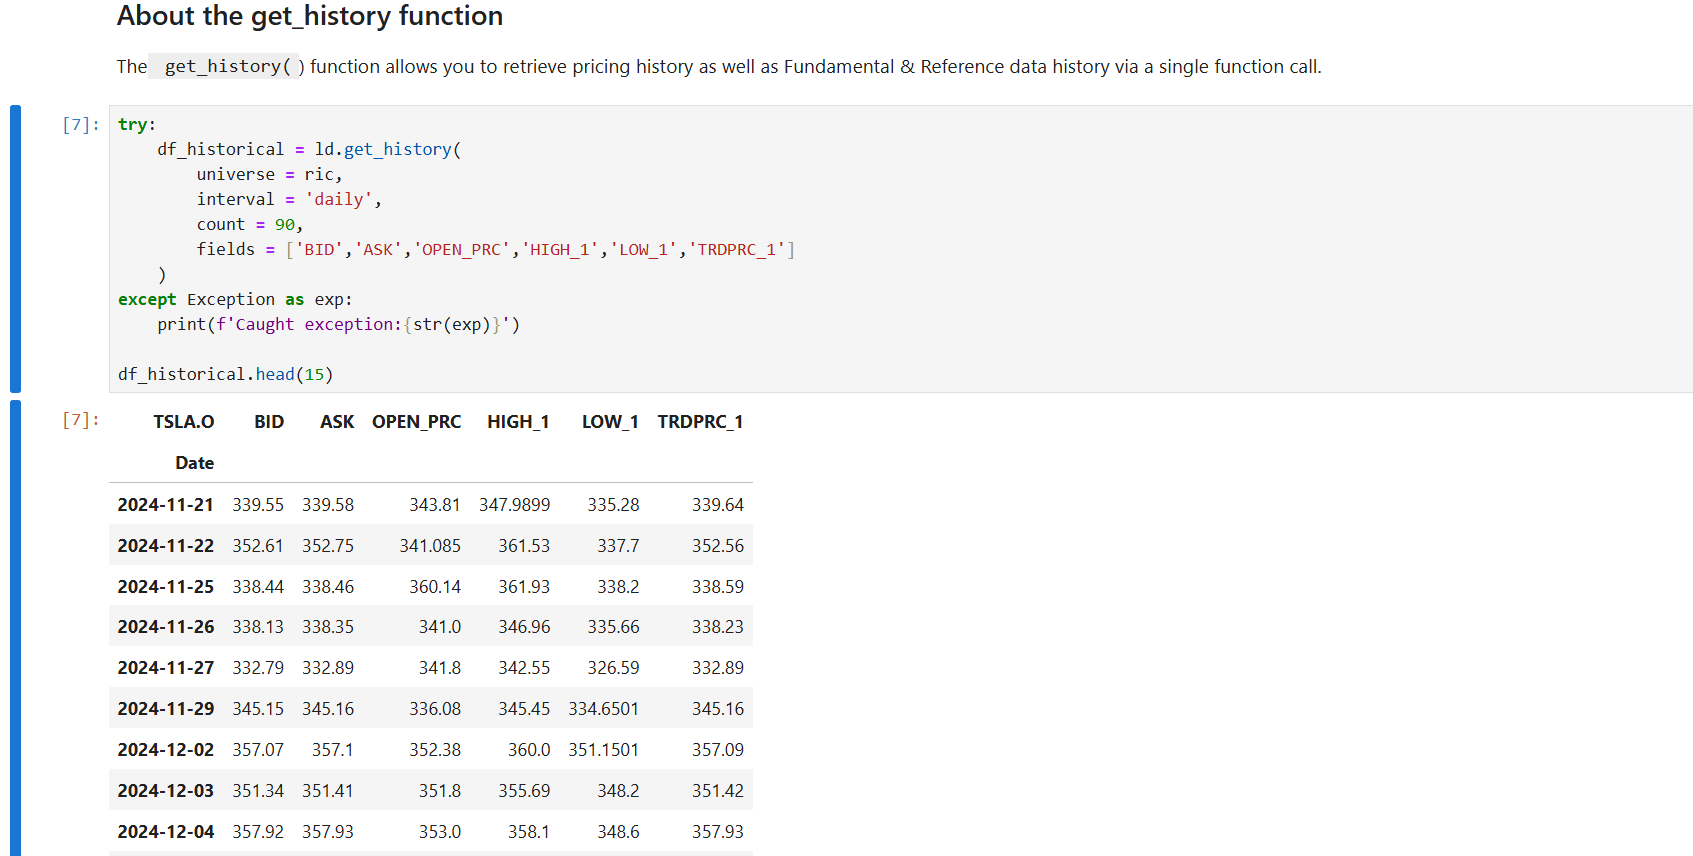
And plot a graph with Plotly.
Caution: You should add .env (and .env.example), Jupyter checkpoints, cache, config, etc. file to a .dockerignore file to avoid adding them to a public Docker Hub repository.
Let’s leave the Data Library Jupyter Docker image there.
What if I use a Desktop Session
That brings us to other scenario. If you are using the Data library with a Desktop Session, the Jupyter Docker Stacks are not for you. The Workspace application integrates a Data API proxy that acts as an interface between the library and the Workspace Platform. For this reason, the Workspace application must be running in the same machine that running Data Library application, and the Workspace desktop application does not support Docker.
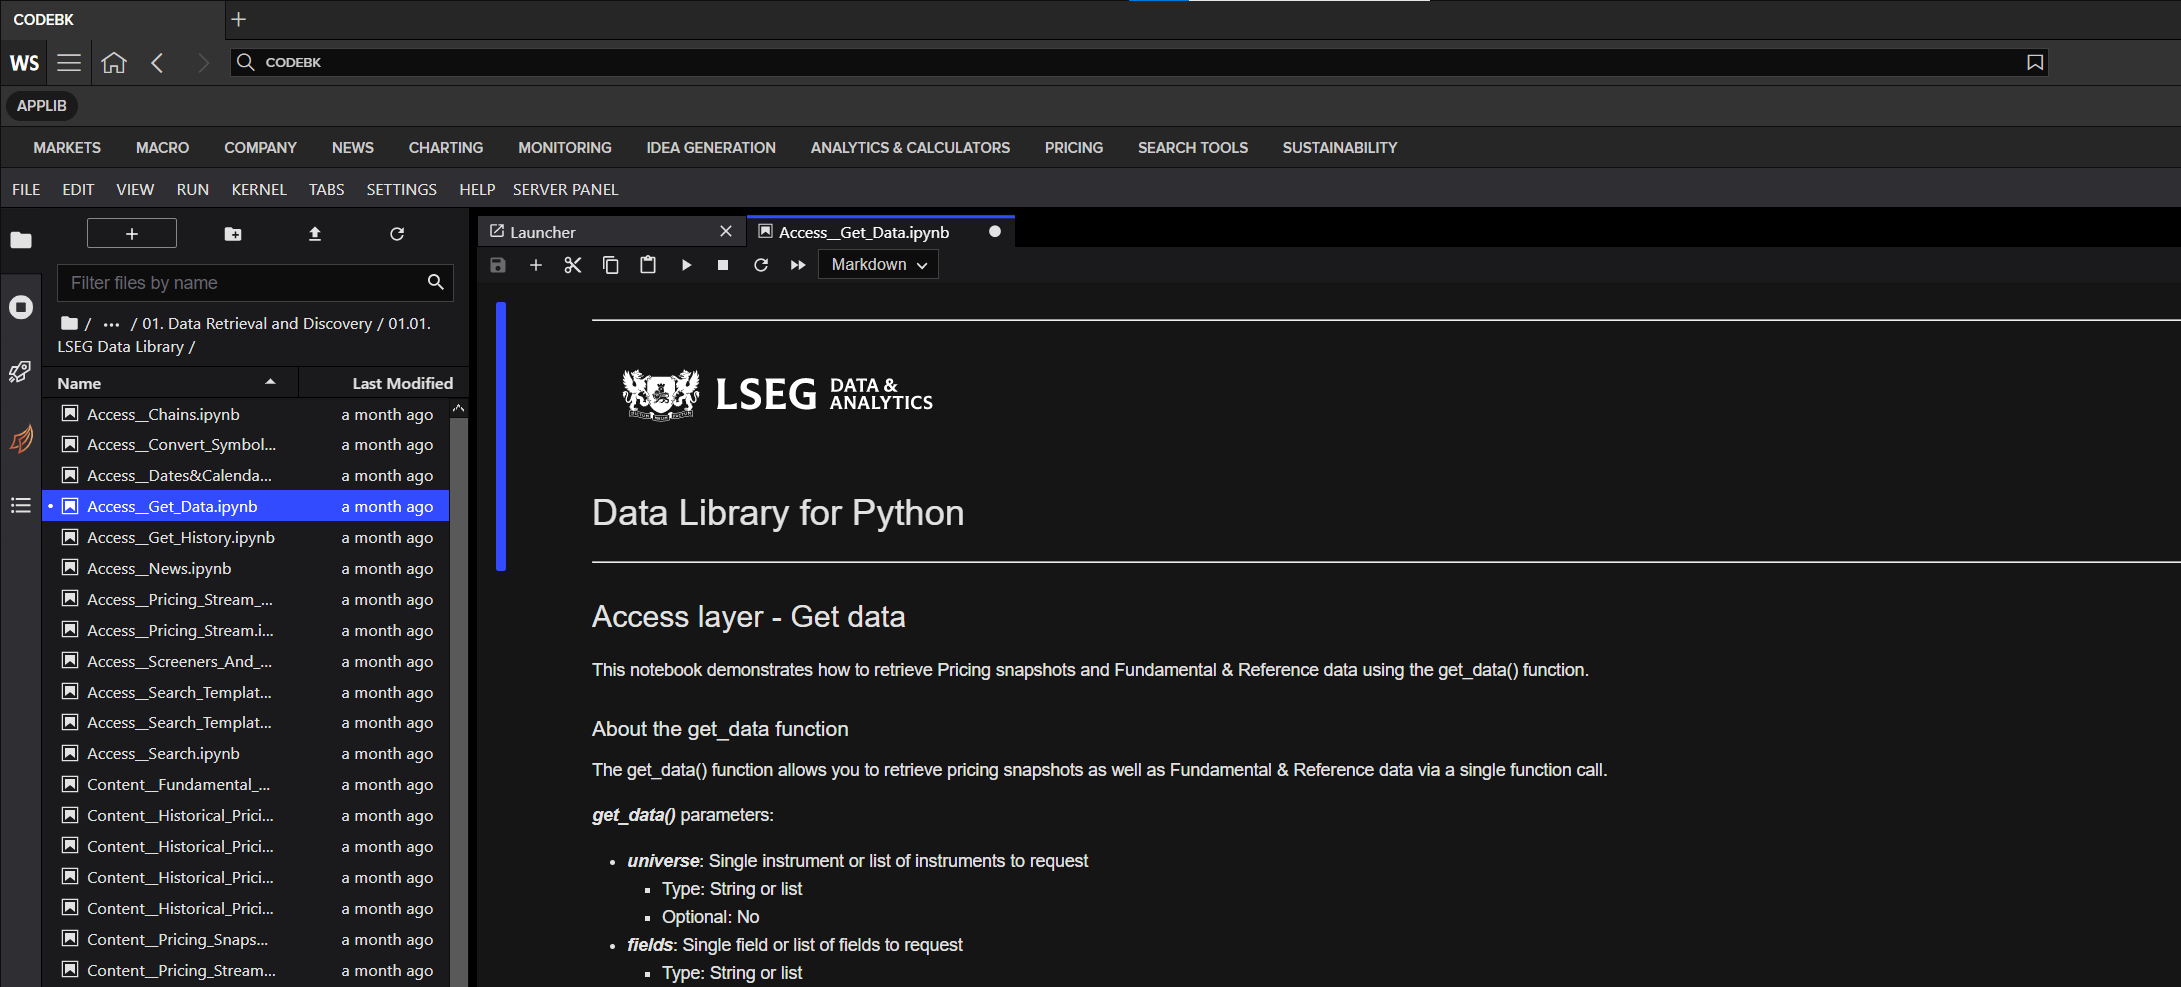
However, you can access the CodeBook, the cloud-hosted Jupyter Notebook development environment for Python scripting from the application. The CodeBook is natively available in Workspace as an app (no installation required!!), providing access to LSEG APIs and other popular Python libraries that are already pre-installed on the cloud. The list of pre-installed libraries is available in the Codebook's Libraries&Extensions.md file.
Conclusion
Docker is an open containerization platform for developing, testing, deploying, and running any software application. The Jupyter Docker Stacks provide a ready-to-use and consistent development environment for Data Scientists, Financial coders, and their teams. Developers do not need to set up their environment/workbench (Anaconda, Virtual Environment, Jupyter installation, etc.) manually which is the most complex task for them anymore. Developers can just run a single command to start the Jupyter notebook server from Jupyter Docker Stacks and continue their work.
The Jupyter Docker Stacks contain a handful of libraries for Data Science/Financial development for various requirements (Python, R, Machine Learning, and much more). If developers need additional libraries, Jupyter Docker Stacks let developers create their Dockerfile with an instruction to install those dependencies. All containers generated from the customized image can use the libraries without any manual installation.
References
You can find more details regarding the Data Library, Plotly, Jupyter Docker Stacks, and related technologies for this notebook from the following resources:
- LSEG Data Library for Python on the LSEG Developer Community website.
- Essential Guide to the Data Libraries - Generations of Python library (EDAPI, RDP, RD, LD) article.
- Plotly Official page.
- Plotly Python page.
- Plotly Express page
- Plotly Graph Objects page
- Jupyter Docker Stacks page
- Jupyter Docker Stack on DockerHub website.
- Setup Jupyter Notebook for R article.
- An Introduction to Docker for R Users.
For any questions related to LSEG APIs, please use the following forums on the the Developers Community Q&A page.