Wasin Waeosri
Developer Advocate
Developer Advocate
Introduction
This article demonstrates how to run the LSEG Data Library for Python (aka Data Library version 2) inside a container. This means you can package the application and run it anywhere without worrying about installing Python or managing dependencies on the target machines.
What you'll learn:
- How to containerize a Python application that accesses LSEG financial data
- How to connect to LSEG's cloud platform (Platform Session) from within a container
- How to build and run containers using Docker or Podman
Technology used:
- Data Library for Python version 2.1.1
- Python 3.12
- Docker or Podman (containerization tools)
About the Data Library for Python
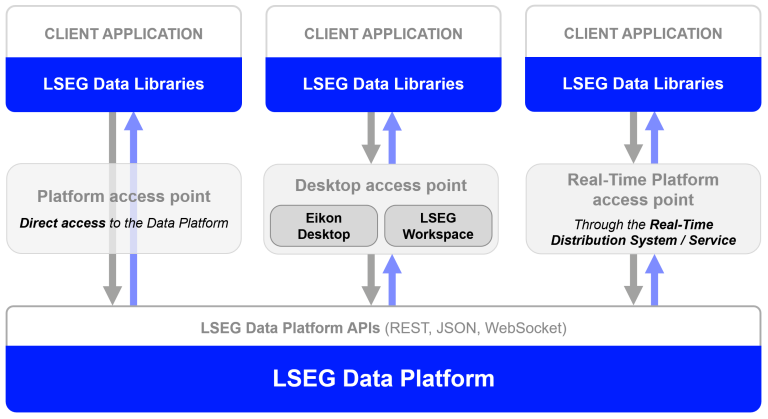
The Data Library for Python is a powerful toolkit that gives you easy access to LSEG's vast collection of financial data and services. Think of it as a universal adapter that lets you access the same data whether you're working from:
- Your desktop (Workspace application)
- The cloud (Delivery Platform)
- Real-time streaming services
Key benefits:
- Write code once, use it across multiple platforms
- Simple, consistent interface regardless of your data source
- Available in Python, .NET, and TypeScript
The Data Library are available in the following programming languages:
Want to learn more? Check out these resources:
What are Containers?
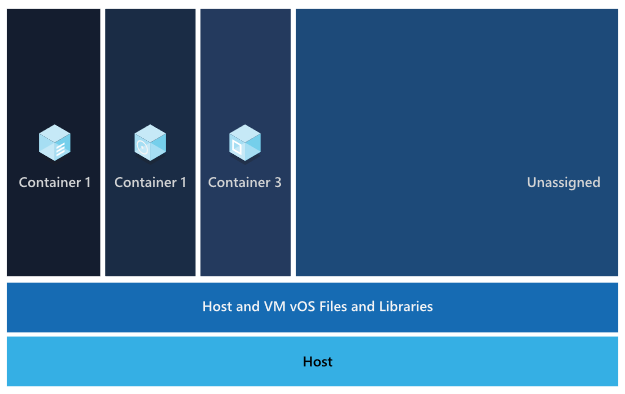
Let me start by explaining what a Container is. According to Docker and Redhat - Understanding Container, and IBM - What are containers? documents, a container is a technology that allows applications to be packaged a code with all its runtime environment, dependencies and configurations files as an isolated unit. The application's container can runs quickly and reliably from one computing environment to another with consistent behavior and functionality. Multiple containers can run on the same machine and share the OS kernel with other containers, each running as isolated processes in user space. The containerized application can be tested as a unit and deployed as a container image instance to the host operating system.
What You Need
Now we come to the prerequisite of running the Data Library for Python in a Container.
- LSEG Credentials: An account with access to the Delivery Platform (Data Platform) that includes Pricing and Historical Pricing permissions
- Don't have credentials? Contact your LSEG representative for access
- Containerization Tool: Either Docker Desktop or Podman installed on your computer
- Internet Connection: Required to download packages and connect to LSEG services
Why Use "Platform Session" Access Point for Containers?
The Data Library can connect to data in different ways:
- Desktop Session: Requires the LSEG Workspace desktop application running on your computer
- Platform Session: Connects directly to LSEG's Delivery Platform (aka Data Platform, RDP) on the Cloud or the Real-Time Platform (on-prem or Cloud hosted). No desktop app needed.
For containerized applications, we use Platform Session because:
- Containers can't access the Workspace desktop applications running on your host computer
- Platform Session consumes data from cloud
- Your container can run anywhere with internet access
What If I Am Using the Real-Time Platform Access Point?
Yes, you can containerize your Data Library application if you are connecting to your Real-Time Distribution System (RTDS). The container can connect to on-prem RTDS and Cloud/LSEG hosted RTDS.
The local RTDS also supports containerization too.
What If I Am Using Desktop Session to Consume Data From LSEG Workspace?
No, you cannot use a Desktop Session with Containers. The reason is the Data Library must be used in the same machine/OS/kernel as the LSEG Workspace only. Containers can't access the Workspace desktop applications running on your host computer.
Application Source Code
The example application source code uses simple Access Layer methods to get snapshot pricing and historical data.
If you have requirements to get more flexible API interfaces, you can use the Content and Delivery Layers too.
try:
# Open the data session
ld.open_session()
session = ld.session.get_default()
session.open()
if str(session.open_state) == 'OpenState.Opened':
print('Session is opened')
# request snapshot real-time data
get_price_data(['THB=', 'JPY='],['BID', 'ASK'])
print()
# request historical data
get_historical_interday_data(
instruments=['AMD.O','NVDA.O'],
fields=['BID','ASK','OPEN_PRC','HIGH_1','LOW_1','TRDPRC_1','NUM_MOVES','TRNOVR_UNS'])
# Close session
print('Close Session')
ld.close_session()
except Exception as ex:
print(f'Error in open_session: {str(ex)}')
sys.exit(1)
The code above uses the basic ld.open_session() method to load your RDP credential from the lseg-data.config.json that should be located on the same location as the code.
{
"logs": {....},
"sessions": {
"default": "platform.ldp",
"platform": {
"ldp": {
"app-key": "YOUR APP KEY GOES HERE!",
"username": "YOUR LDP LOGIN OR MACHINE GOES HERE!",
"password": "YOUR LDP PASSWORD GOES HERE!",
"signon_control":true
},
"ldpv2":{
"client_id": "Service-ID (Client ID V2)",
"client_secret": "Client Secret",
"signon_control":true,
"app-key": ""
}
}
}
}
The get_price_data() method calls the Data Library ld.get_data() method for a snapshot real-time data.
def get_price_data(instruments, fields):
""" This method gets snapshot pricing data from RDP """
print(f'Getting Snapshot Price data for {instruments} fields = {fields}')
data = ld.get_data(universe=instruments, fields=fields)
print(data)
The get_historical_interday_data() method calls the Data Library ld.get_history() method for a historical data.
def get_historical_interday_data(instruments, fields):
"""
This method sends a request message to RDP Historical Pricing service.
Args:
universe (str): RIC Code
Returns:
interday data (Pandas Dataframe): Interday data in DataFrame object
"""
print(f'Getting Historical Pricing Interday data for {instruments} fields = {fields}')
# Time Variables
interval = 'weekly' #weekly
start_day = '2025-10-01'
end_day = '2025-11-10'
# Send request message
response = ld.get_history(universe=instruments,
interval=interval,
fields=fields,
count=15,
start=start_day,
end= end_day)
print('This is a Historical Pricing Inter-Day data result from Data Library - Access Layer - get_history method')
print(response)
That is all I have to say about the code.
Image, Container, and Dockerfile
An Image is a read-only template or blueprint of your application including source code, runtime, libraries, and configurations. A Dockerfile (aka Containerfile - for Podman) is like a recipe for creating Image. It contains a step-by-step needed to setup and run a software.
A Container is instance of Image. It is an actual thing that runs your application.
Summary of key differences.
| Image | Container |
| Blueprint | Real instance |
| Static/unchanging | Active/running |
| Storage on disk | Running in memory |
| Can't execute alone | Actually does the work |
| Create once, use many times | Create from image each time |
Note: Podman is fully compatible with Dockerfile.
You can find more details on the following resources:
- What’s the Difference Between Docker Images and Containers?
- Docker image vs container: What are the differences?
- Running a pod using a container or docker file
Data Library for Python Dockerfile/Containerfile
I am demonstrating the Data Library for Python Dockerfile (or Containerfile) using a single-stage build which is a simplest way to create an Image. The single-stage build means all instructions for building and running an application are contained in one Dockerfile stage. An intention is to make it easy to understand as much as possible.
The summarizes steps of a Containerfile is as follows:
- Start with a pre-made Python environment (Python 3.12)
- Install the required Python packages
- Copy your application files
- Set up the container to run your application automatically
ARG PYTHON_VERSION=3.12
ARG VARIANT=slim-bookworm
FROM docker.io/python:${PYTHON_VERSION}-${VARIANT}
LABEL maintainer="LSEG Developer Relations"
COPY requirements.txt .
# install dependencies to the local user directory (eg. /root/.local)
RUN pip install --trusted-host pypi.python.org --trusted-host files.pythonhosted.org --trusted-host pypi.org --no-cache-dir --upgrade pip && \
pip install --trusted-host pypi.python.org --trusted-host files.pythonhosted.org --trusted-host pypi.org --no-cache-dir --no-warn-script-location --user -r requirements.txt
WORKDIR /app
# Update PATH environment variable + set Python buffer to make Docker print every message instantly.
ENV PATH=/root/.local:$PATH \
PYTHONUNBUFFERED=1\
PYTHONIOENCODING=utf-8\
PYTHONLEGACYWINDOWSSTDIO=utf-8
#Copy application files
COPY ["ld_app.py", "lseg-data.config.json", "/app/"]
#Run Python
ENTRYPOINT ["python", "/app/ld_app.py"]
The first instruction is define a FROM instruction to specify the base image to use. I am using the ARG build arguments to set the Python version and variant.
ARG PYTHON_VERSION=3.12
ARG VARIANT=slim-bookworm
FROM docker.io/python:${PYTHON_VERSION}-${VARIANT}
I am using Python 3.12 with a slim version Debian 12 (Bookworm) OS. I am not using the Alpine which is the most lightweight variant because it is hard to install Pandas in Alpine variant which is required for the Data Library for Python.
The next step is copy Python dependencies file requirements.txt to the image and run *pip install to install all project dependencies.
COPY requirements.txt .
# install dependencies to the local user directory (eg. /root/.local)
RUN pip install --trusted-host pypi.python.org --trusted-host files.pythonhosted.org --trusted-host pypi.org --no-cache-dir --upgrade pip && \
pip install --trusted-host pypi.python.org --trusted-host files.pythonhosted.org --trusted-host pypi.org --no-cache-dir --no-warn-script-location --user -r requirements.txt
Please be noticed that I am using --trusted-host pypi.python.org --trusted-host files.pythonhosted.org --trusted-host pypi.org arguments to workaround LSEG beloved ZScaler that blocks access to PyPI repository. If your environment does have this stupid limitation, please use the following instructions instead.
COPY requirements.txt .
# install dependencies to the local user directory (eg. /root/.local)
RUN pip install --upgrade pip && \
pip install --no-cache-dir --user -r requirements.txt
Next, I am setting an Image environment variables about the character encoding and stdout/stderr on the terminal console. I also set the working directory of an Image.
WORKDIR /app
# Update PATH environment variable + set Python buffer to make Docker print every message instantly.
ENV PATH=/root/.local:$PATH \
PYTHONUNBUFFERED=1\
PYTHONIOENCODING=utf-8\
PYTHONLEGACYWINDOWSSTDIO=utf-8
Then I am copying the source code ld_app.py and lseg-data.config.json configuration file to an Image.
#Copy application files
COPY ["ld_app.py", "lseg-data.config.json", "/app/"]
And lastly, I use the ENTRYPOINT (reference) to run a python application.
#Run Python
ENTRYPOINT ["python", "/app/ld_app.py"]
Now this Dockerfile/Containerfile is ready to create an Image.
For references about Dockerfile/Containerfile, please see the following resources:
That covers a Dockerfile/Containerfile for Data Library for Python.
How To Run This Dockerfile/Containerfile
Step 1: Creating An Image
Now we come to Image building steps. I am demonstrating with [podman-build] command, but if you're using Docker, simply replace podman with docker.
The first step to build Image is open a command prompt or terminal application and navigate to the project folder, then run the following command to create an Image name ld_app.
podman build -t ld_app .
This process may take a few minutes as it downloads and installs everything needed.
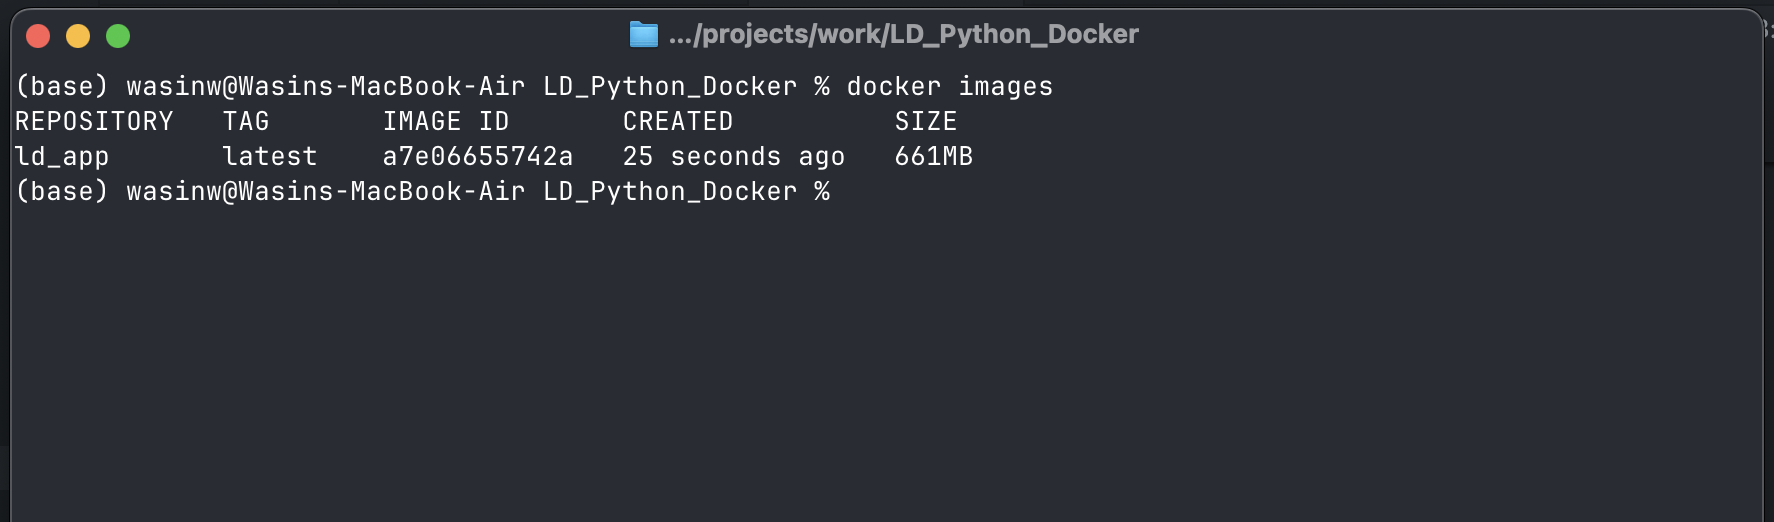
When complete, verify the image was created with the following command:
podman images
You should see ld_app Image in the list.

That’s all I have to say about how to build an Image.
Step 2: Running A Container
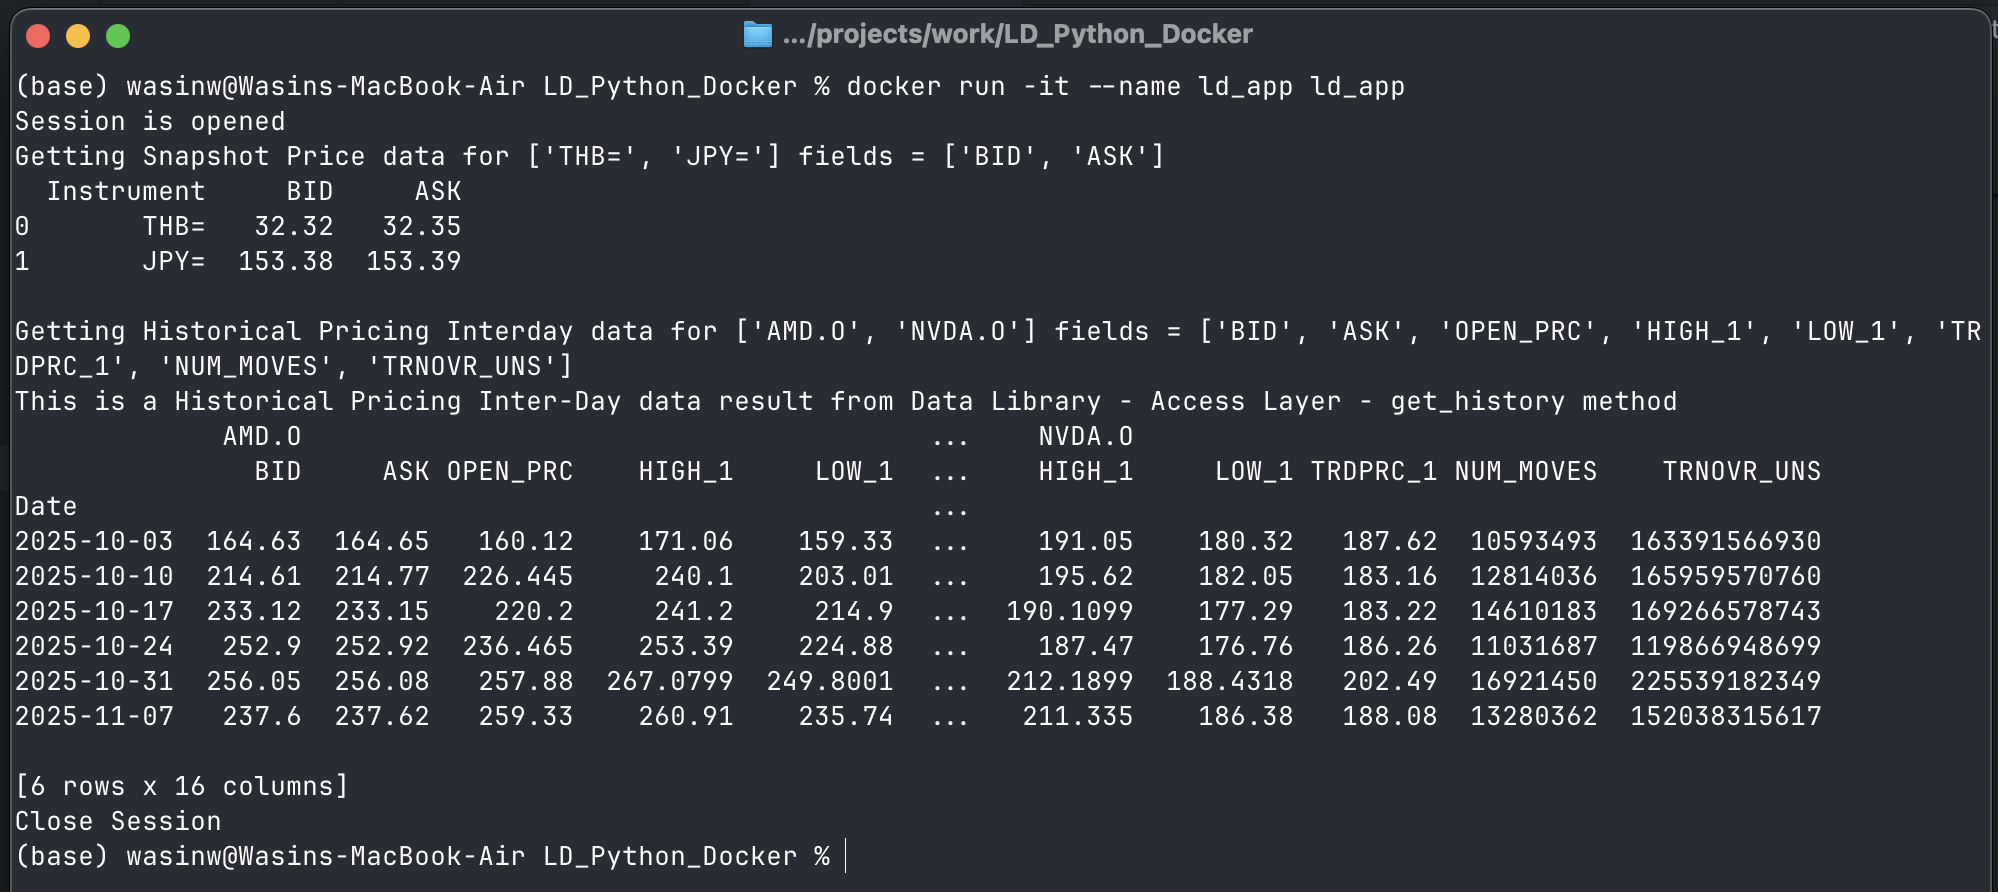
Now, what about how to run a Container from this newly created Image. You can run a Container with the following command:
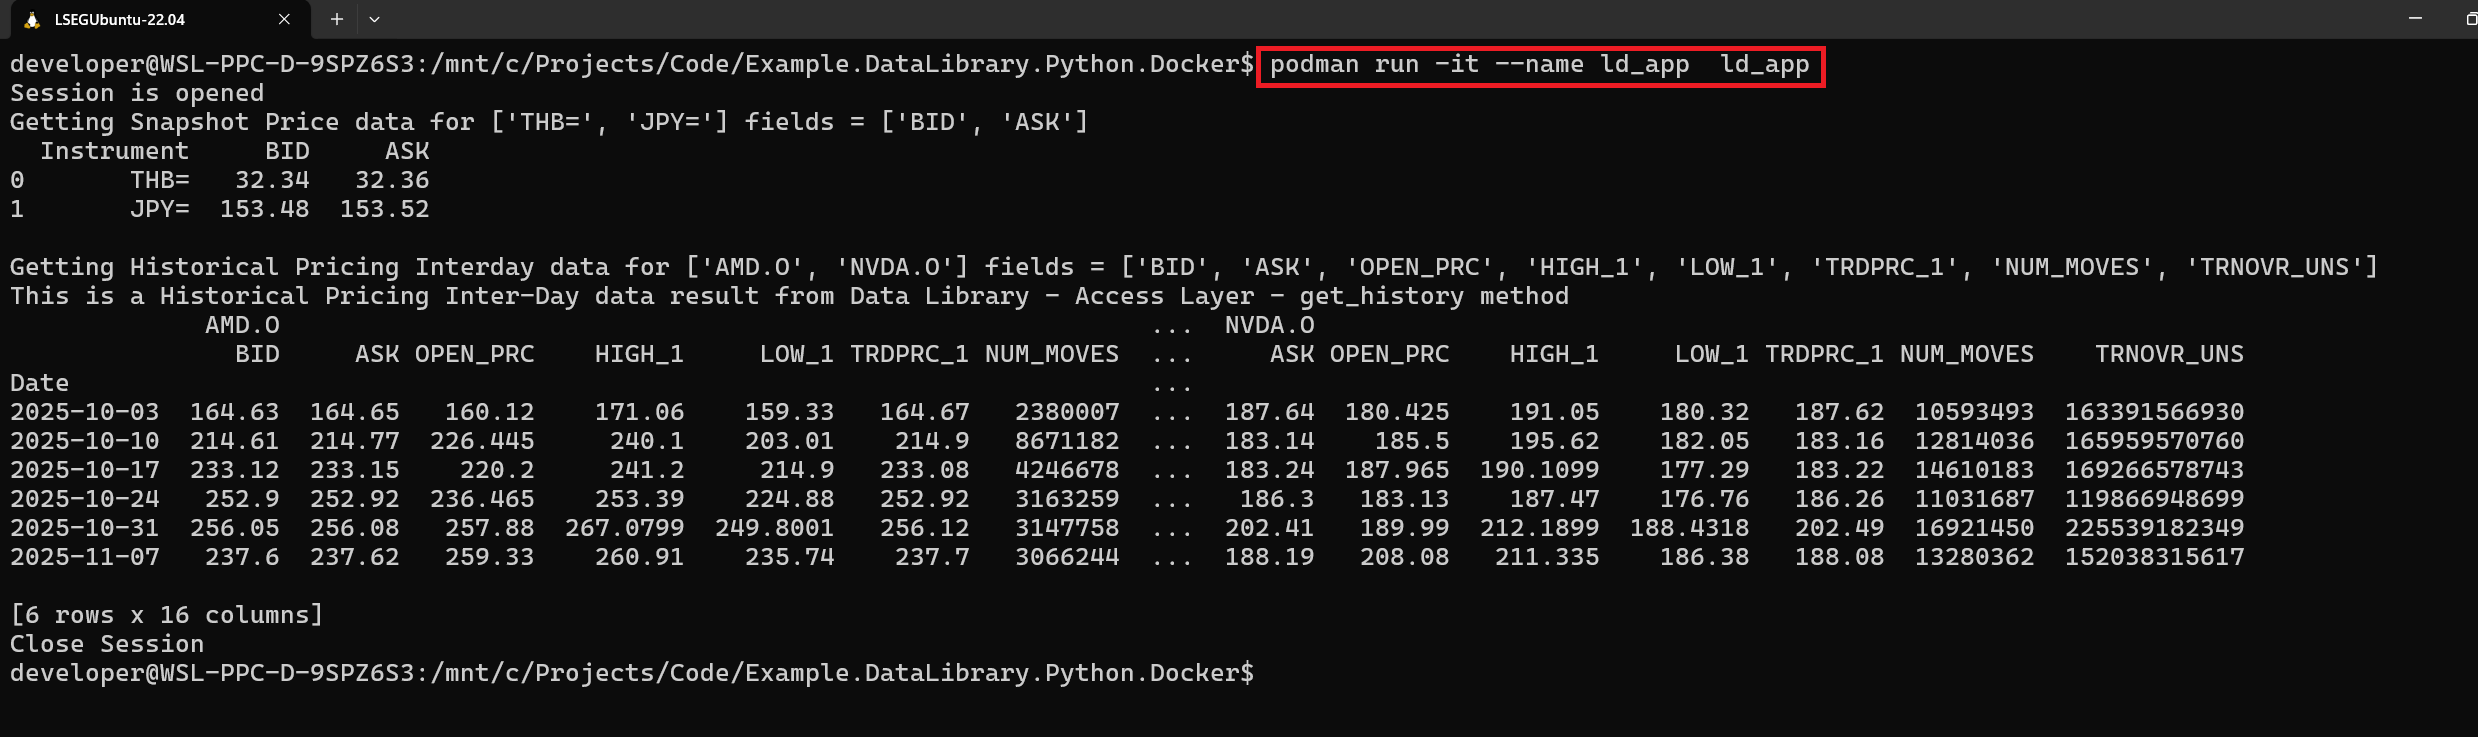
podman run -it --name ld_app ld_app
Note: Please let me remind you, use docker instead of podman if you are using Docker.
Your application will now run and connect to LSEG's data platform!
To stop a Container, press Ctrl+C button or run podman stop ld_app command.
Please see more detail on podman stop command document.
Step 3: Cleanup (Optional)
That brings us to clean up a Container. Once you have stopped a Container, you cannot run a Container with the same name until you delete it (or just change a Container name).
You can delete a Container with the following command:
podman rm ld_app
Please see more detail on podman rm and podman container cleanup commands documents.

Optionally, you can delete an Image with the following command (all associated Containers must be removed).
podman rmi ld_app
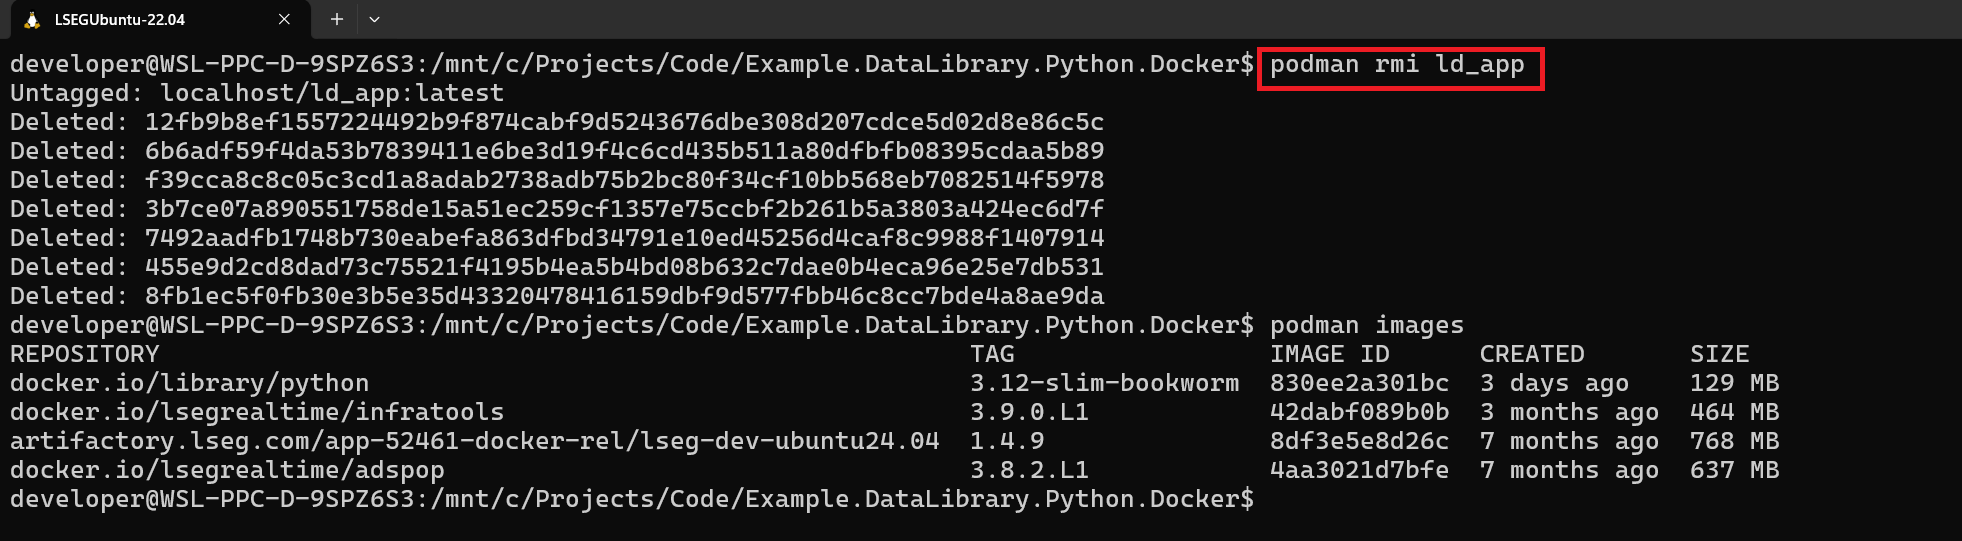
You can find more detail about this command on the podman rmi document page.
That covers how to run and cleanup Container.
What if I am using Docker?
The Containerfile/Dockerfile supports Docker Containerization tool. You can just replace the podman command on step 1,2, and 3 with docker. I have tested the project with Docker with my personal machine (LSEG does not allow to install Docker anymore) and it works fine.
Conclusion
Congratulations! You've successfully containerized a Data Library for Python application. You now have a portable, self-contained package that can run consistently across different environments—from your local development machine to production servers or cloud platforms.
What You've Accomplished
In this article, you learned how to:
- Package a Python application with all its dependencies into a container image
- Connect to LSEG's Data Platform from within a containerized environment
- Build and run containers using either Docker or Podman
- Understand key concepts like Images, Containers, and Dockerfile/Containerfile
Key Benefits You Can Now Leverage
By containerizing your Data Library application, you've unlocked several advantages:
- Consistency: Your application will run the same way regardless of where you deploy it
- Portability: Easily move your application between development, testing, and production environments
- Isolation: Your application and its dependencies won't conflict with other software on your system
- Simplified Deployment: Deploy to cloud platforms or on-premises servers with minimal configuration
- Reproducibility: Share your containerized application with team members who can run it immediately
Next Steps
Now that you understand the basics of containerization, consider exploring:
- Multi-stage builds to create smaller, more optimized images
- Docker Compose or Podman Compose for managing multi-container applications
- Cloud deployment to platforms like AWS, Azure, or Google Cloud
- Orchestration tools like Kubernetes for managing containers at scale
- CI/CD pipelines to automate building and deploying your containers
References
For more information about containerization and LSEG Data Library:
- LSEG Data Library for Python page on the LSEG Developers Portal website.
- LSEG Data Library for Python Documentation.
- LSEG Data Library Examples on GitHub.
- LSEG Delivery Platform.
- Podman Documentation.
- Getting Started with Podman.
- Docker Documentation.
- Getting Started with Docker
- Benefits of Containerization
- What is Containerization? - AWS
- Containerization for Python Developers
- The Benefits of Containerization - IBM
For any questions related to this example or the LSEG Data Library, please use the Developer Community Q&A Forum.
Get In Touch
Related Articles
Related APIs
Source Code
Request Free Trial
Call your local sales team
Americas
All countries (toll free): +1 800 427 7570
Brazil: +55 11 47009629
Argentina: +54 11 53546700
Chile: +56 2 24838932
Mexico: +52 55 80005740
Colombia: +57 1 4419404
Europe, Middle East, Africa
Europe: +442045302020
Africa: +27 11 775 3188
Middle East & North Africa: 800035704182
Asia Pacific (Sub-Regional)
Australia & Pacific Islands: +612 8066 2494
China mainland: +86 10 6627 1095
Hong Kong & Macau: +852 3077 5499
India, Bangladesh, Nepal, Maldives & Sri Lanka:
+91 22 6180 7525
Indonesia: +622150960350
Japan: +813 6743 6515
Korea: +822 3478 4303
Malaysia & Brunei: +603 7 724 0502
New Zealand: +64 9913 6203
Philippines: 180 089 094 050 (Globe) or
180 014 410 639 (PLDT)
Singapore and all non-listed ASEAN Countries:
+65 6415 5484
Taiwan: +886 2 7734 4677
Thailand & Laos: +662 844 9576