

Last Updated: October 2023
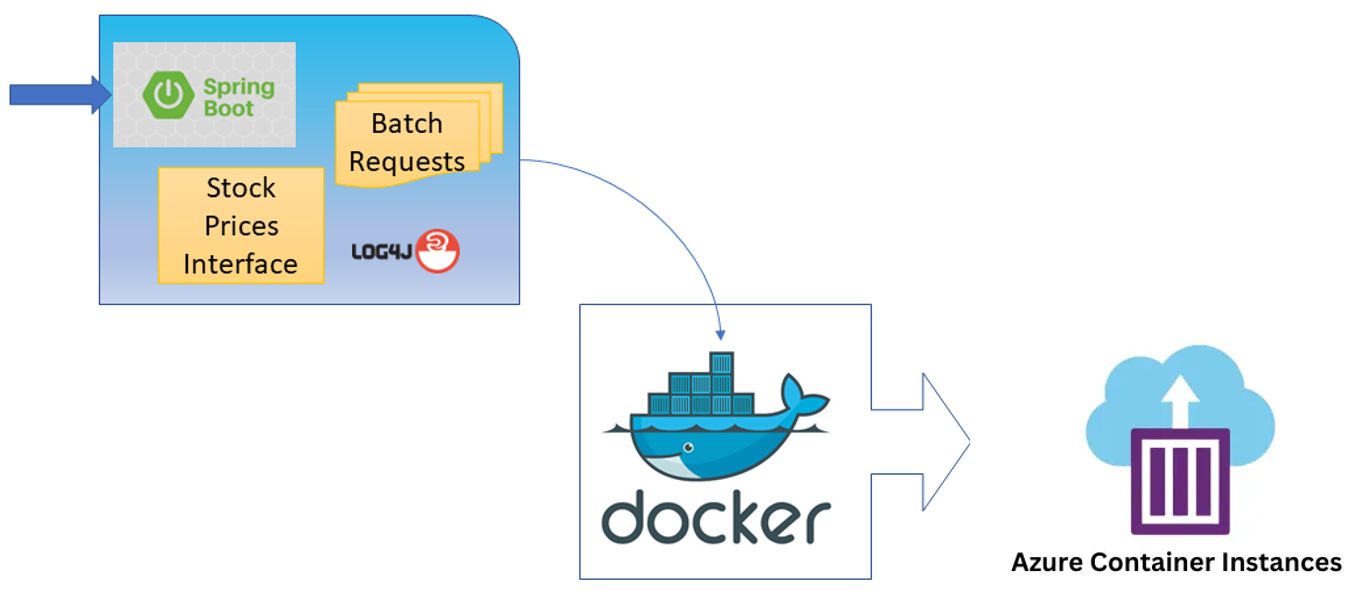
This article is a semi-sequel to my colleague's How to deploy a web service on AWS article. In this article, I am showing how to deploy the modified WebService-RTO application to the Microsoft Azure Container Instances service.
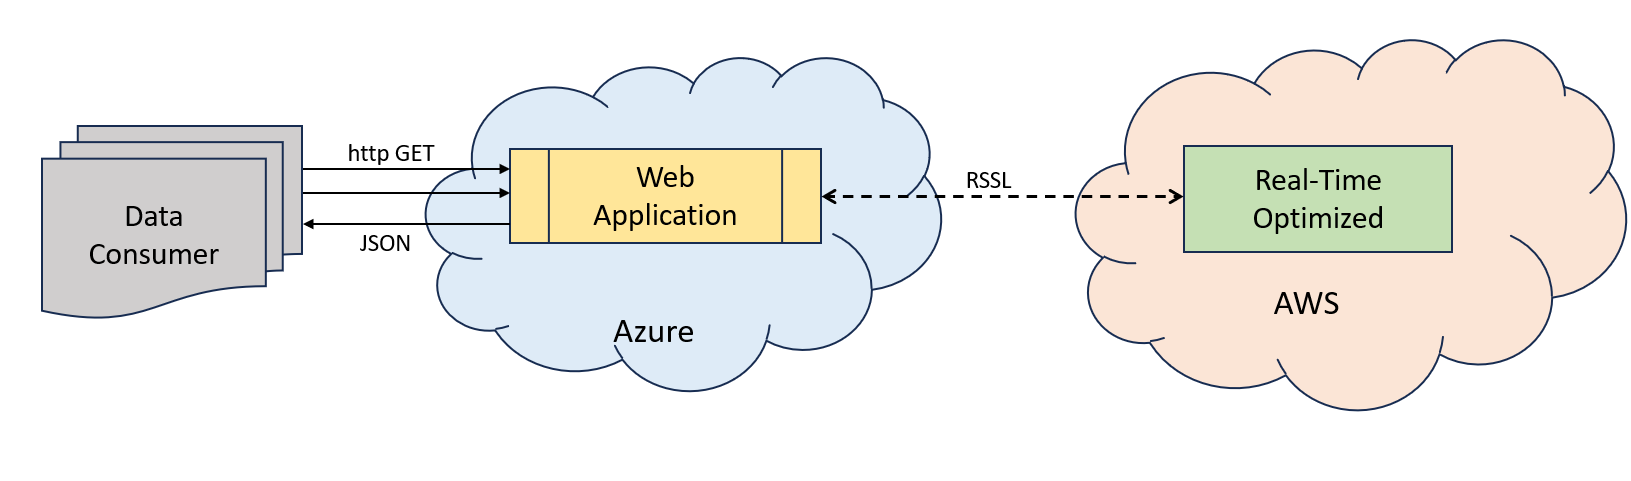
To make the solution fully supports the Cloud platform, the Spring Boot MDWebService application has been forked and updated to support the Real-Time Optimized (RTO, not a Wealth solution products) with the Authentication Version 2 (aka Customer Identity and Access Management - CIAM, or Service Account).
For more detail about the original project implementation and deployment, please check the following article:
- How to build a scalable web service for stock prices article.
- How to deploy a web service on AWS article.
For further details about Migrating a EMA Java API application to Authentication Version 2, please check out the following resource:
- EMA Java API: Real-Time Optimized Version 2 Authentication Migration Guide article.
- Account authorization V1 to V2 migration cheat sheet article.
- Getting Started with Version 2 Authentication for Real-Time - Optimized: Overview article.
Prerequisite
This project requires the following dependencies and software.
- Oracle 1.11 & 1.17 or OpenJDK 11.
- Apache Maven project management and comprehension tool.
- Internet connection.
- Access to the Real-Time Optimized (Not Wealth products) with Authentication Version 2 (aka Customer Identity and Access Management - CIAM, or Service Account). The Service Account is Client ID and Client Secret.
- Docker Desktop application.
- Docker Hub repository account.
- Microsoft Azure account.
Please contact your LSEG representative to help you to access the RTO Service account and services.
Updated for the RTO Connection
Please see more detail about the source code and configuration files updated for the RTO connection on the project's CHANGELOG.md file.
I am referring the RTO version of the MDWebService Web application as MDWebService-RTO.
Test the RTO Connection Locally
My next point is how to set up the project for the RTO connection and test it locally. Firstly, set a application.properties file to connect to RTO as follows:
#Choose connection mode RTDS or RTO
MarketData.ConnectionMode=RTO
Next, create a .env file in a MDWebService folder with the Authentication Version 2 credential like the following format:
#Authentication V2
CLIENT_ID=<Your Auth V2 Client-ID>
CLIENT_SECRET=<Your Auth V2 Client-Secret>
Finally, set the prefer RTO endpoint region in the Location configuration node of the EmaConfig.xml file.
<ChannelGroup>
<ChannelList>
<Channel>
<Name value="Channel_RTO"/>
<ChannelType value="ChannelType::RSSL_ENCRYPTED"/>
<CompressionType value="CompressionType::None"/>
<GuaranteedOutputBuffers value="5000"/>
<!-- EMA discovers a host and a port from RDP service discovery for the specified location
when both of them are not set and the session management is enable. -->
<Location value="ap-southeast"/>
<EnableSessionManagement value="1"/>
<ObjectName value=""/>
</Channel>
</ChannelList>
</ChannelGroup>
So, now let’s look at how to run the project with Docker which is one of the main target of this project. Firstly, build the container image by issuing the command (a Dockerfile is available in the MDWebService folder):
docker build -t mdwebservice-rto .
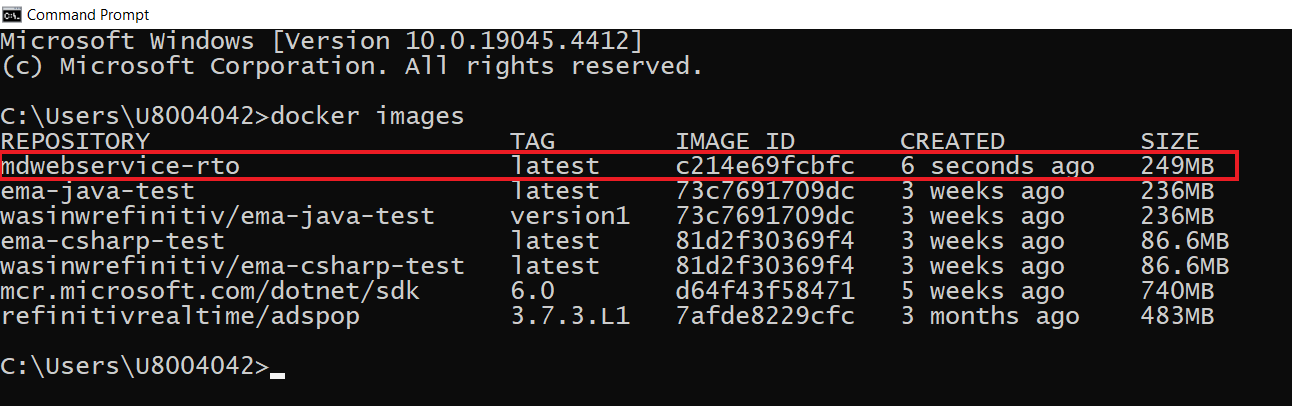
This will compile the image for our container. The newly created image can be seen with the *docker images command:
Note: Please note that the Real-Time SDK isn't qualified on the Docker platform. If you find any problems while running it on the Docker platform, the issues must be replicated on bare metal machines before contacting the helpdesk/Real-Time APIs support.
This will compile the image for our container. The newly created image can be seen with the docker images command:
Then start a container using the command:
docker run -it --rm -p 8080:8080 --env-file .env mdwebservice-rto
Here, we have run the container to connect to RTO. The container also binds the port 8080 used by Tomcat on to our local machine.
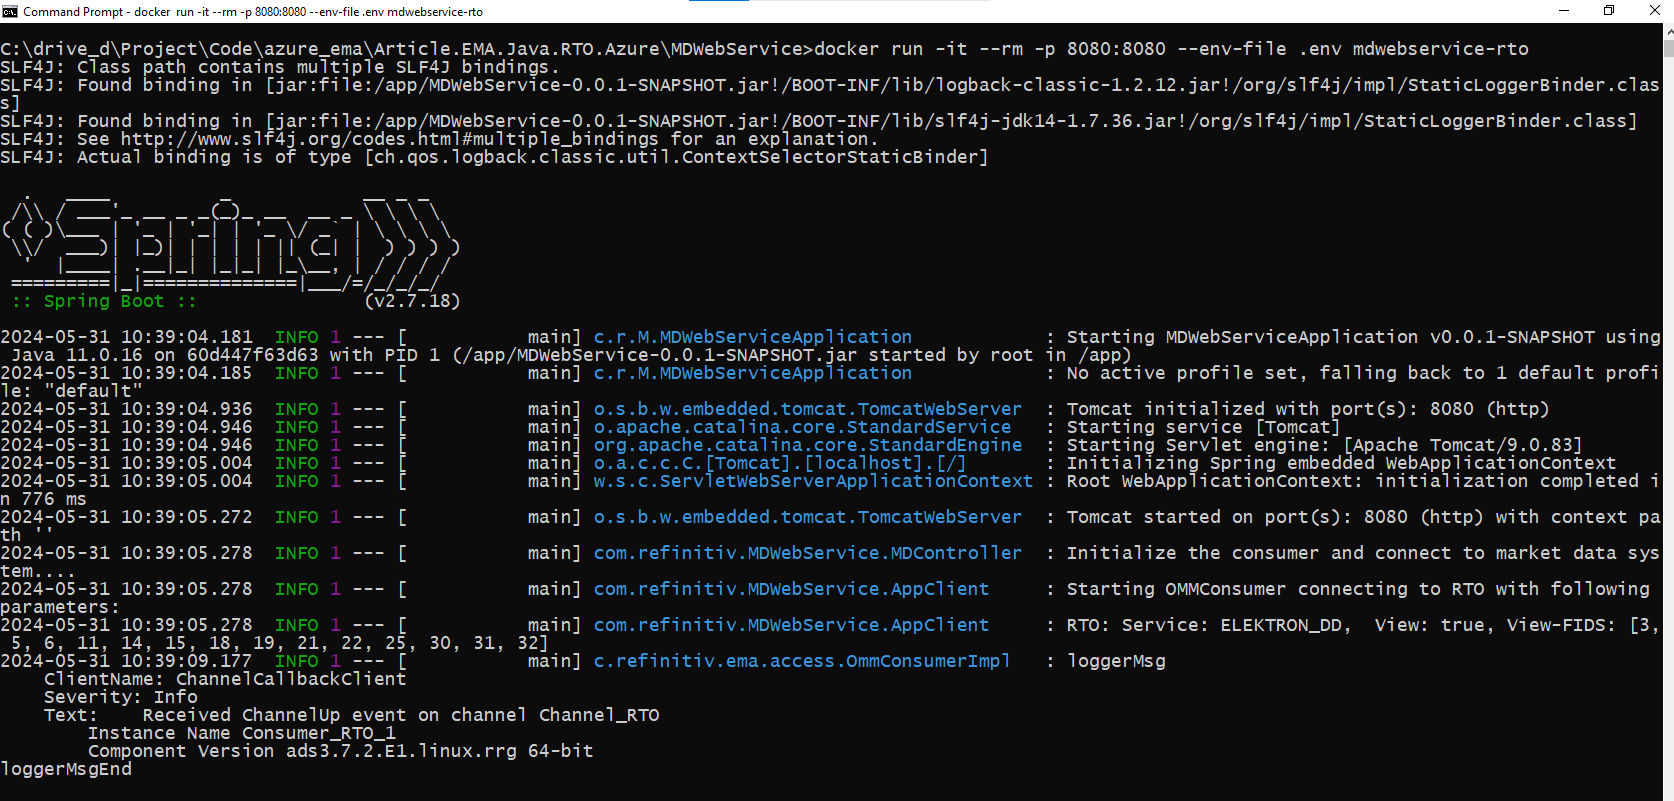
The ChannelUp message from EMA informs the application that it has successfully connected to the RTO server on port 14002.
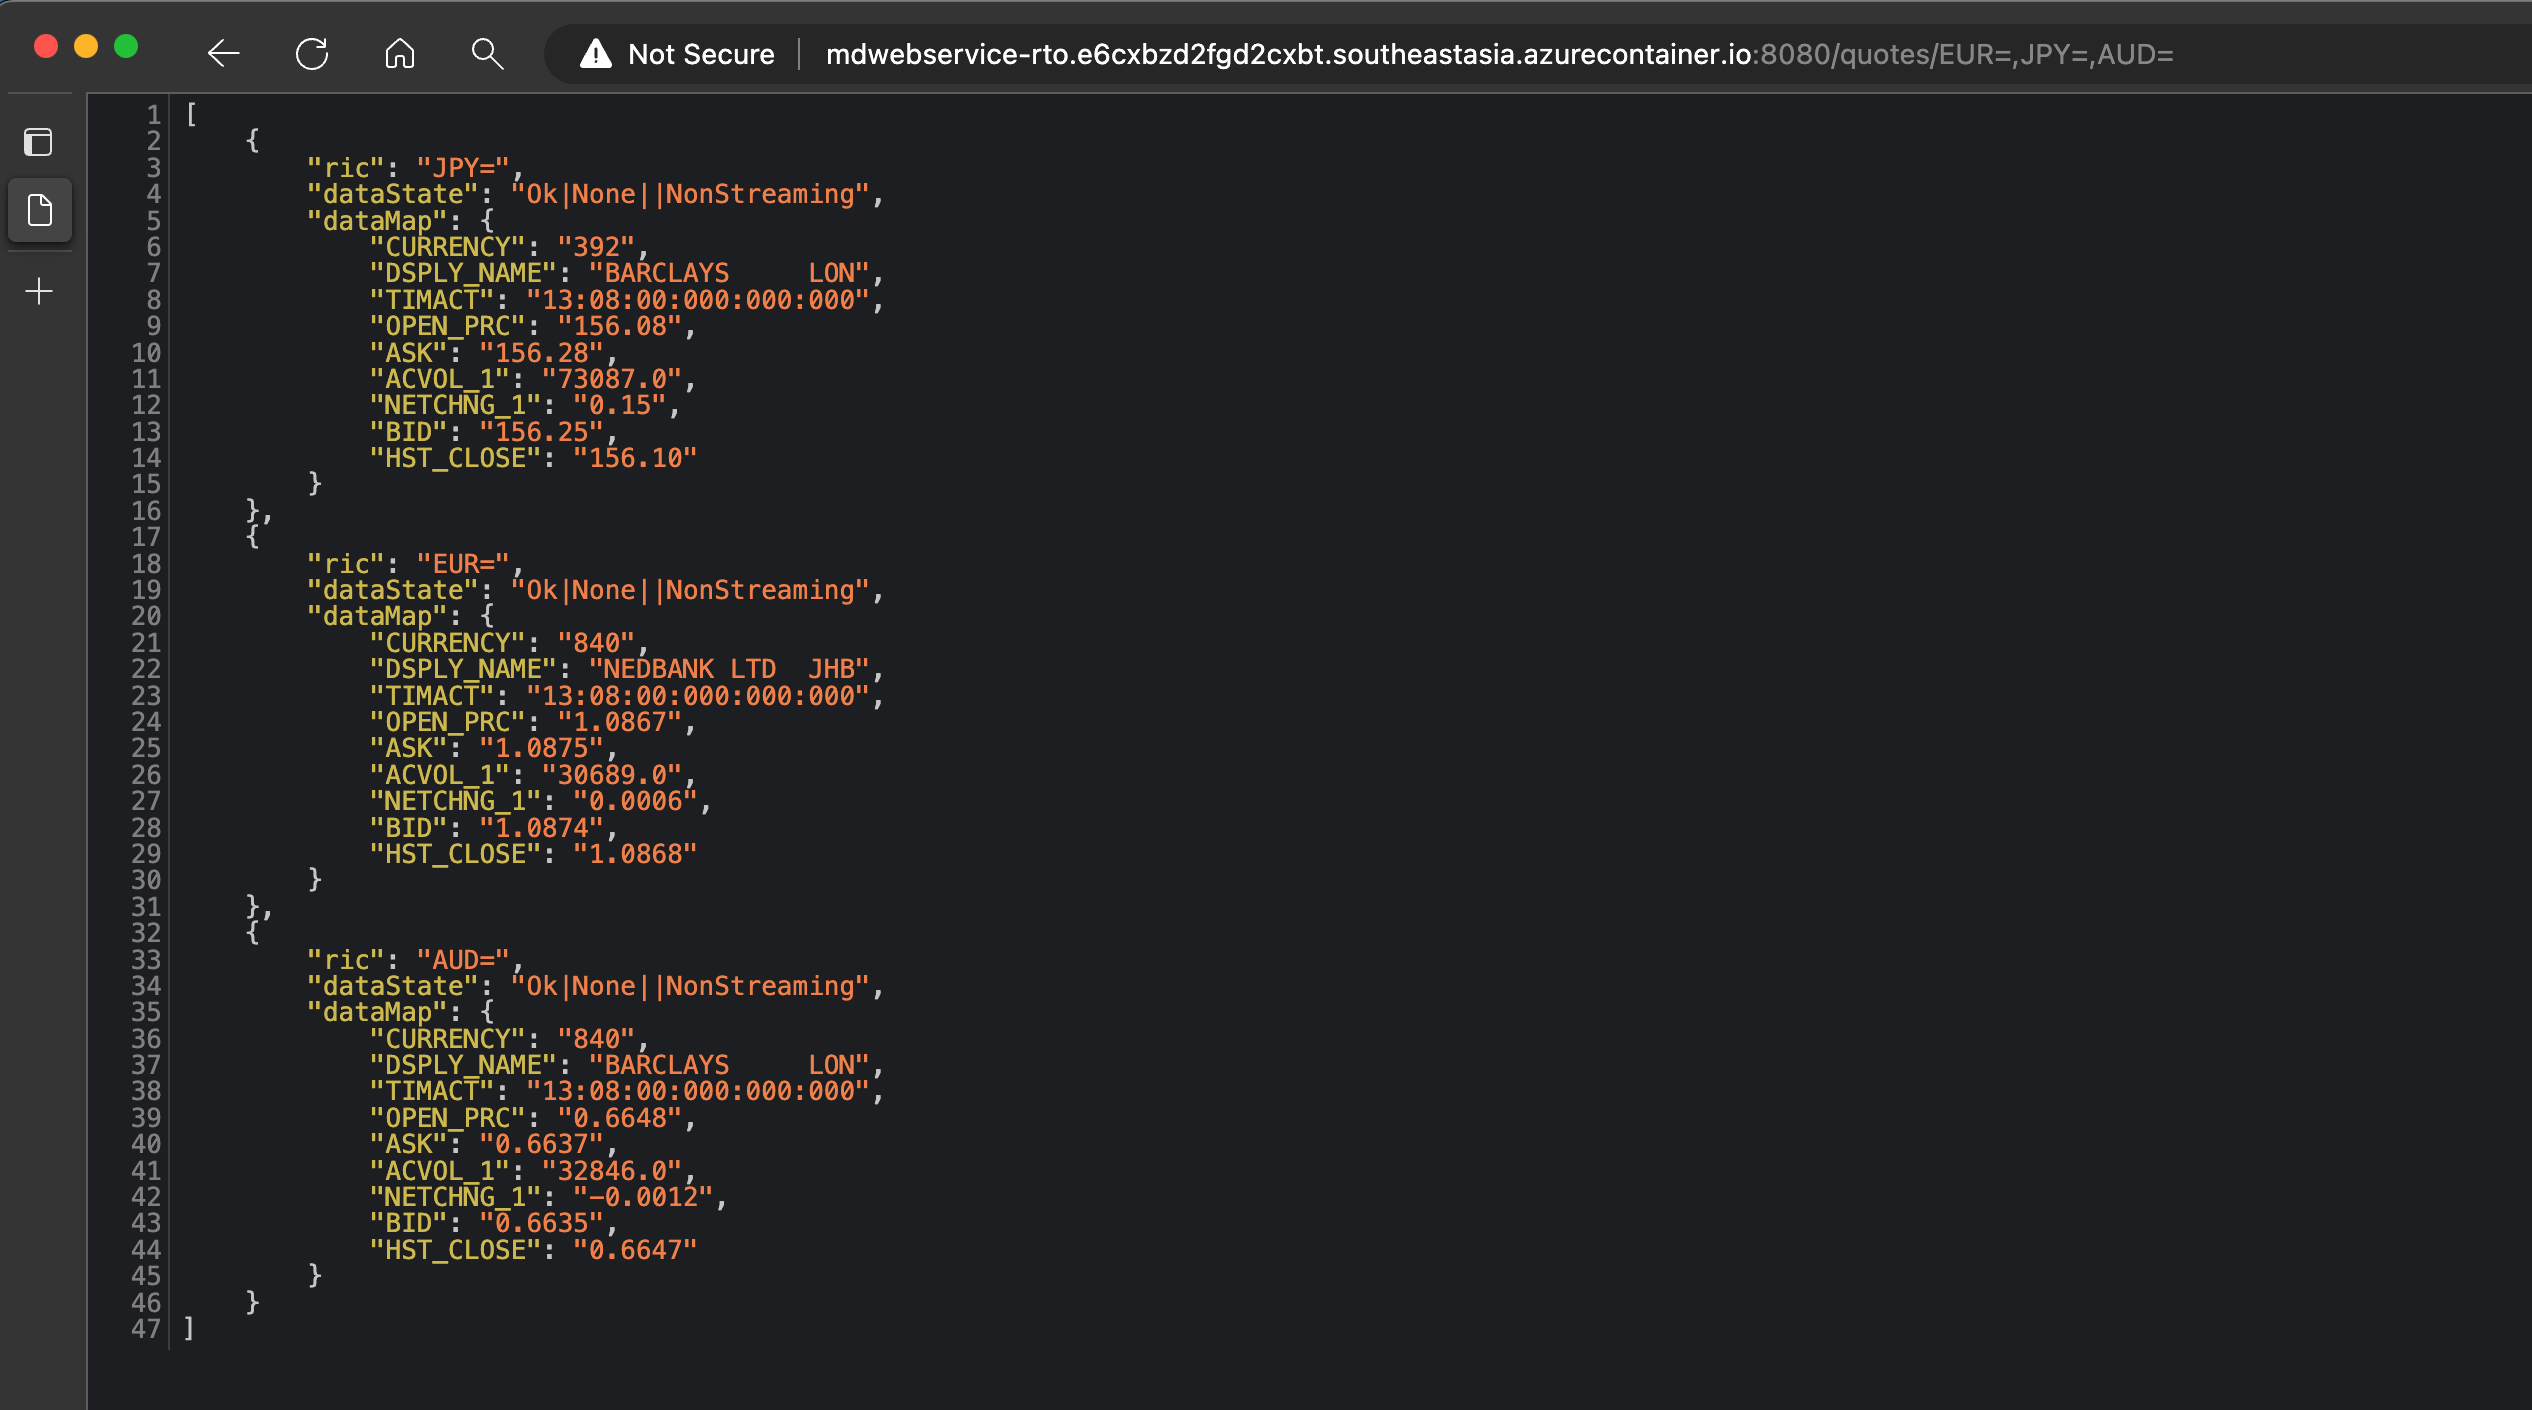
Once the application is running and successfully connected to the market data system, navigating to the web URL of http://server:port/quotes/JPY=,THB=,SGD= should produce a JSON response like this:
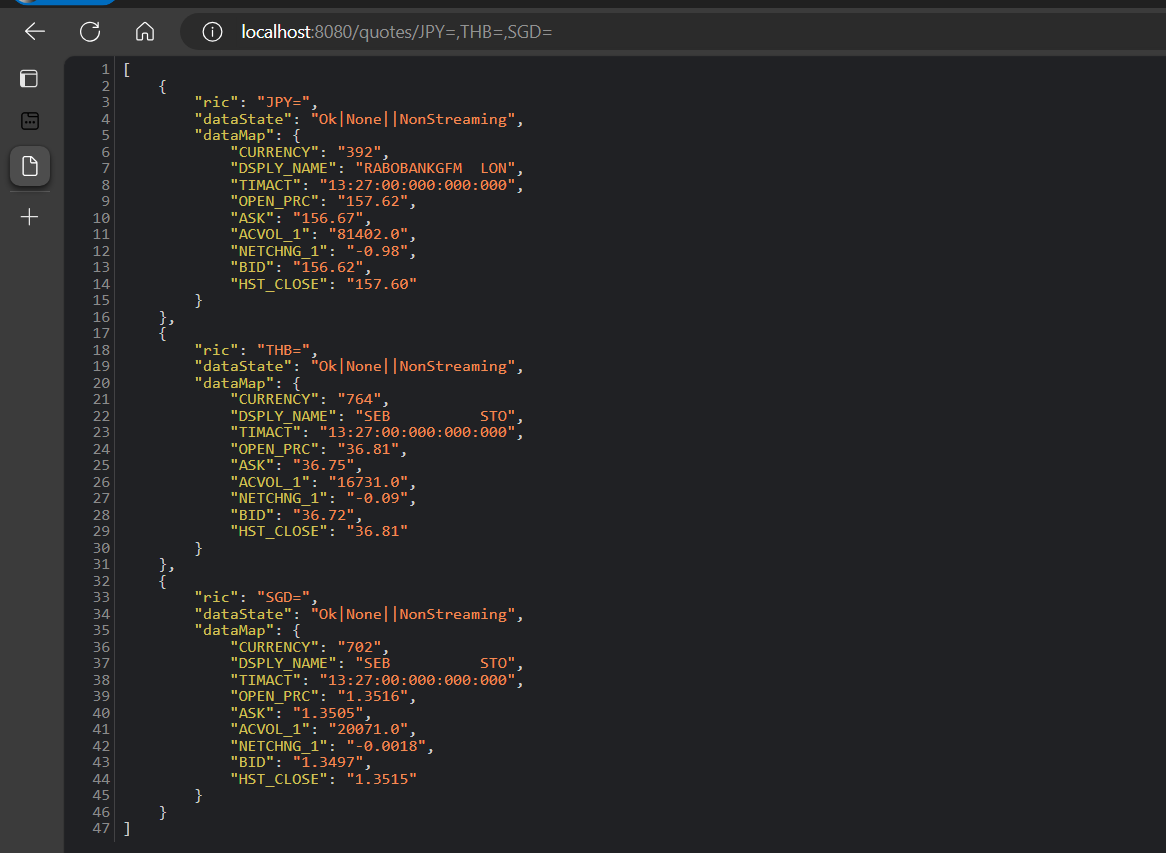
That’s all I have to say about how to run the project locally.
How to deploy to Azure Cloud Service
There are various ways to deployed an application on the cloud service like create a Virtual Machine (VM) on the cloud, or use the Serverless or Platform as a Service (PaaS) to run application's source code on the cloud, or use the fully managed container orchestration service to run an application's container. It is based on your preference of manageability, business logic and cost to choose which way is suitable for you.
The VM way is supported by all major Cloud services like the Azure Virtual Machine, AWS EC2, and Google Cloud Compute Engine. However, it requires a lot of manual work such as manage and set up the machine, install all application's dependencies, and run an application by yourself manually. This is the reason our article does not choose the VM way.
Since our MDWebService application already have been containerize, this article chooses the fully managed container orchestration service way.
Azure provides various services for supporting different requirements,cost, and your application's preference. You can find more detail about the comparisons of all services that supports containerized applications on Azure on Comparing Container Apps with other Azure container options and Difference between Azure Container Instances and Azure Container Apps - serverfault websites. I am choosing the Azure Container Instances service which is the easiest one.
Note: This project is based on May/June 2024 UX/UI version of the Azure Web Portal and Docker Hub websites. The UX and UI of those websites are subject to changed.
Container Registry
So, I will start off with container registry. Azure also has the Container Registry Service repository for storing and managing container images and artifacts with a fully managed environment within Azure. This repository requires the Azure CLI tool to push/pull an application image to Azure container registry.
However, the service also supports Docker Hub registry repository too, so I am choosing this way because I can set other Cloud Container solutions to pull image from Docker Hub as well.
Push Image to Docker Hub
Turning to how to push an application image to Docker Hub. The steps to push an MDWebService application image to Docker Hub repository are as follows.
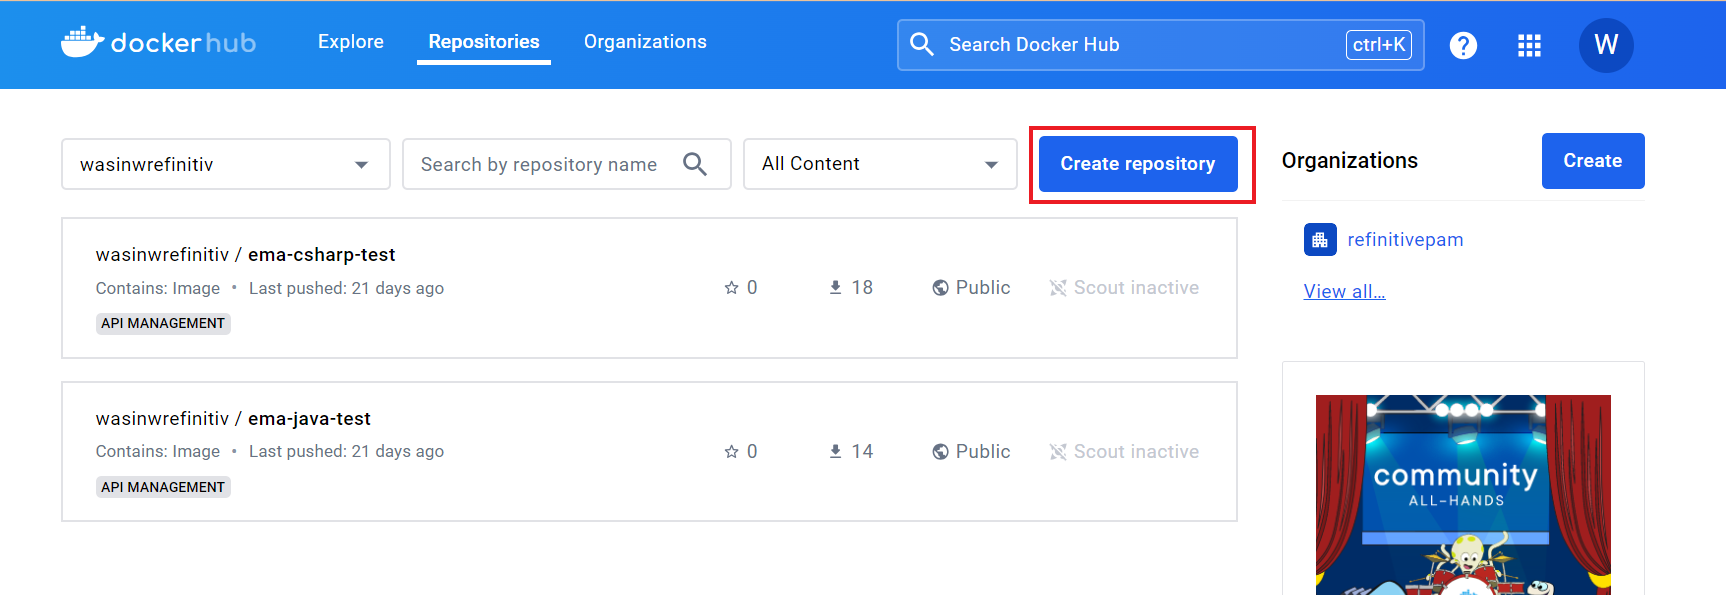
Firstly, log in to Docker Hub registry website, and select the Create repository button.
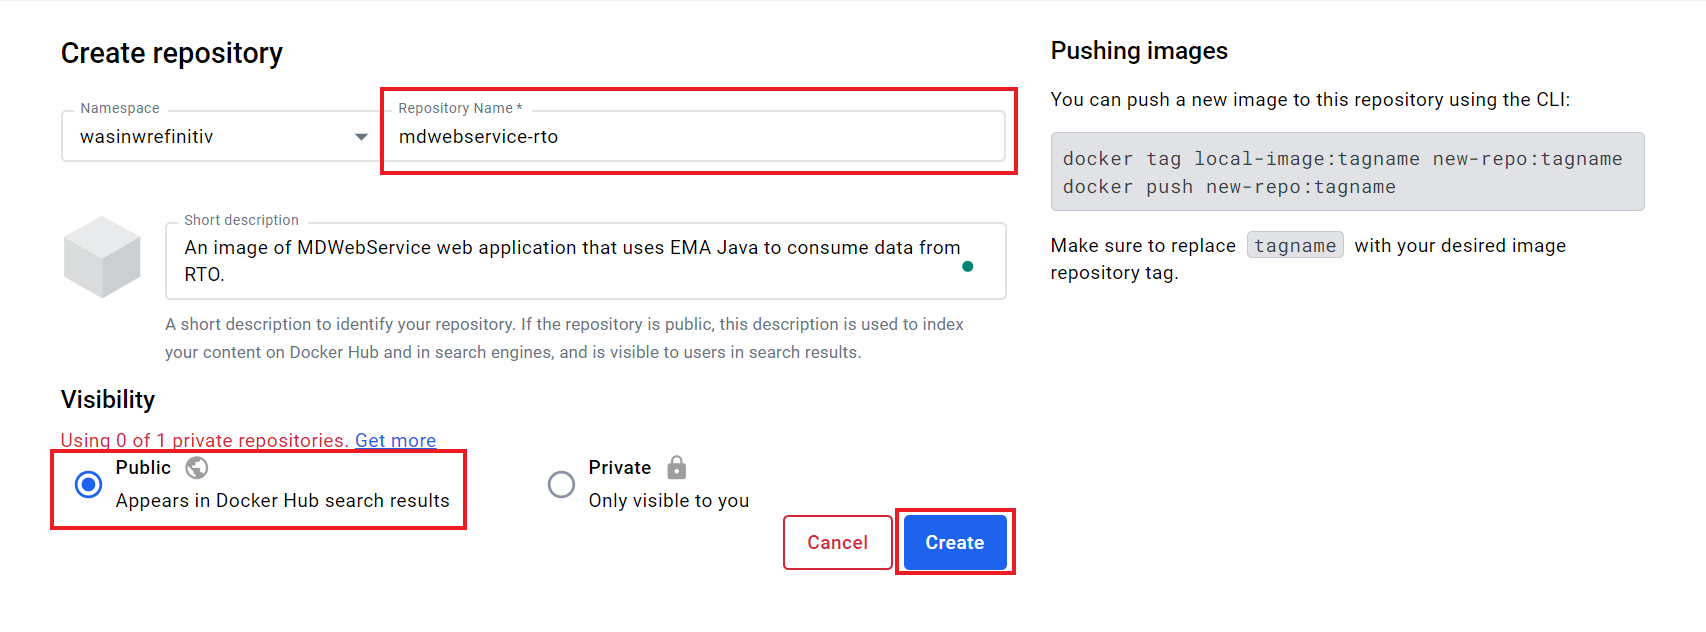
Next, input Repository Name as mdwebservice-rto, input a short description of your image, and choose Public Visibility. And then click the Create button.
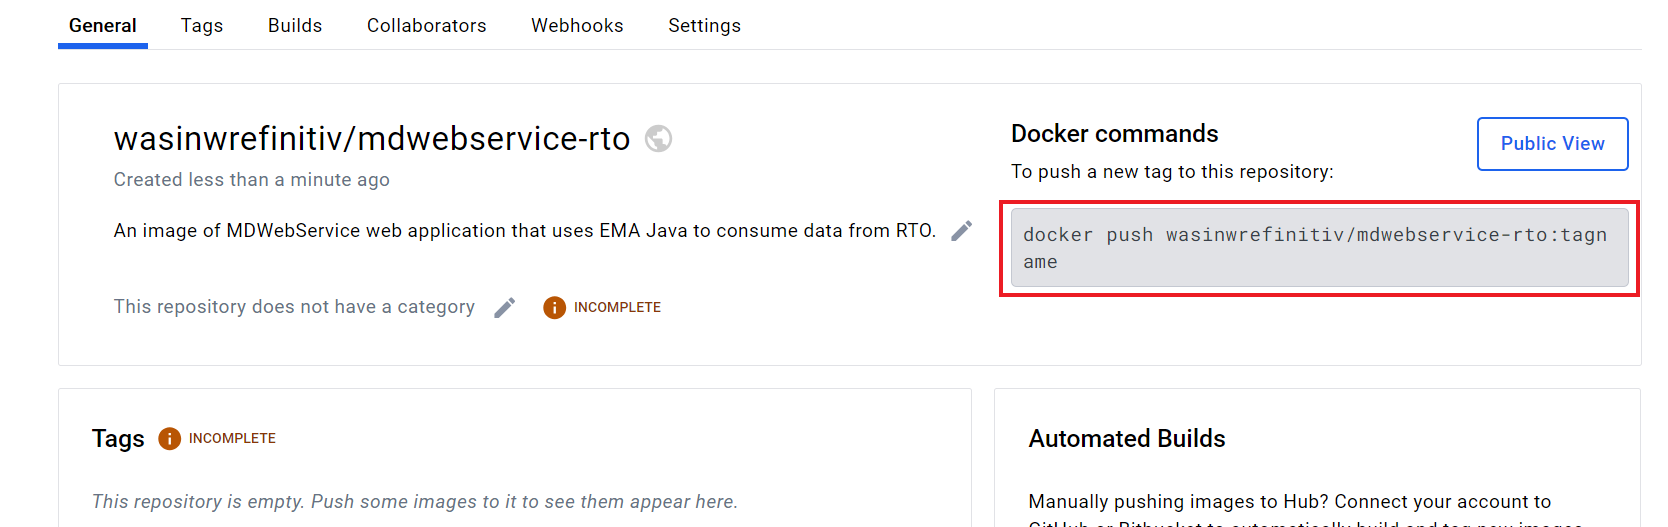
Once the repository is created successfully, the page redirects you to your repository page which contains commands to push your local image to this repository.
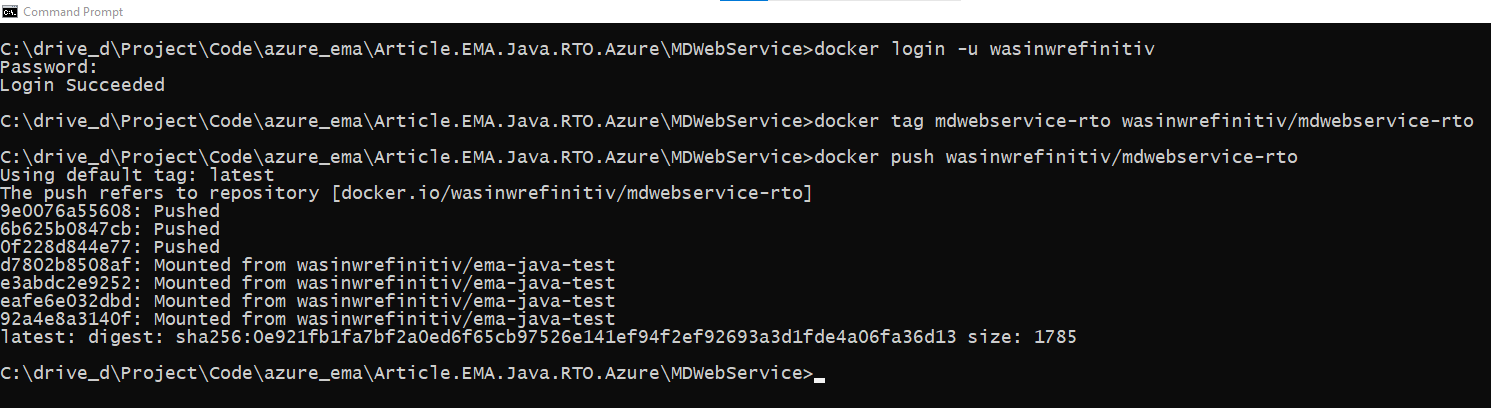
Moving on to the next step to push image, open a command prompt and run the following command to log in to Docker Hub via the CLI.
docker login -u YOUR-USER-NAME
Then input your Docker Hub account credential (password or token), then press the Enter button

Once you have logged in to Docker Hub on the CLI, use the docker tag command to give the mdwebservice-rto image a new name.
docker tag mdwebservice-rto wasinwrefinitiv/mdwebservice-rto

Once the image has been tagged, run the docker push command. Please note that if you don't specify a tagname part, Docker uses a tag called latest.
docker push wasinwrefinitiv/mdwebservice-rto
Then go back to Docker Hub website, the repository page shows your image detail. You can add the repository's category and overview based on your preference.
Please note that your image name is <your namespace>/<repository name> (wasinwrefinitiv/mdwebservice-rto in my case).
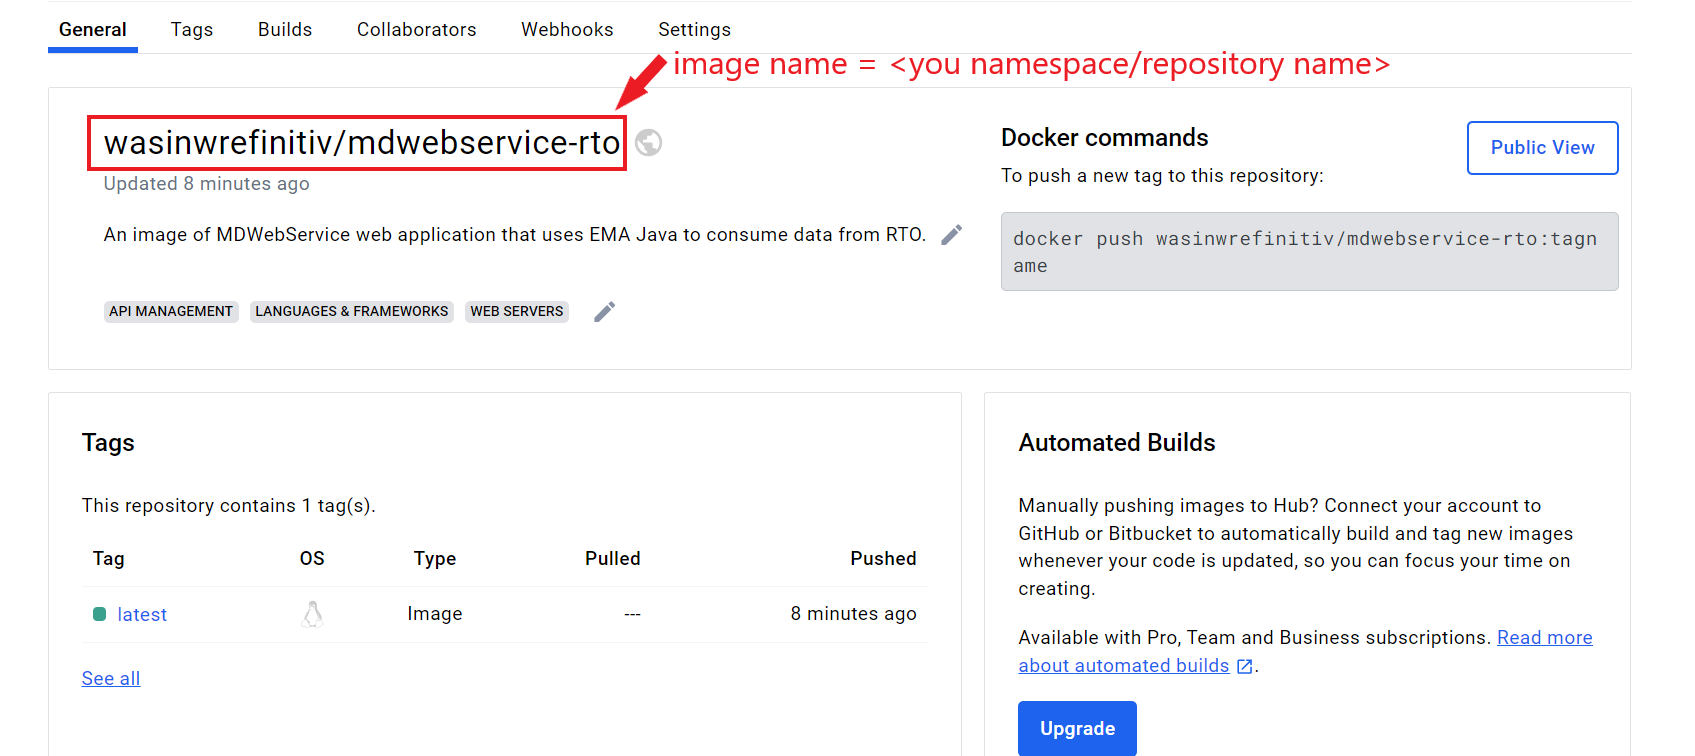
You can find more detail about how to push an application image to Docker Hub on Share the application document.
That covers how to push image to Docker Hub.
Creating Azure Container Instances
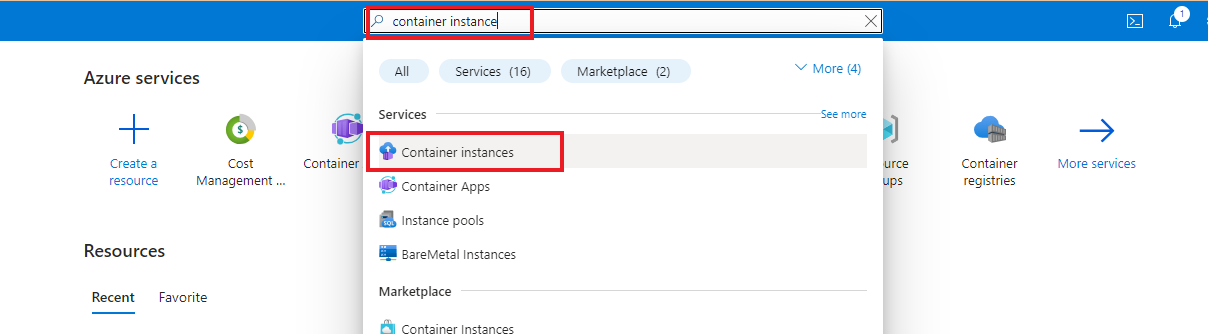
Now, what about how to pull an image from the container registry to Azure Container Instances Service. Firstly, open a web browser to Azure portal website, then type Container Instances in a search bar. The Container Instance Service menu will be appeared, choose that menu.
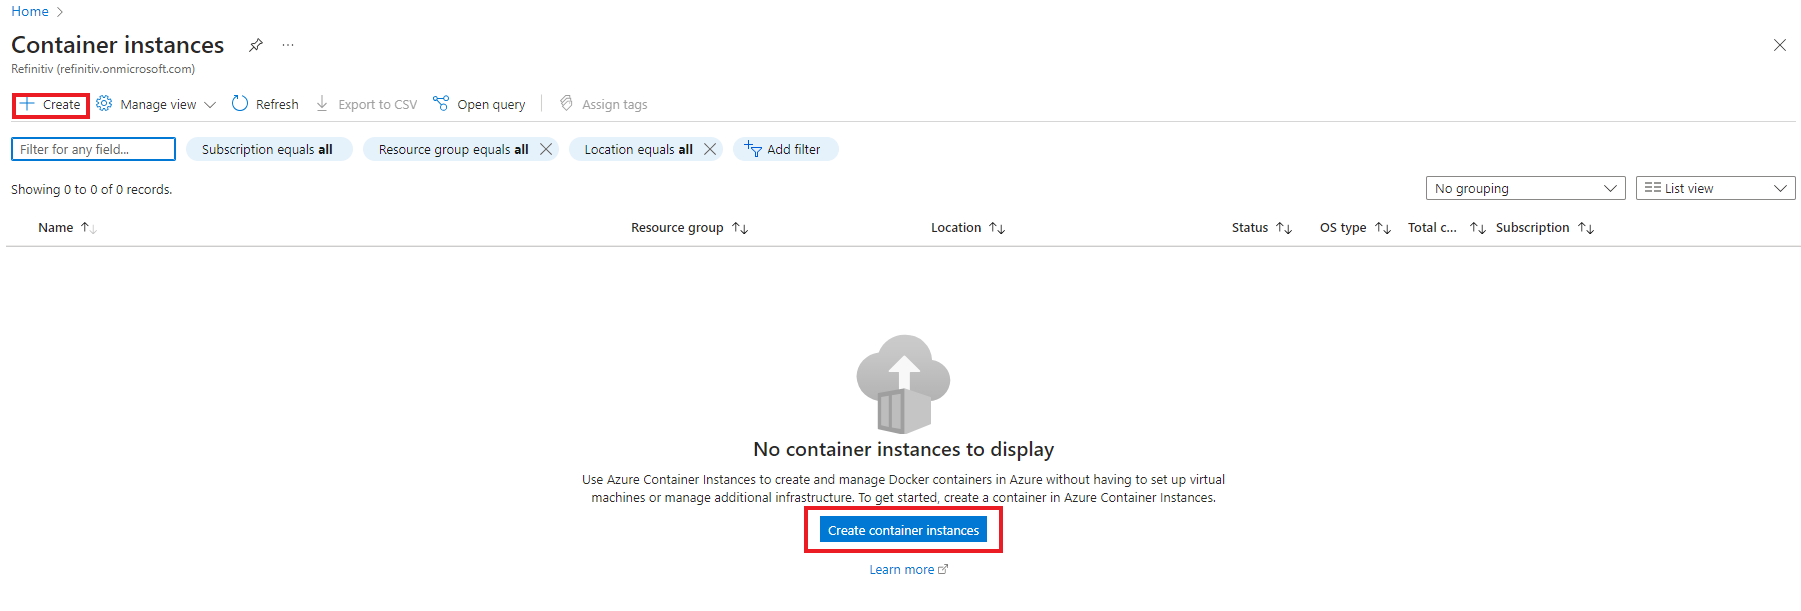
The page redirects to the Container Instances resource management page. To create a container, you can click either the +Create button or Create container instances button.
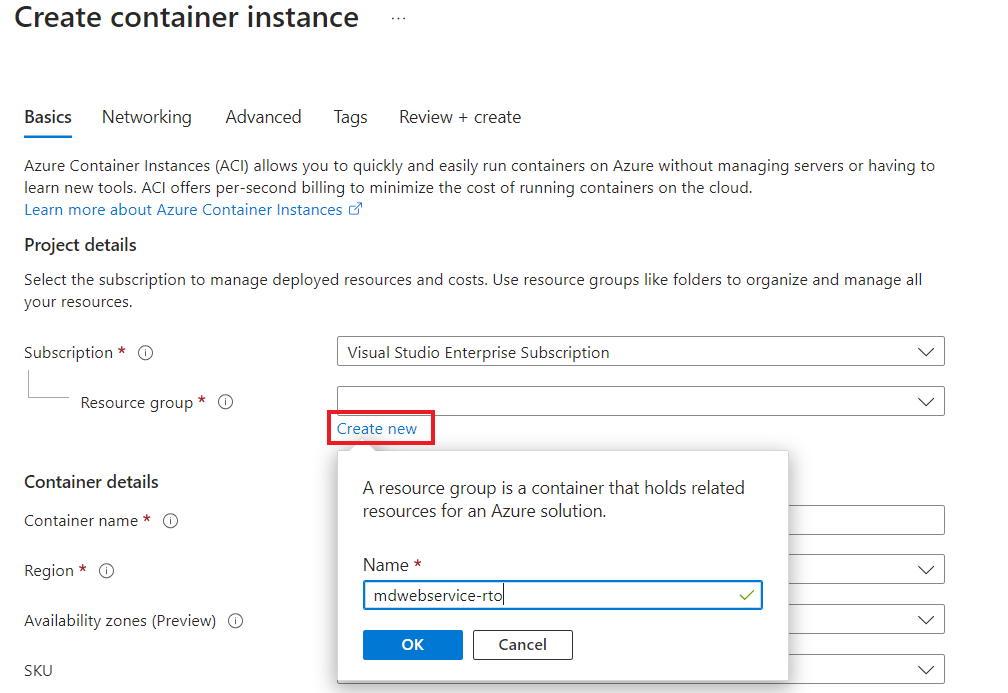
You are now in the Container instances creation page. The first step is choosing your Azure subscription and create a new Resource group. I choose the mdwebserivce-rto name for the new Resource Group.
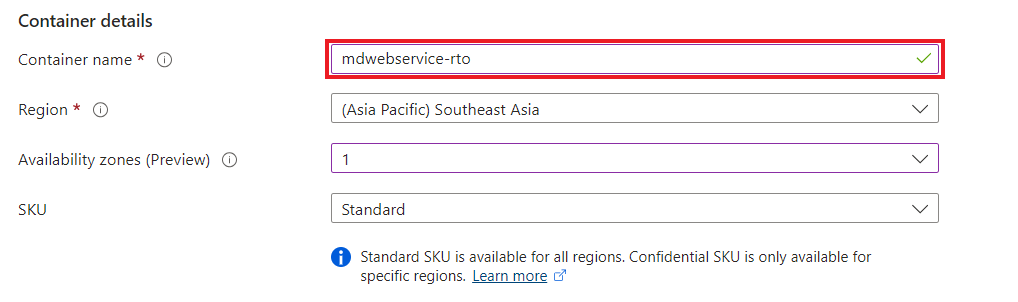
Next, input a container name. I choose mdwebservice-rto as my container name. Select your prefer region and numbers of Availability zone.
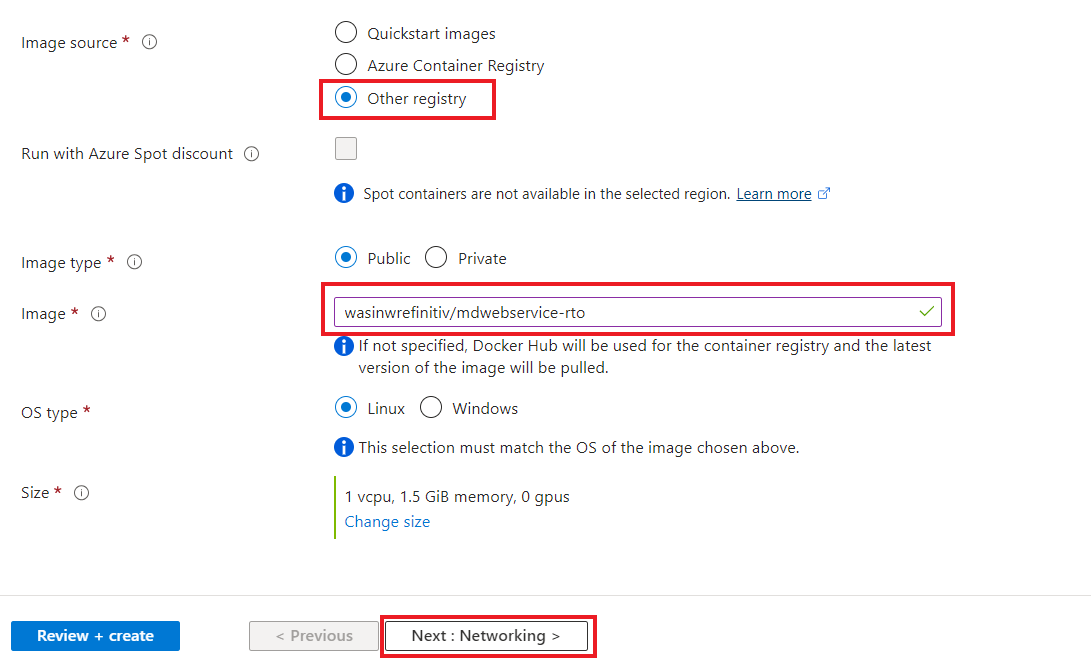
Now we need to input the image detail as follows, and then click the Next: Networking button.
- Image source: For Docker Hub registry, choose Other registry
- Image type: Public
- Image: Input your image name (<your namespace>/<repository name>)
- Leave other options as is.
That brings us to the network creation page. Set the DNS named label to mdwebservice-rto and add the following ports with type TCP to our instance:
- 8080 (for our Web Server)
- 443 (for connecting to RDP API)
- 14002 (for the RSSL connection)
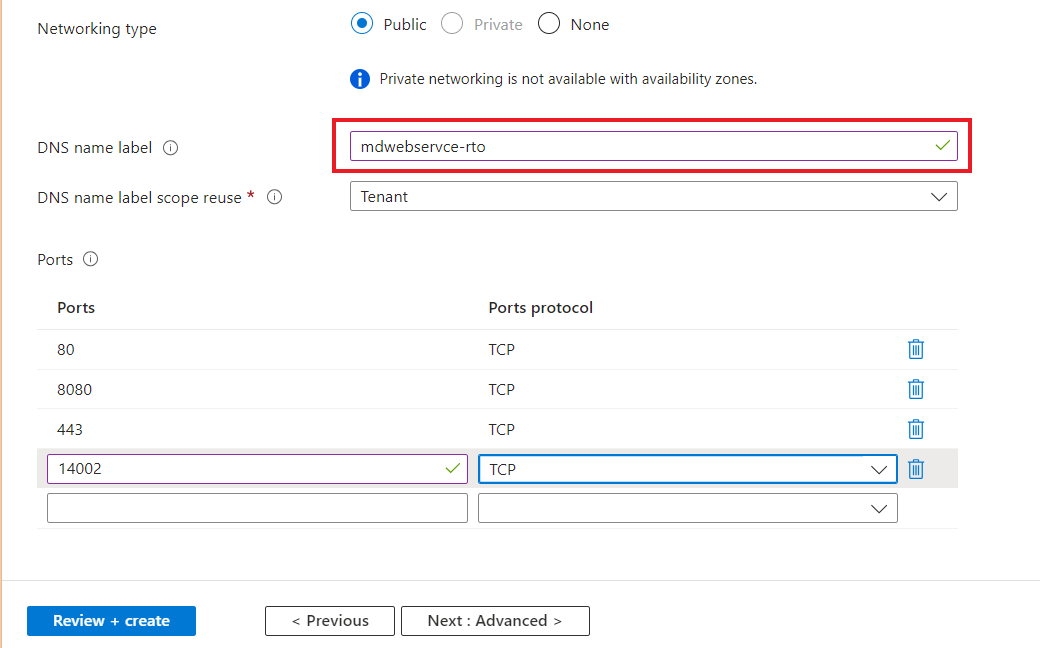
And click the Next: Advanced button.
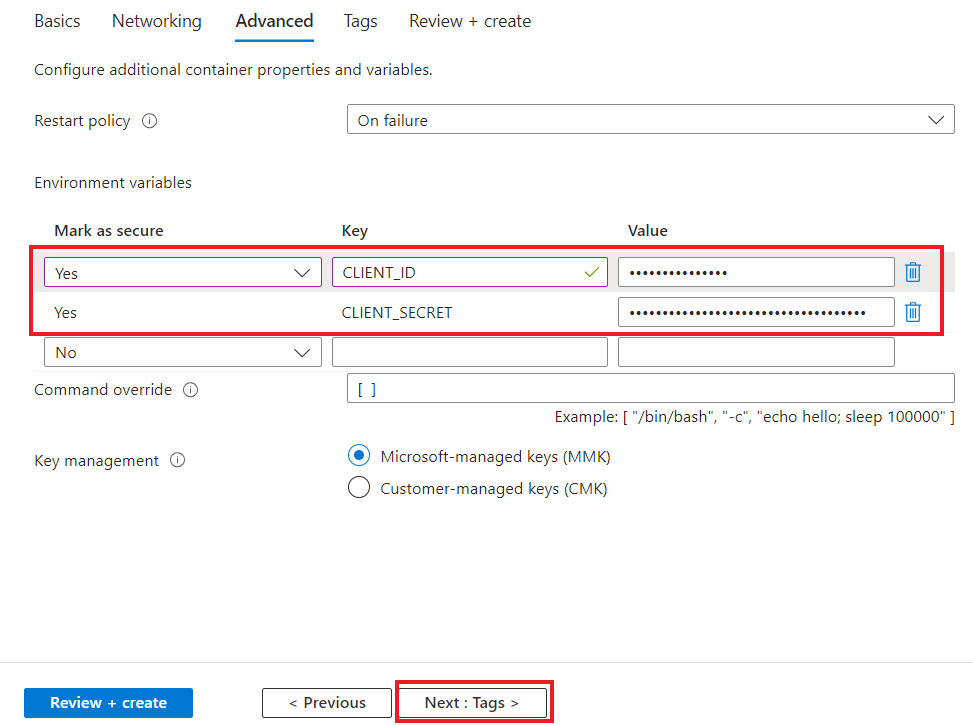
Moving on to advanced page. We can set a container's Environment Variables here. Please choose Mark as secure as Yes and input the following keys and values
- CLIENT_ID: Your Authentication V2 Client ID
- ClIENT_SECRET: Your Authentication V2 Client Secret
And click the Next: Tags button.
Next, choose your prefer tag names and values, then click the Next: Review + create button.
Now we come to the final step. You can review your setting here and go back for changing any properties you need. If set up looks fine, click the Create button.
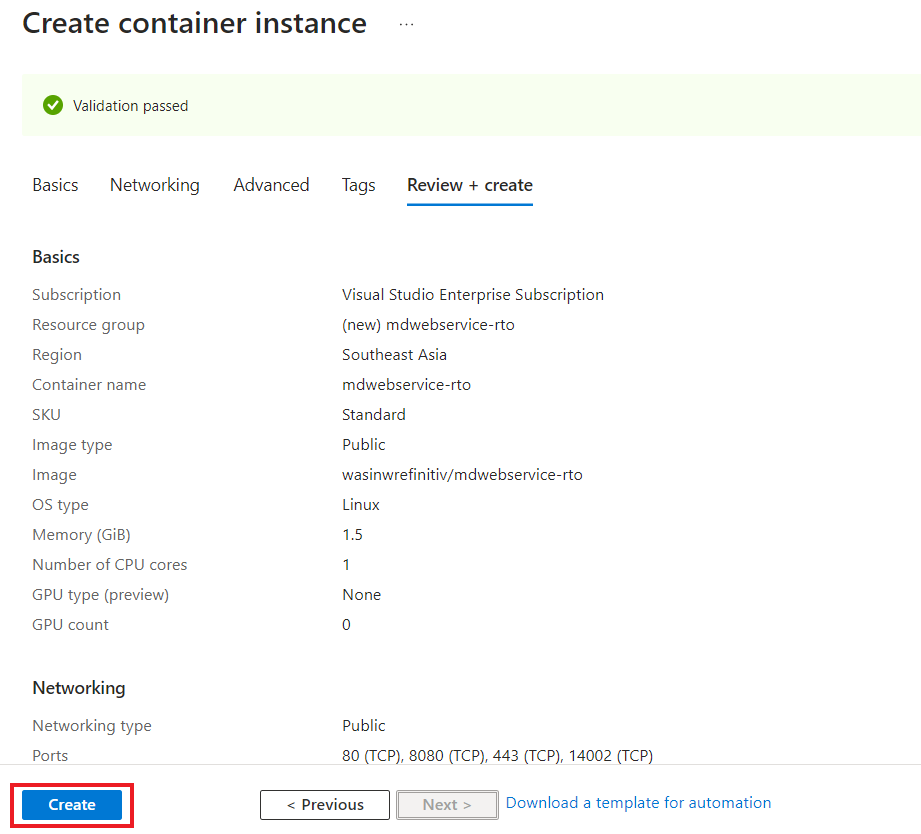
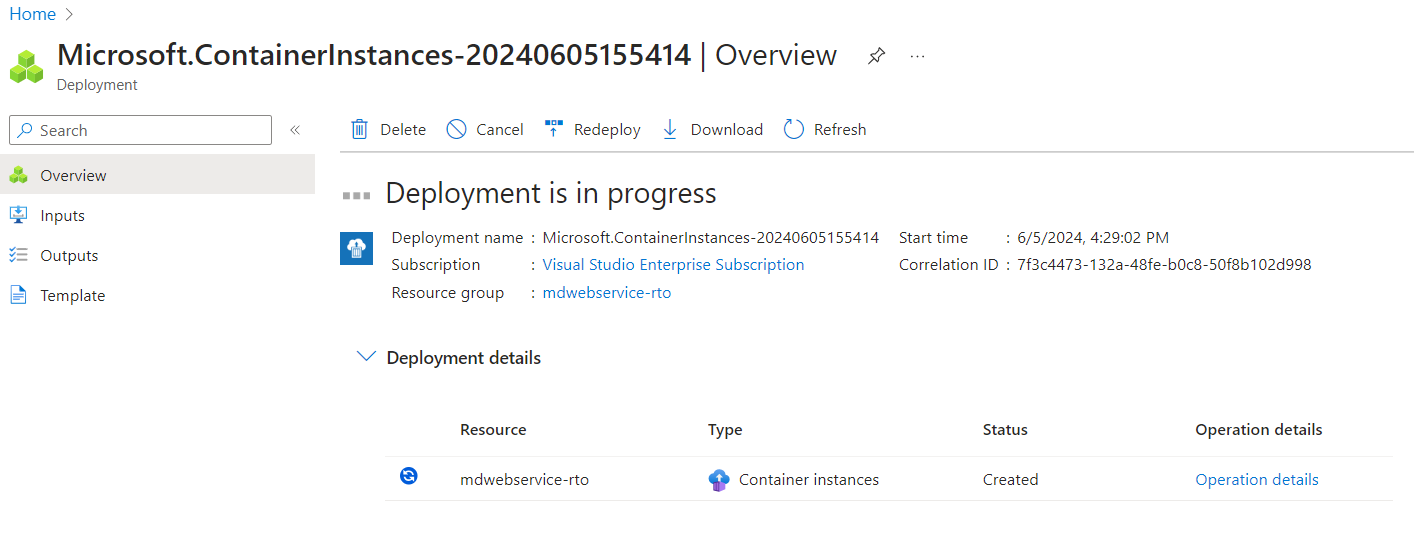
Then the Azure Container Instances service deploys your image.
Once deployment is completed. You can click the Go to resource button to check your newly deployed container.
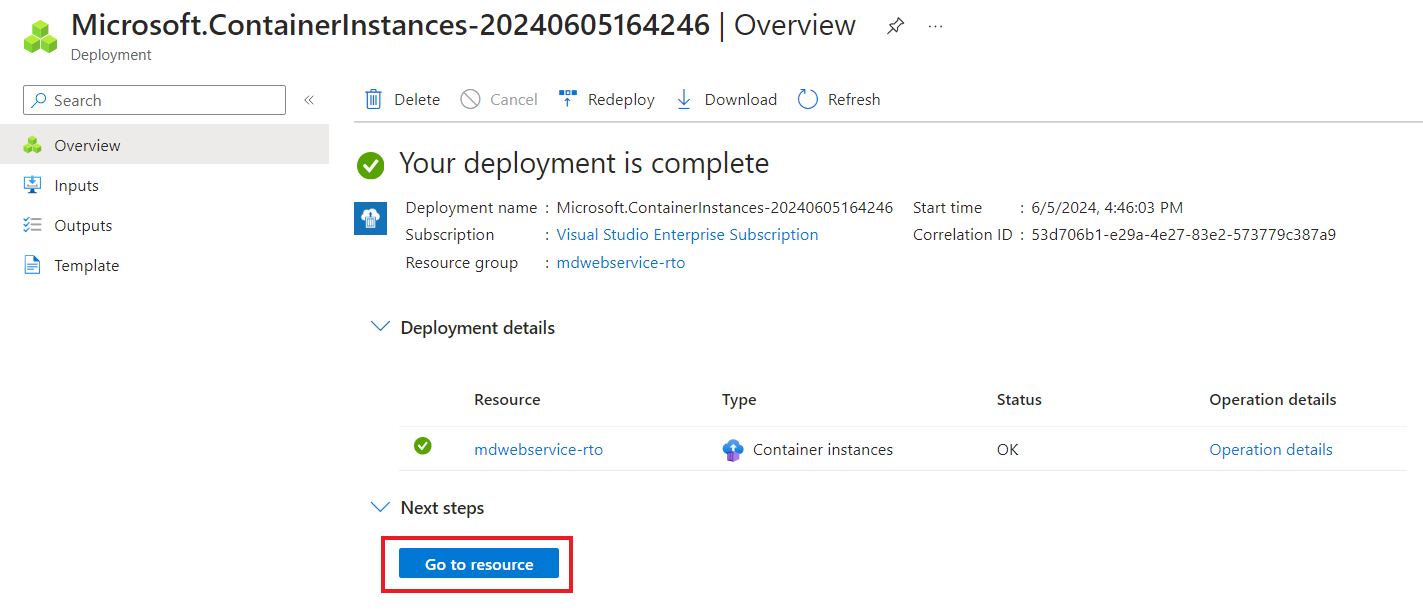
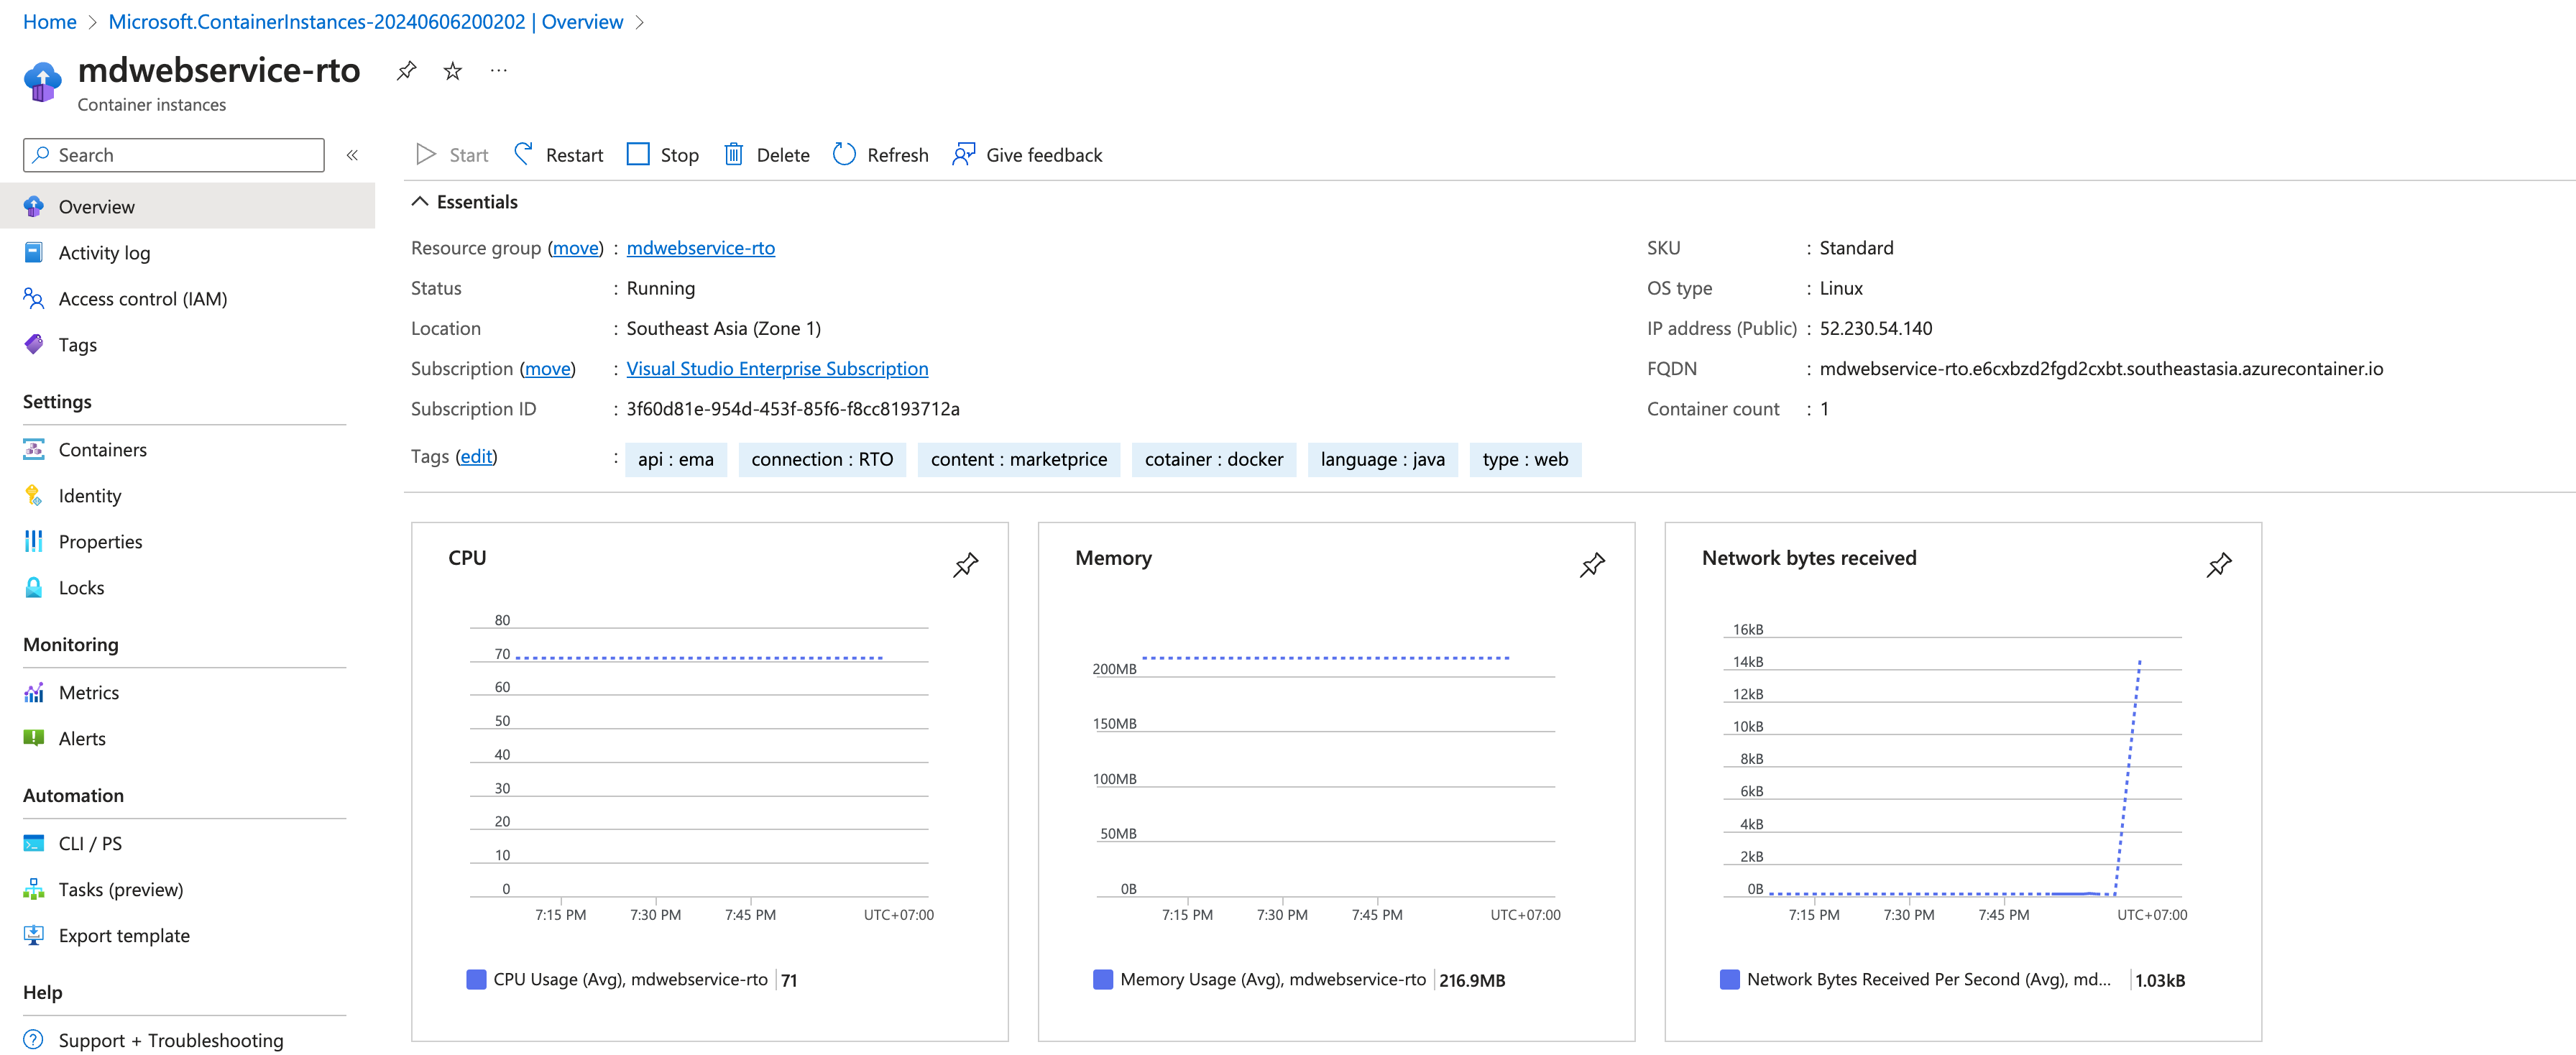
That brings us to the mdwebservice-rto instance resource page. The overview page contains the statistic of resource usages, container status, and the Public IP Address and container's automatically assigned DNS name. Please note that you can start, stop, and delete the instance from this resource page too.
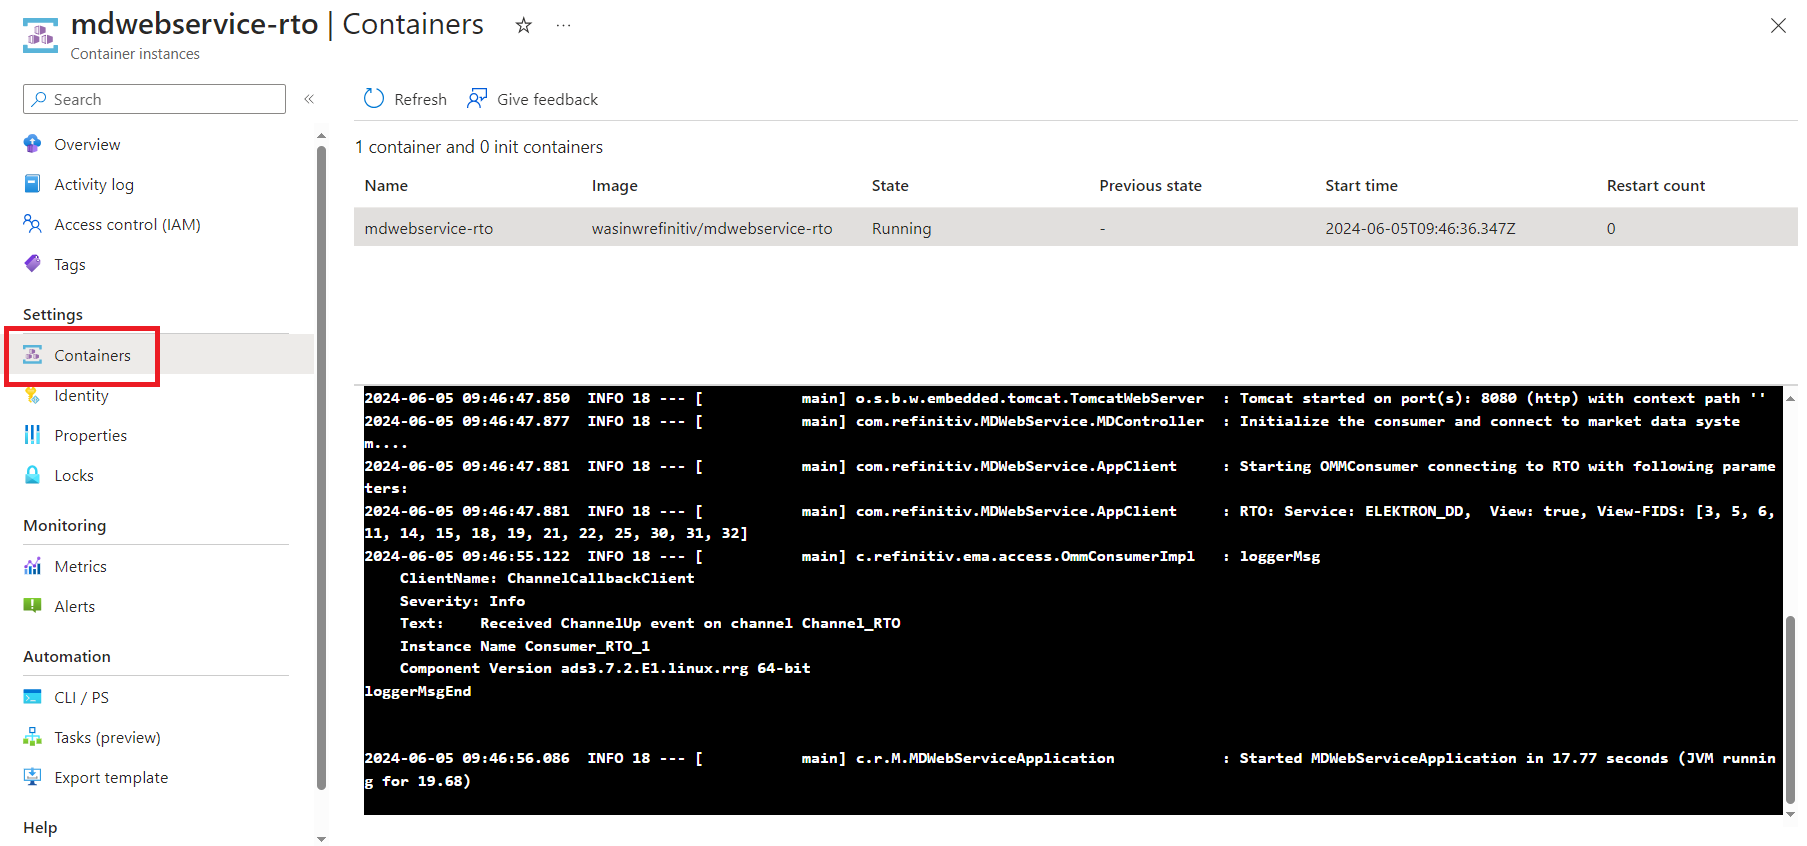
You can click on the Settings --> container tab --> Log to check the application's console log messages.
To test the deployed web server instant, copy the DNS url from the FQDN property (in the red circle), and open it on your web browser as http://<FQDN name>:8080/quotes/RIC_Code URL.

Please note that with the autogenerated domain name, the URL might be blocked by corporate firewall or network policy. I am testing and capturing the image from my personal machine.
That’s all I have to say about how to deploy a web service container to Azure.
Clean Up
My next point is how to clean up the resources if you do not need to run an instance anymore (for cost saving too!).
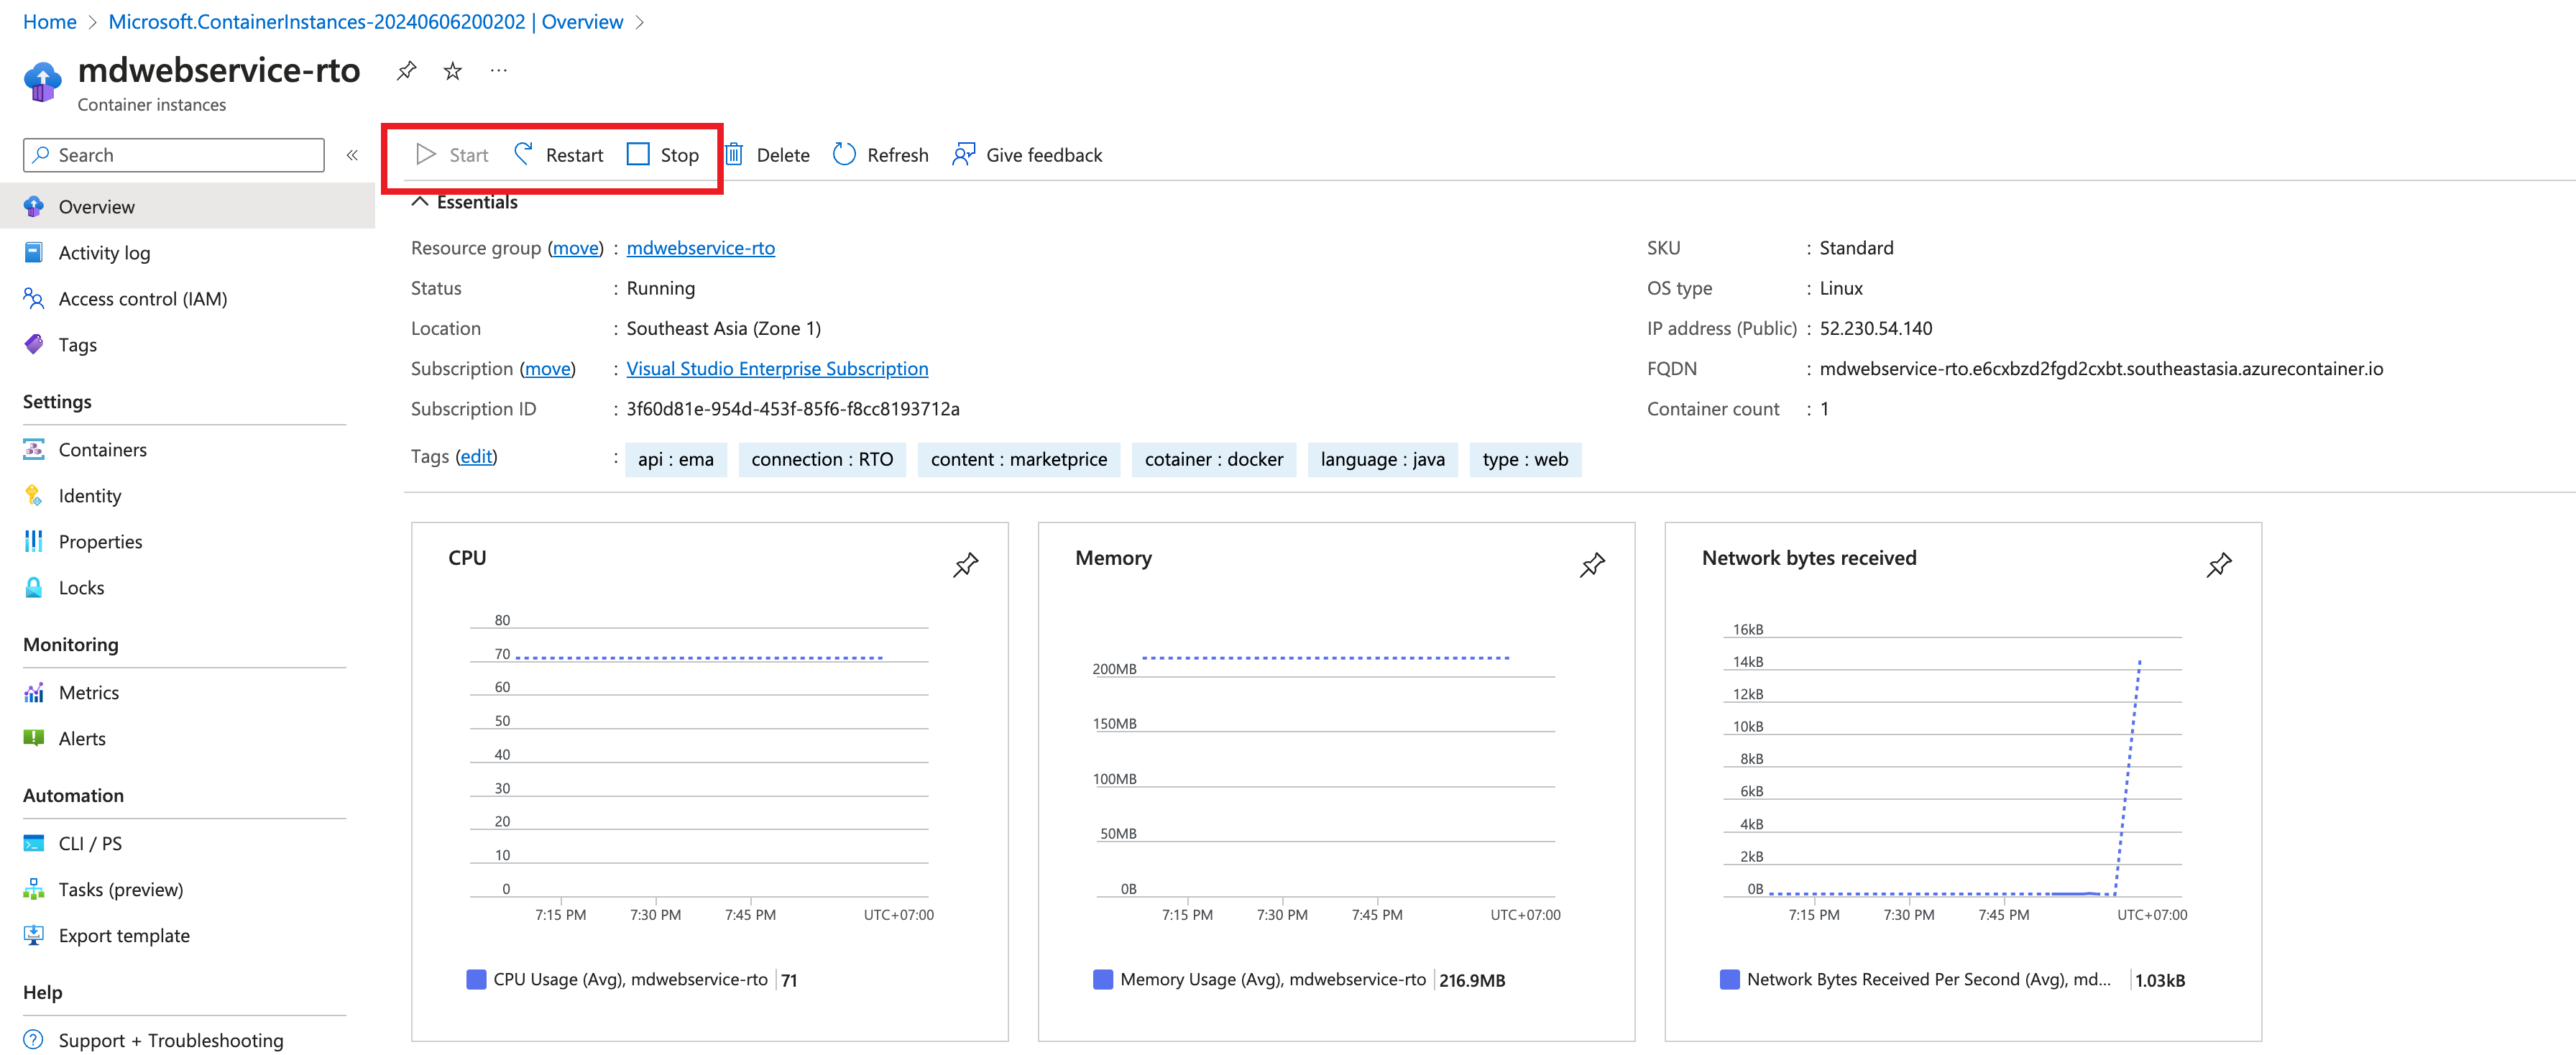
On the Container Instance Resources page, you can restart, stop, or delete an instance from the menu on this page.
That covers overall steps of deploying EMA instance on the Azure Container Instance service.
Next Steps
That brings me to the end of this project. The step-by-step guide on this project just shows the easiest way to deploy and host your web application container on Azure cloud service as a test scenario. However, there more tasks to do if you need to deploy your production container like the following:
- Adding the SSL to your deployment for enabling the secure HTTPS connection
- Set up the load balancer and availability zone to handle more consumers traffics and for resiliency.
- Define CI/CD process for the next deployment.
- And much more.
About adding the SSL to Azure Container Instance App, there are various way to add SSL to Container Instances such as, Enable automatic HTTPS with Caddy in a sidecar container, Enable a TLS endpoint in a sidecar container.
There are also other Azure Container services like Azure App Service or Azure Container Apps that supports automatic scalability, more advanced network control/configurations, easy to connect to other Azure services, and built-in SSL supported. They are the service that I am planing to explorer with our APIs in the future.
To learn more about the Azure App Services and Container Apps, please check the following resources:
- Quickstart: Run a custom container in Azure App Services
- Azure Container Apps Overview
- Quickstart: Deploy your first container app using the Azure portal
- Azure App Service vs Azure Container Apps - which to use?
Meanwhile, the open-source nature of the RTSDK makes the SDK easy to deploy on the Cloud Service. With the EMA API, you can create a Real-Time application with ease-of-use interfaces and easy to integrate with other services.
For more detail about the Real-Time SDKs, please check the following resources
Special Thank
Special thank to Gurpreet Bal for the original version of the MDWebService source code and articles.
Reference
For further details, please check out the following resources:
- Real-Time SDK Java page on the LSEG Developer Community website.
- The Real-Time SDK Family page.
- Enterprise Message API Java Quick Start
- Developer Webinar: Introduction to Enterprise App Creation With Open-Source Enterprise Message API
- Developer Article: 10 important things you need to know before you write an Enterprise Real Time application
- Comparing Container Apps with other Azure container options article.
- Changes to Customer Access and Identity Management: Real-Time - Optimized
- How to build a scalable web service for stock prices article.
- How to deploy a web service on AWS article.
- Azure Portal
- Microsoft Learn for Azure website.
- Difference between Azure Container Instances and Azure Container Apps - serverfault post.
- Azure Container Instances Service
- Azure Container Instances documentation
- How to enable TLS for Hasura GraphQL Engine in an Azure Container Instance with Caddy blog post.
- Adding SSL/TLS To Azure Container Instances blog post.
- Enable automatic HTTPS with Caddy in a sidecar container document.
- Enable a TLS endpoint in a sidecar container document.
For any question related to this article or the RTSDK page, please use the Developer Community Q&A Forum.
Related Articles
-
How to build a scalable web service for stock prices
-
How to deploy a web service on AWS
-
10 important things you need to know before you write a Real-Time application
-
Changes to Customer Access and Identity Management: Real-Time - Optimized
-
EMA Java API: Real-Time Optimized Version 2 Authentication Migration Guide
-
Introduction to Enterprise Message API
-
Enterprise Message API (EMA) - Configuration Overview
-
Implementing Real-Time Cloud Consumer Application with Kotlin