

Introduction
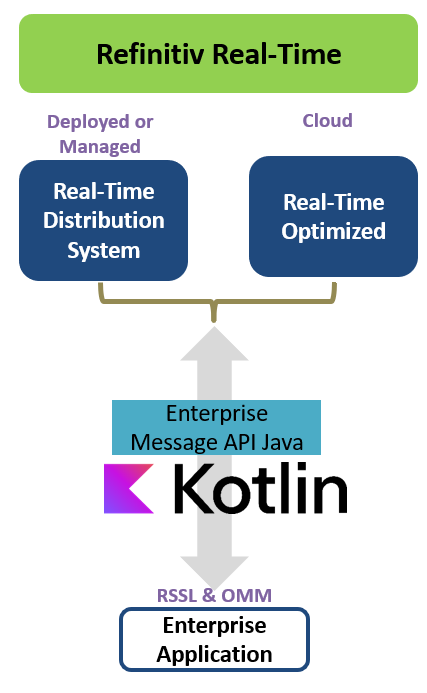
Refinitiv Real-Time SDK (Java Edition) (RTSDK, formerly known as Elektron SDK) is a suite of modern and open source APIs that aim to simplify development through a strong focus on ease of use and standardized access to a broad set of Refinitiv proprietary content and services via the proprietary TCP connection named RSSL and proprietary binary message encoding format named OMM Message. The capabilities range from low latency/high-performance APIs right through to simple streaming Web APIs.
The How to Implement EMA Java Application with Kotlin Language article shows how to implement Enterprise Message API (EMA) Java Consumer and Interactive Provider applications using Kotlin. This article shows a step-by-step guide to build the EMA Java Consumer application to connect and consume real-time streaming data from the Cloud (Refinitiv Real-Time Optimized, aka RTO).
Note:
- This example project uses Kotlin version 1.9.0 and EMA Java 3.7.1.0 (RTSDK 2.1.1.L1)
- I am demonstrating with the Version 2 Authentication
Introduction to Kotlin
Kotlin is a modern, cross-platform, statically typed, high-level programming language developed by Jetbrains. The language syntax is concise, safe, interoperable with Java. Kotlin is designed with fully Java Interoperability in mind. It can be compiled to JavaScript and iOS/Android native code (via LLVM) with many ways to reuse code between multiple platforms for productive programming.
One major benefit for Java developers is integration with Java code and libraries (including RTSDK Java). Existing Java code can be called from Kotlin in a natural way. Kotlin syntax aims for reducing Java language verbosity and complexity, so Java developers can migrate to Kotlin easily. With a lot of potentials, Kotlin has been chosen by Google to be a first-class programming language on Android OS since 2019.
Kotlin syntax aims for "making developers happier" by reducing Java language verbosity and complexity like the following example:
fun main() {
println("Hello world!")
val a = 100
val b = 12
println("$a + $b = ${sum(a,b)}") //"100 + 12 = 112"
}
fun sum(a: Int, b: Int): Int {
return a + b
}
That’s all I have to say about Kotlin introduction.
Prerequisite
Before I am going further, there is some prerequisite, dependencies, and libraries that the project is needed.
Java SDK
Firstly, you need Java SDK. Please check for the supported Java version from the API Compatibility Matrix page.
I am using the Open JDK version 11 in this project (as of April 2023).
Maven
Next, the Maven build automation tool. Please follow Apache Maven installation guide document.
Docker or IntelliJ IDEA
The example project is a console application that can be run on Docker or IntelliJ IDEA editor.
Access to the RTO
This project uses RTO access credentials for both Version 1 Authentication (Machine ID type) and Version 2 Authentication (Service ID)
Please contact your Refinitiv representative to help you with the RTO account and services.
Internet Access
This demonstration connects to RTO on AWS via a public internet.
Application Code Walkthrough
Maven pom.xml file
Let’s start with the Maven pom.xml file setting for Kotin. The pom.xml file the main Maven's project configuration. To use Kotlin with Maven, you need the kotlin-maven-plugin to compile Kotlin sources and modules. The first step is defining the version of Kotlin via the <properties> tag as follows:
<properties>
<kotlin.compiler.jvmTarget>11</kotlin.compiler.jvmTarget>
<rtsdk.version>3.7.1.0</rtsdk.version>
<kotlin.version>1.9.0</kotlin.version>
<main.class>com.refinitiv.kotlin.KonsumerRTOKt</main.class>
...
</properties>
And then set add the Kotlin standard library in the pom.xml file dependency setting.
<dependencies>
<dependency>
<groupId>com.refinitiv.ema
</groupId>
<artifactId>ema</artifactId>
<version>${rtsdk.version}</version>
</dependency>
<dependency>
<groupId>org.jetbrains.kotlin</groupId>
<artifactId>kotlin-stdlib</artifactId>
<version>{kotlin.version}</version>
</dependency>
</dependencies>
For more detail about EMA Java dependency and Maven, please check the How to Set Up Refinitiv Real-Time SDK Java Application with Maven article.
Next, set the pom.xml file's source directory and kotlin-maven-plugin plugins to let Maven knows where and how to compile the source code as follows:
<build>
<sourceDirectory>src/main/kotlin</sourceDirectory>
<testSourceDirectory>src/test/kotlin</testSourceDirectory>
<plugins>
<plugin>
<groupId>org.jetbrains.kotlin</groupId>
<artifactId>kotlin-maven-plugin</artifactId>
<version>{kotlin.version}</version>
<executions>
<execution>
<id>compile</id>
<phase>compile</phase>
<goals>
<goal>compile</goal>
</goals>
</execution>
<execution>
<id>test-compile</id>
<phase>test-compile</phase>
<goals>
<goal>test-compile</goal>
</goals>
</execution>
</executions>
</plugin>
...
<plugins>
</build>
You can see a full pom.xml file configurations in the project repository.
To learn more about Kotlin and Maven configurations, please see Kotlin: Maven build tool page.
Let’s leave the pom.xml file setting for the Kotlin project development there.
Consumer Creation and Configuration
Now we come to the consumer code walkthrough. The demo application (KonsumerRTO.kt) is based on the EMA Java ex451_MP_OAuth2Callback_V2, ex333_Login_Streaming_DomainRep, series300.ex360_MP_View and ex113_MP_SessionMgmt examples source code to connect and consume real-time streaming from RTO with the View feature.
The KonsumerRTO.kt file implements the standard EMA Java Consumer applications with Kotlin syntax mindset.
1. Set the application entry point
An entry point of a Kotlin application is in the main function, and it does not need to be inside a class like Java. The main function creates the KonsumerRTO object, pass the RTO Service ID credential (Version 2 Authentication), and service name information to the KonsumerRTO object for further EMA-RTO workflow.
import io.github.cdimascio.dotenv.dotenv
fun main() {
val dotenv = dotenv {
ignoreIfMalformed = true
ignoreIfMissing = true
}
val clientId: String = dotenv["CLIENT_ID"]
val clientSecret: String = dotenv["CLIENT_SECRET"]
val serviceName: String = dotenv["SERVICENAME"]
val appRTO = KonsumerRTO()
appRTO.run(clientId, clientSecret, serviceName)
}
class KonsumerRTO {
fun run(clientId: String, clientSecret: String, serviceName: String = "ELEKTRON_DD") {
//Perform RTO connection logic
}
}
The code use the dotenv-kotlin library to load the RTO credentials and configuration from the environment variable .env file or the System Environment Variables. The OS/system's environment variables always override .env configurations by default.
That’s all I have to say about the consumer application entry point.
2. Setting RDP Version 2 Authentication credentials to the OmmConsumer Class
The next step is creating the OmmConsumer object. Then set the V2 auth Client Credentials (client ID and client secret) to the OmmConsumer instance via the OmmConsumerConfig class.
class KonsumerRTO {
private val tokenUrlV2 = "https://api.refinitiv.com/auth/oauth2/v2/token"
private val itemName = "EUR="
fun run(clientId: String, clientSecret: String, serviceName: String = "ELEKTRON_DD") {
var consumer: OmmConsumer? = null
try {
val appClient = AppClient()
val config: OmmConsumerConfig = EmaFactory.createOmmConsumerConfig()
consumer = EmaFactory.createOmmConsumer(
config.consumerName("Consumer_4")
.clientId(clientId)
.clientSecret(clientSecret)
.tokenServiceUrlV2(tokenUrlV2)
)
} catch (excp: InterruptedException) {
println(excp.message)
} catch (ex: OmmException) {
println(ex.message)
} finally {
consumer?.uninitialize();
}
}
}
The "Consumer_4" is defined to connect to RTO in the EmaConfig.xml file as follows
<Channel>
<Name value="Channel_4"/>
<ChannelType value="ChannelType::RSSL_ENCRYPTED"/>
<CompressionType value="CompressionType::None"/>
<GuaranteedOutputBuffers value="5000"/>
<!-- EMA discovers a host and a port from RDP service discovery for the specified location
when both of them are not set and the session management is enable. -->
<Location value="ap-southeast"/>
<EnableSessionManagement value="1"/>
<ObjectName value=""/>
</Channel>
Please refer to the Refinitiv Real-Time - Optimized Install and Config Guide document to find more detail about RTO endpoints locations.
3. Setting a client secret in the ReactorOAuthCredentialRenewal
By default, the EMA API will store all credential information. To use secure credential storage, a callback function can be specified by the user. If an OmmOAuth2ConsumerClient instance is specified when creating the OmmConsumer object, the EMA API does not store the password or clientSecret. In this case, the application must supply the password or clientSecret whenever the OAuth credential event OmmOAuth2ConsumerClient.onCredentialRenewal callback method is invoked. This call back must call set the credentials to the OAuth2CredentialRenewal instance and set it to the OmmConsumer.renewOAuthCredentials method to provide the updated credentials.
/* This is for example purposes, For best security, please use a proper credential store. */
data class CredentialStore(var clientSecret: String, var clientId: String, var consumer: OmmConsumer?)
/* Implementation of OmmOAuth2ConsumerClient. This is a very basic callback that uses the closure to obtain
* the OmmConsumer and call submitOAuthCredentialRenewal.
*
* This is intended to show functionality, so this example does not implement or use secure credential storage.
*/
class OAuthcallback : OmmOAuth2ConsumerClient {
override fun onOAuth2CredentialRenewal(event: OmmConsumerEvent?) {
val credentials: CredentialStore? = event?.closure() as CredentialStore?
val renewal = EmaFactory.createOAuth2CredentialRenewal() as OAuth2CredentialRenewal
renewal.clientId(credentials?.clientId)
renewal.clientSecret(credentials?.clientSecret)
println("Submitting credentials due to token renewal")
credentials?.consumer?.renewOAuthCredentials(renewal)
}
}
The main purpose of the CredentialStore class is for holding the credentials only, so I am using the Kotlin Data Class feature to shorten this POJO class implementation.
Then add the oAuthCallback and credentials objects to the OmmConsumer.createOmmConsumer(OmmConsumerConfig config,OmmOAuth2ConsumerClient OAuthClient,java.lang.Object closure) method as follows.
fun run(clientId: String, clientSecret: String, serviceName: String = "ELEKTRON_DD") {
var consumer: OmmConsumer? = null
val oAuthCallback = OAuthcallback()
val credentials = CredentialStore(clientId, clientSecret, consumer)
try {
val appClient = AppClient()
val config: OmmConsumerConfig = EmaFactory.createOmmConsumerConfig()
consumer = EmaFactory.createOmmConsumer(
config.consumerName("Consumer_4")
.clientId(clientId)
.clientSecret(clientSecret)
.tokenServiceUrlV2(tokenUrlV2), oAuthCallback, credentials as Any
)
credentials.consumer = consumer
}
...
}
That covers how to initialize connection with RTO using the Version 2 Authentication.
4. Registering Login Stream
My next point is how to monitors the state of connectivity when connecting to the RTO. The application can open a login stream to receive the stream's status and information.
fun run(clientId: String, clientSecret: String, serviceName: String = "ELEKTRON_DD") {
var consumer: OmmConsumer? = null
val oAuthCallback = OAuthcallback()
val credentials = CredentialStore(clientId, clientSecret, consumer)
try {
val appClient = AppClient()
val config: OmmConsumerConfig = EmaFactory.createOmmConsumerConfig()
consumer = EmaFactory.createOmmConsumer(
config.consumerName("Consumer_4")
.clientId(clientId)
.clientSecret(clientSecret)
.tokenServiceUrlV2(tokenUrlV2), oAuthCallback, credentials as Any
)
credentials.consumer = consumer
val loginReq = EmaFactory.Domain.createLoginReq()
consumer.registerClient(loginReq.message(), appClient)
}
...
}
Note: If you are connecting to the RTDS (either on-prem or hosted solution), registering a a login stream to receive the stream's status and information can be helpful for monitoring a connection.
5. Requesting Data
Now we come to the item subscription process. I am using the View feature to subscribe only interested FIDs.
fun run(clientId: String, clientSecret: String, serviceName: String = "ELEKTRON_DD") {
...
private val itemName = "EUR="
try {
val appClient = AppClient()
val config: OmmConsumerConfig = EmaFactory.createOmmConsumerConfig()
...
// --------------------------------- View ---------------------------
val view = EmaFactory.createElementList()
val arrayView = EmaFactory.createOmmArray()
arrayView.fixedWidth(2)
arrayView.add(EmaFactory.createOmmArrayEntry().intValue(22)) //BID
arrayView.add(EmaFactory.createOmmArrayEntry().intValue(25)) //ASK
arrayView.add(EmaFactory.createOmmArrayEntry().intValue(15)) //CURRENCY
arrayView.add(EmaFactory.createOmmArrayEntry().intValue(875)) //VALUE_DT1
arrayView.add(EmaFactory.createOmmArrayEntry().intValue(1010)) //VALUE_TS1
view.add(EmaFactory.createElementEntry().uintValue(EmaRdm.ENAME_VIEW_TYPE, 1))
view.add(EmaFactory.createElementEntry().array(EmaRdm.ENAME_VIEW_DATA, arrayView))
consumer.registerClient(
EmaFactory.createReqMsg().serviceName(serviceName).payload(view).name(itemName),
appClient
)
Thread.sleep(900000)
}
...
}
That completes the OmmConsumer main part, let's move on the the OmmConsumerClient part that handles the login and item streams incoming messages.
Create the Client application class
That brings us to client application AppClient class which implements the OmmConsumerClient interface.
6. Defining the mandatory callbacks
The OmmConsumerClient interface needs to contains the mandatory callback functions to capture the different events generated when the application registers interest in an item as follows.
class AppClient : OmmConsumerClient {
override fun onRefreshMsg(refreshMsg: RefreshMsg, event: OmmConsumerEvent) {
println("Received Refresh. Item Handle: ${event.handle()} Closure: ${event.closure()}")
println("Item Name: ${if (refreshMsg.hasName()) refreshMsg.name() else "<not set>"}")
println("Service Name: ${if (refreshMsg.hasServiceName()) refreshMsg.serviceName() else "<not set>"}")
println("Item State: ${refreshMsg.state()}")
println(refreshMsg)
}
override fun onUpdateMsg(updateMsg: UpdateMsg, event: OmmConsumerEvent) {
println("Received Update. Item Handle: ${event.handle()} Closure: ${event.closure()}")
println("Item Name: ${if (updateMsg.hasName()) updateMsg.name() else "<not set>"}")
println("Service Name: ${if (updateMsg.hasServiceName()) updateMsg.serviceName() else "<not set>"}")
println(updateMsg)
}
override fun onStatusMsg(statusMsg: StatusMsg, event: OmmConsumerEvent) {
println("Received Status. Item Handle: ${event.handle()} Closure: ${event.closure()}")
println("Item Name: ${if (statusMsg.hasName()) statusMsg.name() else "<not set>"}")
println("Service Name: ${if (statusMsg.hasServiceName()) statusMsg.serviceName() else "<not set>"}")
println(statusMsg)
}
override fun onAckMsg(ackMsg: AckMsg, event: OmmConsumerEvent) {}
override fun onAllMsg(allMsg: Msg, event: OmmConsumerEvent) {}
override fun onGenericMsg(genericMsg: GenericMsg, event: OmmConsumerEvent) {}
}
Now the AppClient class can receive and print incoming data from the API.
7. Handling Login Stream Messages
Since the KonsumerRTO class has registered the Login stream, the Login stream event messages will come to the AppClient as well. To handle the Login stream message, you can check the incoming message domain type in the onRefreshMsg and onStatusMsg callback methods to parse the Login stream message accordingly
class AppClient : OmmConsumerClient {
private val _loginRefresh: LoginRefresh = EmaFactory.Domain.createLoginRefresh()
private val _loginStatus: LoginStatus = EmaFactory.Domain.createLoginStatus()
override fun onRefreshMsg(refreshMsg: RefreshMsg, event: OmmConsumerEvent) {
...
if (refreshMsg.dataType() == EmaRdm.MMT_LOGIN) {
_loginRefresh.clear()
println(_loginRefresh.message(refreshMsg).toString())
} else {
println(refreshMsg)
}
println()
}
override fun onStatusMsg(statusMsg: StatusMsg, event: OmmConsumerEvent) {
...
if (statusMsg.domainType() == EmaRdm.MMT_LOGIN) {
_loginStatus.clear()
println(_loginStatus.message(statusMsg).toString())
}
println()
}
}
Example messages:
Received Refresh. Item Handle: 1 Closure: null
Item Name: xXXXXXXXXXXXXXXX
Service Name: <not set>
Item State: Open / Ok / None / 'Login accepted by host ads-fanout-sm-az1-apse1-prd.'
AllowSuspectData : true
ApplicationId : 256
ApplicationName : RTO
Position : 192.168.XX.XXX/WIN-XXXXXX
ProvidePermissionExpressions : true
ProvidePermissionProfile : false
SingleOpen : true
SupportBatchRequests : 7
SupportOMMPost : true
SupportOptimizedPauseResume : false
SupportViewRequests : true
SupportStandby : true
SupportEnhancedSymbolList : 1
AuthenticationErrorCode : 0
Solicited : true
UserName : xXXXXXXXXXXXXXXX
UserNameType : 1
State : StreamState: 1 DataState: 1 StatusCode: 0StatusText: Login accepted by host ads-fanout-sm-az1-apse1-prd.
Now you can monitor the connectivity health from the Login stream messages.
8. Handling incoming messages Field-By-Field
Now, what about the market price message handling. The code above just prints incoming messages "as is" which is not be useful. I am implementing the decode method to iterate incoming data's FieldList object and handle data field by field. Please be noticed that the decode method handles only a few data types because the KonsumerRTO uses the View feature to request only interested FIDs, so the method can check only subscription FIDs data types.
class AppClient : OmmConsumerClient {
private val _loginRefresh: LoginRefresh = EmaFactory.Domain.createLoginRefresh()
private val _loginStatus: LoginStatus = EmaFactory.Domain.createLoginStatus()
override fun onRefreshMsg(refreshMsg: RefreshMsg, event: OmmConsumerEvent) {
....
if (refreshMsg.domainType() == EmaRdm.MMT_LOGIN) {
_loginRefresh.clear()
println(_loginRefresh.message(refreshMsg).toString())
} else {
decode(refreshMsg)
}
println()
}
override fun onUpdateMsg(updateMsg: UpdateMsg, event: OmmConsumerEvent) {
....
decode(updateMsg)
println()
}
private fun decode(msg: Msg) {
if (msg.attrib().dataType() == DataType.DataTypes.FIELD_LIST) decode(msg.attrib().fieldList())
if (msg.payload().dataType() == DataType.DataTypes.FIELD_LIST) decode(msg.payload().fieldList())
}
private fun decode(fieldList: FieldList) {
for (fieldEntry: FieldEntry in fieldList) {
print(
"Fid ${fieldEntry.fieldId()} Name = ${fieldEntry.name()} DataType: ${
DataType.asString(
fieldEntry.load().dataType()
)
} Value: "
)
if (Data.DataCode.BLANK == fieldEntry.code()) {
println(" blank")
} else {
when (fieldEntry.loadType()) {
DataType.DataTypes.REAL -> println(fieldEntry.real().asDouble())
DataType.DataTypes.TIME -> println(
"${fieldEntry.time().hour()} : ${fieldEntry.time().minute()} : ${
fieldEntry.time().second()
} : ${fieldEntry.time().millisecond()}"
)
DataType.DataTypes.DATE -> println(
"${fieldEntry.date().day()} / ${fieldEntry.date().month()} / ${fieldEntry.date().year()}"
)
DataType.DataTypes.ENUM -> println(if (fieldEntry.hasEnumDisplay()) fieldEntry.enumDisplay() else fieldEntry.enumValue())
DataType.DataTypes.ERROR -> println(
"${fieldEntry.error().errorCode()} (${fieldEntry.error().errorCodeAsString()})"
)
else -> println()
}
}
}
}
}
Example Messages:
Received Refresh. Item Handle: 2 Closure: null
Item Name: EUR=
Service Name: ELEKTRON_DD
Item State: Open / Ok / None / ''
Fid 15 Name = CURRENCY DataType: Enum Value: USD
Fid 22 Name = BID DataType: Real Value: 1.0942
Fid 25 Name = ASK DataType: Real Value: 1.0943
Fid 875 Name = VALUE_DT1 DataType: Date Value: 15 / 8 / 2023
Fid 1010 Name = VALUE_TS1 DataType: Time Value: 9 : 50 : 6 : 0
Received Update. Item Handle: 2 Closure: null
Item Name: EUR=
Service Name: ELEKTRON_DD
Fid 22 Name = BID DataType: Real Value: 1.094
Fid 25 Name = ASK DataType: Real Value: 1.0944
Fid 875 Name = VALUE_DT1 DataType: Date Value: 15 / 8 / 2023
Fid 1010 Name = VALUE_TS1 DataType: Time Value: 9 : 50 : 8 : 0
That covers the OmmConsumer Client application source code with Kotlin explanation.
How to run the demo application
My next point is how to run the demo application. The first step is to unzip or download the example project folder into a directory of your choice.
Then, go to the project's folder and create a file name .env with the following content.
#Authentication V2
CLIENT_ID=<Client ID V2>
CLIENT_SECRET=<Client Secret V2>
SERVICENAME=<ELEKTRON_DD or ERT_FD3_LF1>
The Kotlin source code can be compiled to Java, so the demo application can run with the same Dockerfile setting as the native Java application
FROM maven:3.9.3-eclipse-temurin-11-alpine as builder
LABEL authors="Developer Relations"
WORKDIR /app
COPY pom.xml .
RUN mvn dependency:go-offline -B
COPY src ./src
RUN mvn clean -e -B package
FROM openjdk:11-jre-slim-bullseye
#FROM openjdk:17.0.2-slim-bullseye
WORKDIR /app
COPY --from=builder /app/target/RTO_Kotlin-1.0-jar-with-dependencies.jar .
COPY EmaConfig.xml .
# run RTO_Kotlin-1.0-jar-with-dependencies.jar with CMD
CMD ["java", "-jar", "./RTO_Kotlin-1.0-jar-with-dependencies.jar"]
To build a Docker image, run the following command
docker build . -t kotlin_rto
Once the building process is success, run the following command to run a Docker container:
docker run -it --name kotlin_rto --env-file .env kotlin_rto
To stop and delete a Docker container, press Ctrl+C (or run docker stop kotlin_rto) then run the docker rm kotlin_rto command.
To delete a Docker image, run the docker rmi kotlin_rto after a container is removed.
That covers how to run an example.
Conclusion
Before I finish, let me just say Kotlin is now a rising star cross-platform, general-purpose programming language. The language has been used by both mobile, front-end, and the back-end developers. Kotlin lets developers implements a shorter and easier-to-read source code while maintaining full compatibility with Java.
The Java language is trying to simplify itself via the JEP 445 Unnamed Classes and Instance Main Methods specification which is currently available as a preview feature of Java version 21. However, it takes time until Java developers can migrate their supported JVM to Java 21. But with Kotlin, developers can build applications with concise, simply, and expressive, code with fully supports the current JVM versions without waiting for Java 21.
This language simplicity helps developers implements the Real-Time application using EMA in a simple way that simpler than implement on the native-Java.
That’s all I have to say about Kotlin and RTO.
References
For further details, please check out the following resources:
- Refinitiv Real-Time SDK Java page on the Refinitiv Developer Community web site.
- Refinitiv Real-Time SDK Family page.
- Enterprise Message API Java Quick Start
- Developer Webinar: Introduction to Enterprise App Creation With Open-Source Enterprise Message API
- Developer Article: 10 important things you need to know before you write an Enterprise Real Time application
- Changes to Customer Access and Identity Management: Refinitiv Real-Time - Optimized
- Kotlin programming language: Official page.
- Kotlin Getting Started Guide
- Kotlin comparison to Java
- Get started with Kotlin/JVM
- Kotlin Build tools: Maven
- IntelliJ IDEA: Get started with Kotlin
- How to Implement EMA Java Application with Kotlin Language article
- Kotlin Brand Assets
For any question related to this article or the RTSDK page, please use the Developer Community Q&A Forum.