

Wasin Waeosri
Developer Advocate
Developer Advocate
Overview
The Client File Store (CFS) is a capability of Delivery Platform (aka Data Platform or RDP - formerly known as Refinitiv Data Platform) that provides authorization and enables access to content files stored in publisher repositories. LSEG provides various content file domains (aka bucket) for consumers such as CFS ESG data, Green Revenue data, Symbology data, Tick History, Starmine, Municipal Market Monitor (TM3) much more.
A consumer can get a bulk file via a series of HTTP RESTful RDP and CFS APIs calls. The "Workflow" of these APIs calls might be to hard for some users who used to familiar with the legacy SFTP connection. That is why I am creating this article to demonstrate a workflow using Postman as a simple tool to guide you to get your file.
This article is a simplify version of my previous article, A Step-By-Step Workflow Guide for RDP Client File Store (CFS) API which got a lot of feedback that it is too complex for non-technical people.
For the Municipal Market Monitor (TM3) file users: There is another article aims for your TM3 bulk file available on the A Step By Step Guide for Getting Municipal Market Monitor (TM3) Bulk File Using C# article. I highly recommend you check it.
Important Note
I am demonstrating with the Municipal Market Monitor (TM3) bulk file (bucket=bulk-Custom). However, you can change a bucket name to other supported bucket name (bulk-ESG, bulk-GreenRevenue,bulk-Symbology,bulk-FMRD, etc.). The workflow are the same.
The actual Bulk files are hosted on the Cloud (currently supports only Amazon S3).
Please note that this Postman collection is intended for demonstration purposes only. It is not optimized for production use.
The collections and environment files have been tested on Postman Enterprise and Insomnia version 11.1.0.
Introduction to Postman
Postman application is a universal remote for talking to APIs and websites. Postman provides a clear, visual way to interact (run, test, and manage) with APIs request-response messages without needing to write a code for you. It helps teams organize requests, verify that systems work correctly, and share workflows easily.
Introduction to TM3 Bulk File
The Municipal Market Monitor (TM3) is a product providing US Municipal Bond information to clients. All the municipal market information collected from across the globe is consolidated and displayed in TM3 website.
To enhance scalability and leverage modern capabilities, TM3 is migrating its components to the Client File Store (CFS) within the Delivery Platform (aka Data Platform or RDP) on the cloud.
What You Need
Now we come to the prerequisite of getting the TM3 bulk file via the CFS API.
- RDP Machine ID , Password, and App Key credential.
- Access to RDP CFS API and your file.
- Your bucket name package ID (If you are TM3 users, your bucket name is bulk-Custom).
- Postman application.
Please contact your LSEG's representative or Account Manager to help you to access to RDP CFS API.
Overview of the TM3 CFS API Workflow
My next point is an overview of the workflow. An application's workflow can be summarized to the following steps:
Log in to the RDP Authentication Service
Require: Machine ID, Password, App Key Retrieves: access token, refresh token, and expires_in.
Query the File-Set
Require:
- access token in HTTP Authentication header
- bucketname = Your bucket name (bulk-Custom for TM3 data)
- package_id = Your package ID (ask your LSEG contact)
- modifiedSince = Only show files updated after this date
- pageSize = How many results to show (max 100)
Retrieves:
- Array in of Files information in JSON messages. The File-Set is in each files array of each message.
- Handles @nextLink for pagination (if the results are more than 100 entries).
Get the actual File URLfrom the Cloud
Require
- access token in HTTP Authentication header
- File-Set = selected File-Set from Step 2
Download the file from the Actual URL
Download the Bulk file using the actual URL from Step 3.
Refresh Token before expires_in
Require:App Key and refresh token Retrieves: access token, refresh token, and expires_in.
Log out when done
Require:App Key and access token

That covers an application workflow summary.
Postman Workflow
Import the Postman Collection and Environment
Let’s start with how to set up your Postman application. You can download the Postman collection and environment files from GitHub repository. There are 2 files that you need for the workflow:
- TM3 CFS API.postman_collection.json: This collection contain all HTTP requests with the RDP CFS file API. The requests are in ordered from Step 1 to Step 6.
- TM3 CFS Environment.postman_environment.json: This environment contains all parameters consumers need for requesting data with the requests in RDP CFS API Collection (including the credential).
On the Postman application, click on the menu button --> File -> Import... option.
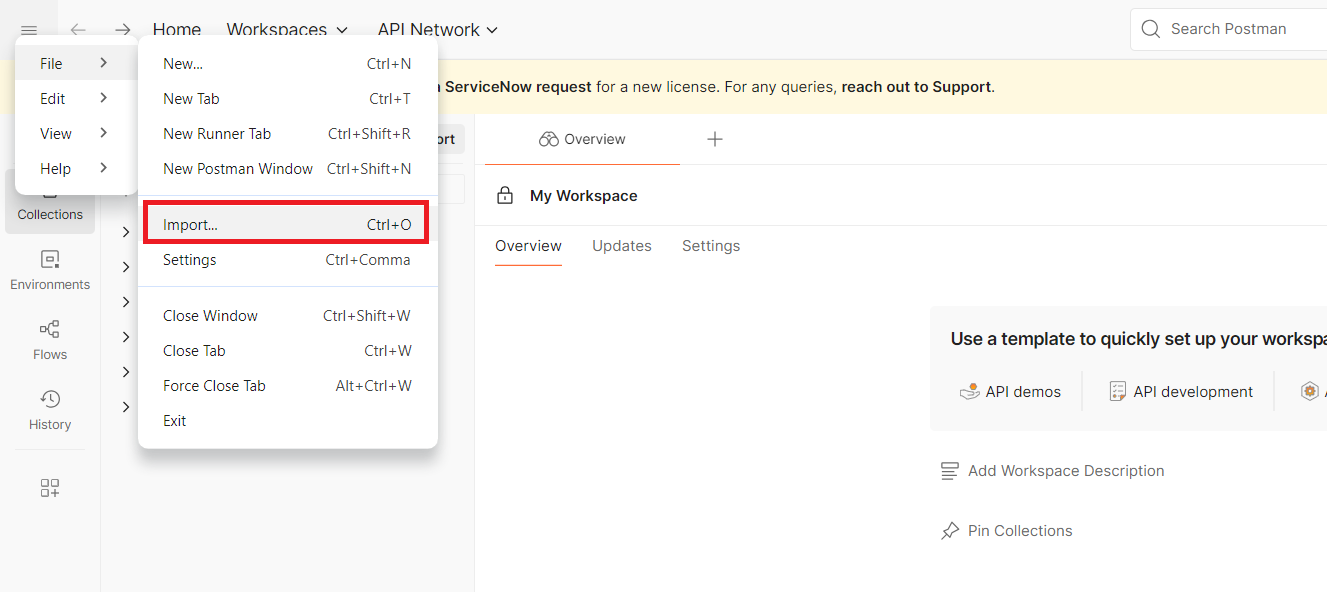
Then the popup window for uploading the files will be appeared.
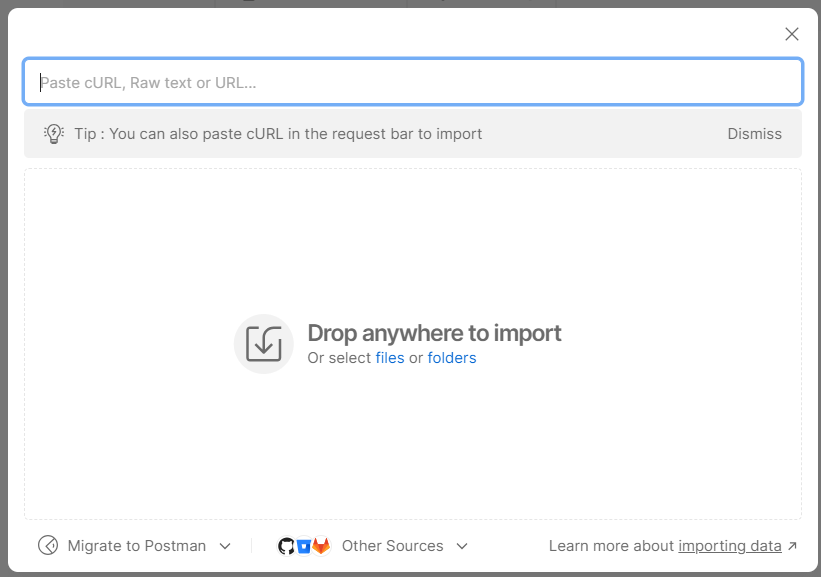
Please upload both TM3 CFS API.postman_collection.json and TM3 CFS Environment.postman_environment.json files.
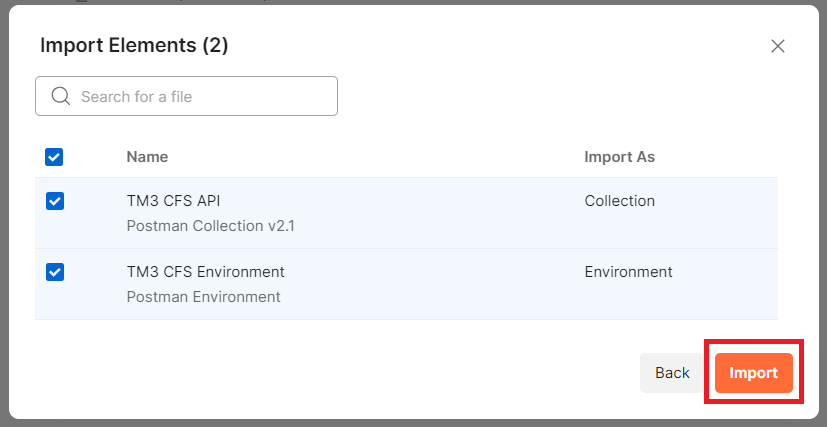
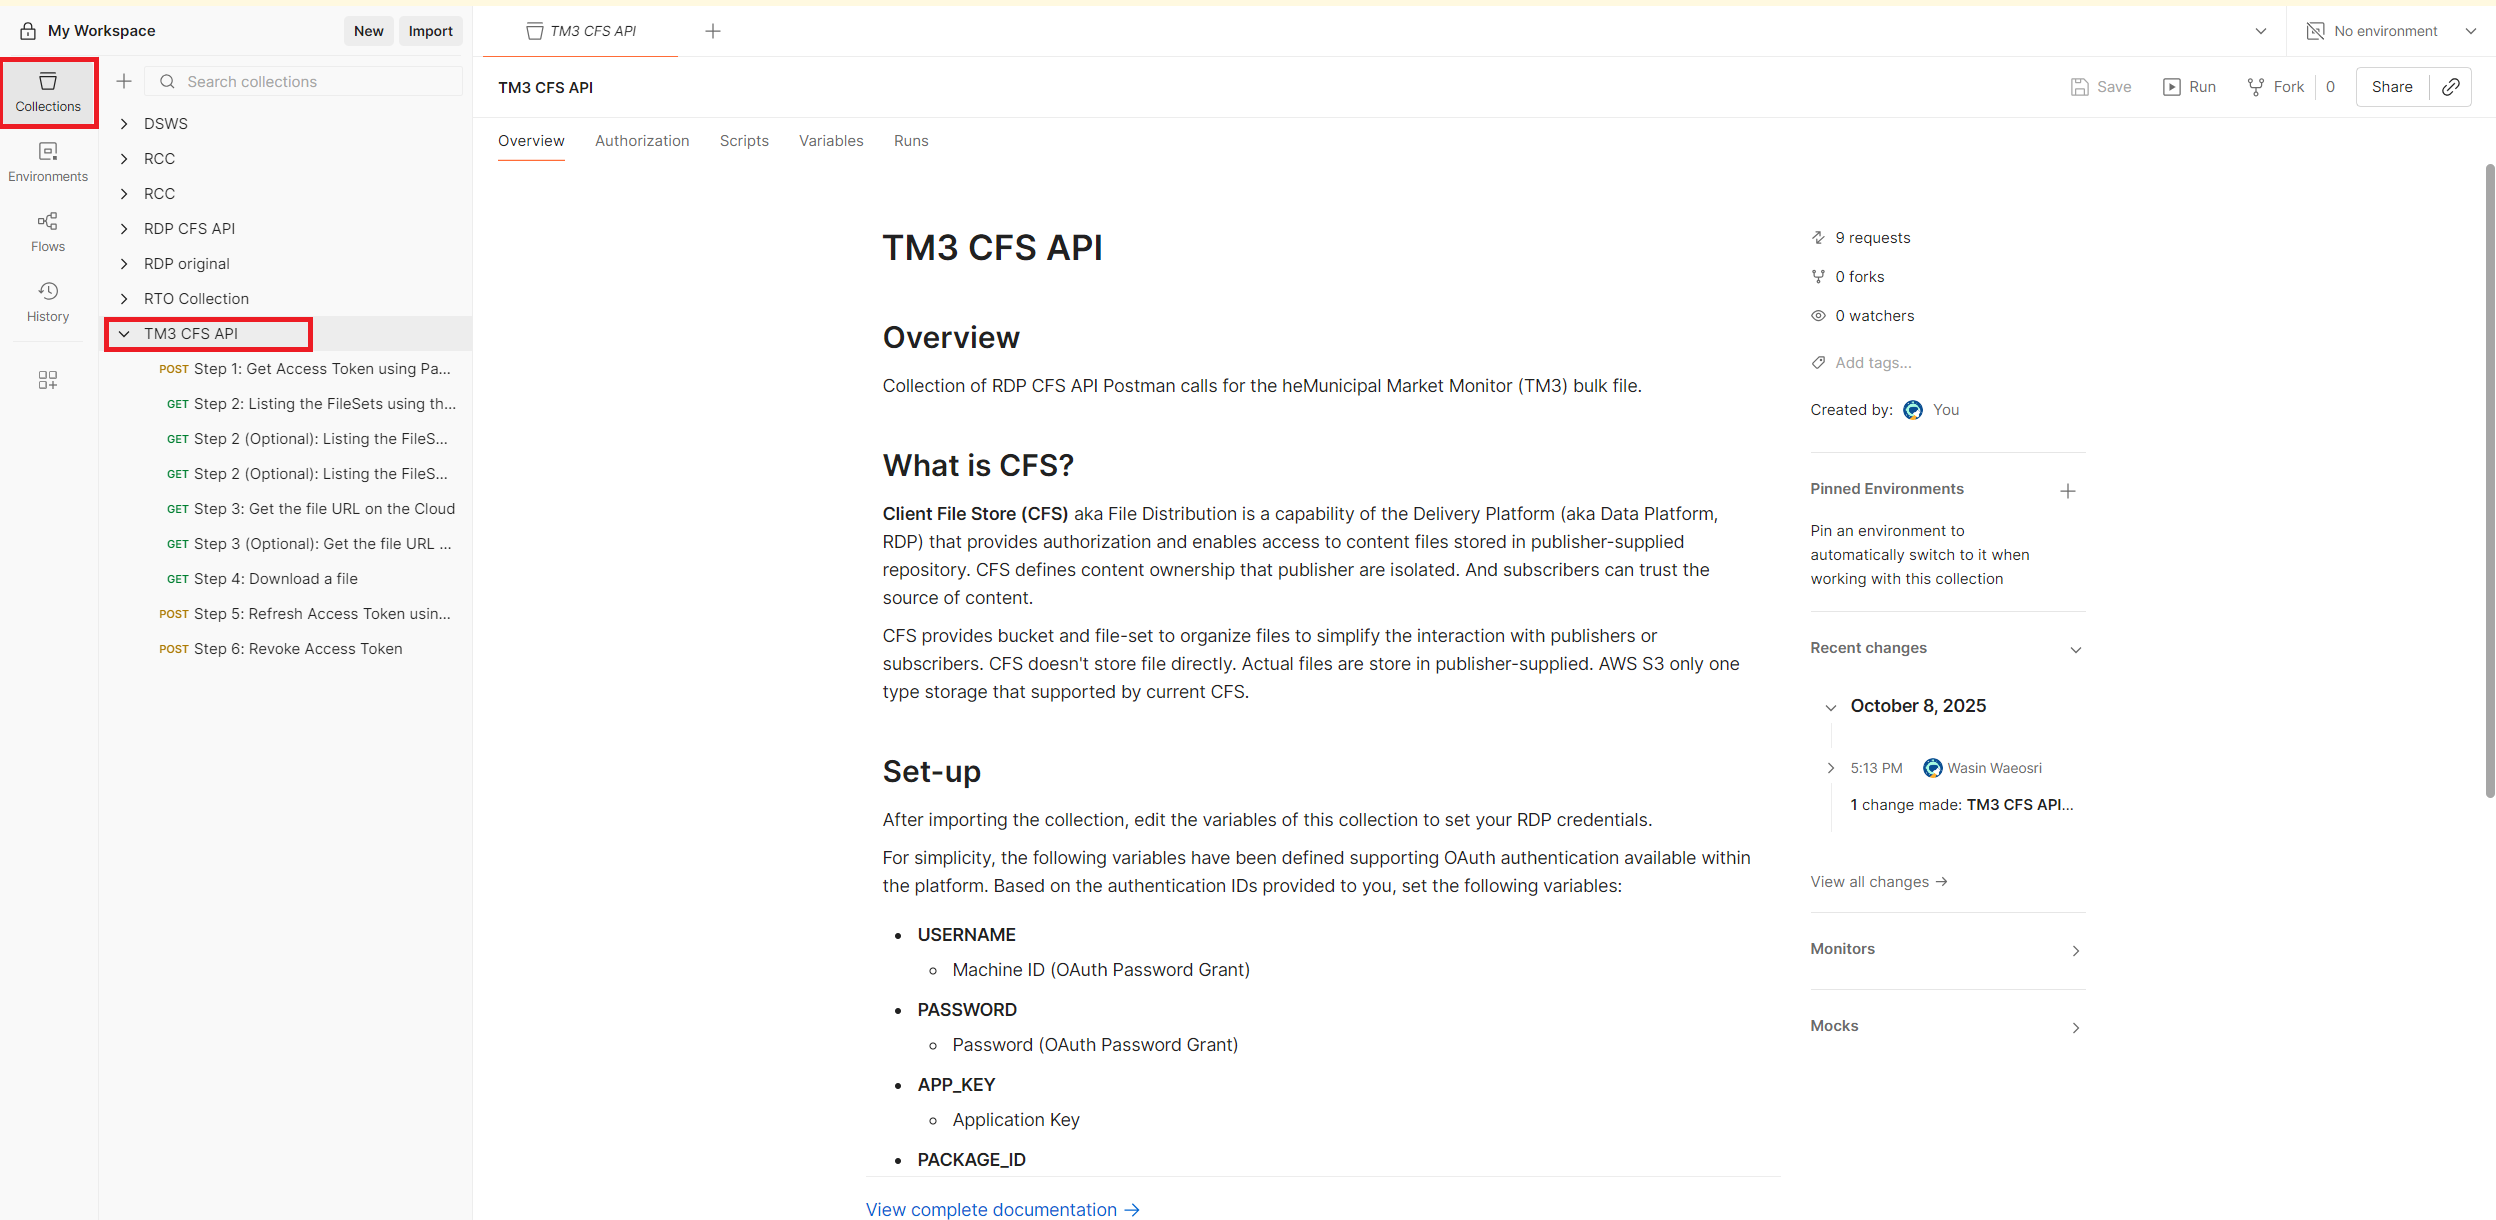
Once the import process is successful, you will see the TM3 CFS API collection on your Postman Collections tab.
Set Your Credential and Package ID
Now let me move on to the next step, setting your RDP credential and package ID to the Environment.
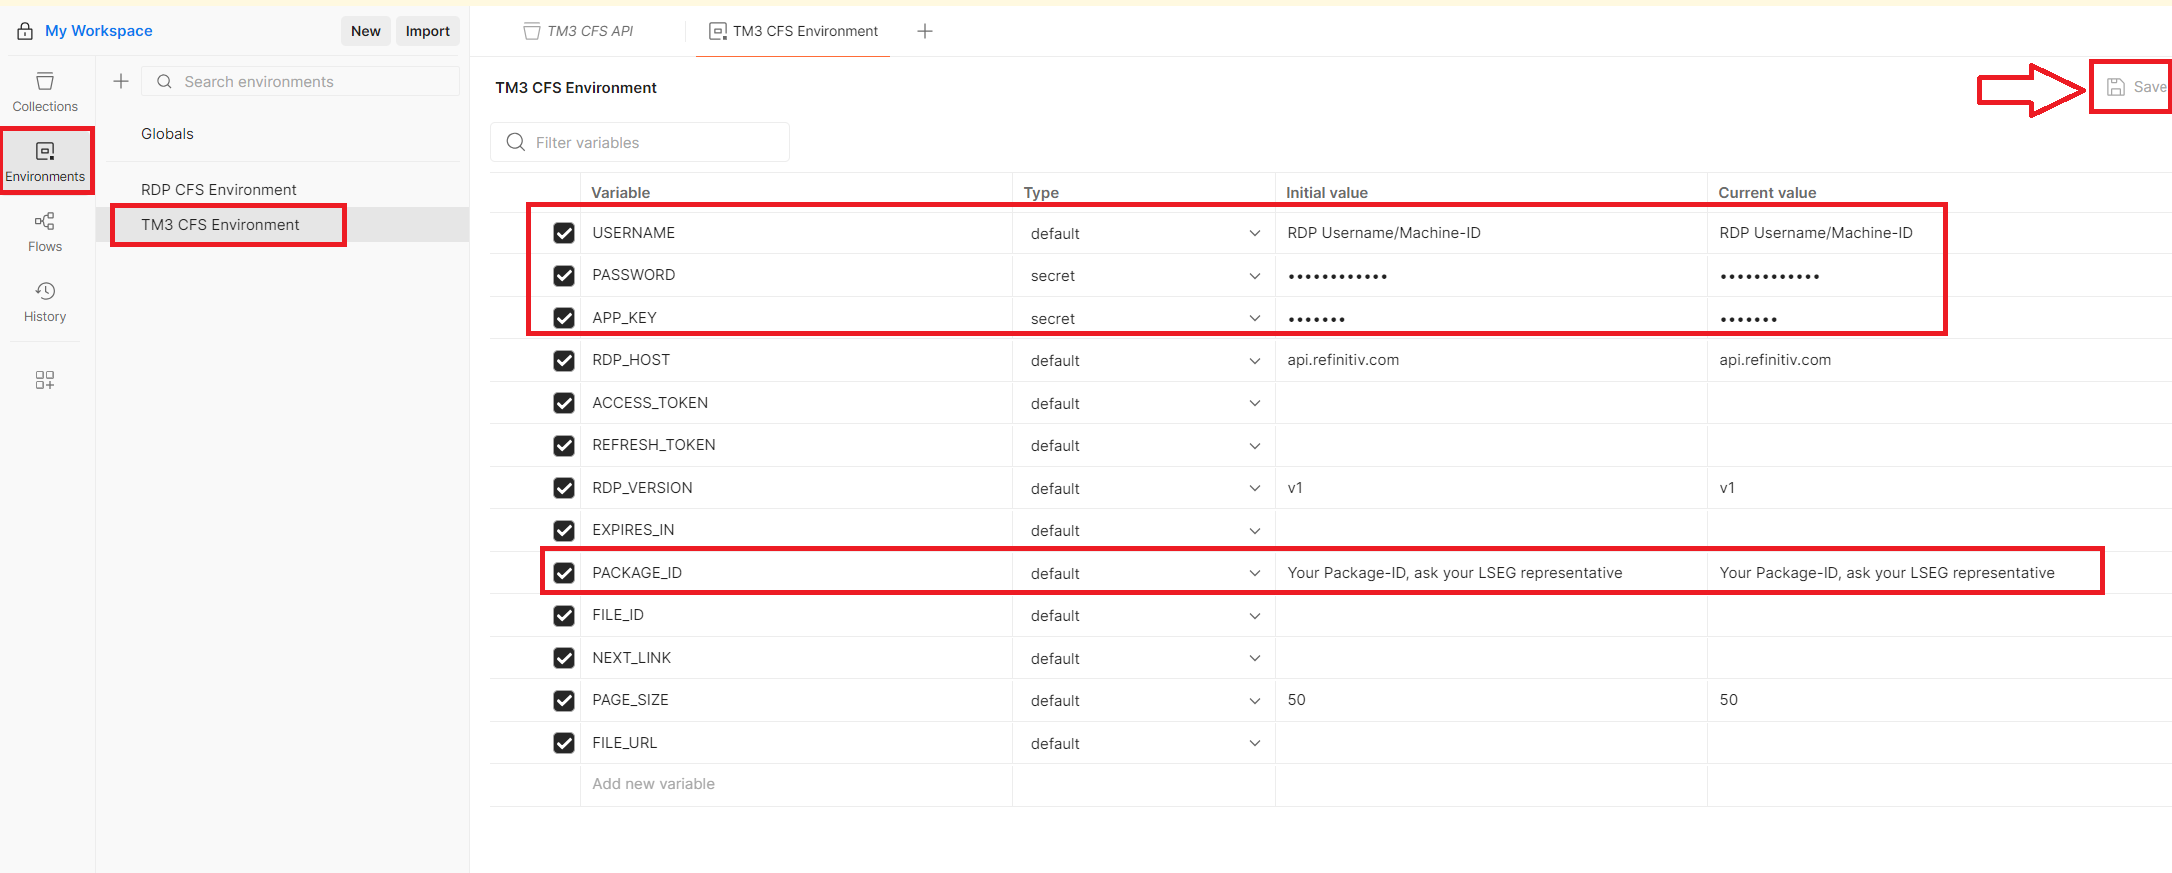
On the Postman Environments tab, click on the TM3 CFS Environment. Then input the following information.
- USERNAME: Your RDP username (email) or Machine-ID
- PASSWORD: Your RDP password
- APP_KEY: Your API App Key. Please refer to this How to get App Key post for more detail.
- PACAKGE_ID: Your bulk file Package ID. Please contact your LSEG representative or Account Manager to get it.
Now, your Postman application is ready for a CFS API workflow.
Step 1: Get Access Token using Password Grant (Machine ID)
Let’s start with the authentication. The first step of an application workflow is to login to RDP Auth Service.
The required credential information is as follow:
- Username: The username/machine-id.
- Password: Password associated with the username/machine-id.
- Client ID (AppKey): A unique ID for your app, created using the App Key Generator. Keep it private.
- Grant Type password: This is for initial authentication request using username/password combination.
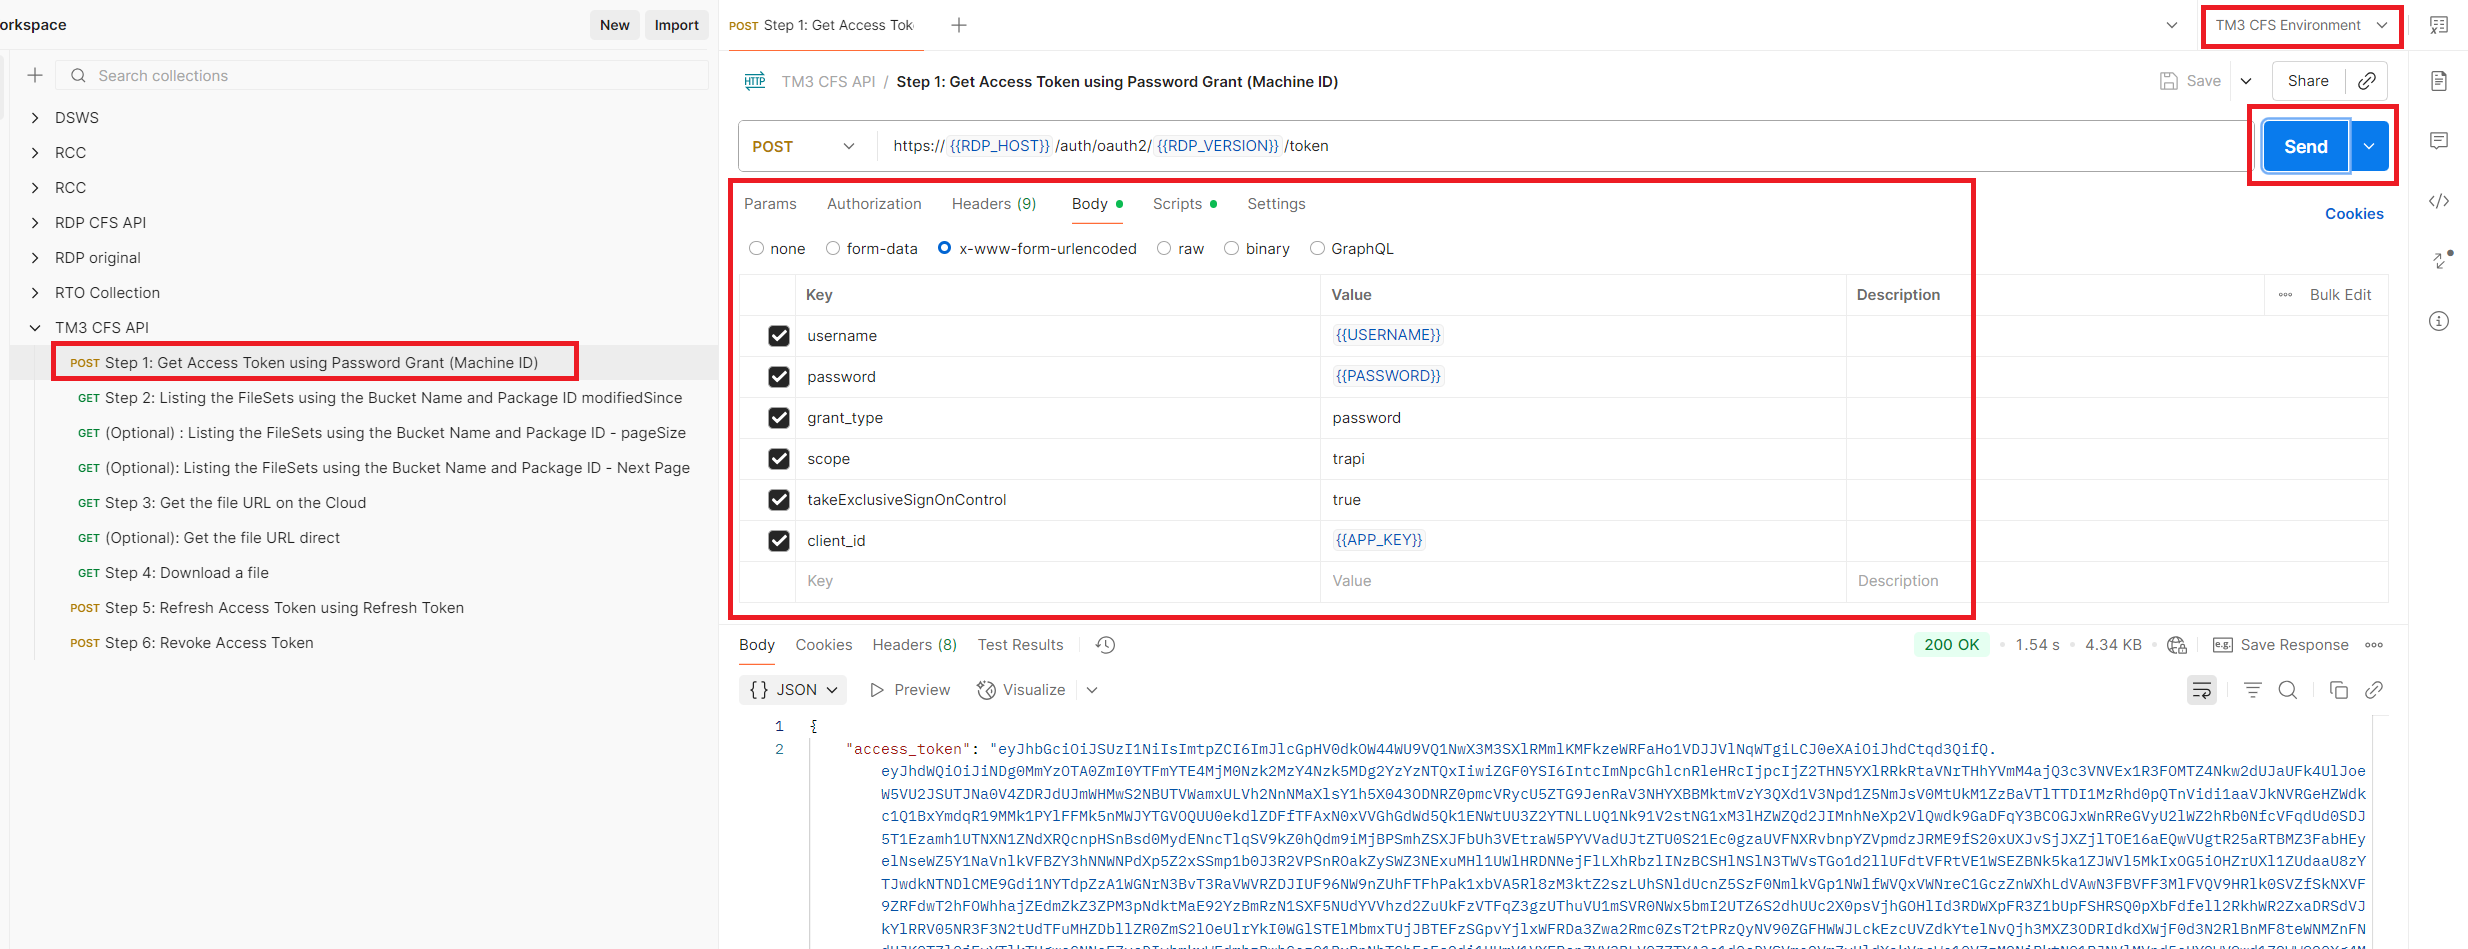
Click on the Postman Collections tab --> TM3 CFS API --> Step 1: Get Access Token using Password Grant (Machine ID) request. Then select the TM3 CFS Environment on the environment list on the top right corner of an application.
You can verify the variables (your credential) and click on the *Send button to send an authentication POST request message to RDP.
Once the authentication success, the function gets the RDP Auth service response message and keeps the following RDP token information in the variables.
- access_token: Used to get data from RDP APIs. Keep this safe for future requests.
- refresh_token: Used to get a new Access Token when the old one is about to expire.
- expires_in: How long (in seconds) the Access Token is valid.
The response message including the token information will be displayed on the screen.
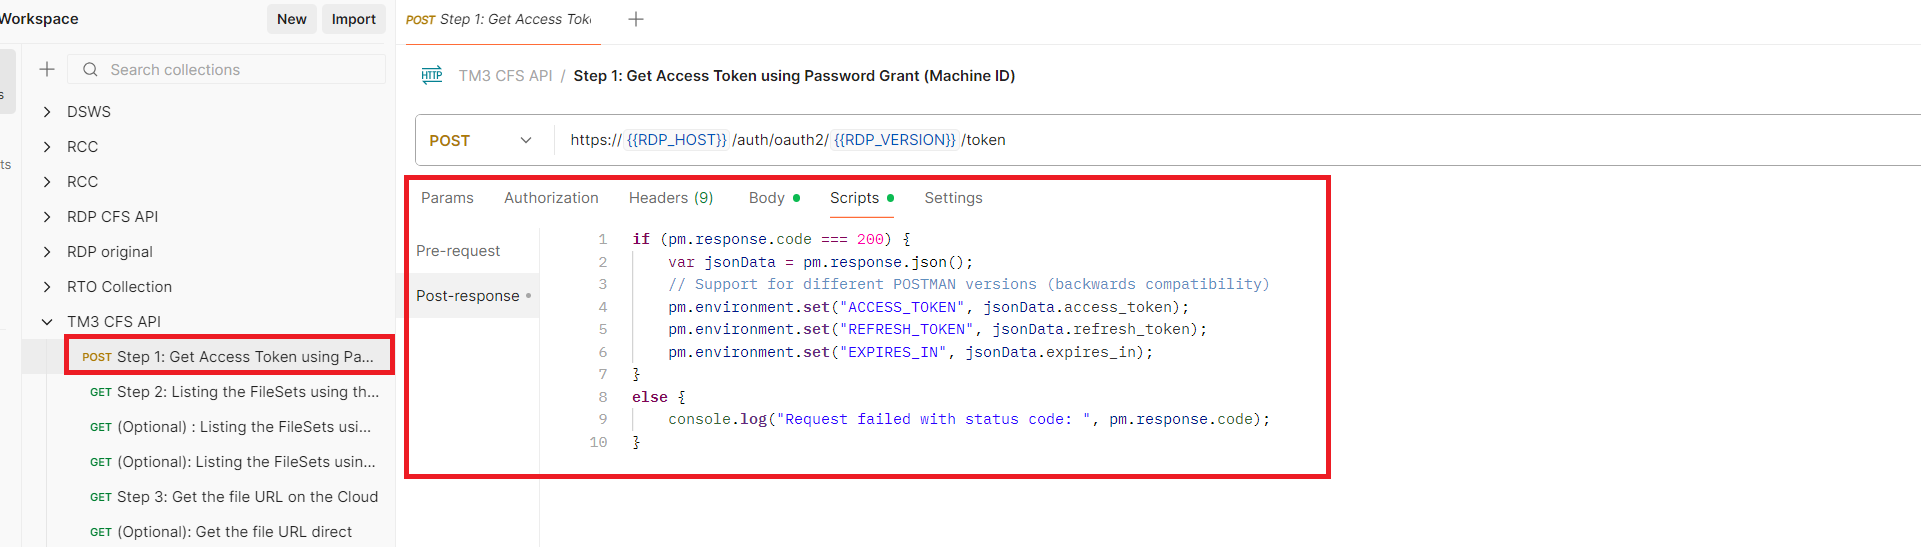
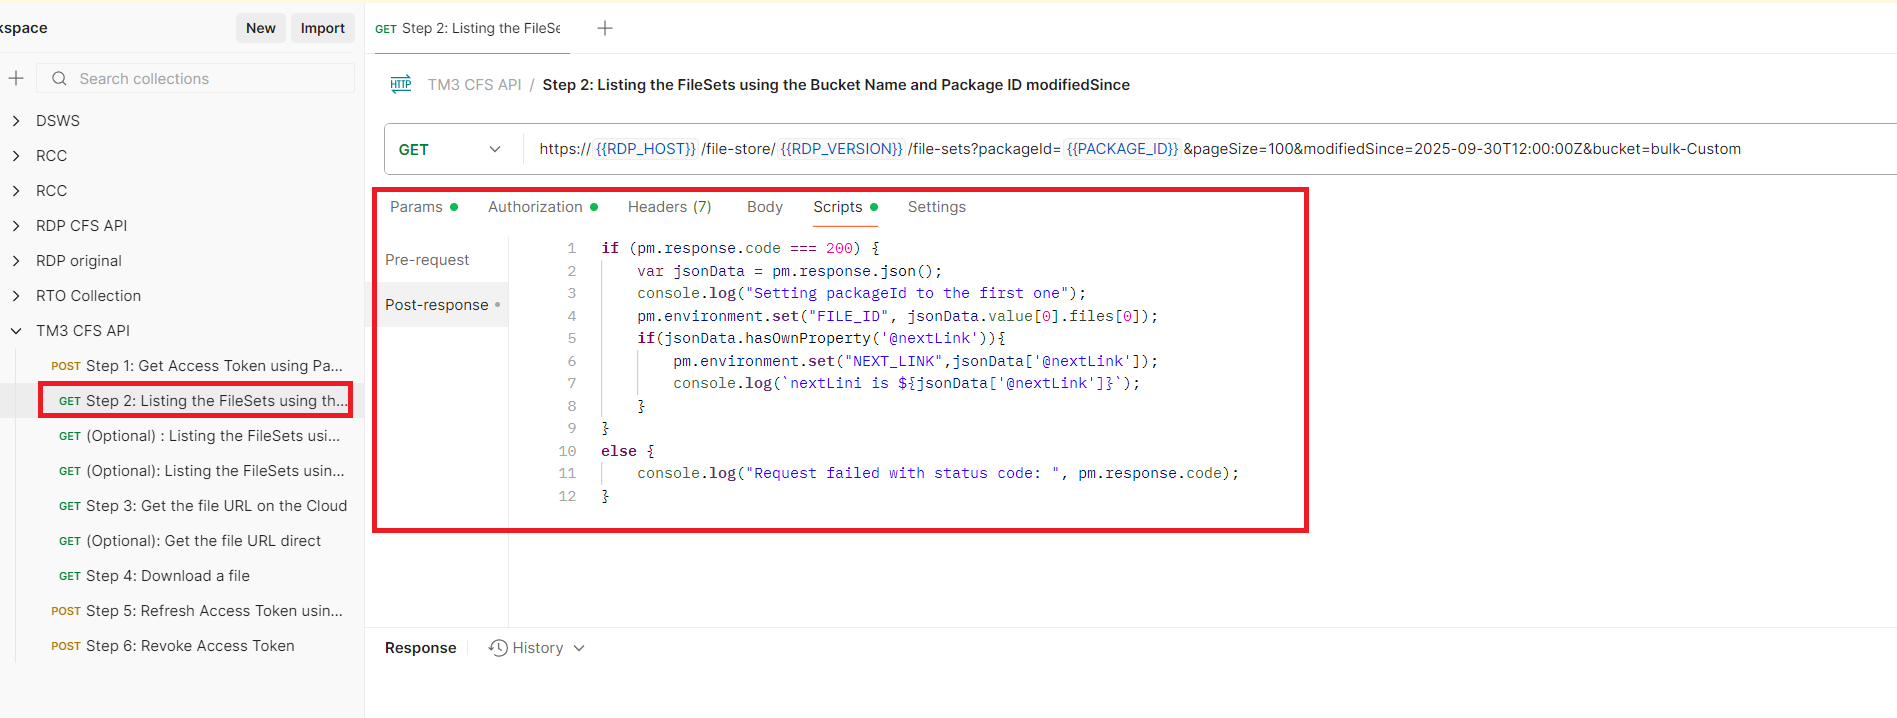
This Postman collection automatic gets and keeps these information using the Scripts feature as follows.
Next, after the application received the Access Token (and authorization token) from RDP Auth Service, all subsequent REST API calls will use this token to get the data. Please find more detail regarding RDP APIs workflow in the following resources:
- RDP APIs: Introduction to the Request-Response API page.
- RDP APIs: Authorization - All about tokens page.
Step 2: Listing the FileSets using the Bucket Name and Package ID modifiedSince
The next step is to getting the FileSets information. The application needs to send an HTTP GET request to the RDP /file-store/v1/file-sets?bucket={bucket-name}&packageId={packageId}&pageSize=100&modifiedSince={modifiedSince} endpoint to list all FileSets under the input bucket-name (always bulk-Custom for TM3) and packageId.
Click on the Step 2: Listing the FileSets using the Bucket Name and Package ID modifiedSince request. Please be noticed that the environment TM3 CFS Environment must be remain selected.
The required information in the request message is as follows:
- An access token in HTTP request message header
- bucket-name = bulk-Custom for TM3 files
- package-id =Your package ID (provided by your LSEG contact)
- pageSize = 100 (returns up to 100 entries; default is 25)
- modifiedSince = Only returns FileSets modified after this timestamp (example 2025-09-12T12:00:00Z). You can change date and time of your query here.
On the request's Authorization tab. You see that the request has set Authentication Type as Bearer Token with Token {{ACCESS_TOKEN}} which the request dynamically set from the Step 1. The reason is every subsequent API requests must include this token in the Authorization header like this:
- Header:
- Authorization = Bearer <RDP Access Token>
Click on the *Send button to send the request message.
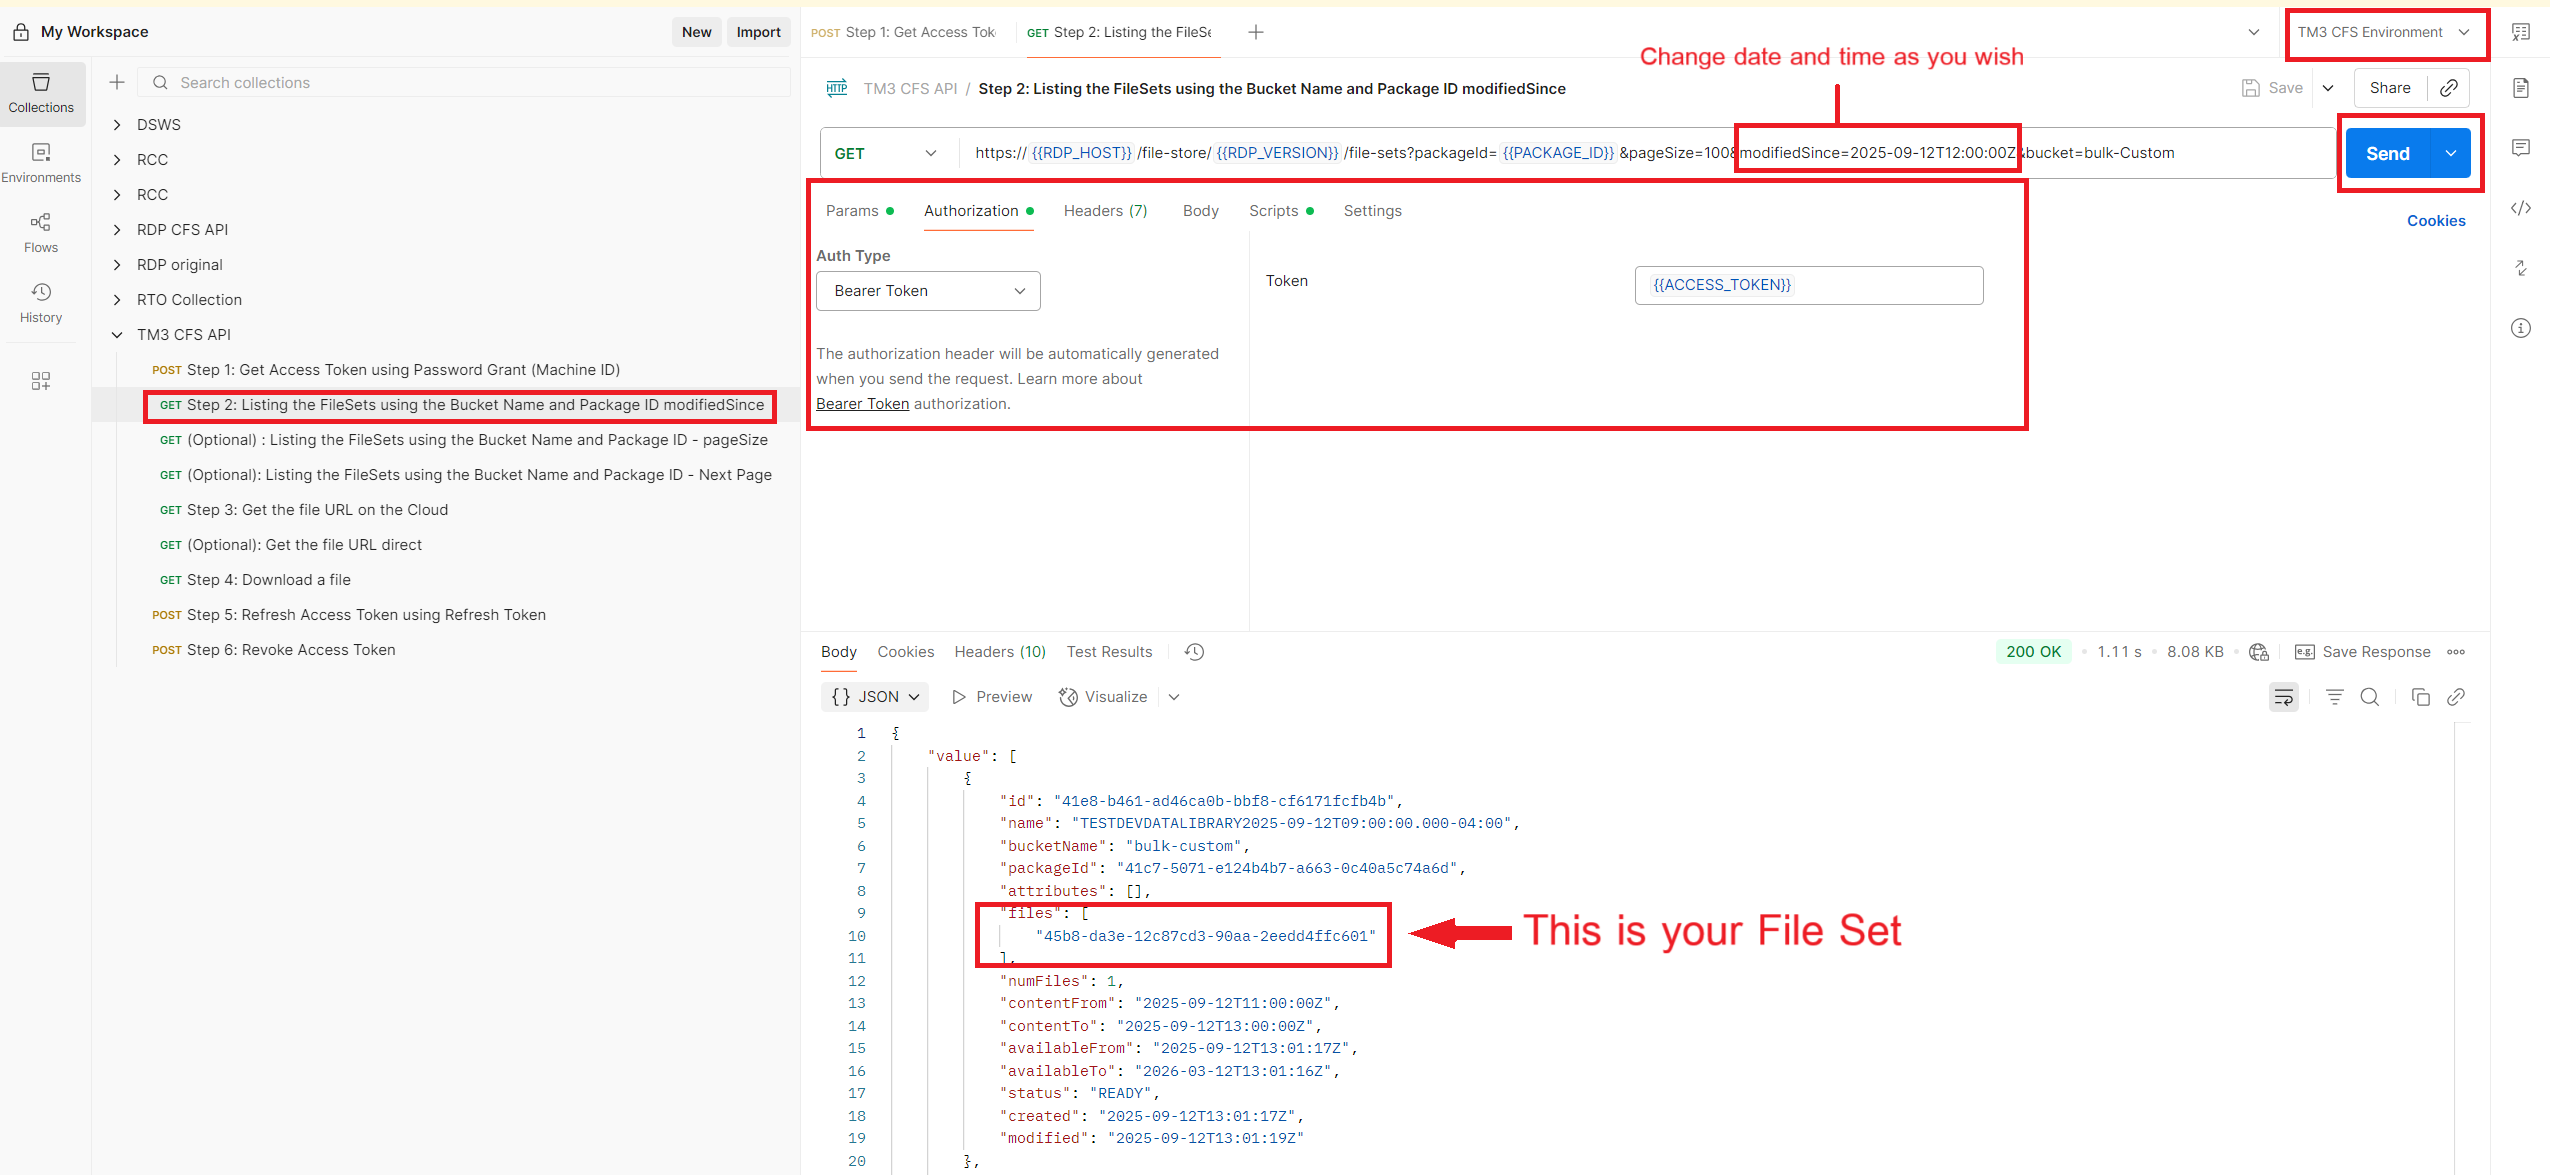
The FileSets responses are in array of JSON message. Please note that a number of data entries can be up to 100 entries per one response message. The example response is shown below:
{
"value": [
{
"id": "41e8-b461-ad46ca0b-bbf8-cf6171fcfb4b",
"name": "TESTDEVDATALIBRARY2025-09-12T09:00:00.000-04:00",
"bucketName": "bulk-custom",
"packageId": "41c7-5071-e124b4b7-a663-0c40a5c74a6d",
"attributes": [],
"files": [
"45b8-da3e-12c87cd3-90aa-2eedd4ffc601"
],
"numFiles": 1,
"contentFrom": "2025-09-12T11:00:00Z",
"contentTo": "2025-09-12T13:00:00Z",
"availableFrom": "2025-09-12T13:01:17Z",
"availableTo": "2026-03-12T13:01:16Z",
"status": "READY",
"created": "2025-09-12T13:01:17Z",
"modified": "2025-09-12T13:01:19Z"
},
{
"id": "46a6-1023-c8c8b578-8acc-099e8307a6dc",
"name": "TESTDEVDATALIBRARY2025-09-12T11:00:00.000-04:00",
"bucketName": "bulk-custom",
"packageId": "41c7-5071-e124b4b7-a663-0c40a5c74a6d",
"attributes": [],
"files": [
"4e24-0015-1b5f5321-ae10-c129e93d3b7d"
],
"numFiles": 1,
"contentFrom": "2025-09-12T13:00:00Z",
"contentTo": "2025-09-12T15:00:00Z",
"availableFrom": "2025-09-12T15:02:12Z",
"availableTo": "2026-03-12T15:02:12Z",
"status": "READY",
"created": "2025-09-12T15:02:12Z",
"modified": "2025-09-12T15:02:15Z"
},
{
"id": "4aed-3224-cdd0d4d7-a49a-b7da7c90cffb",
"name": "TESTDEVDATALIBRARY2025-09-12T13:00:00.000-04:00",
"bucketName": "bulk-custom",
"packageId": "41c7-5071-e124b4b7-a663-0c40a5c74a6d",
"attributes": [],
"files": [
"4a73-df2b-465698a8-a7c0-417899a22cea"
],
"numFiles": 1,
"contentFrom": "2025-09-12T15:00:00Z",
"contentTo": "2025-09-12T17:00:00Z",
"availableFrom": "2025-09-12T17:01:38Z",
"availableTo": "2026-03-12T17:01:38Z",
"status": "READY",
"created": "2025-09-12T17:01:38Z",
"modified": "2025-09-12T17:01:41Z"
},
...
]
}
The File Set is in the files property of each file entry above.
{
"id": "41e8-b461-ad46ca0b-bbf8-cf6171fcfb4b",
"name": "TESTDEVDATALIBRARY2025-09-12T09:00:00.000-04:00",
"bucketName": "bulk-custom",
"packageId": "41c7-5071-e124b4b7-a663-0c40a5c74a6d",
"attributes": [],
"files": [
"45b8-da3e-12c87cd3-90aa-2eedd4ffc601" <--- This is a File Set value
],
"numFiles": 1,
...
}
This Postman collection automatic get the first entry's File Set data (saved to File_ID variable) using the Scripts feature. You can change it as your wish.
Step 2.5: (Optional) Listing the FileSets using the Bucket Name and Package ID - Next Page
When you query the file-sets endpoint, the response may contain more than 100 entries. However, each response can only return up to 100 entries at a time.
If there are more than 100 entries, the response will include a special field called @nextLink, which provides the URL to fetch the next page of results. Here's an example response:
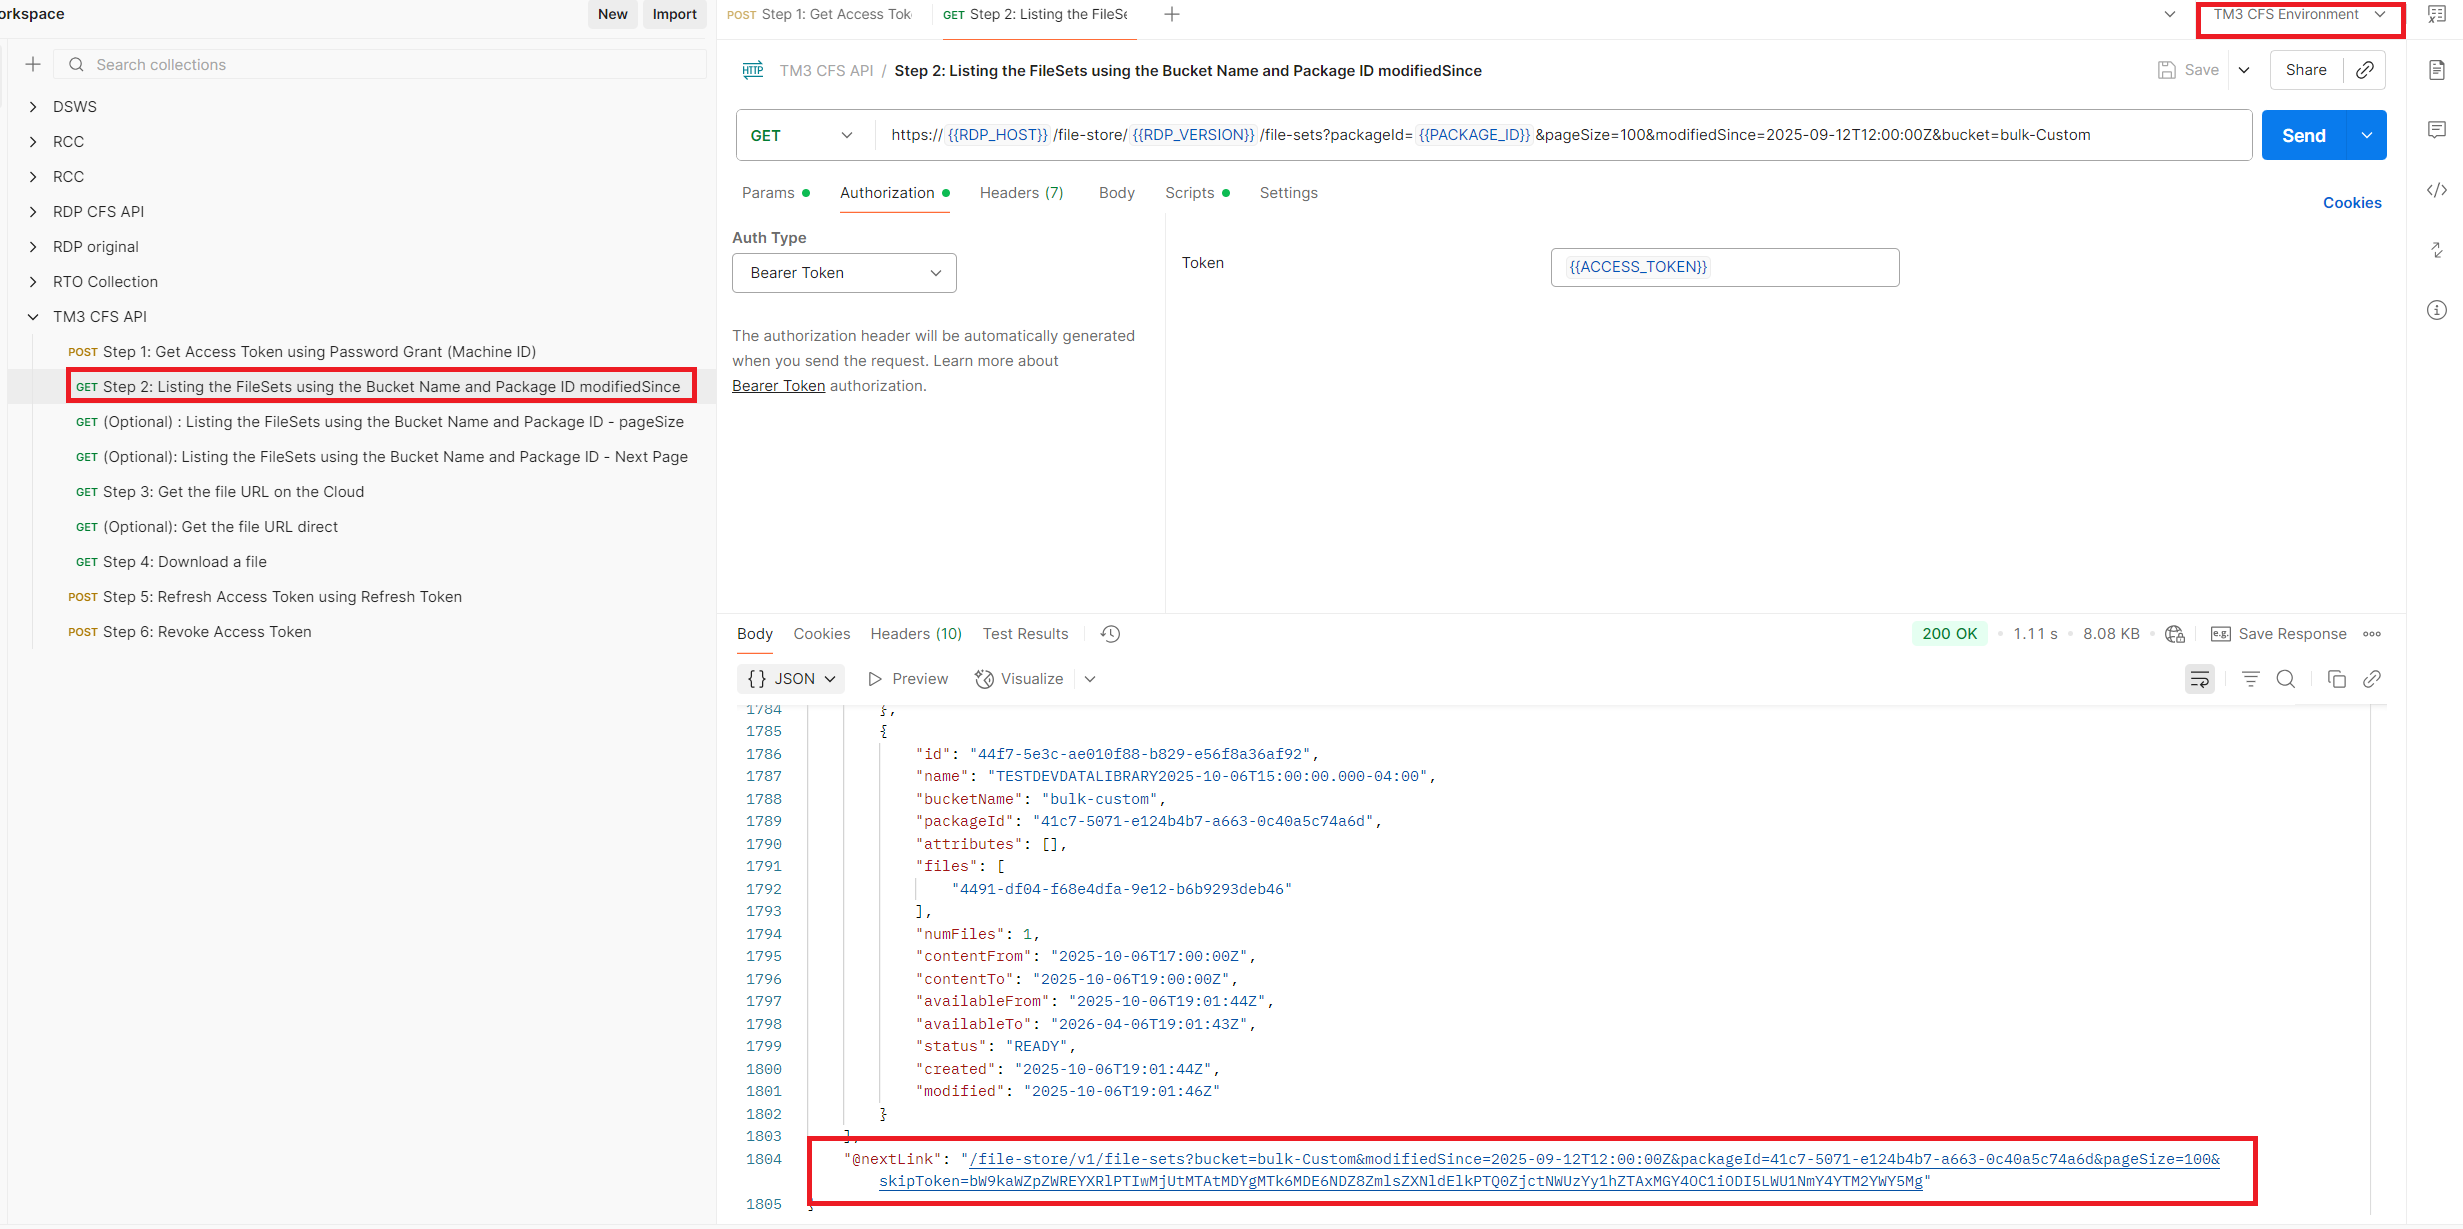
Once you got the @nextLink, you can append it to https://api.refinitiv.com:443 base URL endpoint and request the next (up to 100) data entries.
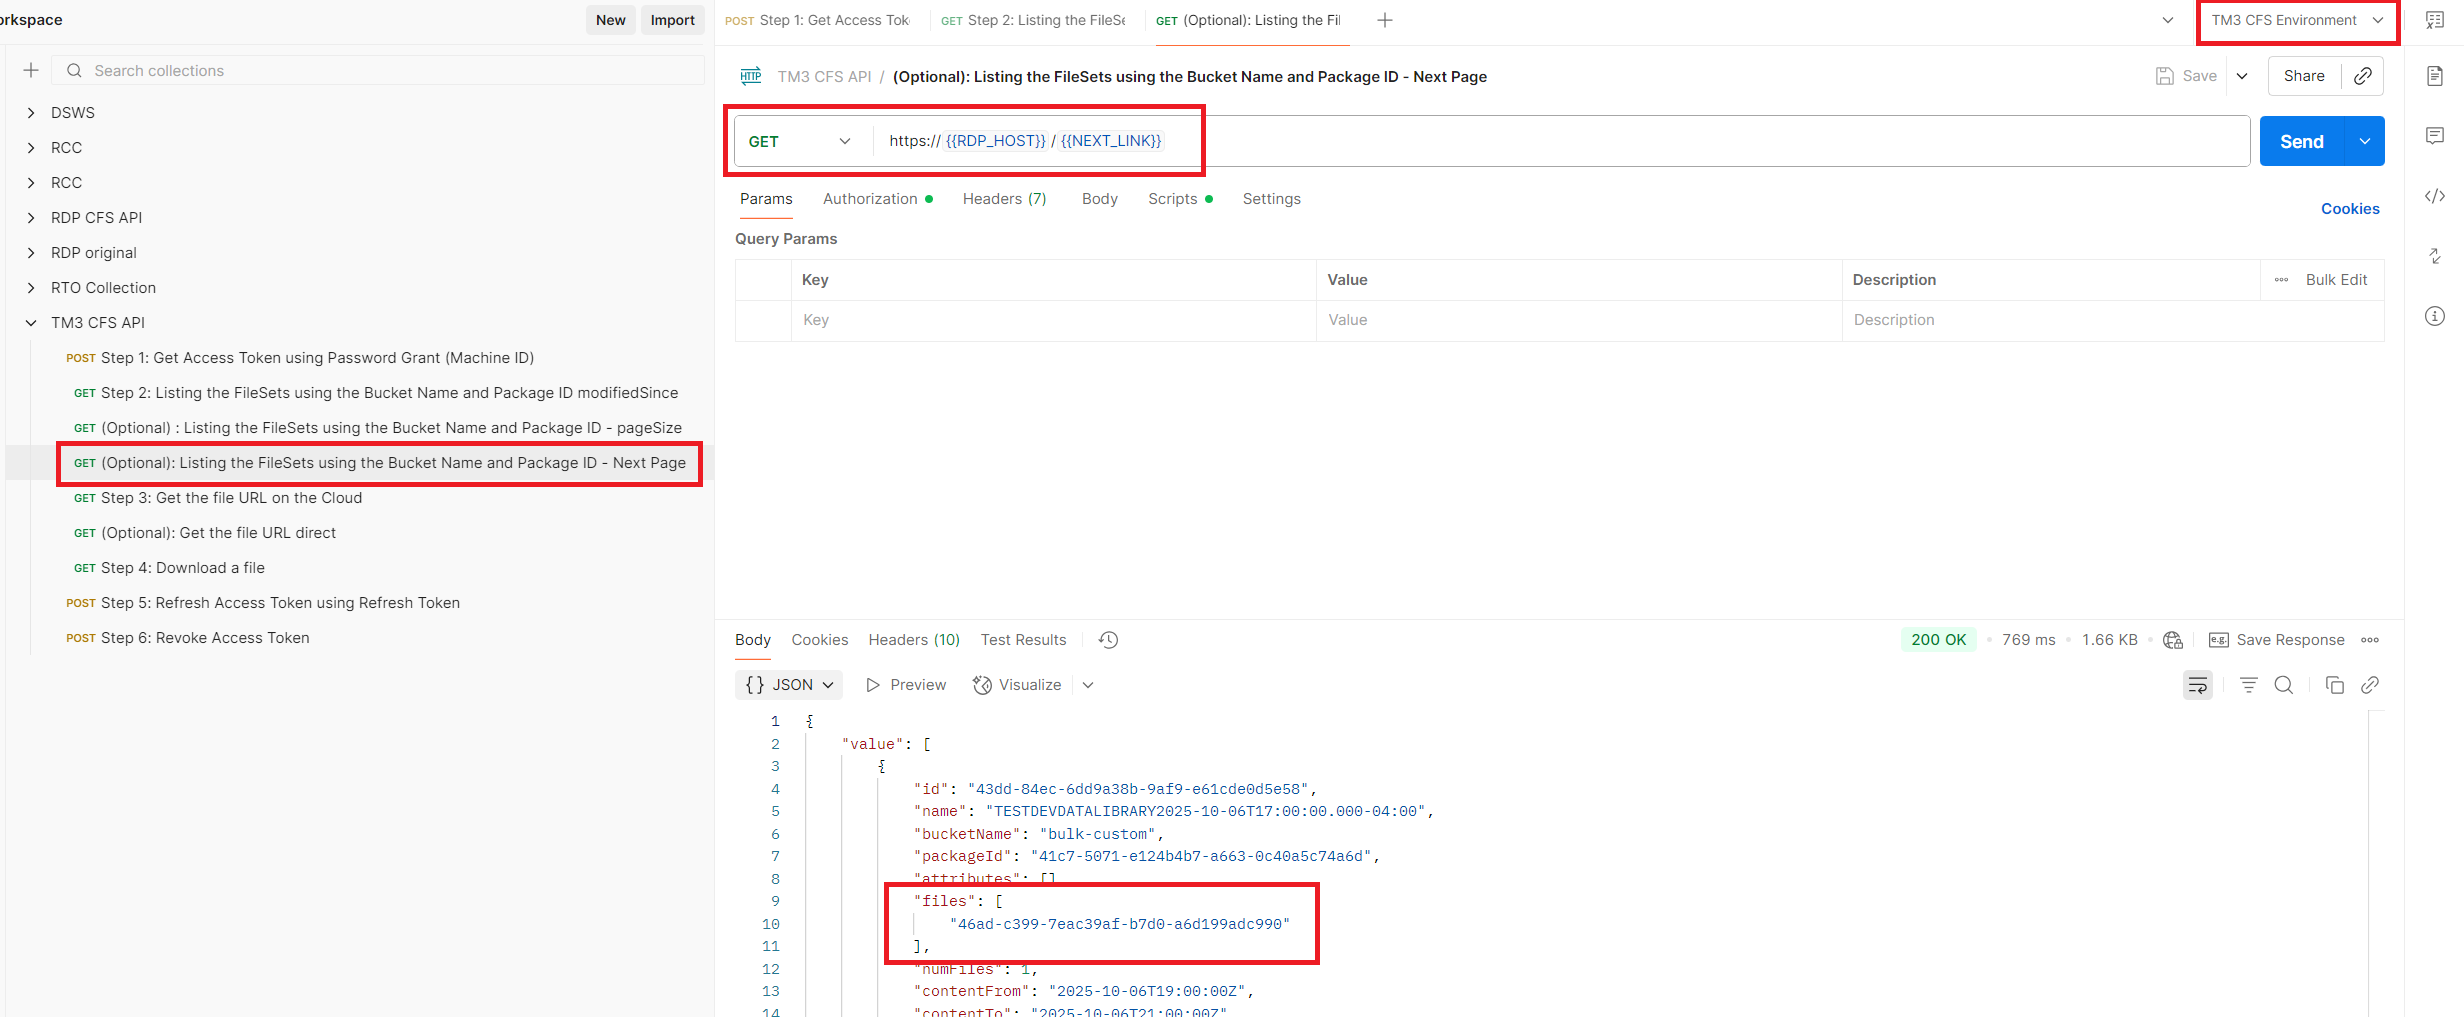
Important Note: an application still need to send an access token in the request message header.
That is all I have to say about how to getting the File Set information.
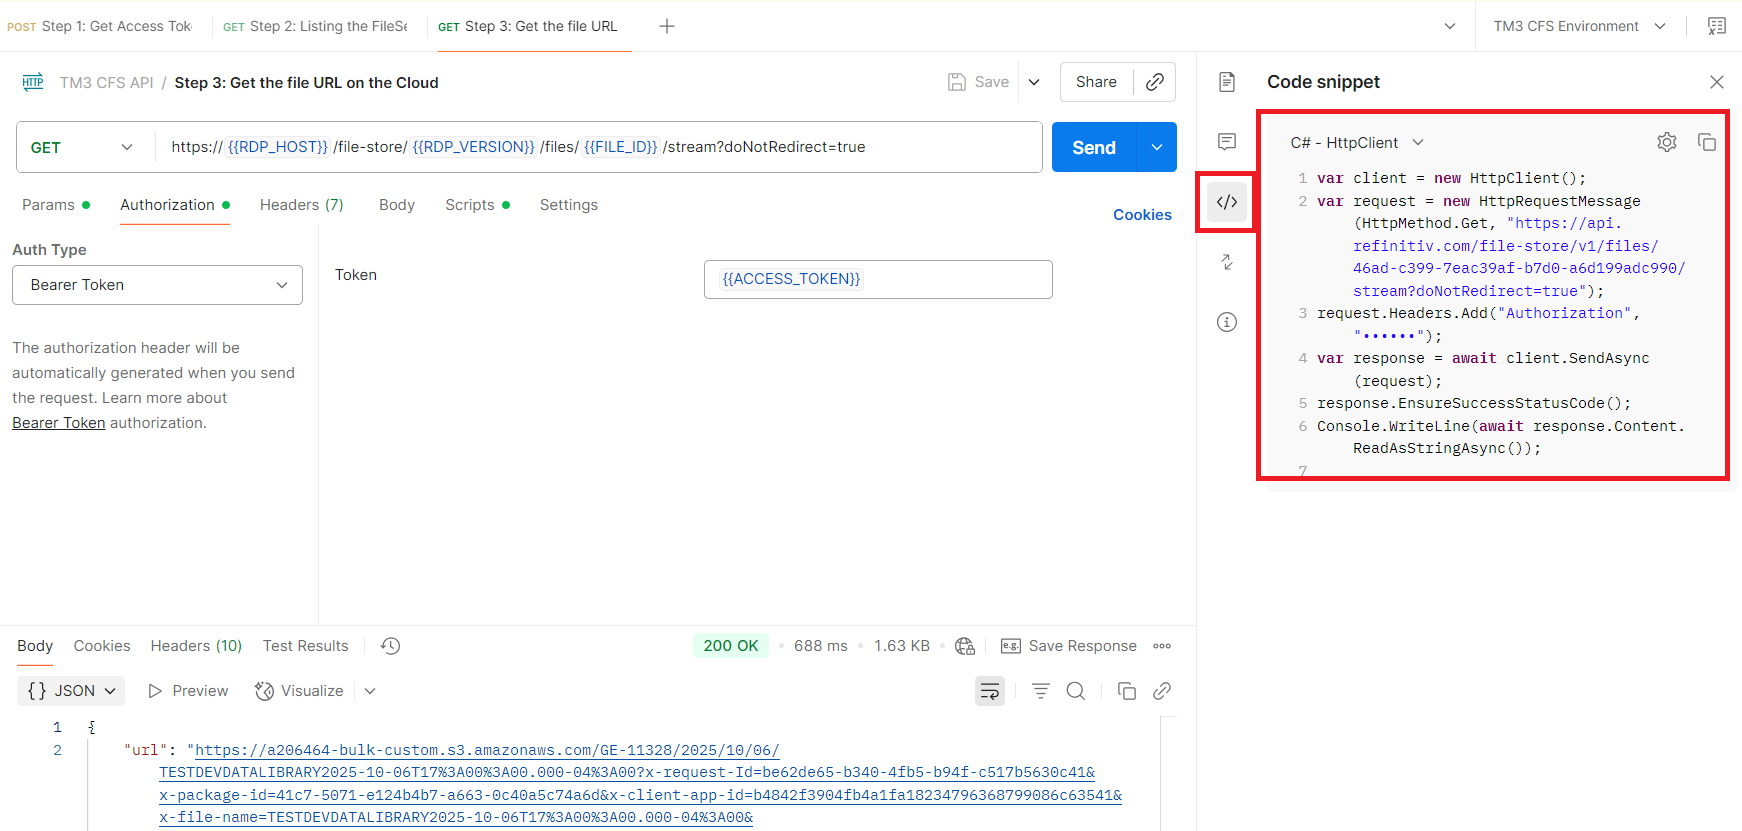
Step 3: Get the actual file URL on the Cloud
Now let me turn to getting the actual file URL on the Cloud (currently supports only Amazon AWS S3 service) with the RDP /file-store/v1/files/{file ID}/stream endpoint.
Click on the Step 3: Get the file URL on the Cloud request. Please be noticed that the environment TM3 CFS Environment must be remain selected. Then, click on the *Send button.
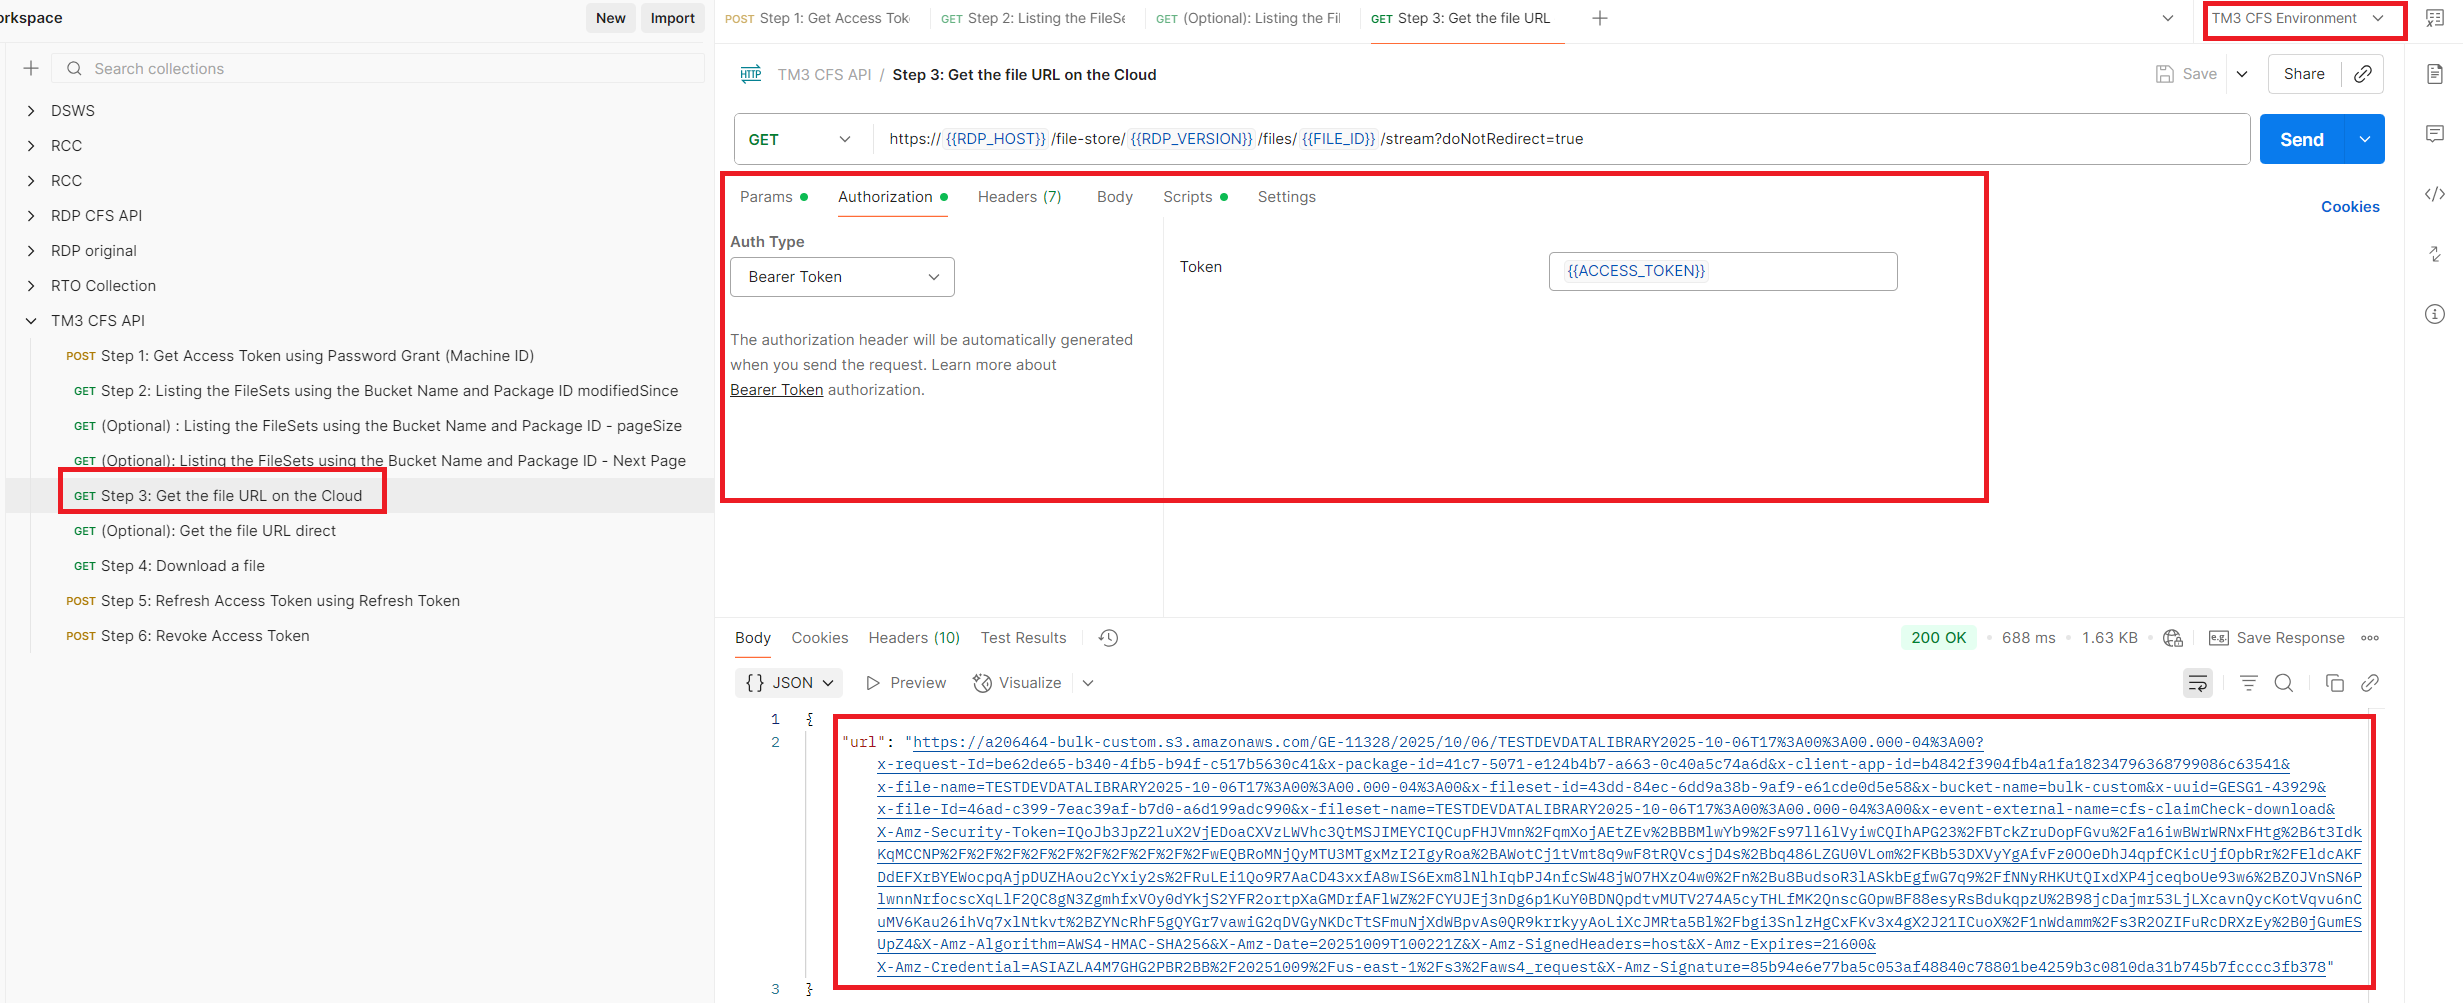
The response message is in JSON message format like an example below.
{
"url": "https://a206464-bulk-custom.s3.amazonaws.com/GE-11328/2025/09/16/TESTDEVDATALIBRARY2025-09-16T13%3A00%3A00.000-04%3A00?x-request-Id=4ed40ee9-ec73-4ee9-a149-f5c19c6aea71&x-package-id=41c7-5071-e124b4b7-a663-0c40a5c74a6d&x-client-app-id=bxxxx"
}
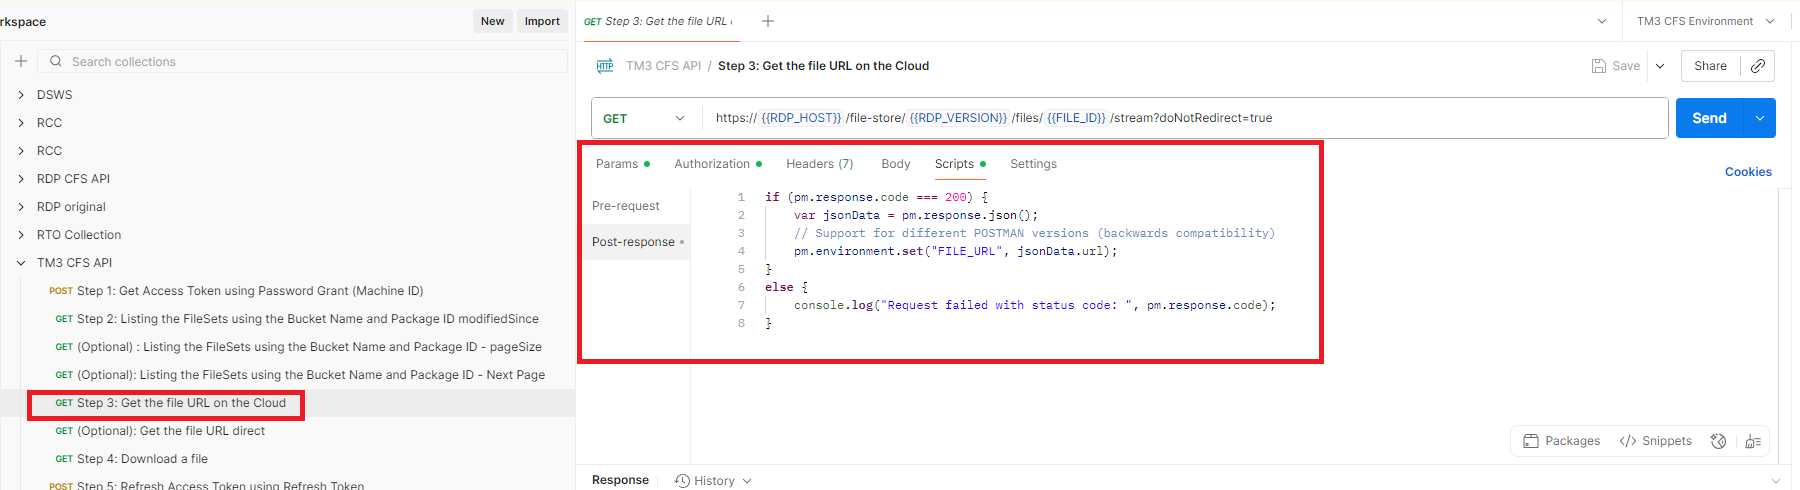
An actual URL of a bulk file is in the url field. You can use this URL to download the file directly from the Cloud (currently supports AWS S3). This Postman collection automatic get url field using the Scripts feature.
Step 4: Downloading the file
That brings us to download the file. The download link (actual URL) will look like this:
https://XXXX.s3.amazonaws.com/XXX/YEAR/MONTH/DATE/{file_name}?x-request-Id={signature}
Examples:
https://a206464-bulk-custom.s3.amazonaws.com/GE-11328/2025/09/16/TESTDEVDATALIBRARY2025-09-16T13%3A00%3A00.000-04%3A00?x-request-Id=signature
An application must use the entire URL exactly as it is to download a bulk file. Do not change anything in the link, or the download will fail due to a signature mismatch error.
Note:
- If you cannot download the file, please wait for a while and then retry download the file from the URL. Please do not flush the download requests.
To download an actual bulk file, click on the Step 4: Download a file request and then click on the Send button.
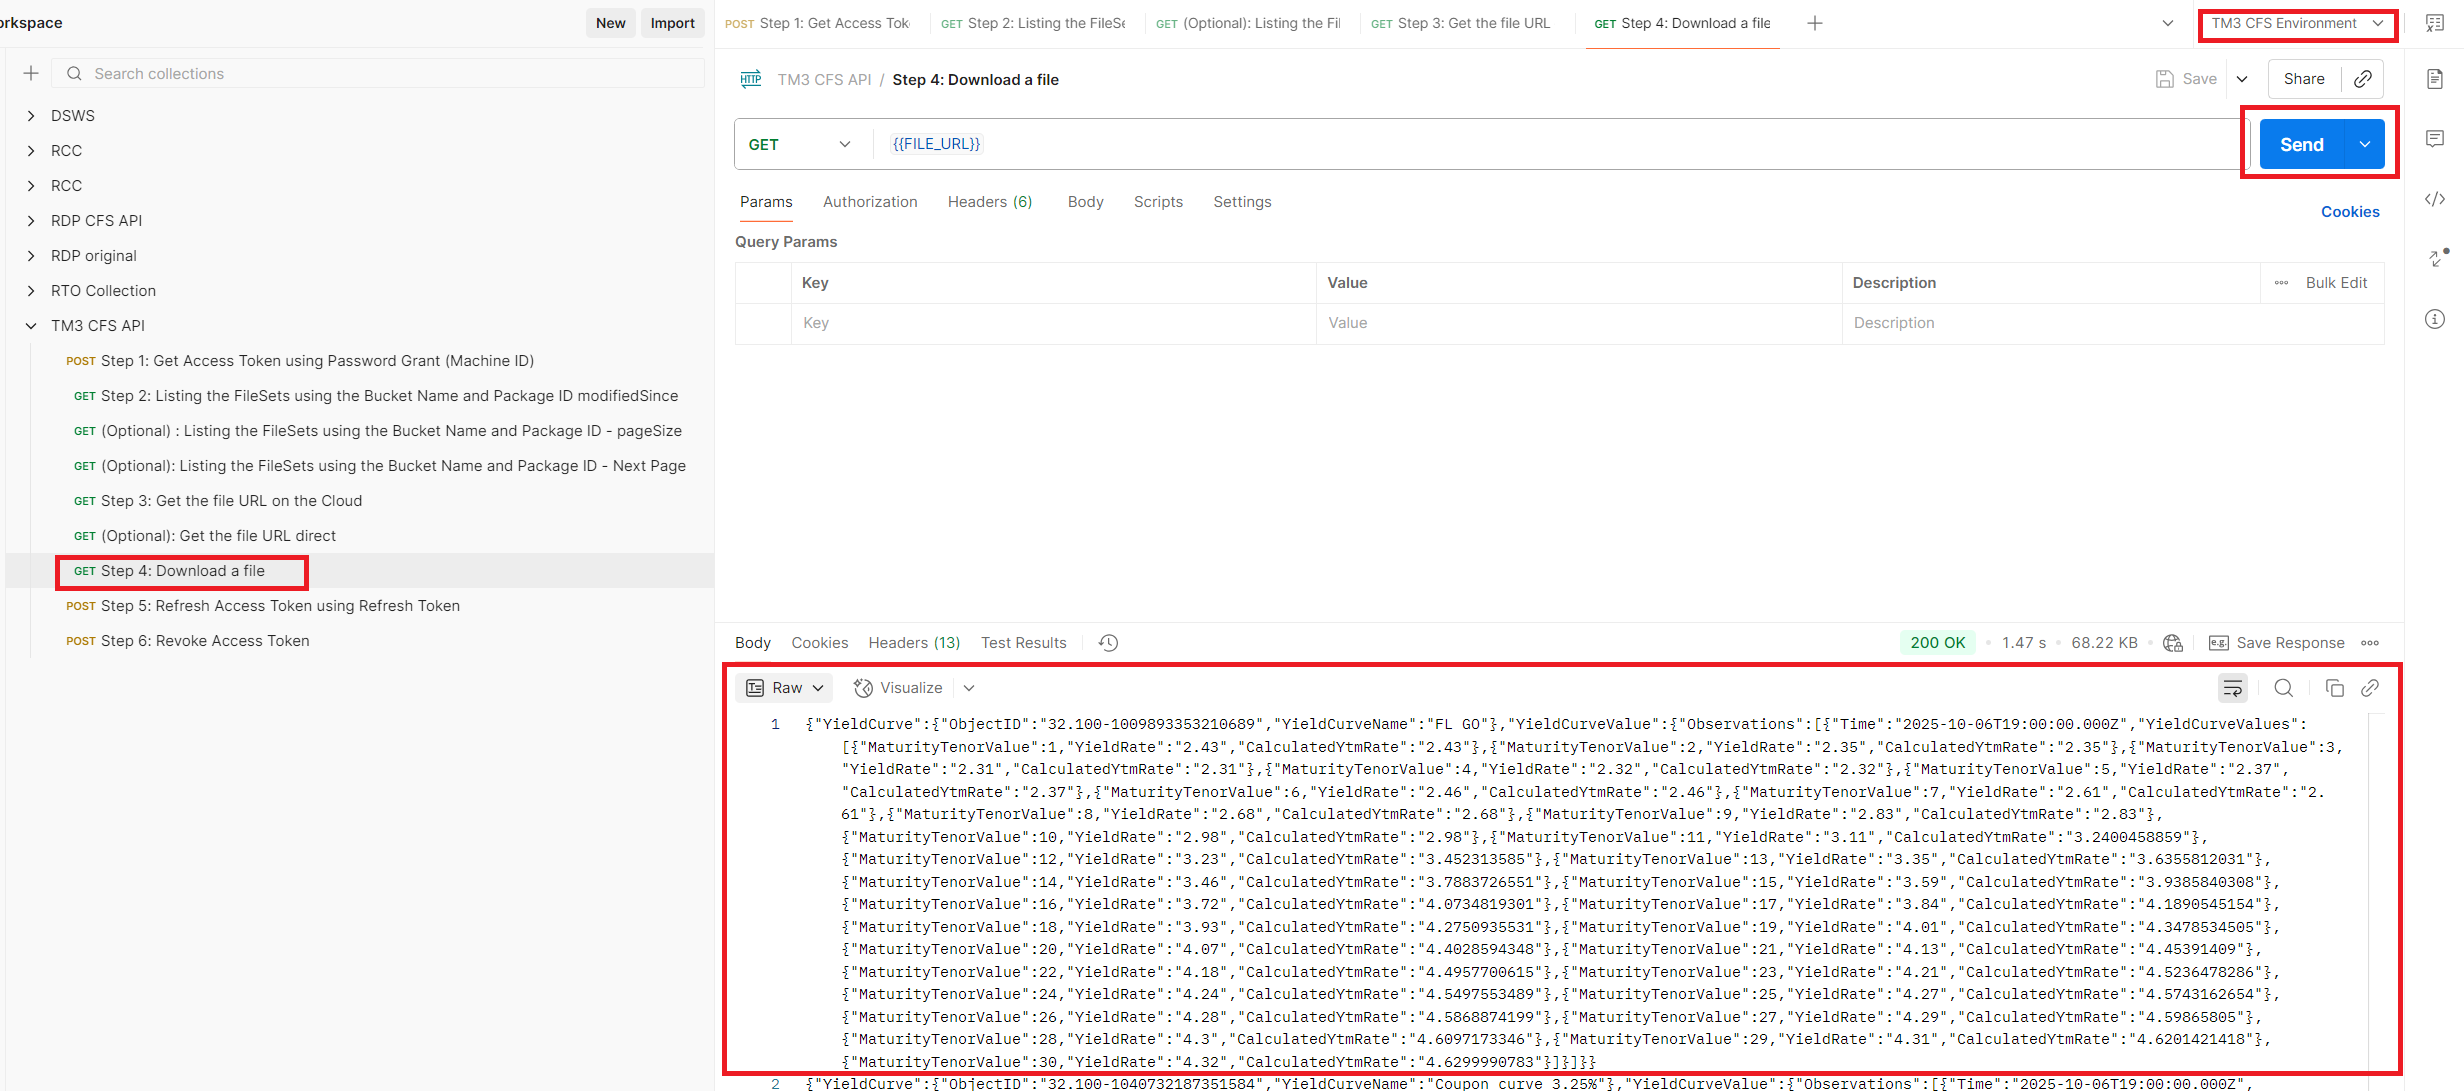
The file will be downloaded and the content will be displayed on the Postman result.
That covers how to download a bulk file via the RDP CFS API.
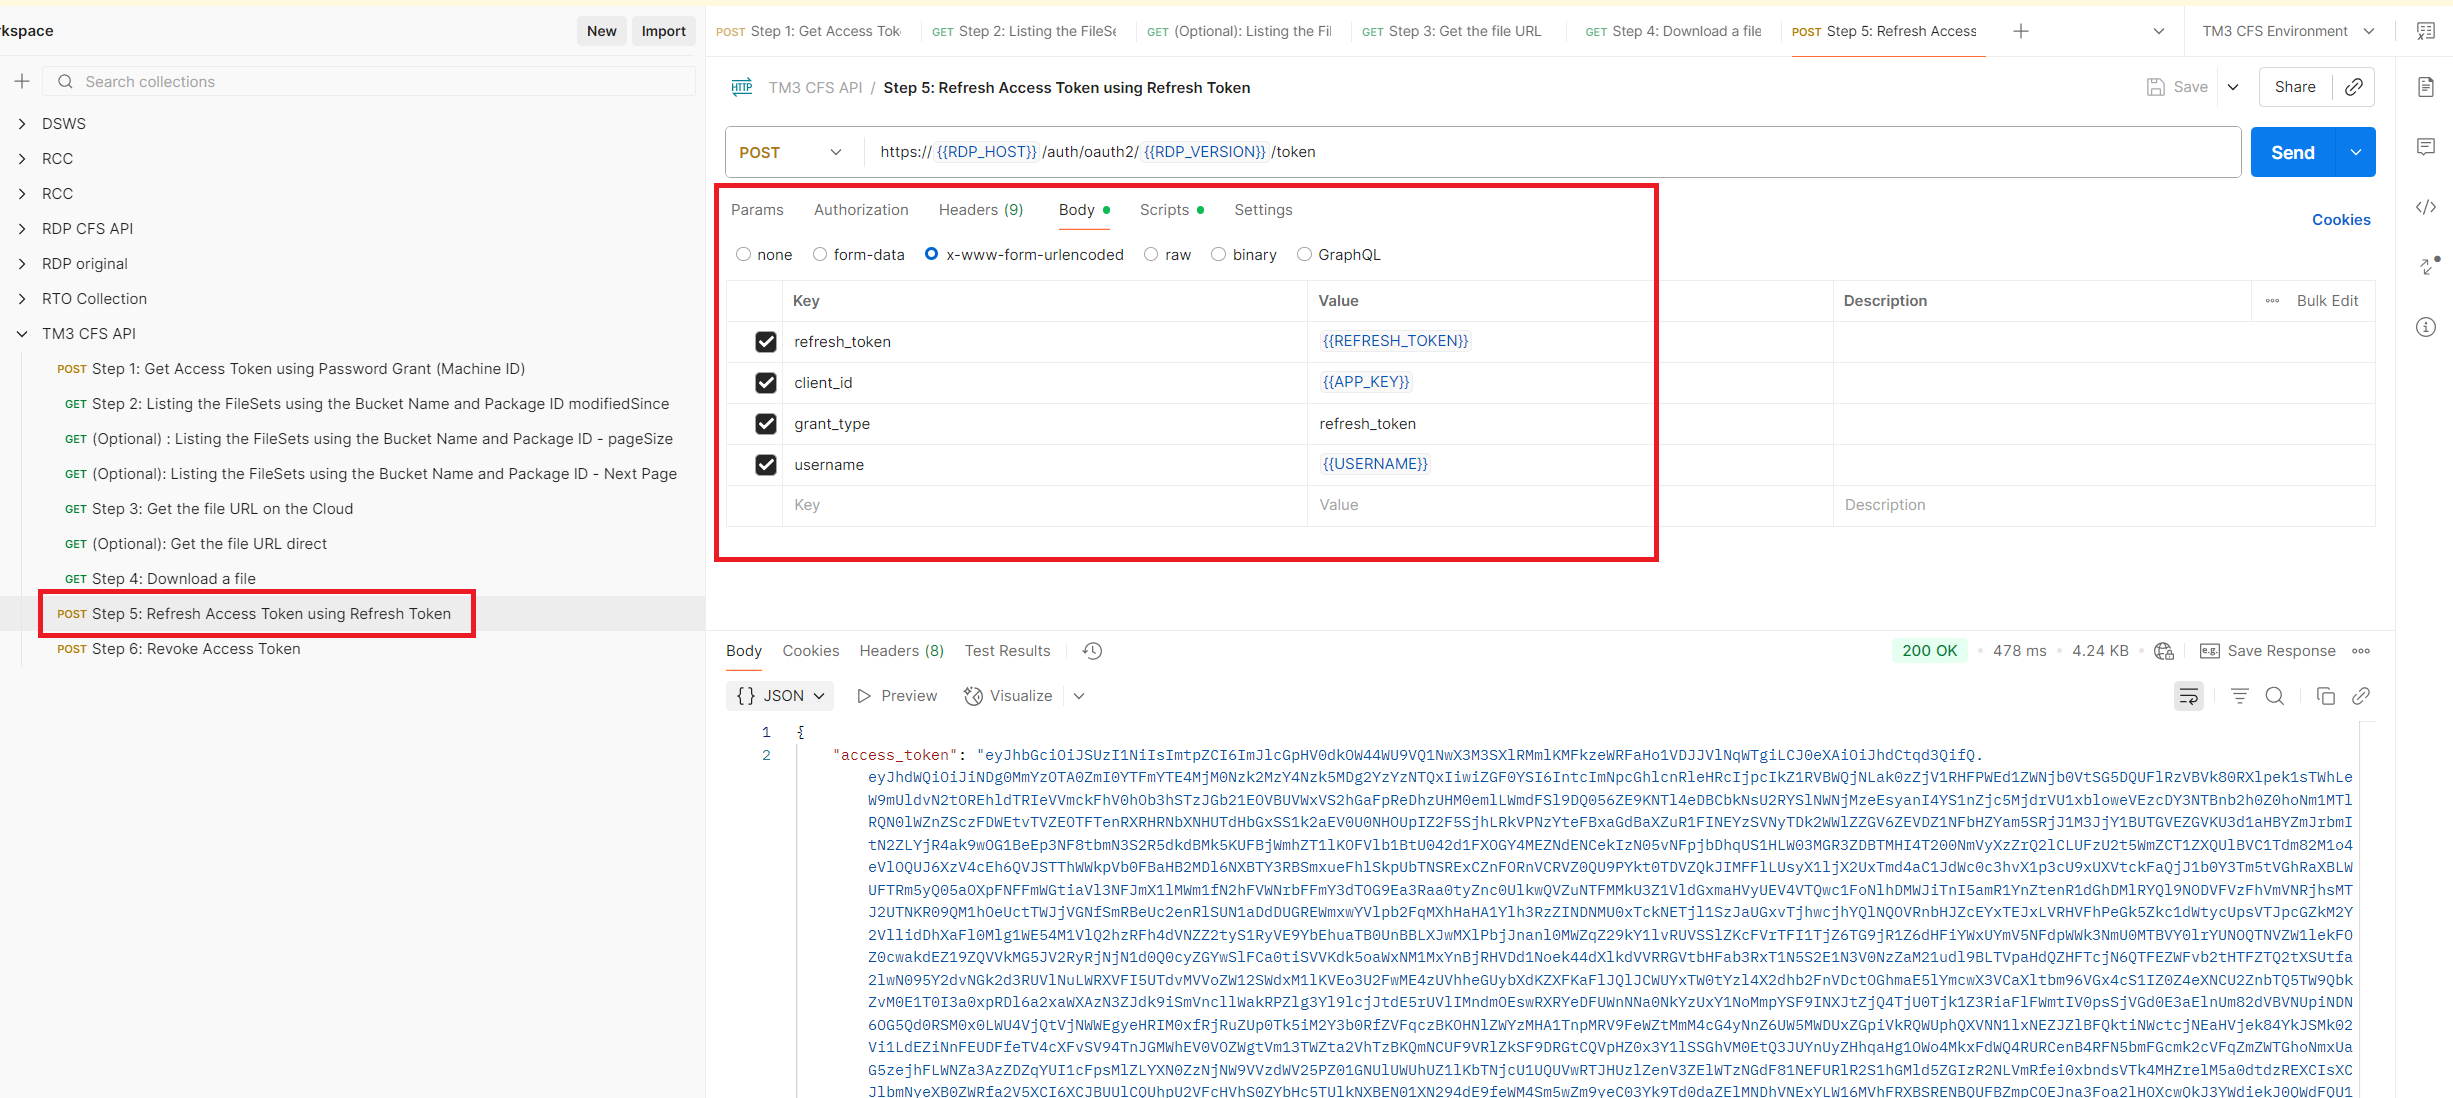
Step 5: Refresh Token with RDP APIs
My next point is how to extend the login session with RDP. Before the session expires (check the expires_in parameter, in seconds) , an application needs to request a new access token. To do this, it must send a Refresh Grant request to the RDP Authentication service. This ensures the app can continue making requests to the platform without interruption.
You can refresh token via the /auth/oauth2/v1/token endpoint (the same one as initial login request), and it must include:
- Refresh Token: The current Refresh Token value from the previous authentication
- Client ID (AppKey): A unique ID for your app, created using the App Key Generator. Keep it private.
- Grant Type: Use refresh_token to indicate you’re requesting a new access token.
To refresh the token, click on the Step 5: Refresh Access Token using Refresh Token request and click on the Send button.
Caution: API Limit
The RDP Authentication service has the API limit described on the RDP APIs: Limitations and Guidelines for the RDP Authentication Service article. If the application flushes the authentication request messages (both password and refresh_token grant_type) beyond the limit, the account will be blocked by the API Gateway.
Once the request is successful, you’ll receive a response with access_token, refresh_token, and expires_in information. An application must keep those value for the next Refresh Token and API calls. This Postman request also uses the Scripts feature to keep these information automatically.
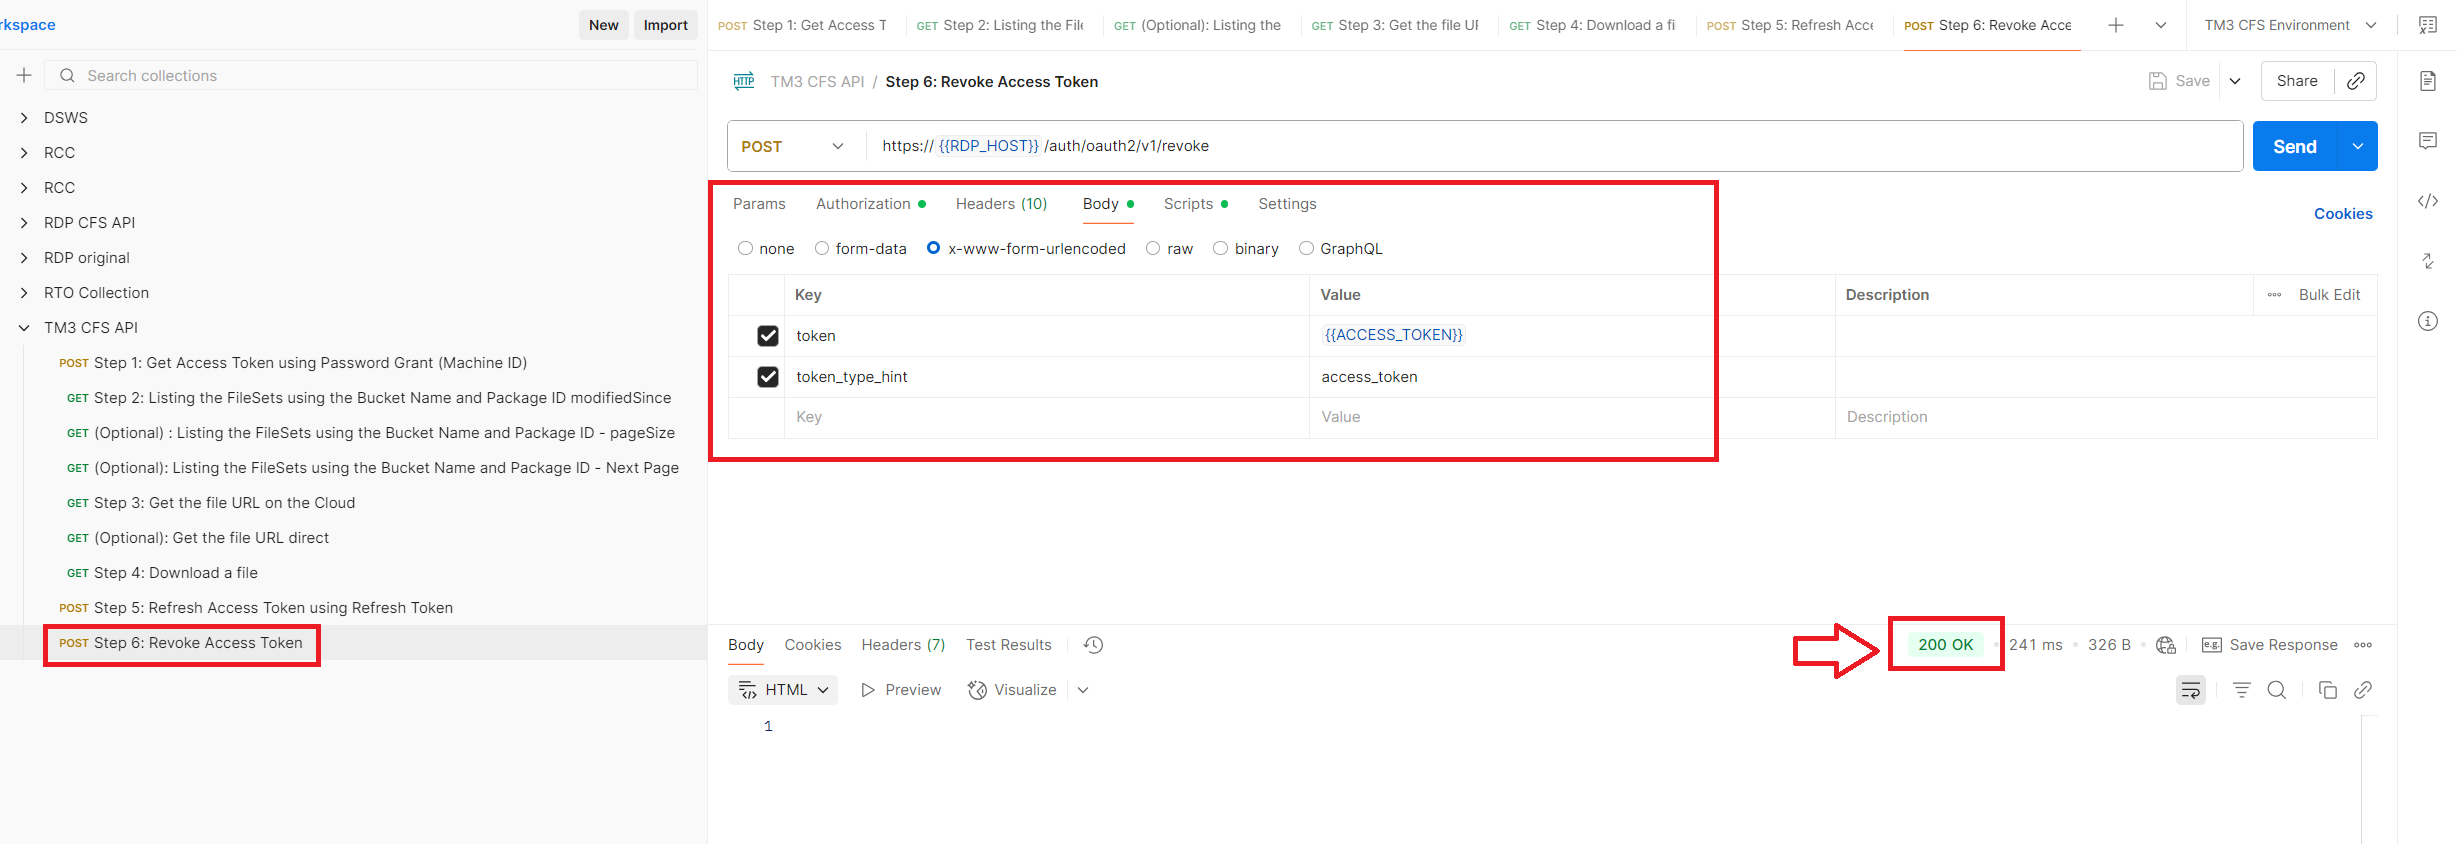
Step 6: Revoke Token to ending the session.
We’re now at the final step: cleaning up resources. This step makes sure that when a user logs out, switches accounts, or closes an application, that application tells the system its access tokens are no longer needed. By doing this, the system can safely remove any related data (like session details) and close the permissions that were granted earlier.
The /auth/oauth2/v1/revoke endpoint requires the following HTTP Header and Credential parameter information:
Header:
- Authorization = Basic <App Key+":" in Base64 format>
Body parameter
- token: The current Access Token value from the previous RDP Authentication call
Please be noticed
- The ":" string after the App Key.
- the space between the Basic and App Key+":" in Base64 values.
- The /revoke endpoint does not use the password in a Basic Authorization, so we need to send empty password in AppKey: format.
To revoke the token, click on the Step 6: Revoke Access Token request. On the request's Authorization tab, you see that the Auth Type is Basic Auth and we set just the APP_KEY information to the username. The Postman converts it <App Key+":" in Base64 format> format for us.
Then click on the Send button to send a request. Please note that the revoke endpoint did not send any data response to an application. It just sends an empty message with HTTP status 200 to an application.
Now your access token is deactivated and cannot be used in any RDP APIs calls.
That’s all I have to say about the TM3 bulk file via RDP CFS API workflow.
Postman Code Source Generating
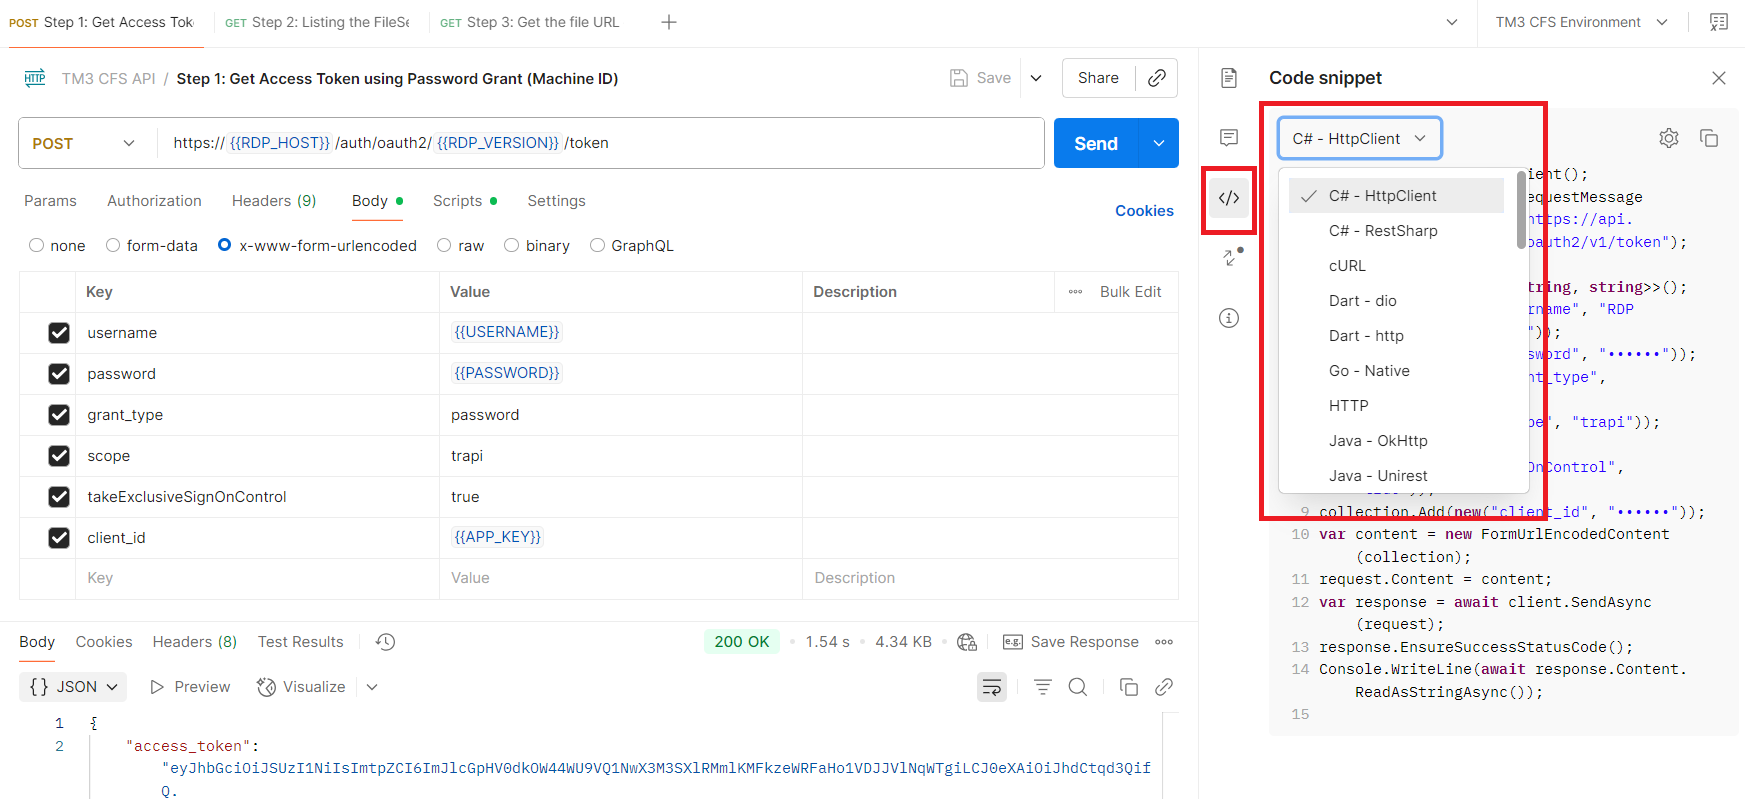
One important feature of the Postman application is converting an API request into code snippet. This feature lets developers generate the source code for selected request to various programming languages.
To generating the source code, click on the request that you need. then select **</>**Code icon Code in the right sidebar. The list of programming languages and variant (libraries) will be shown as an image below.
I am demonstrating with the Step 1: Get Access Token using Password Grant (Machine ID) request and generate the R code for login.
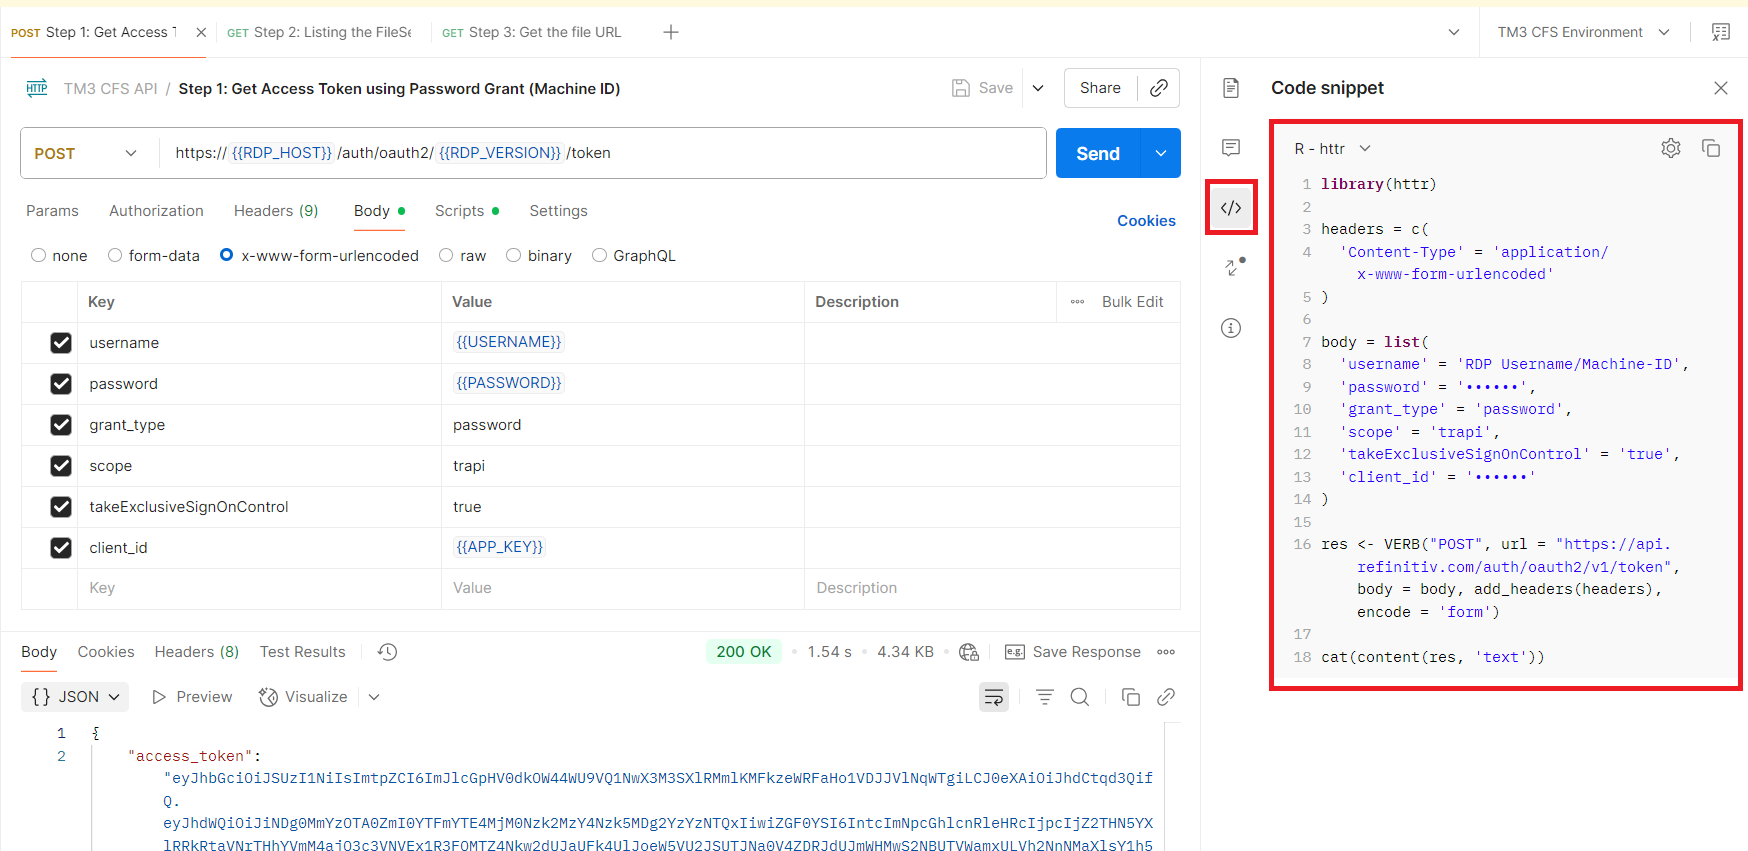
You can choose other programming languages like C#, like an example from the Step 3: Get the actual file URL on the Cloud below.
Please find more detail about the code snippet generating feature on the Postman website.
Troubleshooting
Question: I got "token expired", "Unauthorized" error message when I send a request message to RDP.
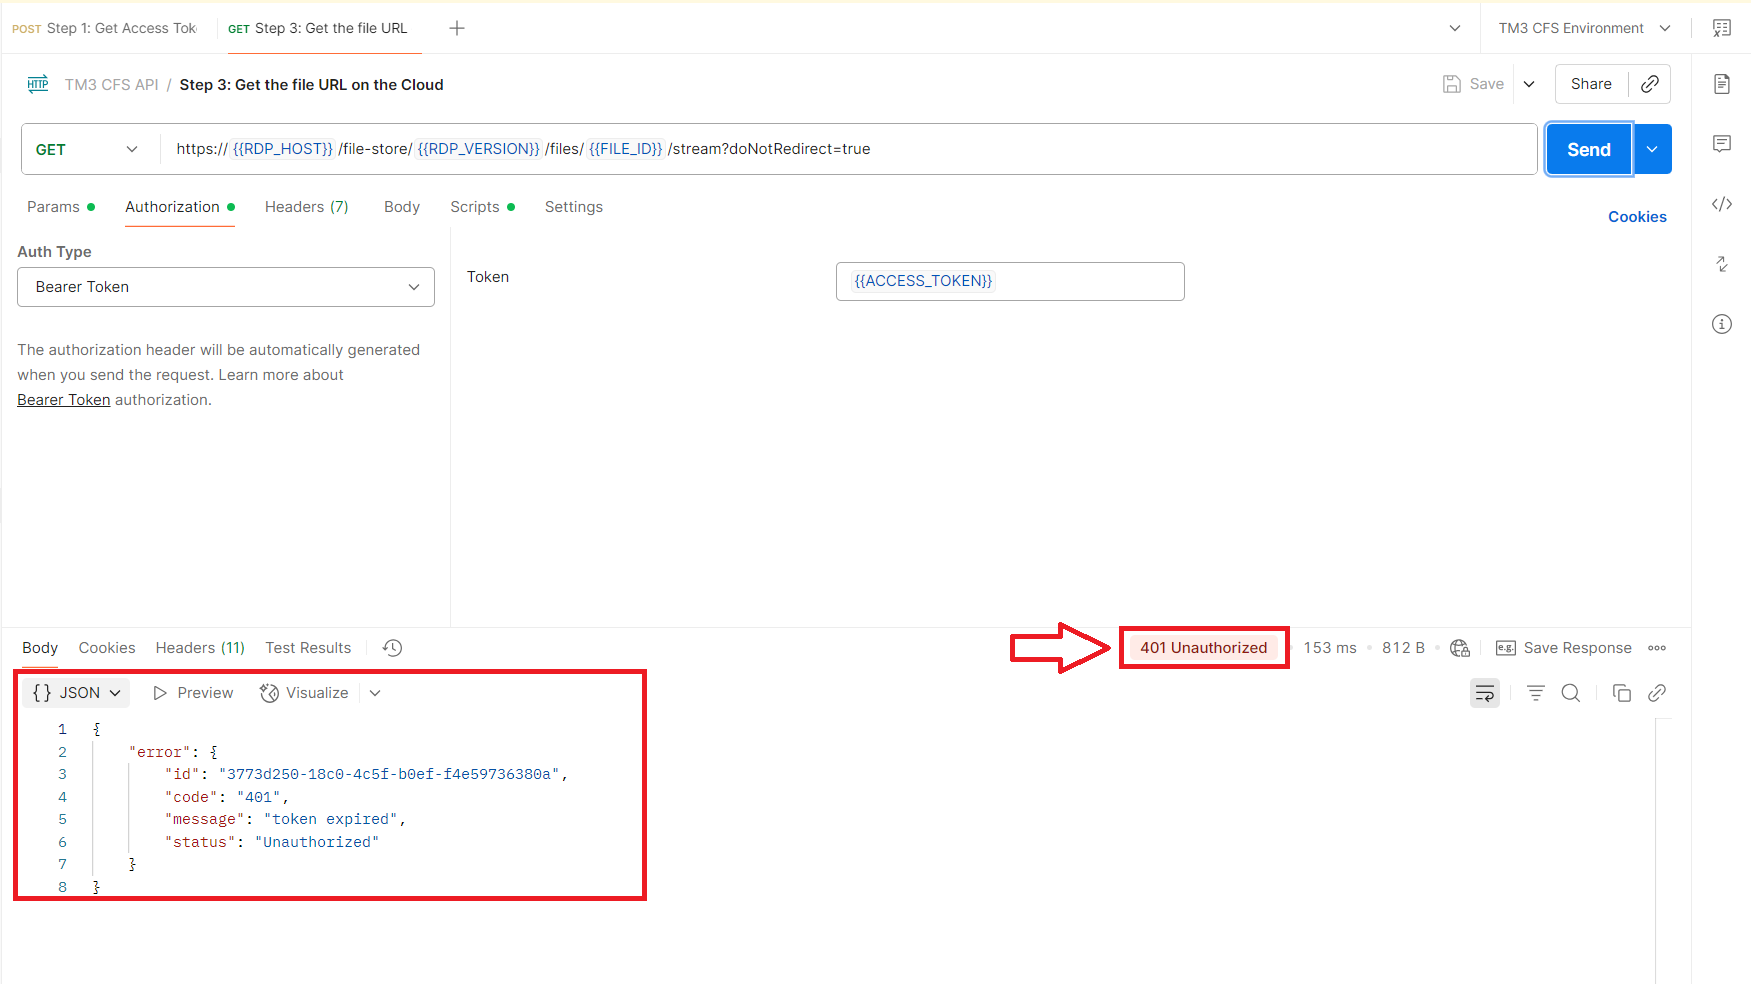
Answer: The error message means your access token is already expired and cannot be used in data request calls anymore.
If the RDP got a request message with expired access token, it returns this message with HTTP Status 401 to an application. An application needs to refresh access token (step 5) or re-request access token (step 1) to get a new valid access token.
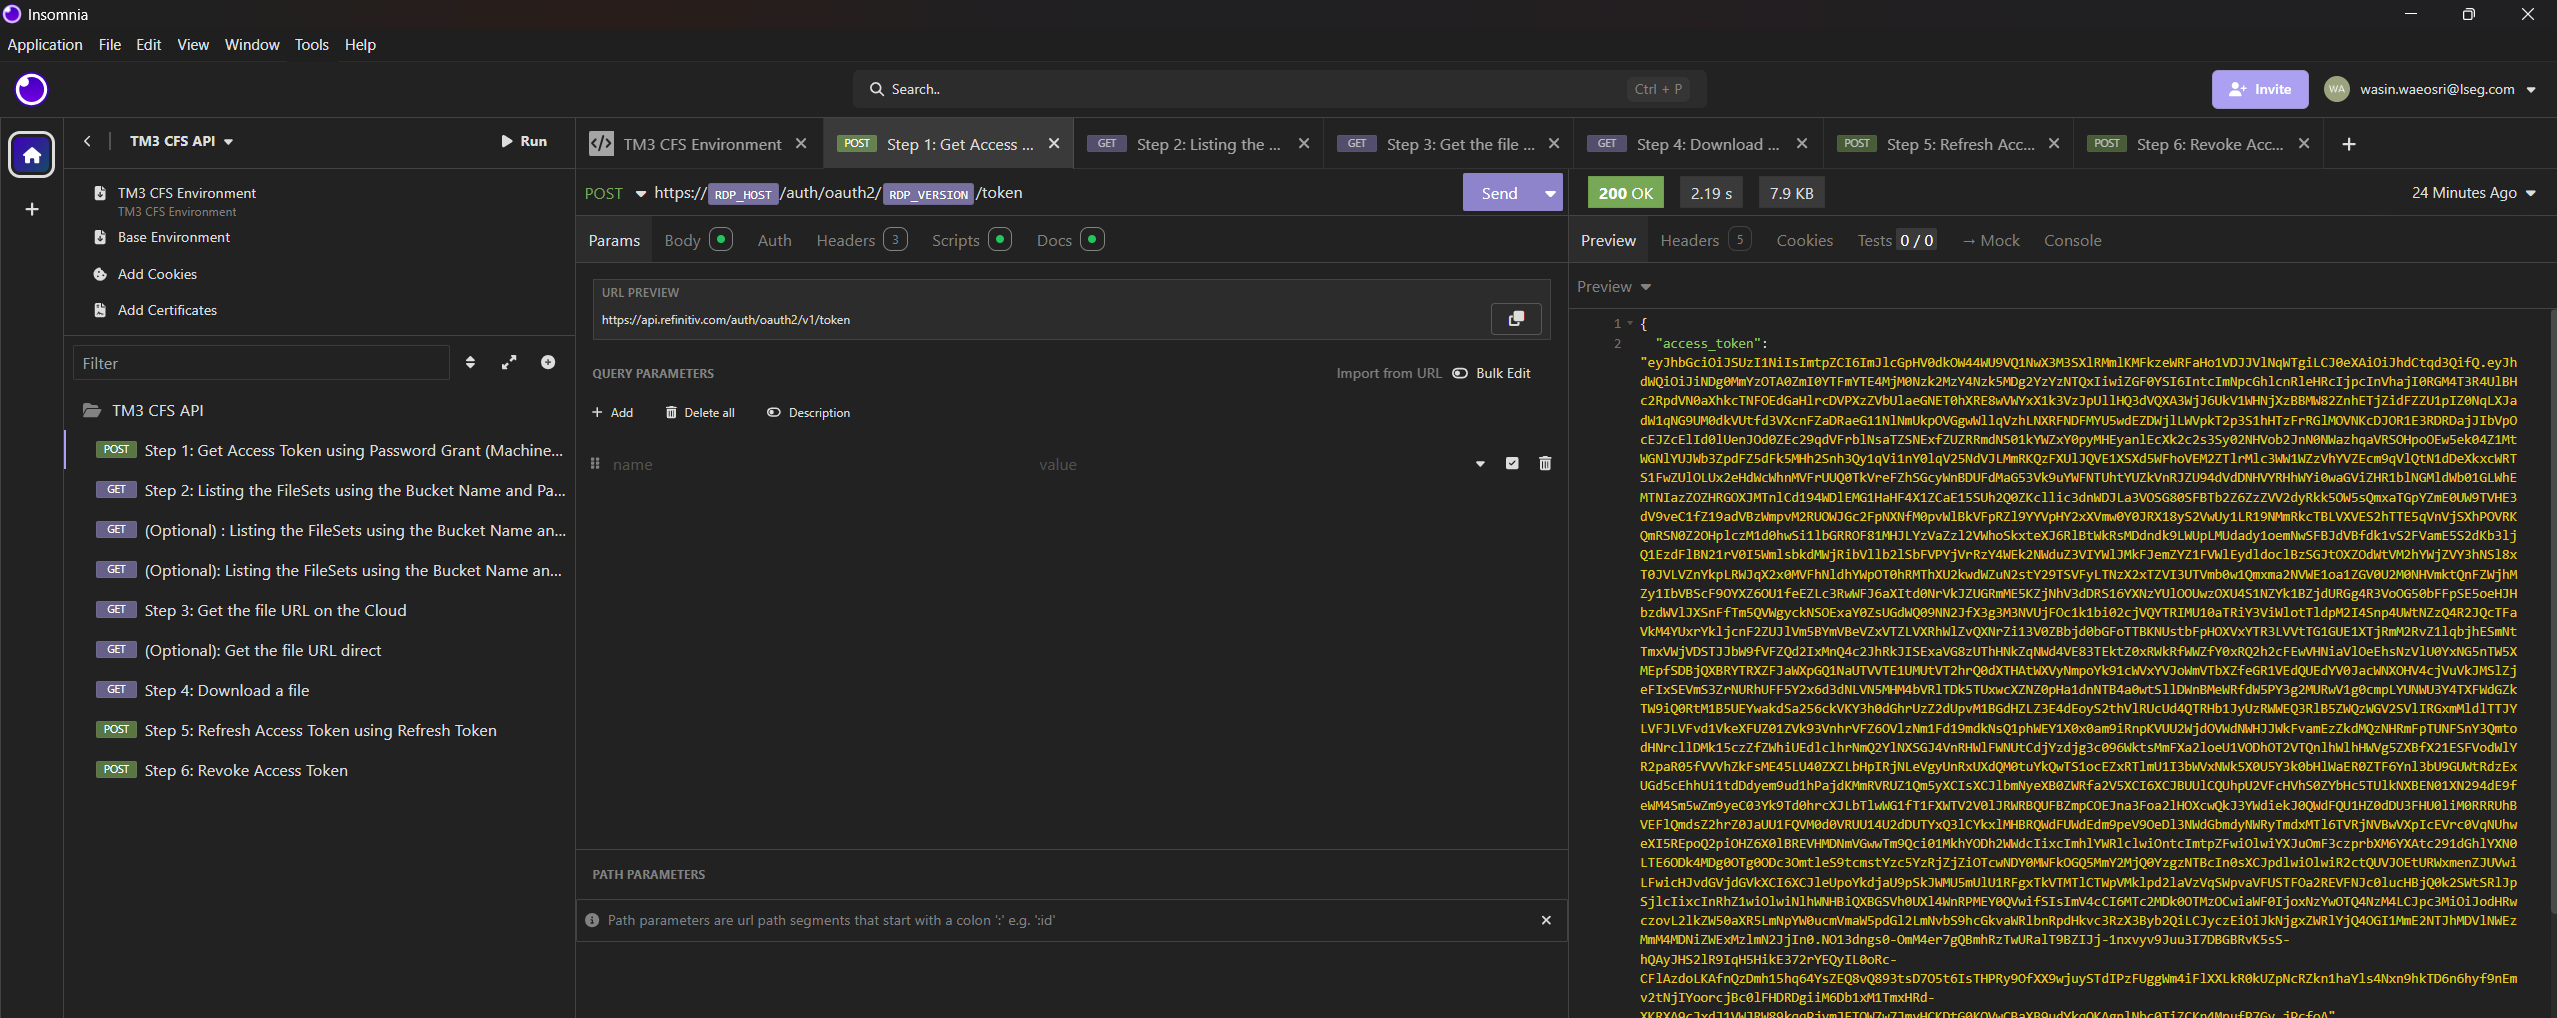
Question: I want to use Insomnia application for testing.
Answer: This Postman collection can be run on Insomnia too. I have tested it with the Insomnia version 11.1.0.
Please see the list of others common issues and their answers on CFS Bulk File/TM3 Q&A forum.
Next Steps
That brings me to the end of this CFS API workflow project. The CFS API is a powerful API that allows developers to download the content file dynamically via a straightforward sequence of HTTP RESTful API calls. The demonstration code is written in C# but the concept of the API calls steps are the same for other programming languages.
At the same time, the Delivery Platform (RDP) APIs provide various LSEG data and content for developers via an easy-to-use Web-based API. The APIs are easy to integrate into any application and platform that supports the HTTP protocol and JSON message format.
You may interested in the following resources for more detail about the CFS data usage:
- A Step By Step Guide for Getting Municipal Market Monitor (TM3) Bulk File Using C#
- A Step-By-Step Workflow Guide for any Bulk Files with Client File Store (CFS) API
- How to use File Notification Message Distribution for any Bulk Files with the Client File Store (CFS) Service
And much more on the Developer Portal website.
References
For further details, please check out the following resources:
- Delivery Platform (RDP) APIs page on the LSEG Developer Community website.
- RDP APIs Playground page.
- RDP APIs: Introduction to the Request-Response API.
- RDP APIs: Authorization - All about tokens.
- Limitations and Guidelines for the RDP Authentication Service article.
- Getting Started with Data Platform article.
- CFS API User Guide.
- A Step-By-Step Workflow Guide for any Bulk Files with Client File Store (CFS) API
- How to use File Notification Message Distribution for any Bulk Files with the Client File Store (CFS) Service
- A Step By Step Guide for Getting Municipal Market Monitor (TM3) Bulk File Using C#
For any questions related to Delivery Platform APIs, please use the on the Developers Community Q&A page.
Get In Touch
Source Code
Related APIs
Request Free Trial
Call your local sales team
Americas
All countries (toll free): +1 800 427 7570
Brazil: +55 11 47009629
Argentina: +54 11 53546700
Chile: +56 2 24838932
Mexico: +52 55 80005740
Colombia: +57 1 4419404
Europe, Middle East, Africa
Europe: +442045302020
Africa: +27 11 775 3188
Middle East & North Africa: 800035704182
Asia Pacific (Sub-Regional)
Australia & Pacific Islands: +612 8066 2494
China mainland: +86 10 6627 1095
Hong Kong & Macau: +852 3077 5499
India, Bangladesh, Nepal, Maldives & Sri Lanka:
+91 22 6180 7525
Indonesia: +622150960350
Japan: +813 6743 6515
Korea: +822 3478 4303
Malaysia & Brunei: +603 7 724 0502
New Zealand: +64 9913 6203
Philippines: 180 089 094 050 (Globe) or
180 014 410 639 (PLDT)
Singapore and all non-listed ASEAN Countries:
+65 6415 5484
Taiwan: +886 2 7734 4677
Thailand & Laos: +662 844 9576