World-Check One API
Get started with our Quick Start guide
- World-Check One Overview
- World-Check One API Overview
- Key terminology
- Getting Started with Postman
- Make your first API request
- Create your first case using API
- Sample code
- Troubleshooting and support
- Stay informed
World-Check One Overview
World-Check One is a state-of-the-art screening platform that enables you to harness the power of World-check risk intelligence data through its next generation screening capabilities which are delivered via web interface portal and advanced APIs that can be accessed over the internet, provided you have been entitled with the appropriate product access.
The web interface and API are fully interchangeable. This allows a full integration with API or a hybrid approach with a lightweight API integration and web interface access. For example, you can automate your screening with API and allow users to access the web interface for remediation purposes. Non-API clients are not given access to the API by default, but the API clients are given a complimentary access to the web interface especially for the client administration purposes. Although a non-API client can always request their LSEG Account team for an upgrade to the API based on their needs.
Assuming you are a client administrator and already have necessary access, you can login to the web interface to manage your admin settings. You may refer this administration quick start guide to setup your account and group configurations, create new groups, manage your users, check admin audit. You may also refer our detailed administration user guide for more details.
World-Check One API Overview
This API developer portal provides you with all the necessary information that you need to test and integrate World-Check One API into your internal systems and existing workflows. The API is delivered as a REST/JSON webservice in Swagger 2.0 format, accessible exclusively over HTTPS.
While version 3 (API v3) is our latest and the most advanced API yet, the platform also supports previous version (v2) for now. If you are a new World-Check One API customer, we highly recommend you integrate with API v3 as this is where all the enhancements are usually released. In this developer portal, we will consider only API v3 for all the examples.
Key terminology
Groups
The concept of “Groups” was designed originally for clients to be able to group multiple related cases under one umbrella. Among other considerations, group configurations may vary for the following reasons:
- As per screening needs - You can create a group with stricter settings for high-risk clients, and another group for low-risk clients.
- Organizational hierarchy - Different business units within the same organization can have separate groups and group settings in line with your organization’s risk appetite.
Case
A “case” is created upon submitting a screening request to screen customer details such as name and secondary identifiers against selected provider types such as World-Check risk intelligence data (for sanctions, regulatory and law enforcements, PEPs, structured adverse media, etc.), Media-Check (unstructured adverse media), Client watchlist (internal lists), and Passport check. All the matched results and audit along with submitted screening data are tagged to a case. Users can perform various actions on the case such as resolve a match, assign a case to another user, archive a case, delete a case, generate case report, etc.
Each case has a unique “caseId” which identifies one case from another across a client’s account. The user can populate this field with a unique identifier; if not, the system will by default assign a “caseId” when creating the case. The user can use this “caseId” to search for the case details on the web interface and perform necessary actions on the case.
Each case also has a unique “caseSystemId” which is a World-Check One internal unique id assigned automatically the system to identify one case from another across a client’s account. The user can use this “caseSystemId” to search for the case details or perform an action via the API.
Note: With regards to the “case”, all the actions on API require “caseSystemId” and any action on the web interface require “caseId”. Hence all API clients must store “caseId” and respective “caseSystemId” on their side to avoid any issues.
Getting Started with Postman
There may be several different tools, code examples, and libraries that you can use to make a request to World-Check One API. We are going to use the Postman tool in this developer portal for all the examples. Postman is a desktop and web application that allows you to make HTTP requests to a REST API from a graphical user interface. We recommend using Postman to explore the API’s functionality, and when you are troubleshooting issues.
Note: This is by no means an endorsement of Postman, it is just an example to get you started. Feel free to use any other tool or REST client that you may prefer.
Prerequisite: Before you get started with Postman, you will need to make sure you have appropriate product entitlements and API credentials.
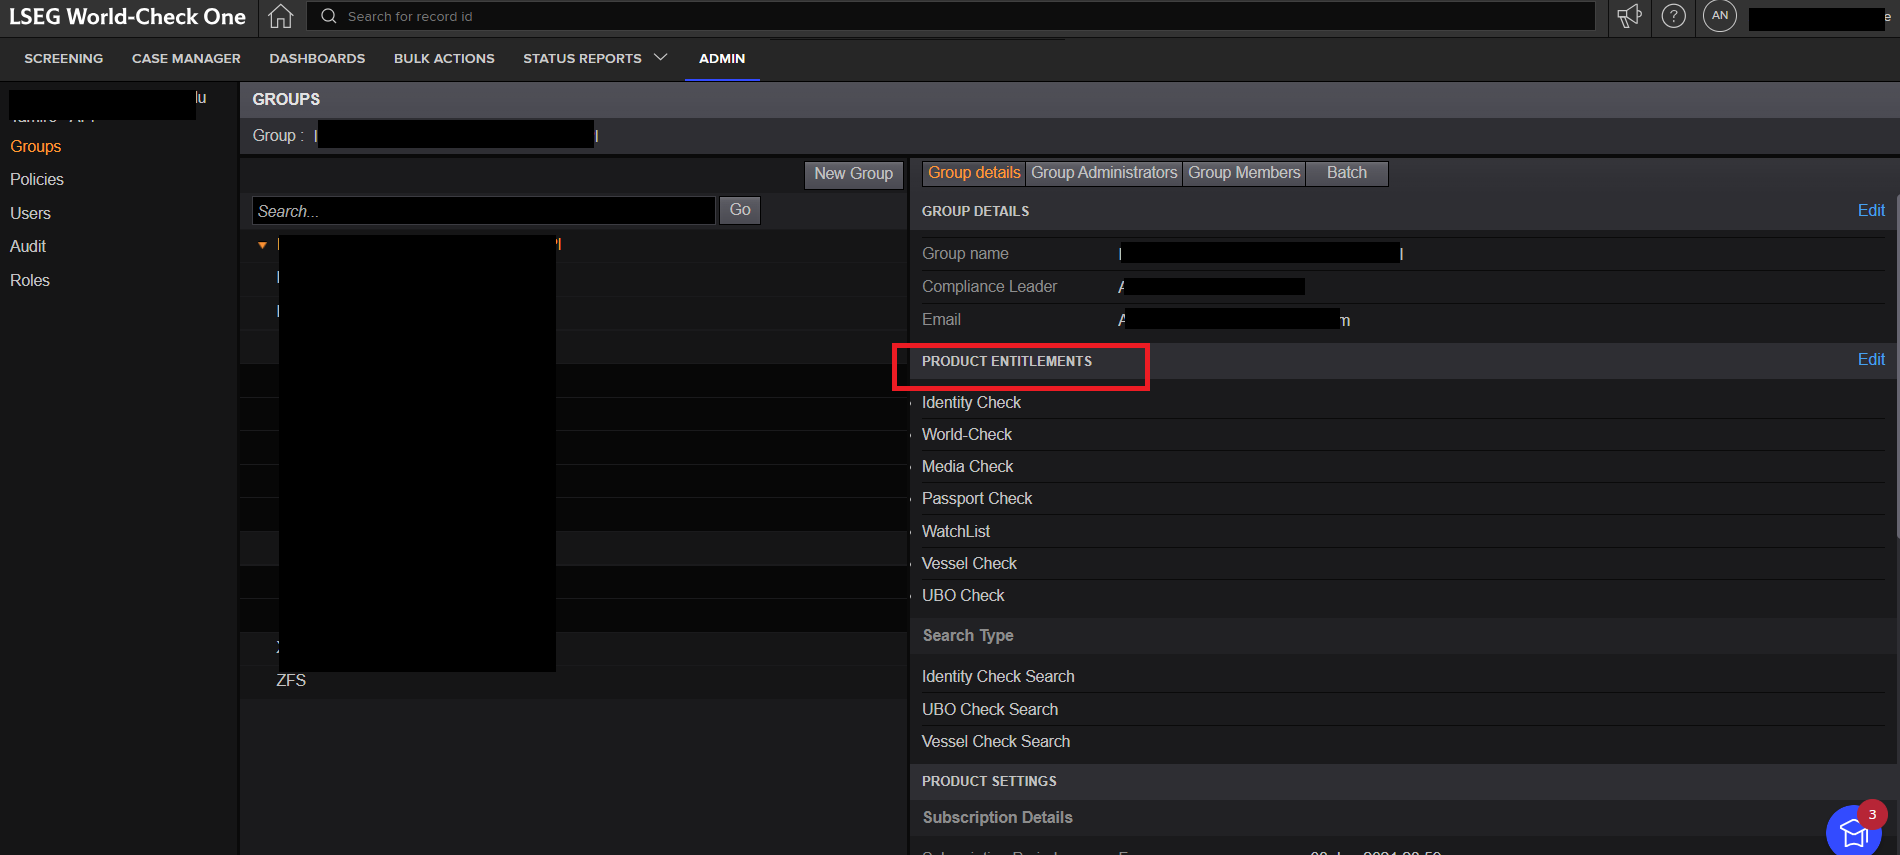
Step 1: Obtain World-Check One API credentials
For OAuth 2.0 (recommended approach), you’ll need:
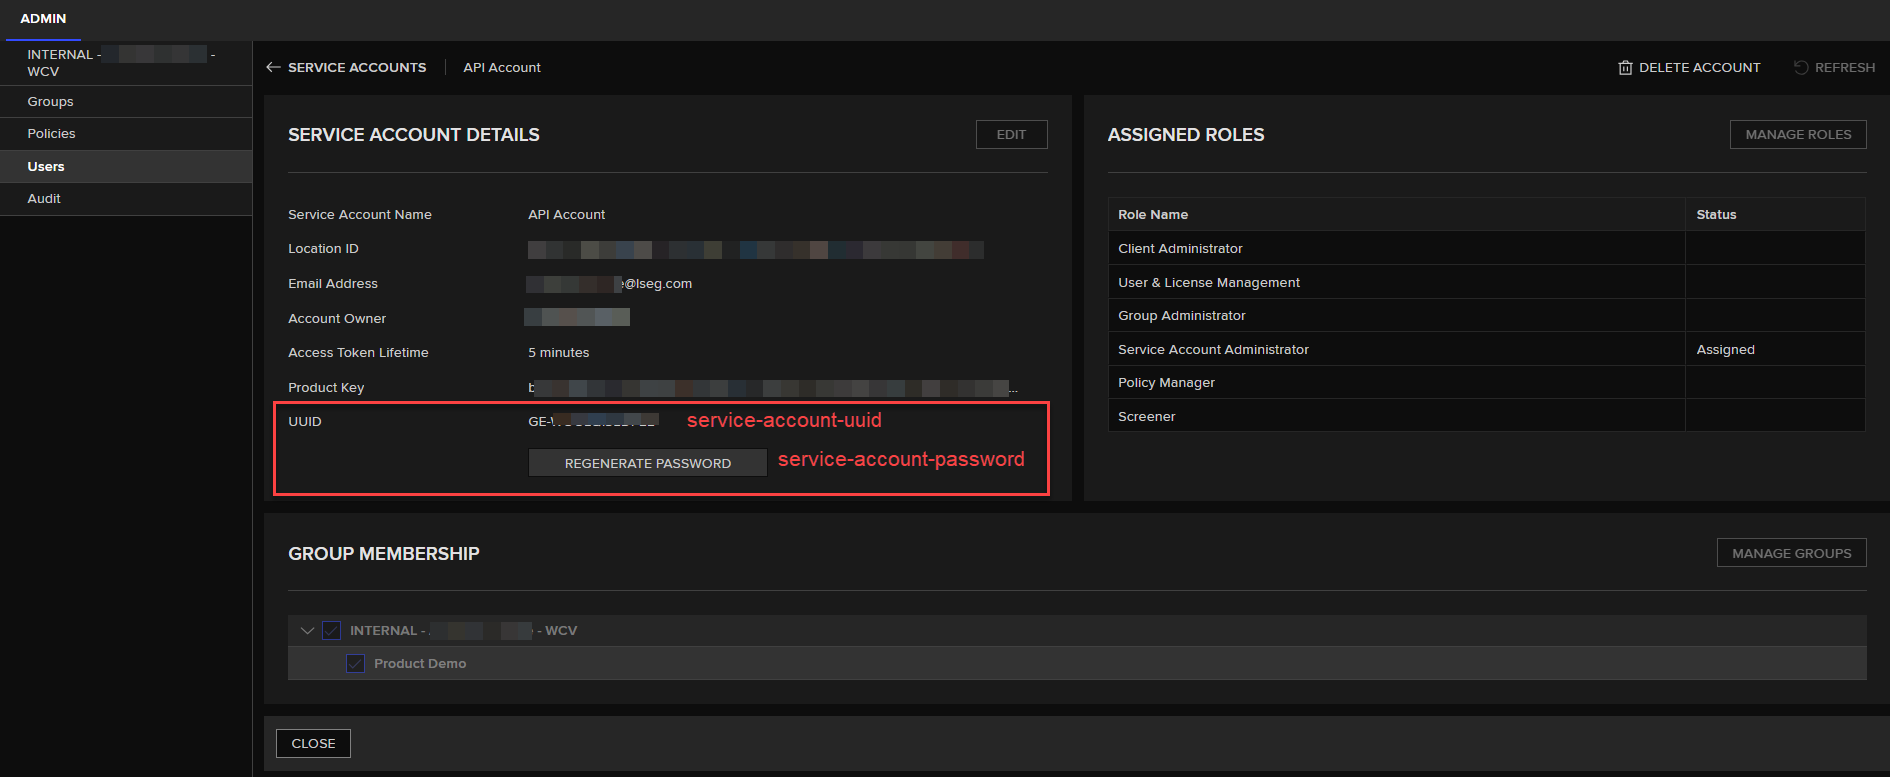
- service-account-uuid - the unique identifier of the service account (client id in oauth terminology)
- service-account-password - the password of the service account (client secret in oauth terminology)
These are provisioned via the World-Check One API admin portal. Ensure the account has the appropriate permissions and token lifespan settings. If you do not have these details already, you may follow below steps to obtain your credentials.
- Log in to Admin Portal.
- Assign the role: Service Account Admin to designated users.
- Users with this role will see the Service Accounts tab under Admin → Users (you may have to refresh or re-login).
More information on how to create and manage service accounts can be found here - Service Accounts - Quick Start Guide.
Key points when creating a service account:
- Every service account needs a service account owner. By default, the logged in user will be selected as service account owner, however, it can be changed using the dropdown which will have all available service account admins (those with the role Service Account Admin).
- Client must select a token lifetime which is essentially an expiry period for tokens generated for that particular service account. The available options are 5mins, 2hrs, 24 hrs.
- Ensure right roles and permissions are assigned to the service account, as it’s similar to how a human user can access the service – but via API. Without right permissions, the API calls may return 403 permission denied error. The general rule of thumb is to assign all the roles if you are going to use this service account to make all API calls.
- Important: WC1 does not store service account passwords. You must save them securely when you generate for the first time or regenerate in future. If lost, you can regenerate via “Edit” service account option.
Once the service account is created, you can start using the service account credentials to generate an access token which must be used to access the API.
For HMAC, you will be able to find the following API keys associated with a human user.
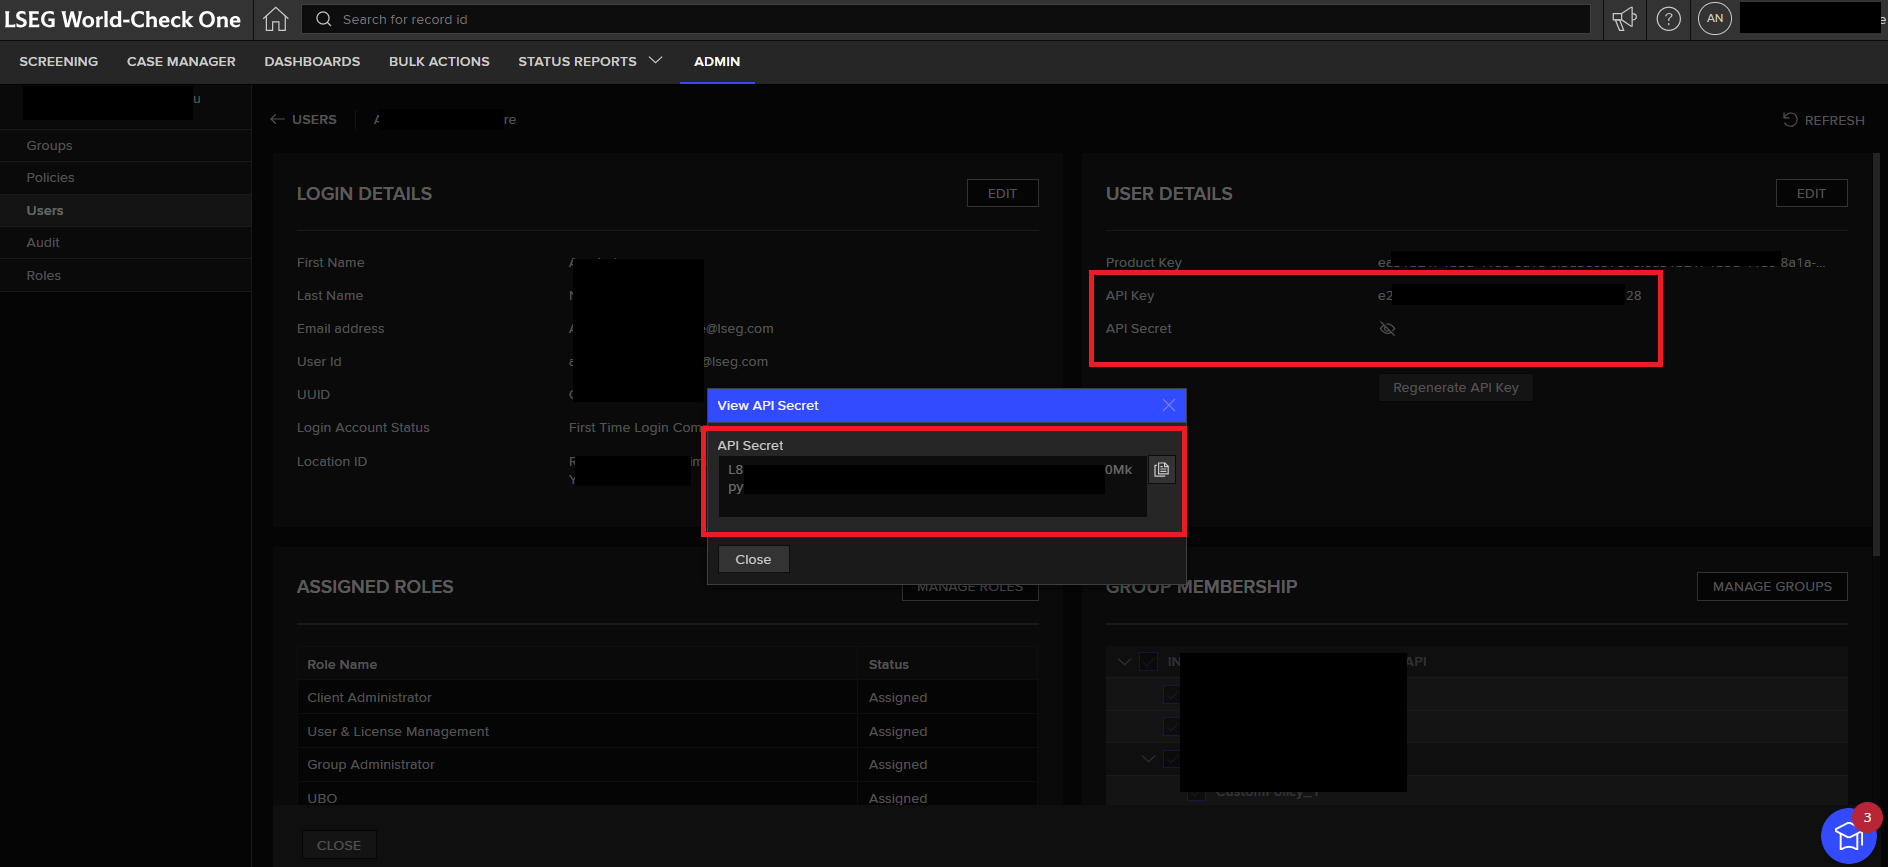
API Key |
This is essentially an API equivalent of username which will be in the below format. <8 chars>-<4 chars>-<4 chars>-<4 chars>-<12 chars> Example: d6b5xxxx-b9xx-4axx-85xx-819c61xxxxxx |
API Secret |
This is essentially an API equivalent of password which will be in below format. <88 chars> |
You will usually be given one Pilot account and Production account, unless you are using one of our World-Check One API partner solutions – in which case you will be given direct access to Production account considering our partner already has a valid integration with our API.
Note: The API credentials will be different for both the accounts. You may use your Pilot account for your development and basic testing purposes before you go-live with your production account.
If you do not have necessary access or API credentials, contact your LSEG Account team.
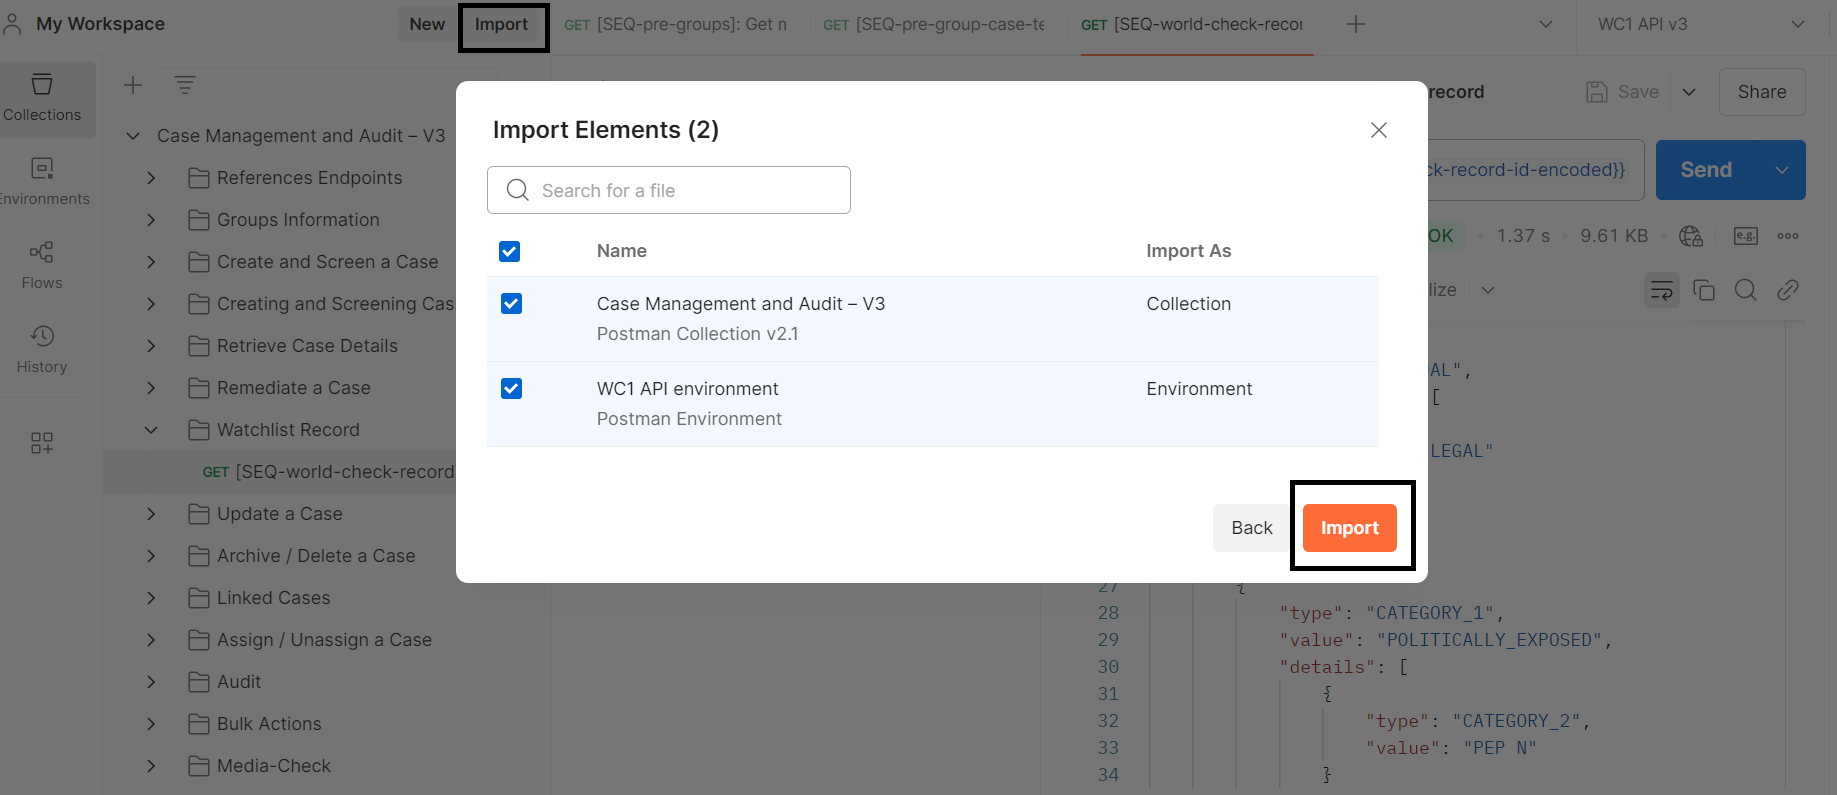
Step 2: Import World-Check One API Postman collection and Postman environment files into your Postman application
While you could build out the specific endpoints that you’d like to use within Postman, we did all the heavy lifting for you and built out a ready to use Postman collection with sample requests and Postman environment for all the necessary variables. Download and import both collection and environment (.json) files into your Postman app to add all the World-Check One API endpoints.
Step 3: Add your API credentials to your Postman environment
Once you have imported your Postman environment, you can add your API credentials to the environment file to start exploring the API functionality.
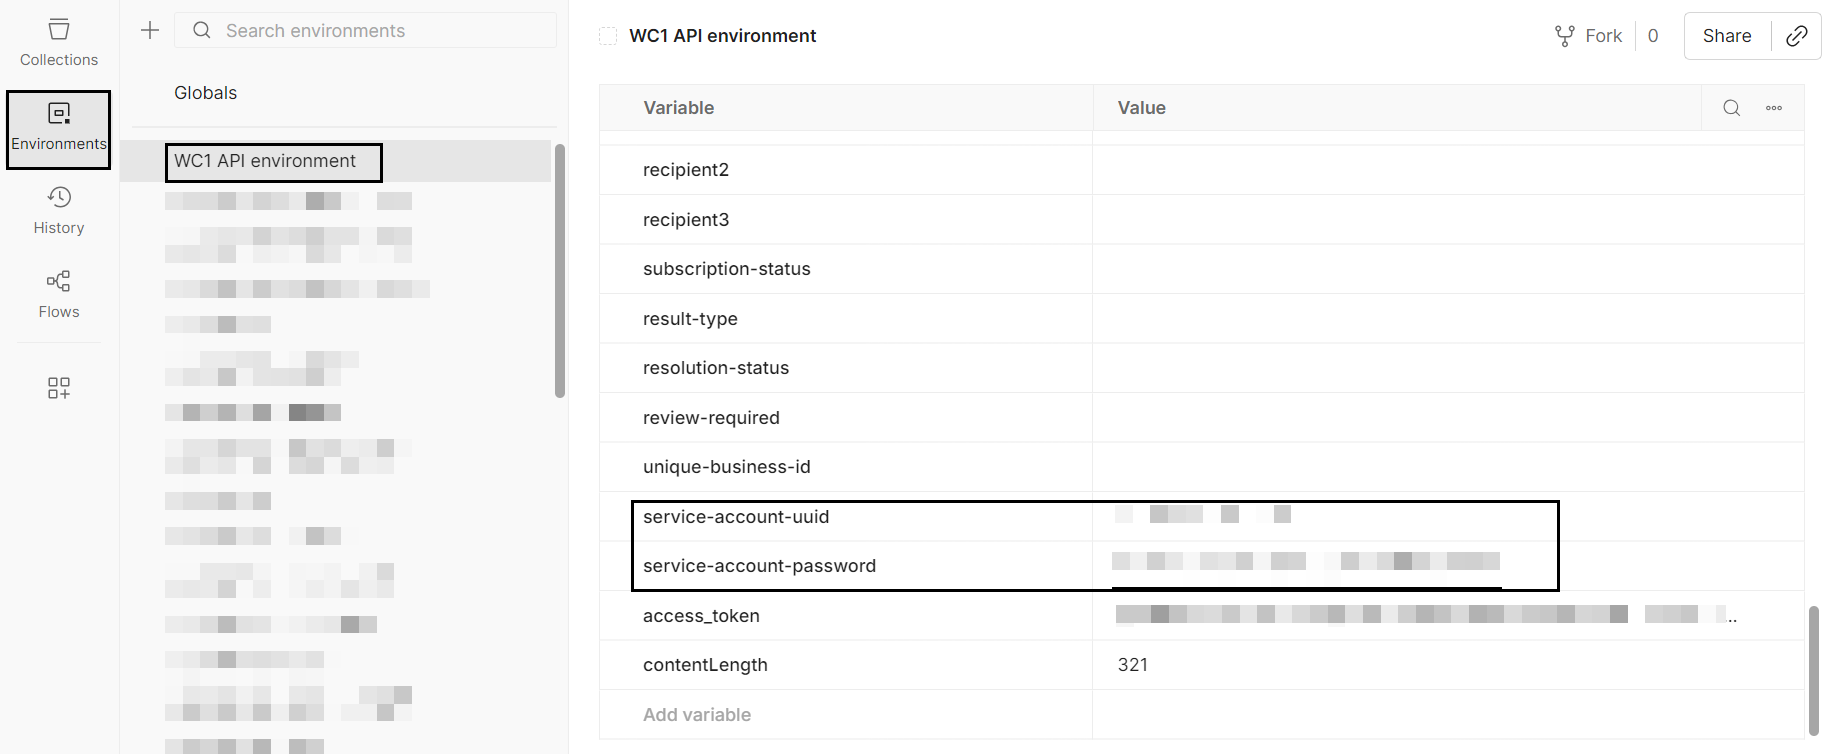
Click on “Environments” and select the WC1 API environment that you just imported.
For OAuth 2.0 (recommended approach), add your service-account-uuid and service-account-password to the respective variables under “Value”.
Note: If you are using older Postman version, you may have to add the API credentials under "Current value" and click on “Save”.
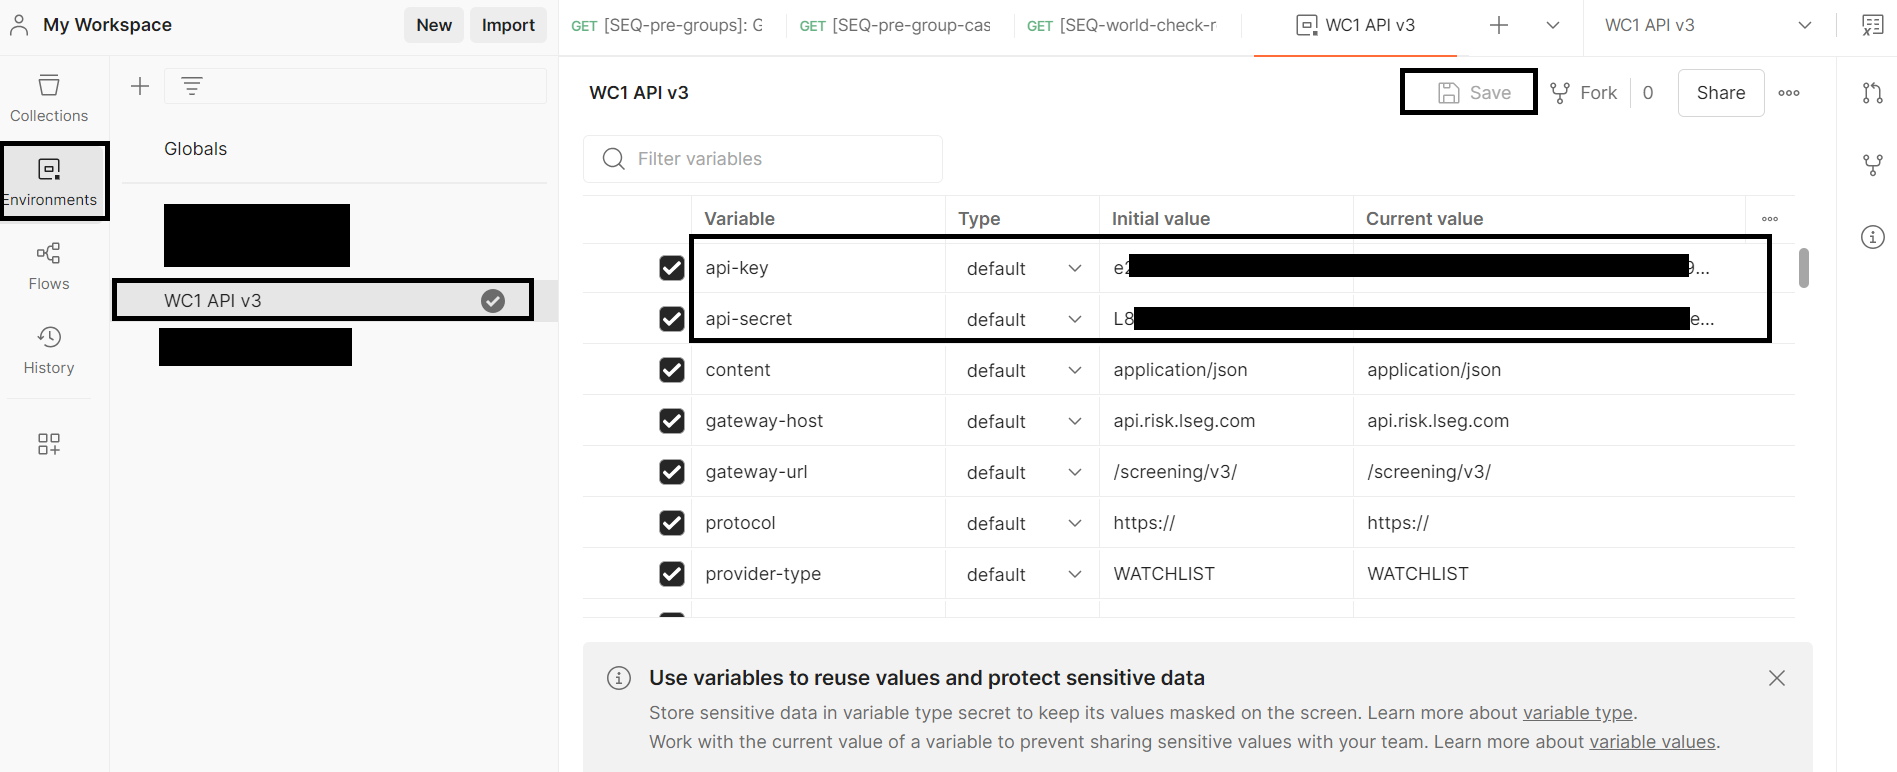
For HMAC, add your API Key and API Secret associated with a human user to the respective variables under "Value".
Note: If you are using older Postman version, you may have to add the API credentials under "Current value" and click on “Save”.
Make your first World-Check One API request
Now that you have setup your Postman with valid API keys, you can follow below steps to make your first request to World-Check One API.
Step 1: Choose a tool to make your request
As mentioned above, there may be several different tools, code examples, and libraries that you can use to make a request to World-Check One API, but we are going to use the Postman tool in this developer portal for all the examples. We recommend checking out Getting Started with Postman section if you haven’t setup your Postman yet. This is necessary to make your first request to World-Check One API using this quick start guide.
If you are using your own tool or code for sending requests to World-Check One API, then refer to sample code section for useful details.
Make sure below key environment variables are properly set along with “api-key” and “api-secret” in whichever tool you use.
content-type: application/json
protocol: https://
gateway-host: api.risk.lseg.com
gateway-url: /screening/v3/
Note: You may receive error 401 (unauthorized access) if you do not use correct URL or credentials, and error 415 (unsupported media type) if you do not use correct content-type.
Step 2: Generate access token
Note: This step is only applicable for OAuth 2.0. Ignore this step for HMAC.
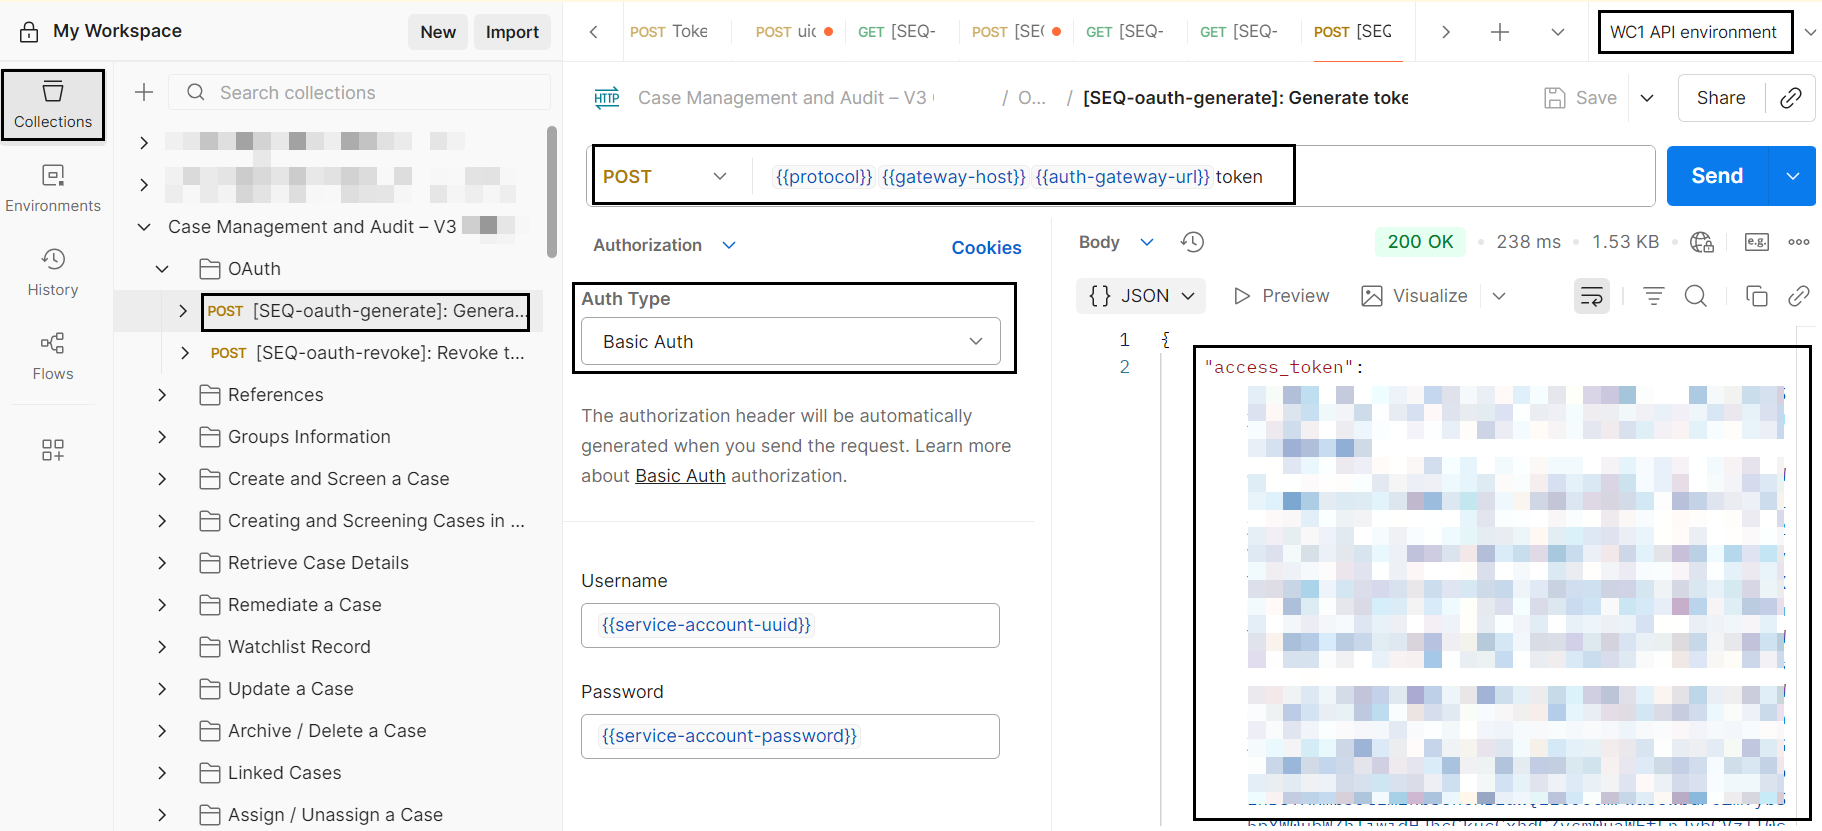
Once you have your service-account-uuid and service-account-password, you can Generate Access Token using below endpoint. Ensure "Auth Type" is "Basic Auth" under Authorization.
Endpoint: “POST /auth/oauth2/v1/token”
Endpoint name in Postman collection: “Generate token”
Step 3: Select an endpoint
Except admin capabilities, most of the World-Check One web interface capabilities are also available via API through a rich collection of various endpoints to perform different operations. You can find the complete list of endpoints that are available within our API Schema Reference, but we recommend using below endpoint for the purpose of making your first request to World-Check One API.
Get all the groups with their immediate descendants
Endpoint: “GET /groups”
Endpoint name in Postman collection: “[SEQ-pre-groups]: Get my top-level,child and zfs groups”
Step 3: Send your request and review your response
Select “GET /groups” endpoint within the imported Postman collection.
For Oauth 2.0, under Authorization, select "Auth Type" as "Bearer Token". Ensure you are using the access token you received in Step 2. Do this for every endpoint you wish to use.
For HMAC, you don't need to change anything (leave auth type as "Inherit auth from parent").
Click on “Send”. If everything is setup properly, you should receive a response similar to below with a successful response code “200”.

Create your first case using World-Check One API and review the screening results
Assuming you have successfully made your first World-Check One API request, you can follow below steps to create your first case using World-Check One API through your Postman by submitting a case creation request and review the screening results within the response.
Note: Below steps are just to get you started and do not cover every step required for screening. Refer our tutorials on screening and other workflows for further details.
Step 1: Choose your customer data for screening
The request body of the case creation request must have the necessary data to be screened such as name, secondary identifiers, etc. along with other key information such as groupId, entityType, etc. While there are examples within the Postman collection for all the entity types, you can refer to the full case template by making a request to below endpoint.
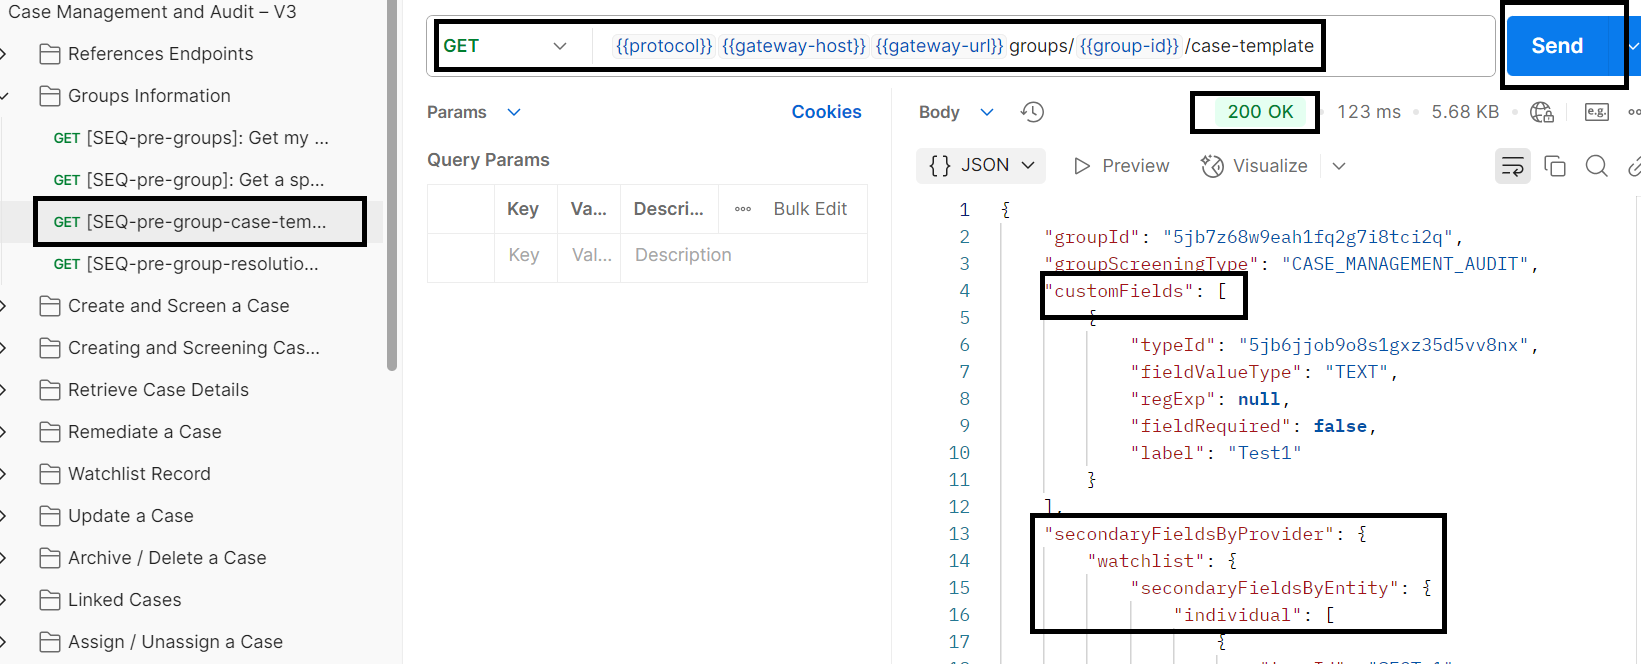
Endpoint: “GET /references/case-template”
Endpoint name in Postman collection: “[SEQ-pre-group-case-template]: Get the case template for a group”
The response of this endpoint will give you all the applicable secondary identifiers and custom fields that you can use within your case creation request for the necessary group and entity type. Refer How to construct a case request body tutorial for more information.
Step 2: Choose a screening type
You can create and screen a case either synchronously or asynchronously based on your use case. We usually recommend using synchronous screening for faster remediation since you will get the screening results within the response of synchronous screening request endpoint. If you choose to use asynchronous screening request, it may take a while before you can retrieve the screening results since all asynchronous screening requests are added to a screening queue.
Endpoint: “POST /cases”
Query parameter: “screen=SYNC/ASYNC”
Endpoint names in Postman collection: “[SEQ-screen-sync-simple]: Creating and Screening a Case”
Step 3: Create and screen a case
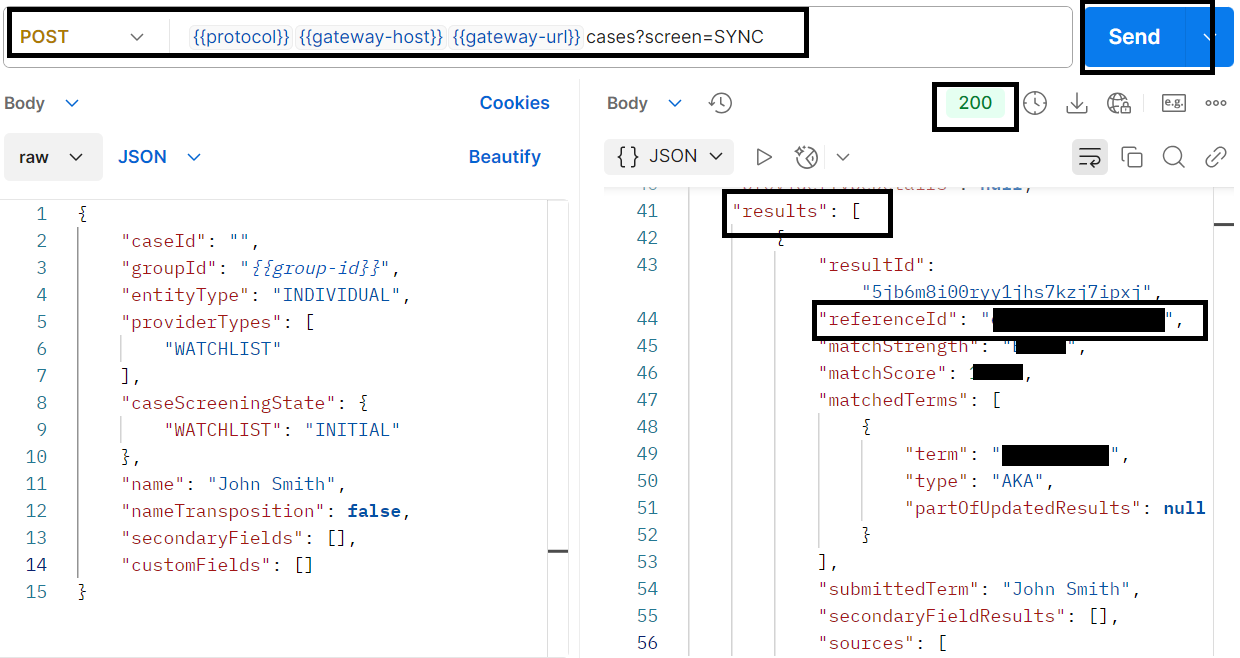
For the purpose of this guide, you can create and screen a case synchronously.
Endpoint and query parameter: “POST /cases?screen=SYNC”
Once you send the synchronous case creation and screening request, you should get a response code “200” and must be able to see all the matched screening results within the response under “results” object.
Note: You can refer our matching engine quick reference guide and user guide if you have any questions about how the name matching works.
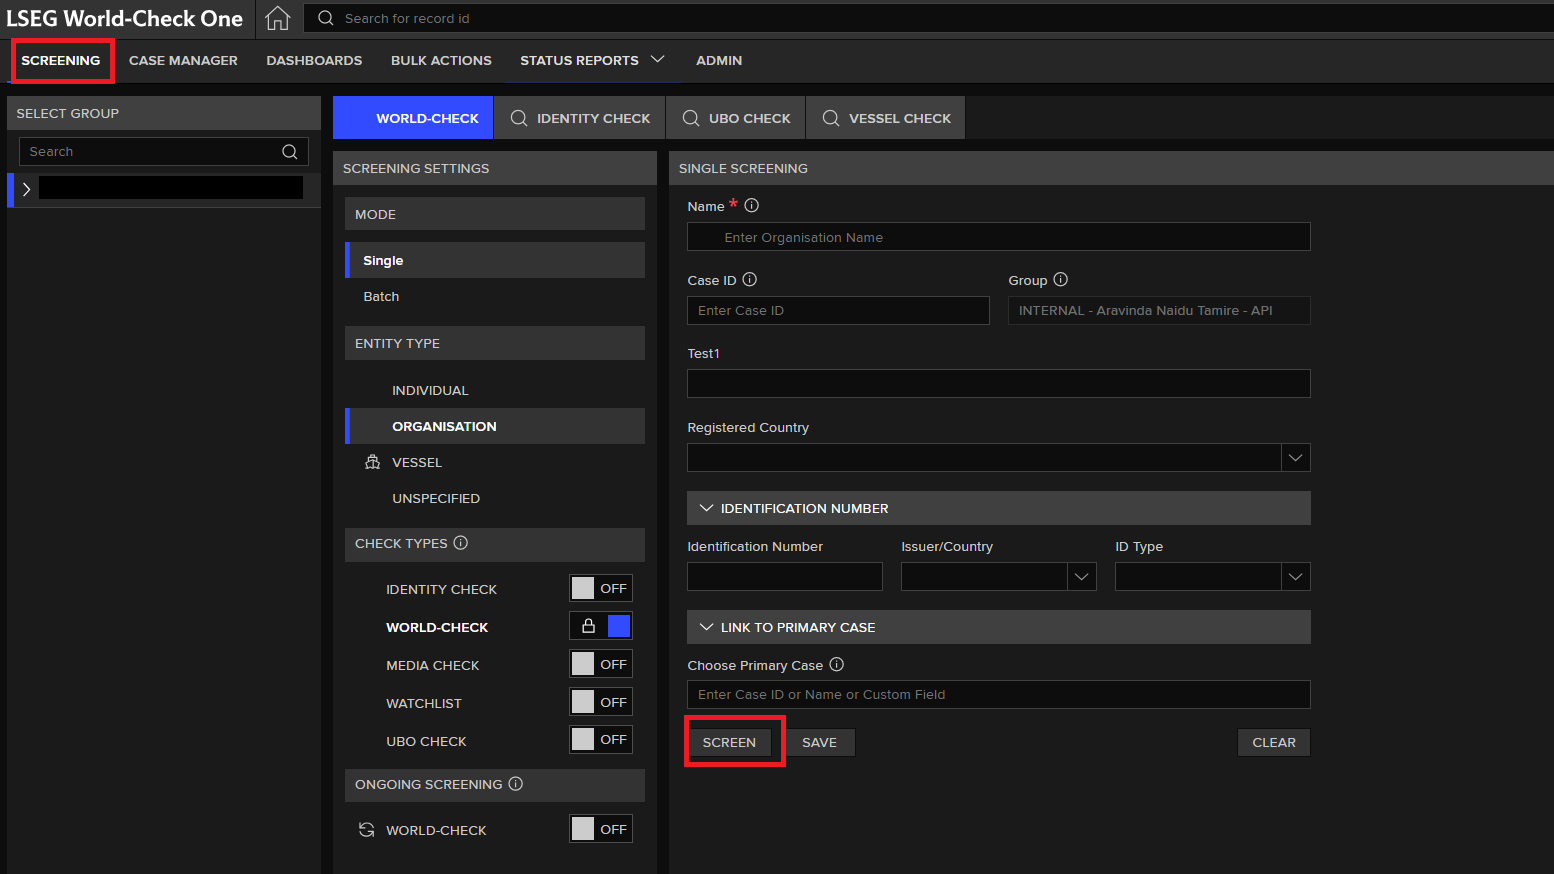
Equivalent World-Check One web portal screen to create and screen a case:
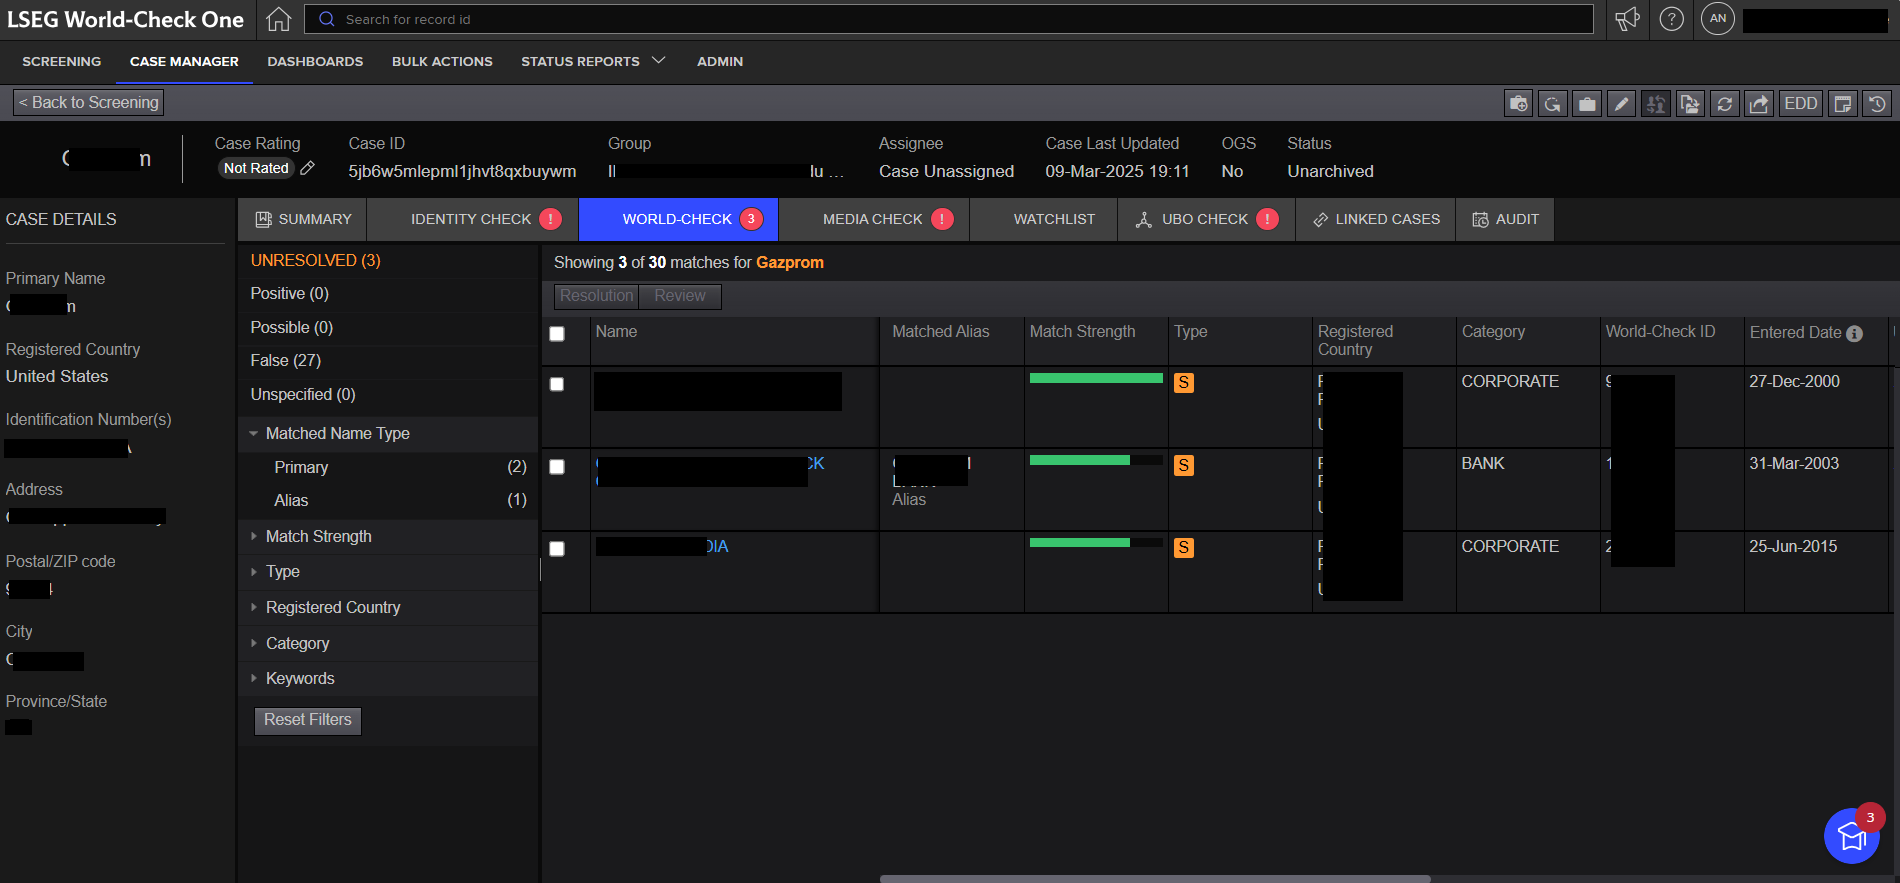
Equivalent World-Check One web portal screen to review screening results:
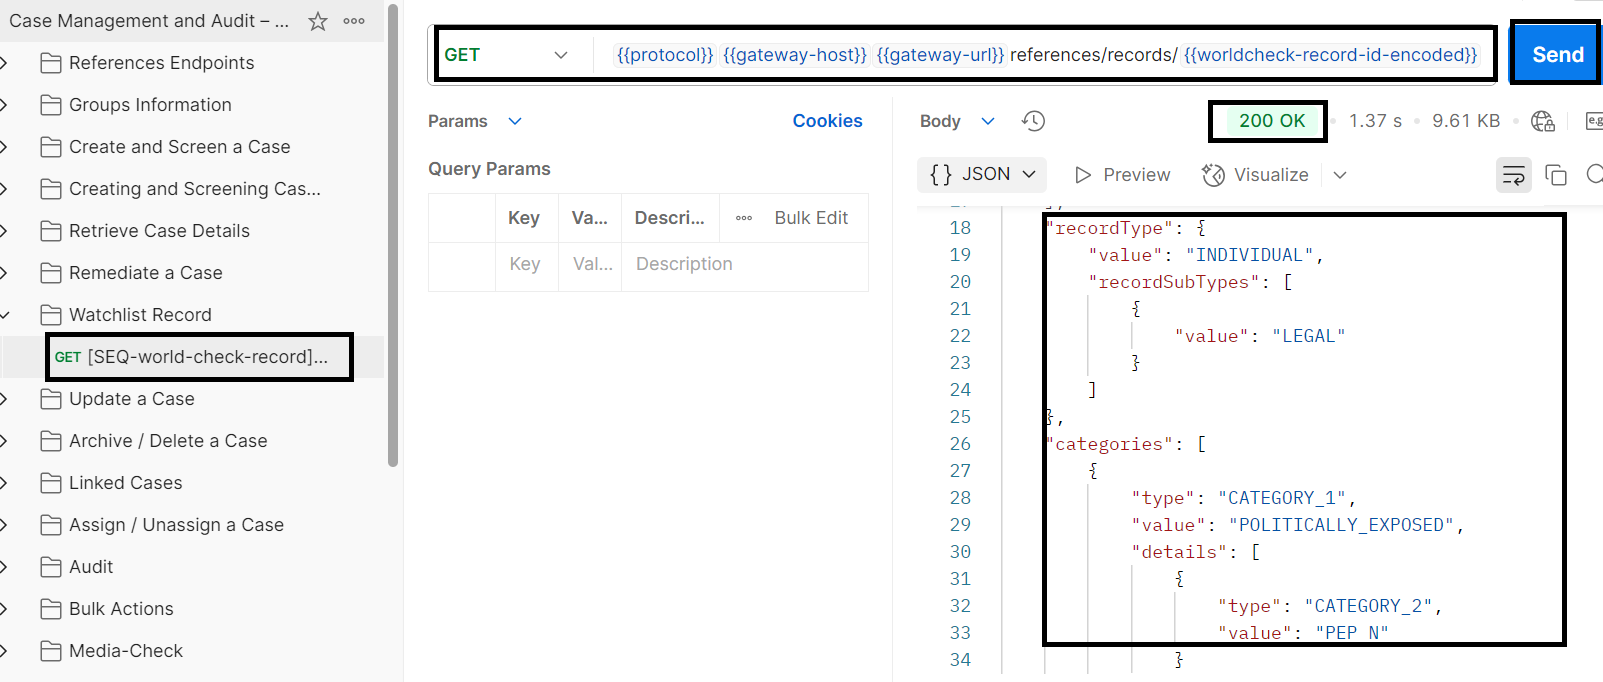
Step 4: Retrieve matched record details
You can use the “referenceId” (unique for every record – this would be World-Check ID in case of a world-check record) from one of the matched screening results to get the full record details in the below endpoint. Refer How to interpret World-Check record data tutorial for more information.
Note: If you are using Postman, you must set “referenceId” as a value for the environment variable “worldcheck-record-id-encoded” within your World-Check One API Postman environment.
Endpoint: “GET /references/records/{id}
Endpoint name in Postman collection: “[SEQ-world-check-record]: Retrieve a World-Check record”

Sample code
If you are using your own tool or code for sending requests, then note World-Check One API uses HMAC for authorization purposes. You can refer our documentation and download sample code in various languages to learn more about how to implement authorization in your request headers to make a successful call to World-Check One API.
Below is a quick snippet of the sample authorization code.
If the request does not have any body:
function generateAuthHeader(dataToSign){
var hash = CryptoJS.HmacSHA256(dataToSign,environment["api-secret"]);
return hash.toString(CryptoJS.enc.Base64);
}
var date = new Date().toGMTString();
var requestMethod = request.method.toLowerCase();
var requestUrlPart = replaceRequestValuesWithEnvValues(request.url.split('?')[0].replace('{{protocol}}{{gateway-host}}{{gateway-url}}', ''));
var dataToSign = "(request-target): ${requestMethod} " + environment["gateway-url"] + requestUrlPart + “\n" +
"host: " + environment["gateway-host"] + "\n" +
"date: " + date;
var hmac = generateAuthHeader(dataToSign);
var authorisation = "Signature keyId=\"" + environment["api-key"] + "\",algorithm=\"hmac-sha256\",headers=\"(request-target) host date\",signature=\"" + hmac + "\"";
postman.setEnvironmentVariable("authorisation",authorisation);
postman.setEnvironmentVariable("currentDate",date);
If the request has a body:
function generateAuthHeader(dataToSign){
var hash = CryptoJS.HmacSHA256(dataToSign,environment["api-secret"]);
return hash.toString(CryptoJS.enc.Base64);
}
var date = new Date().toGMTString();
var requestMethod = request.method.toLowerCase();
var requestUrlPart = replaceRequestValuesWithEnvValues(request.url.split('?')[0].replace('{{protocol}}{{gateway-host}}{{gateway-url}}', ''));
var dataToSign = "(request-target): ${requestMethod} " + environment["gateway-url"] + requestUrlPart + "\n" +
"host: " + environment["gateway-host"] + "\n" +
"date: " + date + "\n" +
"content_type: " + environment["content-type"] + "\n" +
"content_length: " + environment["content-length"];
var hmac = generateAuthHeader(dataToSign);
var authorisation = "Signature keyId=\"" + environment["api-key"] + "\",algorithm=\"hmac-sha256\",headers=\"(request-target) host date content_type content_length\",signature=\"" + hmac + "\"";
postman.setEnvironmentVariable("authorisation",authorisation);
postman.setEnvironmentVariable("currentDate",date);
Note: You may refer to “README.md” file included within the sample code for invoking request to World-Check One API for each HTTP method in various programming languages.
Troubleshooting and support
Debugging an error? Head over to our developer community to search for questions raised by other developers and find useful troubleshooting tips.
Have a question? Post it in our Q&A forum by selecting Forum as “World-Check One”, Tags as “world-check-one-api” and one of our API consultants will attend to it.
Need more help? Raise your concern via LSEG MyAccount Support tool and one of our specialists will reach out asap.
Want to share an idea or general feedback? Keep them coming our way via LSEG MyAccount Feedback tool and we will prioritize our roadmaps accordingly.
Other Useful links:
- Documentation
- Tutorials
- API Schema Reference
- UML Diagrams and Workflows
- Authentication and authorization
- Sample Code
- Downloads
- Changelog
- Release Notes
- FAQs
- World-Check One User Guides
Stay informed
World-Check One API is constantly improving with advanced capabilities through our innovation and customer feedback. All the changes are usually documented and available in the documentation under Changelog section.
Ensure you’re aware of upcoming system changes and/or new functionality that may affect your workflows or require action on your part by subscribing to Product Change Notifications (PCNs).
You can also view and subscribe to PCNs, Data Notifications, and Service Alerts on the Notifications & Alerts page in your LSEG MyAccount.