Introduction
Last Update: January 2025
PyCharm is a flagship cross-platform Python IDE developed by JetBrains (the same company that developed IntelliJ IDEA for Java/Kotlin). The IDE provides coding assistance such as code completion and syntax/error highlight, project and code navigation, package management, debugger, version control, and much more.
PyCharm has two editions, a Professional Edition with full features, and a free Community Edition (see the comparison), this makes the IDE attractive to both newbie and full-stack Python developers.
As a developer, I am using IntelliJ IDEA for Java development projects and the Visual Studio Code editor for Python and JavaScript/TypeScript development projects. I admit that I am never interested in PyCharm. However, there are a lot of questions about how to use our Python APIs/libraries with PyCharm, so it is a good opportunity for me to learn how to use PyCharm and share my knowledge.
This example project shows how to create a Python project with the Data Library for Python version 1 on PyCharm. It covers from starting a blank project to importing existing source code and dependencies configuration file to the IDE.
Note: This project is based on PyCharm Community Edition 2023.1.2 and the Classic UI. Some user interfaces may be different if you use a Professional Edition or New UI.
Update January 2025: There is a new and improve LSEG Data Library for Python (aka Data Library version 2) available now.
Python and PyCharm prerequisite
Before I am going further, there is some prerequisite, dependencies, and libraries that the project is needed.
PyCharm
Firstly, you can download (or purchase) the PyCharm IDE installer file from the PyCharm website.
Anaconda or Miniconda
Next, install the Anaconda or Minconda on your machine.
This project uses Miniconda version 23.3.1.
Access to the Delivery Platform
This project uses Delivery Platform (RDP - formerly known as Refinitiv Data Platform) Version 1 Authentication (User ID or Machine-ID type).
Please contact your Refinitiv representative to help you with the RDP account and services.
Internet Access to PyPI
The Refinitiv Data Library for Python is available in the Python Package Index (PyPI). You can use the Python pip tool to download the library from the Refinitiv-Data package over internet.
What is Data Library for Python version 1?
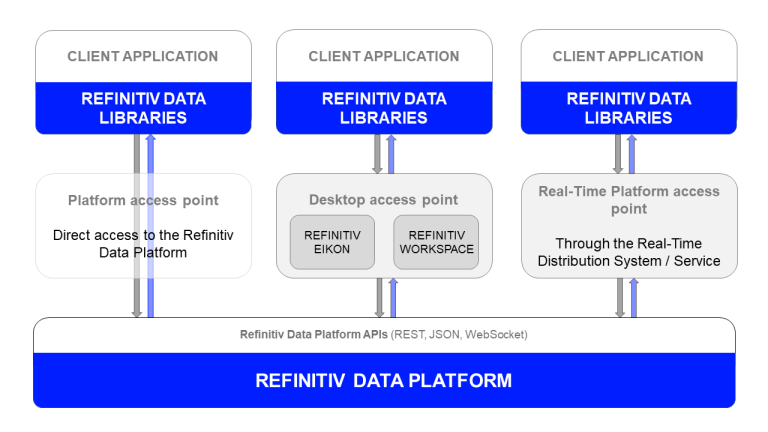
Now let me turn to our example Python library for this project. The Data Library for Python version 1 (aka RD Lib - Python, Refinitiv Data Library for Python) provides a set of ease-of-use interfaces offering coders uniform access to the breadth and depth of financial data and services available on the RDP Platform. The API is designed to provide consistent access through multiple access channels and target both Professional Developers and Financial Coders. Developers can choose to access content from the desktop, through their deployed streaming services, or directly to the cloud. With the Data Library, the same Python code can be used to retrieve data regardless of which access point you choose to connect to the platform.
This example project is focusing on the platform session which connecting to the Delivery Platform (RDP) APIs only.
For more detail regarding the Refinitiv Data Platform, please see the following APIs resources:
- Quick Start page.
- Tutorials page.
That covers a brief introduction to Data Library for Python version 1.
Update January 2025: This project uses Refinitiv Data Library, which is the 1st version of the Python library. The new and improved LSEG Data Library for Python is version 2. The LSEG Data Library is also compatible with PyCharm. Please find more detail on the Essential Guide to the Data Libraries article.
Set up a blank project
Step 1: Creating a new project
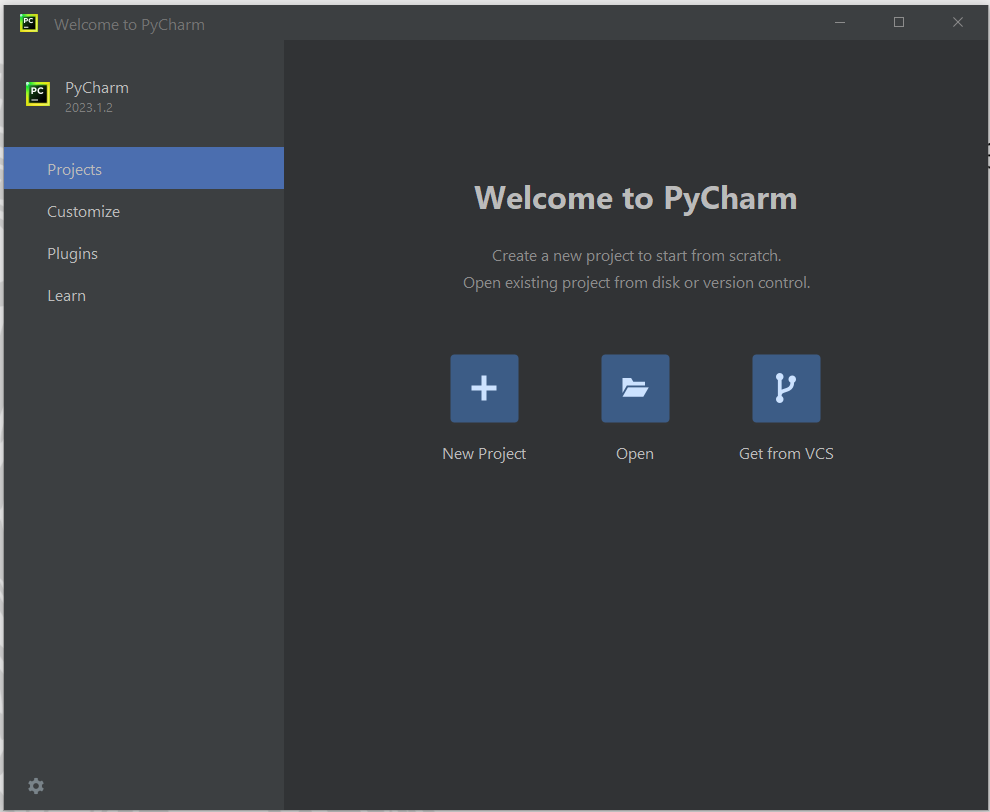
Firstly, create a new development project. Please open the PyCharm IDE and choose "New Project" on the welcome screen.
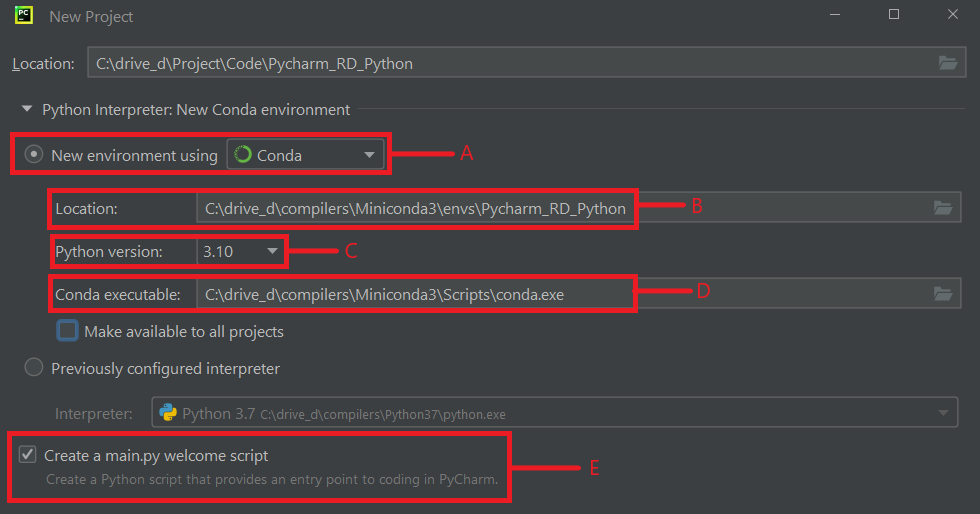
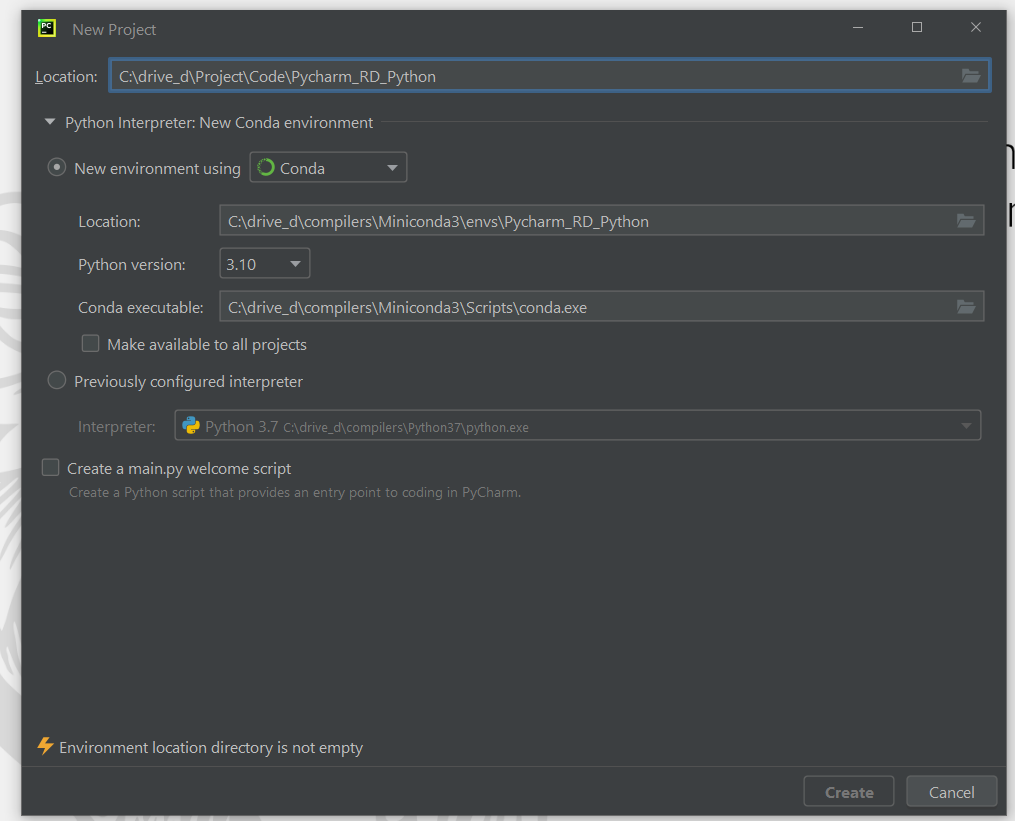
Next, input the project location (I pick C:\drive_d\Project\Code\Pycharm_RD_Python folder as my work location) and set the following properties:
- New environment using: Conda
- Location: Point to your <Conda>\envs\<Project name>
- Python version: Based on your preference, I choose Python 3.10. Please refer to the Python End Of Life page
- Conda executable: Point to <Conda>\Script\conda.exe location in your Conda installation folder
- Create a main.py welcome script: Choose this option
Note: PyCharm supports the Virtualenv, Pipenv, Poetry, and Anaconda/Minconda Python virtual environment and Packaging/Dependencies Management tools. I choose Conda for Python versioning flexibility. Please choose this option based on your development requirement.
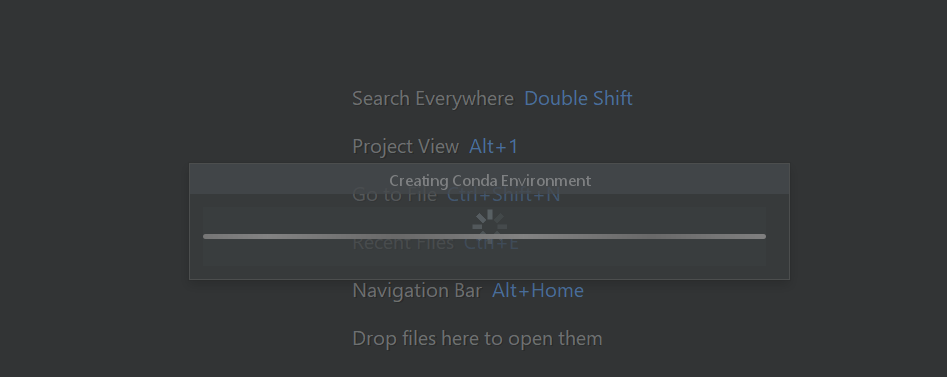
Then PyCharm initializes the project and Conda environment.
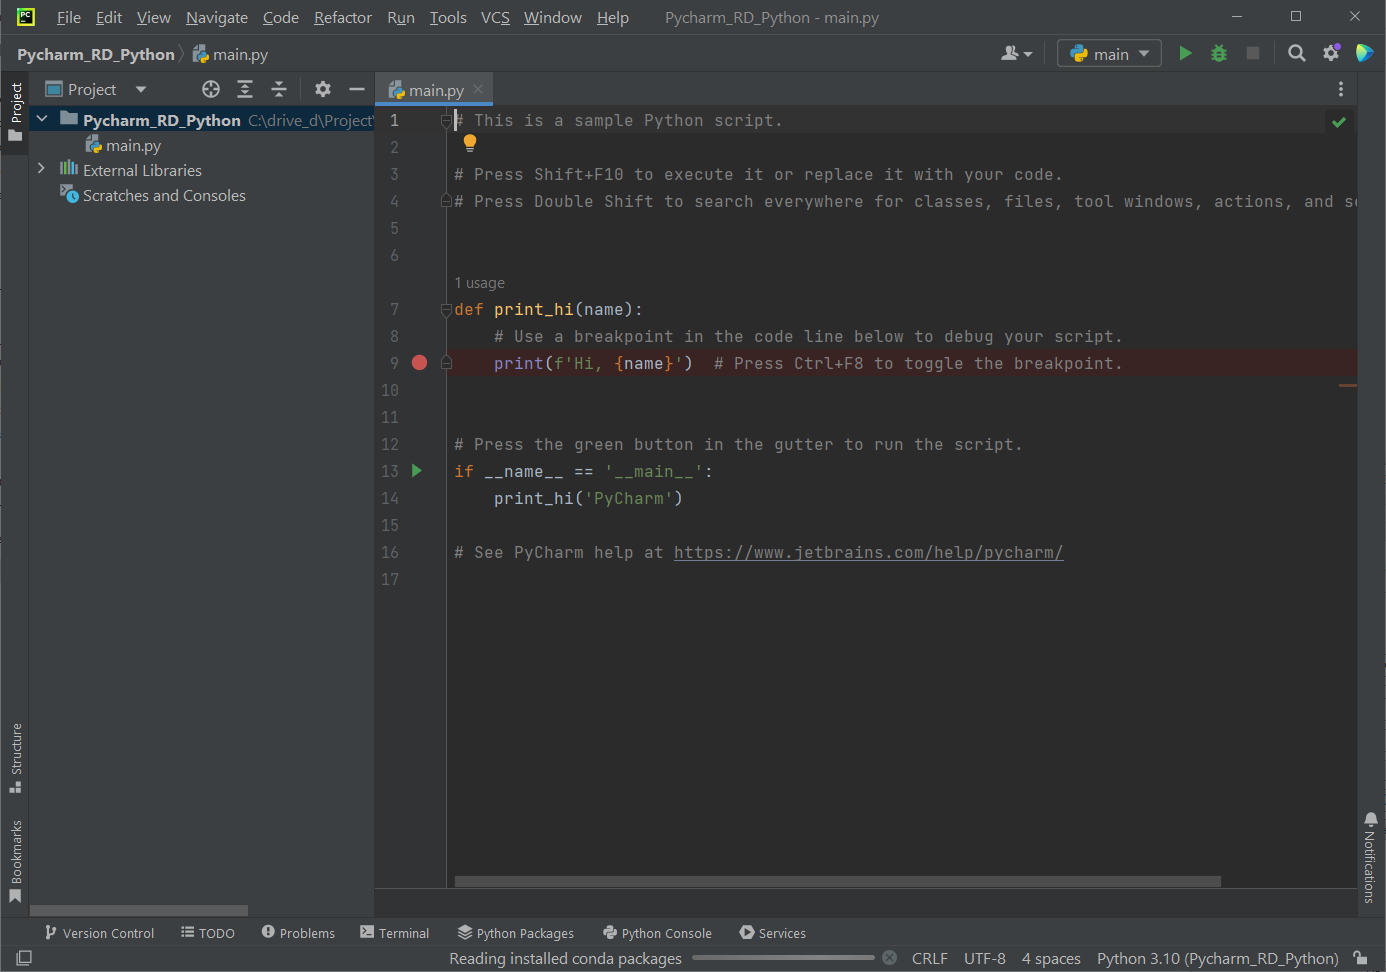
Once the project and Conda environment are created successfully, you see this IDE screen with an example main.py code as follows:
You can use this example main.py script to test if PyCharm can run Python properly on your machine. To run the code, right-click and choose Run 'Main' menu or click the Run command at the toolbar.
The result is as follows:
Now the basic Python setting is done for PyCharm.
Step 2: Set up the Project setting for Data Library for Python version 1
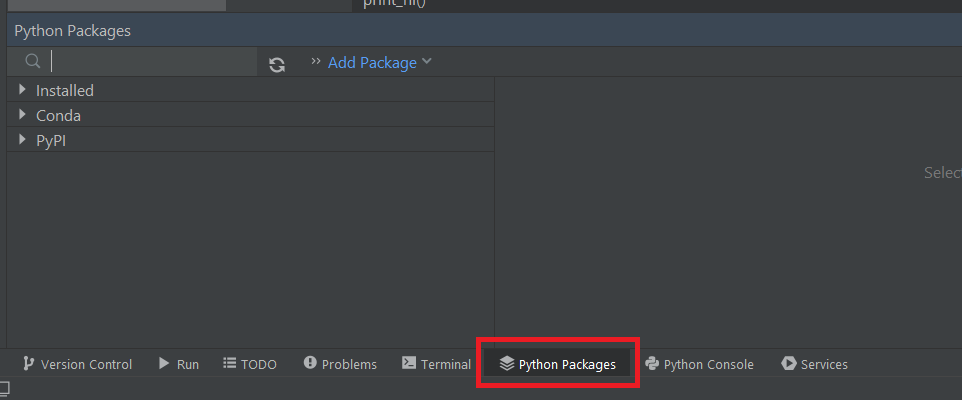
So, now let’s look at installing the Data Library for Python version 1 dependencies. Firstly, open the Python Package tool window available at the bottom of the screen as follows:
You can start typing the package name in the Search field. PyCharm then shows matching packages on each repository. Since we are using a Conda environment, so PyCharm shows search results on both Conda and PyPI repositories like the following search result for the python-dotenv package.
To install Data Library for Python version 1, type refinitiv in the Search field. The RD Lib - Python is available on PyPI only, so I choose the refinitiv-data package under PyPI and click the "Install with pip" button to install the package.
Note: To install the LSEG Data Library for Python, you can type lseg-data in the Search field.
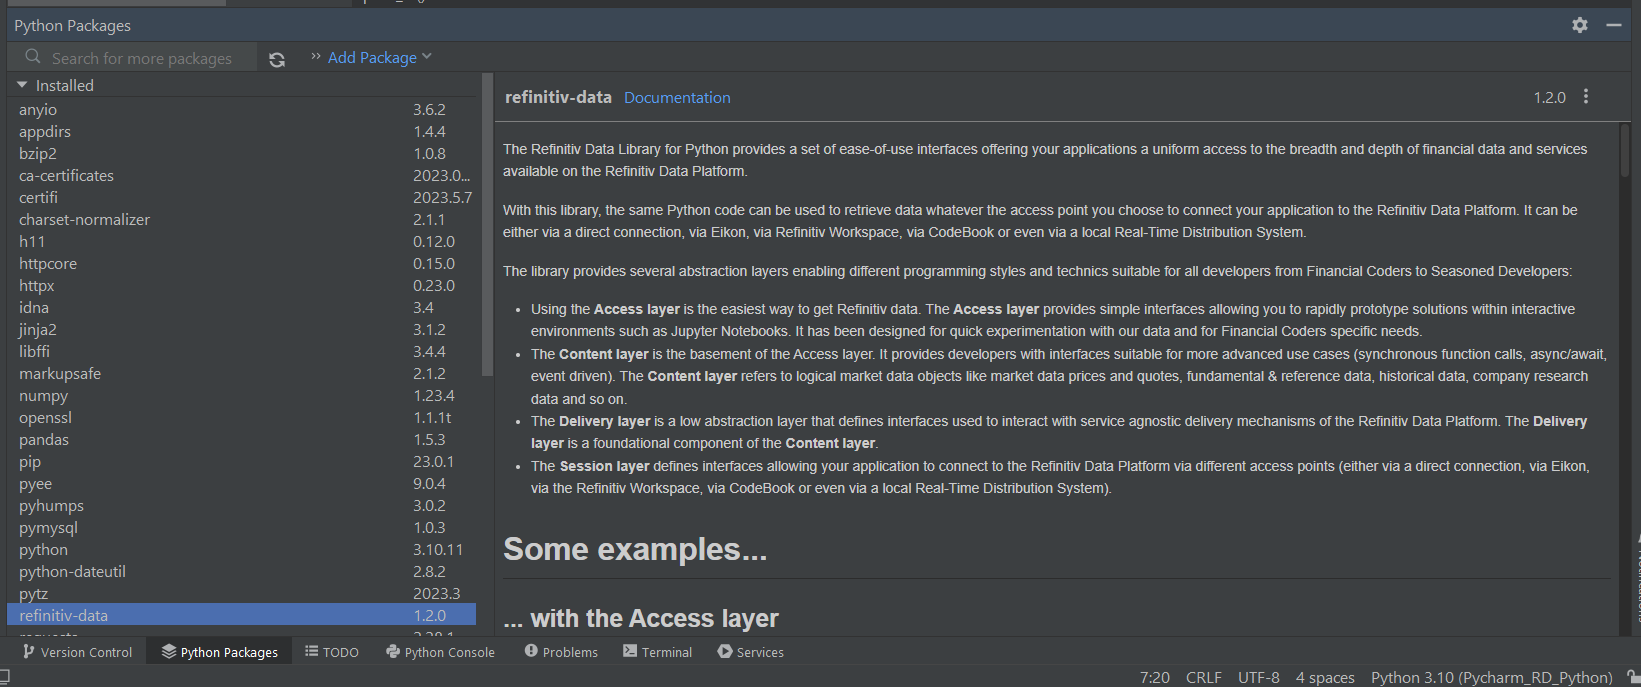
Once the package installation is successful, you see the notification, and the refinitiv-data package is listed in the installed packages.
The next step is testing the RD Lib - Python. You can add the refinitiv-data.config.json file to the IDE with the following configurations:
{
"logs": {
"level": "debug",
"transports": {
"console": {
"enabled": false
},
"file": {
"enabled": false,
"name": "refinitiv-data-lib.log"
}
}
},
"sessions": {
"default": "platform.rdp",
"platform": {
"rdp": {
"app-key": "App Key",
"username": "RDP User ID",
"password": "RDP Password"
},
}
}
}
Please refer to the Quickstart page if you are using other Access Points such as Desktop session, etc.
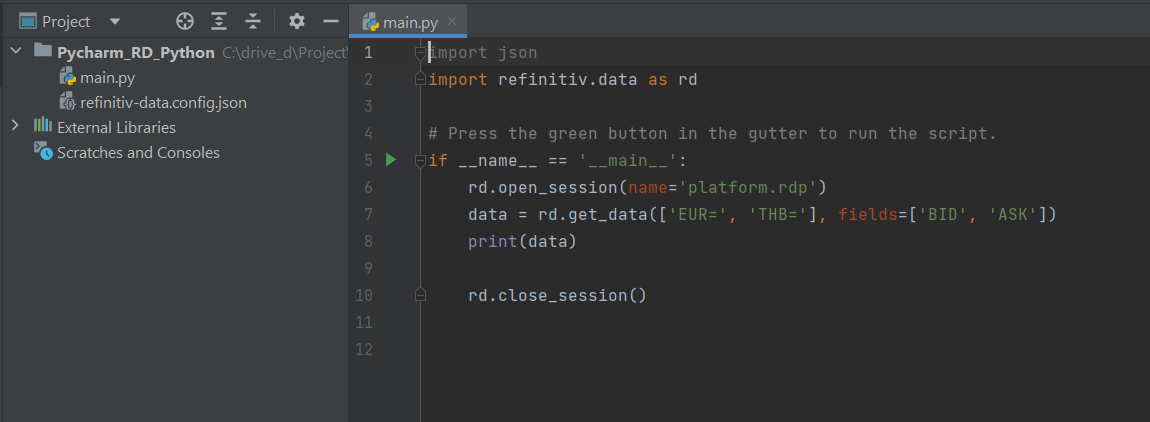
Next, change the code of main.py to call RD - Lib Python instead as follows:
import json
import refinitiv.data as rd
if __name__ == '__main__':
# Open Platform Session
rd.open_session(name='platform.rdp')
# Getting Data
data = rd.get_data(['EUR=', 'THB='], fields=['BID', 'ASK'])
print(data)
# Close session
rd.close_session()
Your PyCharm IDE should look like the following screenshot:
If your RDP credential works fine, the running result shows as follows:
Now your PyCharm is ready to work with Refinitiv Data Library for Python. Let’s leave a main.py file there.
For more detail about packages management with PyCharm, please check the official document.
Step 3: Plotting Graph
Now we come to how to plot a graph with PyCharm. Please note that the Jupyter Notebook integration is available in PyCharm Professional Edition only, so I am demonstrating with a basic graph from a console application instead.
The first step is to install the Matplotlib library. You can open the Python Package tool window to install the package. However, PyCharm has a Terminal emulator that runs the project Conda (or Virtualenv) shell automatically and you can run the pip and conda commands to manage the Python environment directly.
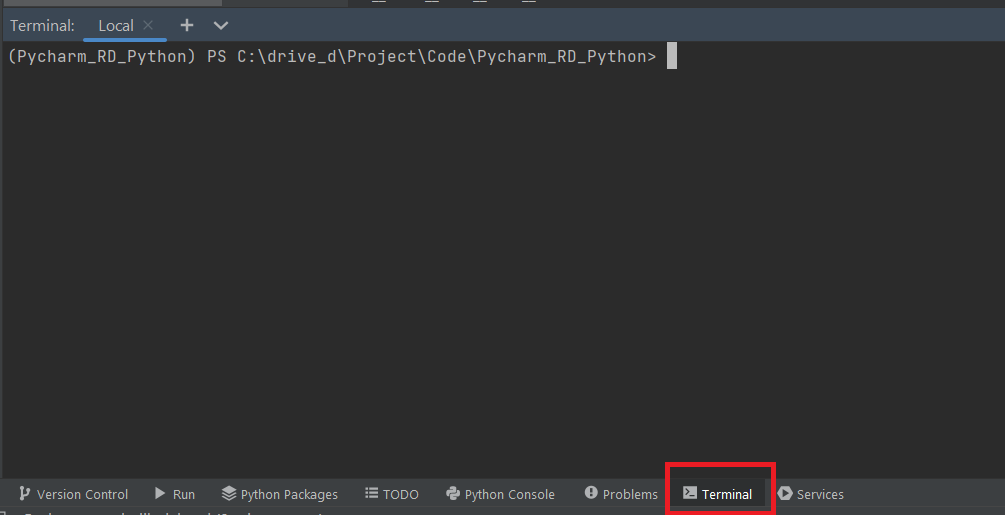
To open the Terminal, just click the Terminal tool window at the bottom of the screen. You see that it activates Conda Pycharm_RDPython by default.
The Matplotlib library is available on both conda-forge and PyPI, let's stick with the PyPI for consistency and install the package with the pip install command.
(Pycharm_RD_Python) C:> pip install matplotlib
Next, add a new Python file chart.py to the IDE with the following source code.
Please see how to add Python files from the official page.
import json
import pandas as pd
import matplotlib.pyplot as plt
import refinitiv.data as rd
from refinitiv.data.content import historical_pricing
from refinitiv.data.content.historical_pricing import Intervals
if __name__ == '__main__':
# Open Platform Session
rd.open_session(name='platform.rdp')
# Getting Data
universe = 'META.O'
response = historical_pricing.summaries.Definition(
universe=universe,
interval=Intervals.DAILY, # Supported intervals: DAILY, WEEKLY, MONTHLY, QUARTERLY, YEARLY.
count=10,
fields=['BID', 'ASK', 'OPEN_PRC', 'HIGH_1', 'LOW_1', 'TRDPRC_1']
).get_data()
# Preparing data for plotting a graph
# Add RIC name to be Dataframe column
response.data.df['Instrument'] = universe
# Reset index
response.data.df.reset_index(level=0, inplace=True)
# Plotting Graph
dataPlot = pd.DataFrame(response.data.df,
columns=['Instrument', 'Date', 'BID', 'ASK', 'OPEN_PRC', 'TRDPRC_1', 'HIGH_1', 'LOW_1'])
dataPlot.sort_values('Date', ascending=True, inplace=True)
dataPlot.plot(x='Date', y=['BID', 'ASK', 'OPEN_PRC', 'TRDPRC_1', 'HIGH_1', 'LOW_1'], figsize=(14, 7))
plt.show()
# Close session
rd.close_session()
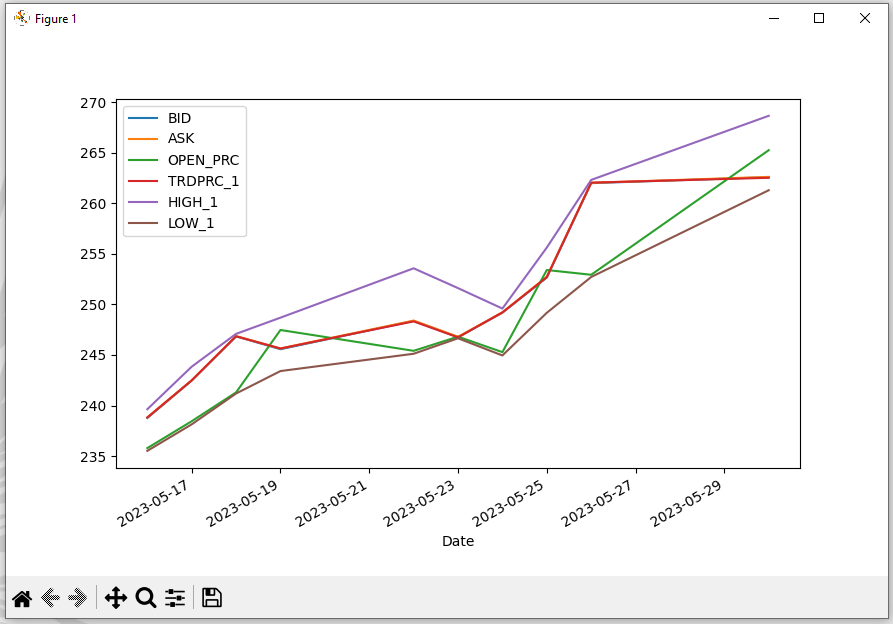
The run result is as follows:
That’s all I have to say about plotting graphs in PyCharm IDE.
Step 4: Save and Export Dependencies
My next point is how to save and export this project's dependencies. It is one of the most important parts to help share the project with your colleagues. With the right setting, your team (or even yourself) can re-create this development environment in simple steps.
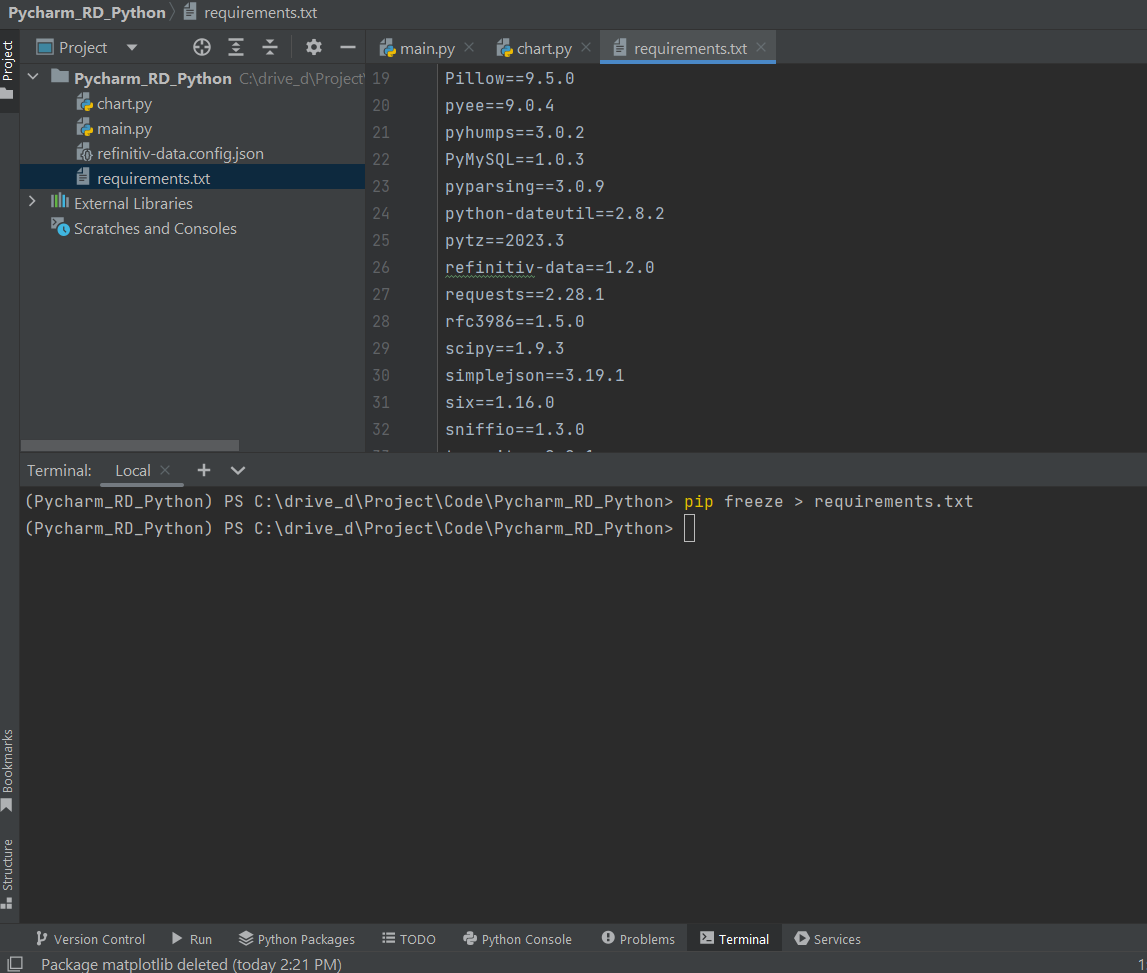
A requirements.txt is a simple text file that saves a list of the Python modules and libraries required by the project/Python environment. To generate a file, you can open the Terminal tool window and run the following command:
(Pycharm_RD_Python) C:> pip freeze > requirements.txt
That covers how to save and export this project's dependencies.
Import existing code to PyCharm
If you have existing Python source code, requirements.txt, and other configuration files. You can create a new PyCharm project with existing files to continue developing the application using PyCharm.
Step 1: Create a new project with a non-empty folder
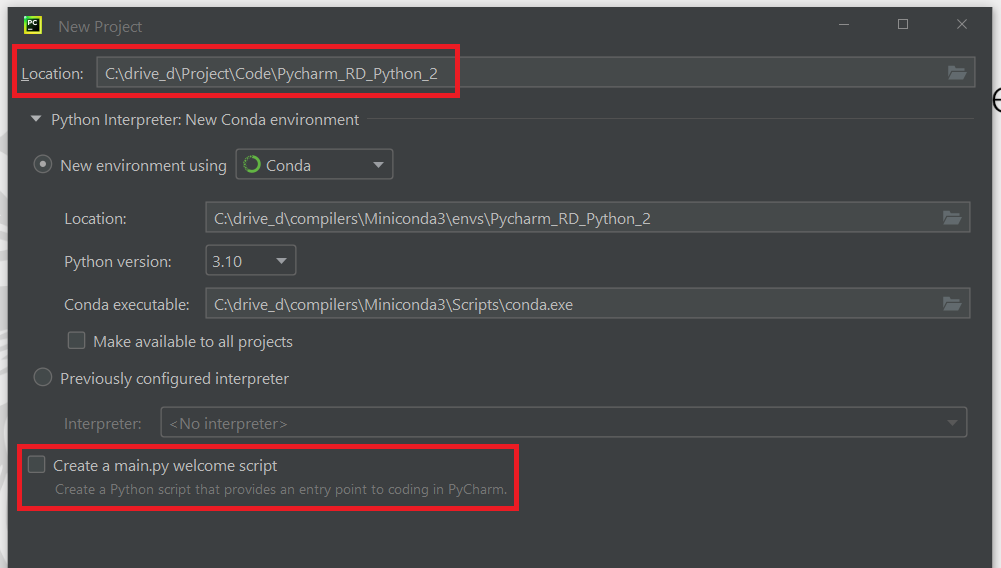
I pick the C:\drive_d\Project\Code\Pycharm_RD_Python_2 folder as my new work location. The folder contains some Python and RDP configuration files as follows:
Next, I am creating a new project on that folder with the same option as a blank project, except uncheck the "Create a main.py welcome script" option as follows:
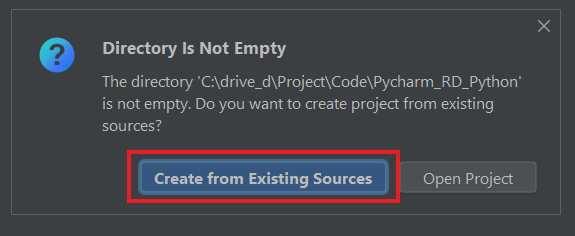
PyCharm IDE can detect that the target folder is not empty and asks if we want to create a new project from existing sources, choose this option.
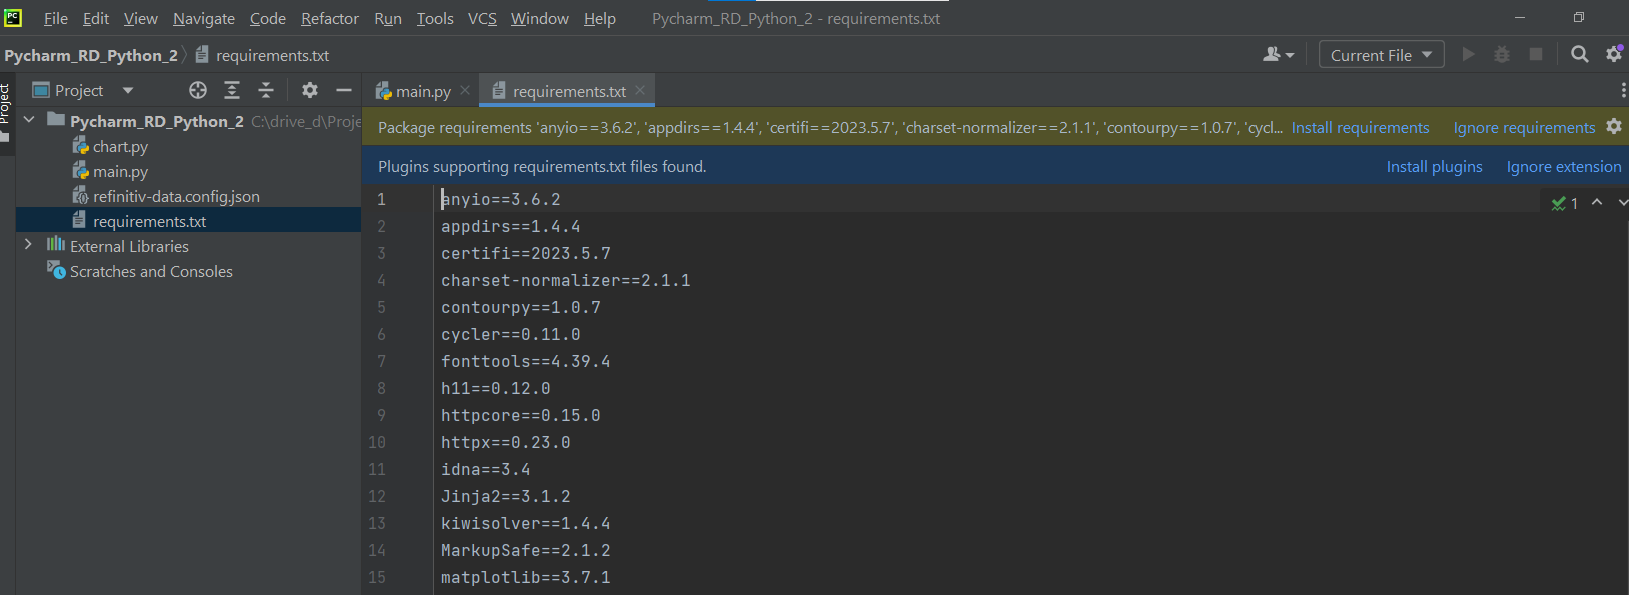
Once the project and Conda environment are created successfully, you see this IDE screen with existing code as follows:
You may be noticed that the IDE can detect the source code use the Python libraries that not installed in the Conda environment yet. If you open a requirements.txt file, the IDE shows the same message as well.
I am not recommended you install the required libraries with the IDE tool's "install requirements" button. Based on my experience, I always encounters pip install error issue.
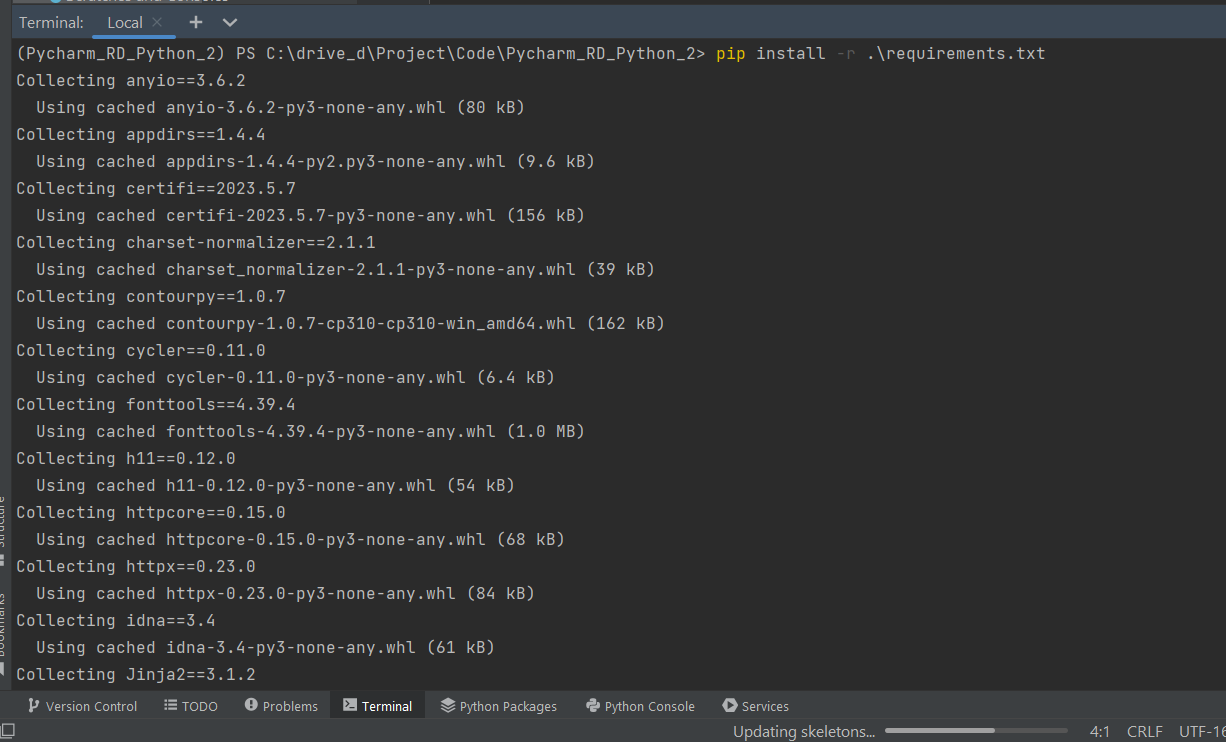
To install required library, I highly recommend you open the Terminal window and install dependencies to the active environment with the following command instead.
(Pycharm_RD_Python_2) PS C:> pip install -r .\requirements.txt
Now this project is ready for RD Library - Python coding.
Reuse existing Conda environment
One benefit of using Anaconda/Miniconda over Virtualenv is developers can share a Conda environment with multiple projects. If the projects share the same dependencies requirements, developers do not need to create a new Conda environment.
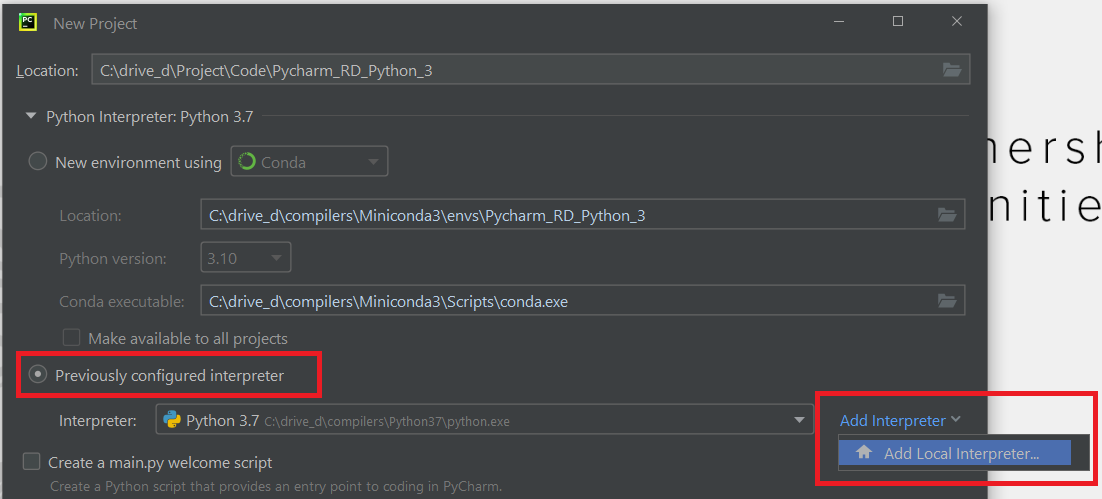
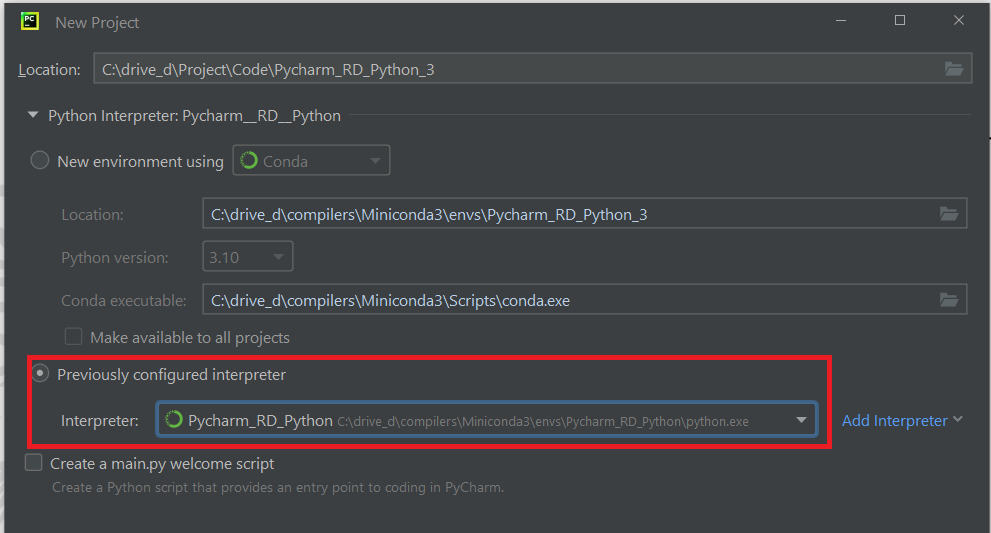
For example, I am creating a new Pycharm_RD_Python_3 project at C:\drive_d\Project\Code\Pycharm_RD_Python_3 folder but I want to use Pycharm_RD_Python Conda environment with this project.
In the new project window, choose the "Previously configured interpreter" option, and click the "Add Local Interpreter.." menu.
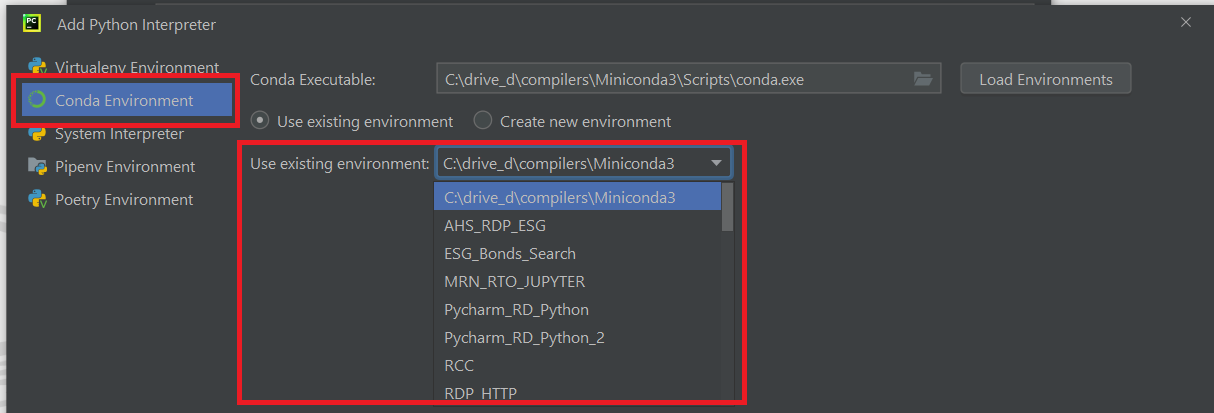
In the Add Python Interpreter window, choose "Conda Environment" and select the environment that you want to use from a drop-down list as follows:
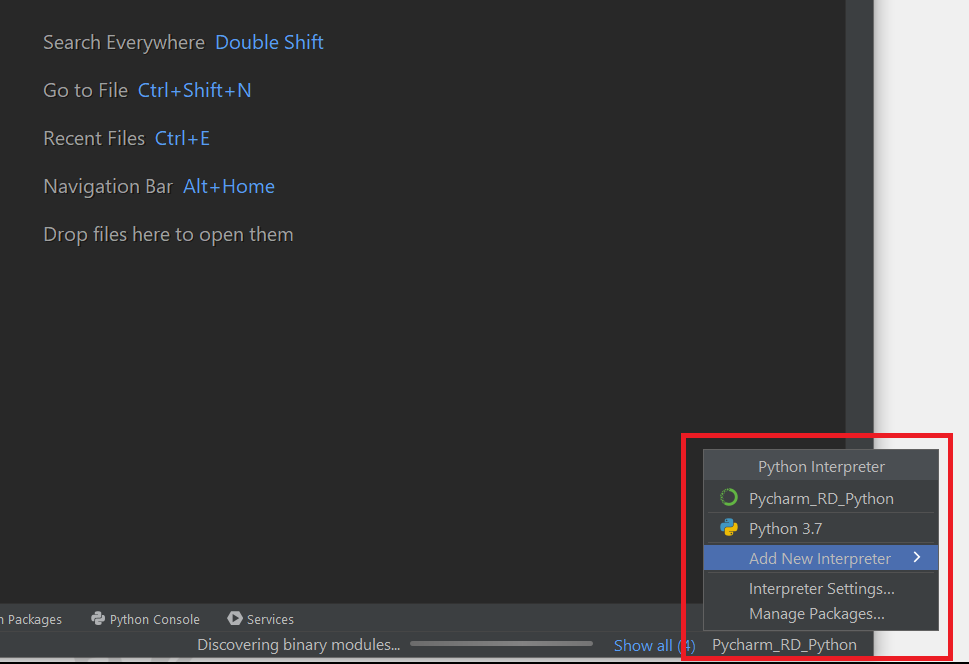
You may want to change Python interpreter/environment on the fly to test the project with other versions of Python or libraries. You can change the project's interpreter/environment by clicking on the Python Interpreter selector located on the status bar.
That is all for how to reuse or change the Python environment on the fly.
Please see more detail on the Configure a Python interpreter page.
Troubleshooting
Error: "Environment location directory is not empty" when creating a new project.
Answer: This error message means you are creating a duplicate Conda environment which is not allowed by the IDE and Conda. You must remove an environment and remove <Conda>\envs\<env name> folder in your machine manually.
Error: I cannot run Jupyter Notebook or .ipynb file in PyCharm Community Edition.
Answer: The Jupyter Notebook integration supported is available in PyCharm Professional Edition only.
Error: Can I use Eikon Data API in PyCharm?
Answer: Yes, you can. You just install the Eikon Data API library in the environment.
Error: I want to use Spyder IDE. How can I use it?
Answer: Please check the Spyder IDE official page and document for more detail.
Error: Where can I find more detail about PyCharm usage?
Answer: Please check the PyCharm Getting Started page for more detail.
Conclusion
PyCharm is one of the most popular IDEs for Python development. It supports Python virtual environment, Package management, and deployment, plugins supported, etc. Python developers can gain benefits from IDE automation and a full-features development environment. These make PyCharm suitable for the rapid development nature of the Data Library for Python.
I hope this step-by-step guide can help Python developers get started using our Python libraries with PyCharm IDE. That completes my article.
References
For further details, please check out the following resources:
- Data Library for Python version 1 and LSEG Data Library for Python on the LSEG Developer Community website.
- Getting Started with Delivery Platform article
- PyCharm: Configure a conda virtual environment
- PyCharm: Create and run your first project
- PyCharm Tutorials
- Getting Started with PyCharm
- PyCharm for Productive Python Development (Guide)
For any questions related to this article or the Data Library for Python, please use the Developer Community Q&A Forum.
Get In Touch
Related Articles
Source Code
Related APIs
Request Free Trial
Call your local sales team
Americas
All countries (toll free): +1 800 427 7570
Brazil: +55 11 47009629
Argentina: +54 11 53546700
Chile: +56 2 24838932
Mexico: +52 55 80005740
Colombia: +57 1 4419404
Europe, Middle East, Africa
Europe: +442045302020
Africa: +27 11 775 3188
Middle East & North Africa: 800035704182
Asia Pacific (Sub-Regional)
Australia & Pacific Islands: +612 8066 2494
China mainland: +86 10 6627 1095
Hong Kong & Macau: +852 3077 5499
India, Bangladesh, Nepal, Maldives & Sri Lanka:
+91 22 6180 7525
Indonesia: +622150960350
Japan: +813 6743 6515
Korea: +822 3478 4303
Malaysia & Brunei: +603 7 724 0502
New Zealand: +64 9913 6203
Philippines: 180 089 094 050 (Globe) or
180 014 410 639 (PLDT)
Singapore and all non-listed ASEAN Countries:
+65 6415 5484
Taiwan: +886 2 7734 4677
Thailand & Laos: +662 844 9576

