

Wasin Waeosri
Developer Advocate
Developer Advocate
Overview
Setting up a new Python data project — creating virtual environments, installing packages, configuring library credentials, and scaffolding notebooks — is a repetitive process that every developer has to go through, often from scratch each time. This project shows how that entire workflow can be driven by a single AI prompt, with no manual steps required.
This project demonstrates how to use a copilot-instructions.md file to automatically set up a complete LSEG Data Library for Python Jupyter Notebook environment using GitHub Copilot. The setup is triggered through either the GitHub Copilot Chat extension for VS Code or the Copilot CLI — whichever fits your preferred workflow.
The .github/copilot-instructions.md file at the heart of this project acts as a structured, step-by-step runbook that Copilot reads and executes. It instructs Copilot to create a Python virtual environment, upgrade pip, install the required packages (lseg-data and jupyterlab), generate a requirements.txt, create and populate a Jupyter notebook with working LSEG Data Library code, write the library configuration file, and finally commit everything to a new Git branch — all from a single prompt.
The goal is to demonstrate that GitHub Copilot's agentic capabilities extend well beyond code completion. With the right instructions, Copilot can reliably automate the full environment lifecycle, making it straightforward for any team member — regardless of their familiarity with the LSEG Data Library — to get a working development environment up and running in minutes.
Disclaimer
This project and the .github/copilot-instructions.md file were tested on Windows with the following Copilot models
- Claude Sonnet 4.6: Both Chat Extensions and Copilot CLI
- Claude Opus 4.6: Both Chat Extensions and Copilot CLI
- GPT-5.4: Both Chat Extensions and Copilot CLI
- GPT-5.3-Codex: Both Chat Extensions and Copilot CLI
If you use a different model, review and revise .github/copilot-instructions.md file with your selected model and your review, then retest the instructions until it satisfies your requirements.
What is GitHub Copilot
Let’s start with what the GitHub Copilot is. GitHub Copilot is an AI coding assistant that helps you write code faster and with less effort. Then, you can focus more energy on problem solving and collaboration. It supports multiple AI models. The GitHub Copilot integrates with your favorite IDE such as VS Code, MS Visual Studio, JetBrains IDEs family, Apple XCode, Eclipse, etc. for the seamless workflow.
I am demonstrating with the VS Code and the GitHub Copilot Chat extension for VS Code extension.
What is Copilot CLI
Now, what about Copilot CLI? Copilot CLI is a command line interface tool allows you to use the Copilot directly from your terminal. You can use it to answer questions, write and debug code, and interact with GitHub.com. For example, you can ask Copilot to make some changes to a project and create a pull request.
GitHub Copilot CLI gives you quick access to a powerful AI agent, without having to leave your terminal. It can help you complete tasks more quickly by working on your behalf, and you can work iteratively with GitHub Copilot CLI to build the code you need.
That’s all I have to say about the GitHub Copilot and Copilot CLI.
What is the .github/copilot-instructions.md File?
My next point is the Copilot instruction file. The .github/copilot-instructions.md file is a project guide that helps both developers and GitHub Copilot understand how the project is structured and how to work with it. The file is a text based in a Markdown format.
It can cover things like coding style, naming conventions, folder structure, required tools, setup steps, and how to run or test the code. Having this in one place makes it easier for new team members and beginners to get started without having to guess or ask for help.
The equivalent files for other AI tools are GEMINI.md for Gemini CLI and CLAUDE.md for Claude.
Prerequisites
Before you begin, ensure the following are installed and available on your PATH:
- Python 3.11 or higher — python.org/downloads
- Git — git-scm.com
- Copilot CLI or GitHub Copilot Chat extension for VS Code — with access to this repository
- Network access to PyPI (or a trusted mirror)
Connection Type Requirement
- If you are using the Desktop Session: The LSEG Workspace Desktop application is required.
- If you are using the Platform Session: The LSEG Data Platform account and permission is required.
- If you are using the Streaming services within a deployed ADS: The local deployed ADS server Hostname/IP Address, WebSocket Port, DACS username (if any) is required. Please contact your Market Data Team.
You can find more regarding each connection type setting in the Data Library Quickstart page.
Copilot .github/copilot-instructions.md Walkthrough
This project .github/copilot-instructions.md file is a Markdown text file contains the project overview, prerequisites, expected project structure information, and a step-by-step guide to set up a Python and Jupyterlab development environment for LSEG Data Library for Python (aka Data Library version 2).
I am explaining the file part-by-part, so it should be easy for developers to follows and understand each part purpose and actions.
Overview and Prerequisites part
Let me start by the first section, overview and prerequisites part. This section describes the project's overview (you can change it based on your project requirements) and prerequisites. The basic prerequisites are Python, Git client application, and access to PyPI Python Package Index repository.
# Data Library - Project Setup Guide
## Overview
A step-by-step Copilot guide to set up a [Data Library for Python](https://developers.lseg.com/en/api-catalog/lseg-data-platform/lseg-data-library-for-python) development environment with Python and JupyterLab on Windows and macOS.
## Prerequisites
- Python 3.11 or higher installed and available on your `PATH`
- Git installed and configured
- Network access to PyPI (or a trusted mirror)
Working Directory and Project Layout
My next points are the project working directory and layout. These two sections may look simple, but they are actually critical for Copilot to work correctly.
The Working Directory section tells Copilot and developers who running the setup — that all commands must be executed from the workspace root folder. Without this, Copilot/Developers might create files or virtual environments in the wrong location, which would cause the rest of the setup steps to fail.
## Working Directory (Important)
Run all commands in this guide from the **workspace root** folder.
The Expected Project Layout section defines the full folder and file structure that the project should have after setup is complete. This gives Copilot a clear target to work toward. Instead of guessing where to create files, Copilot can refer to this layout and place every file exactly where it belongs.
## Expected Project Layout
Before running setup commands, confirm the project structure should match this layout:
```text
/
├── .github/
│ └── copilot-instructions.md
├── .gitignore
├── LICENSE.md
├── Project_README.md
├── README.md (for the repository)
├── images/article81_copilot_ld_python/
├── requirements.txt
├── .venv/
└── notebook/
├── ld_notebook.ipynb
└── lseg-data.config.json
```
Notes:
- `.venv/` must be inside the workspace root.
- `notebook/` must contain both `ld_notebook.ipynb` and `lseg-data.config.json`.
The notes at the bottom are especially useful. They highlight the parts of the layout that are easy to get wrong — for example, .venv/ must be at the workspace root, not inside a subfolder, and the notebook/ folder must contain both the notebook file and the configuration file together.
Together, these two sections anchor the entire setup. They tell Copilot where it is starting from and what the finished result should look like.
That’s all I have to say about the project structure.
Part 1: Create a Project Setup Branch
Now we come to the first step. Since this example project starts with the main branch, we will create a new Git branch named setup-project to handle the initial configuration. This includes adding a .gitignore file and specifying the files and folders that should be excluded from the repository.
This means that when you are creating a .github/copilot-instructions.md file, you must have a clear picture of the project's folder structure in mind.
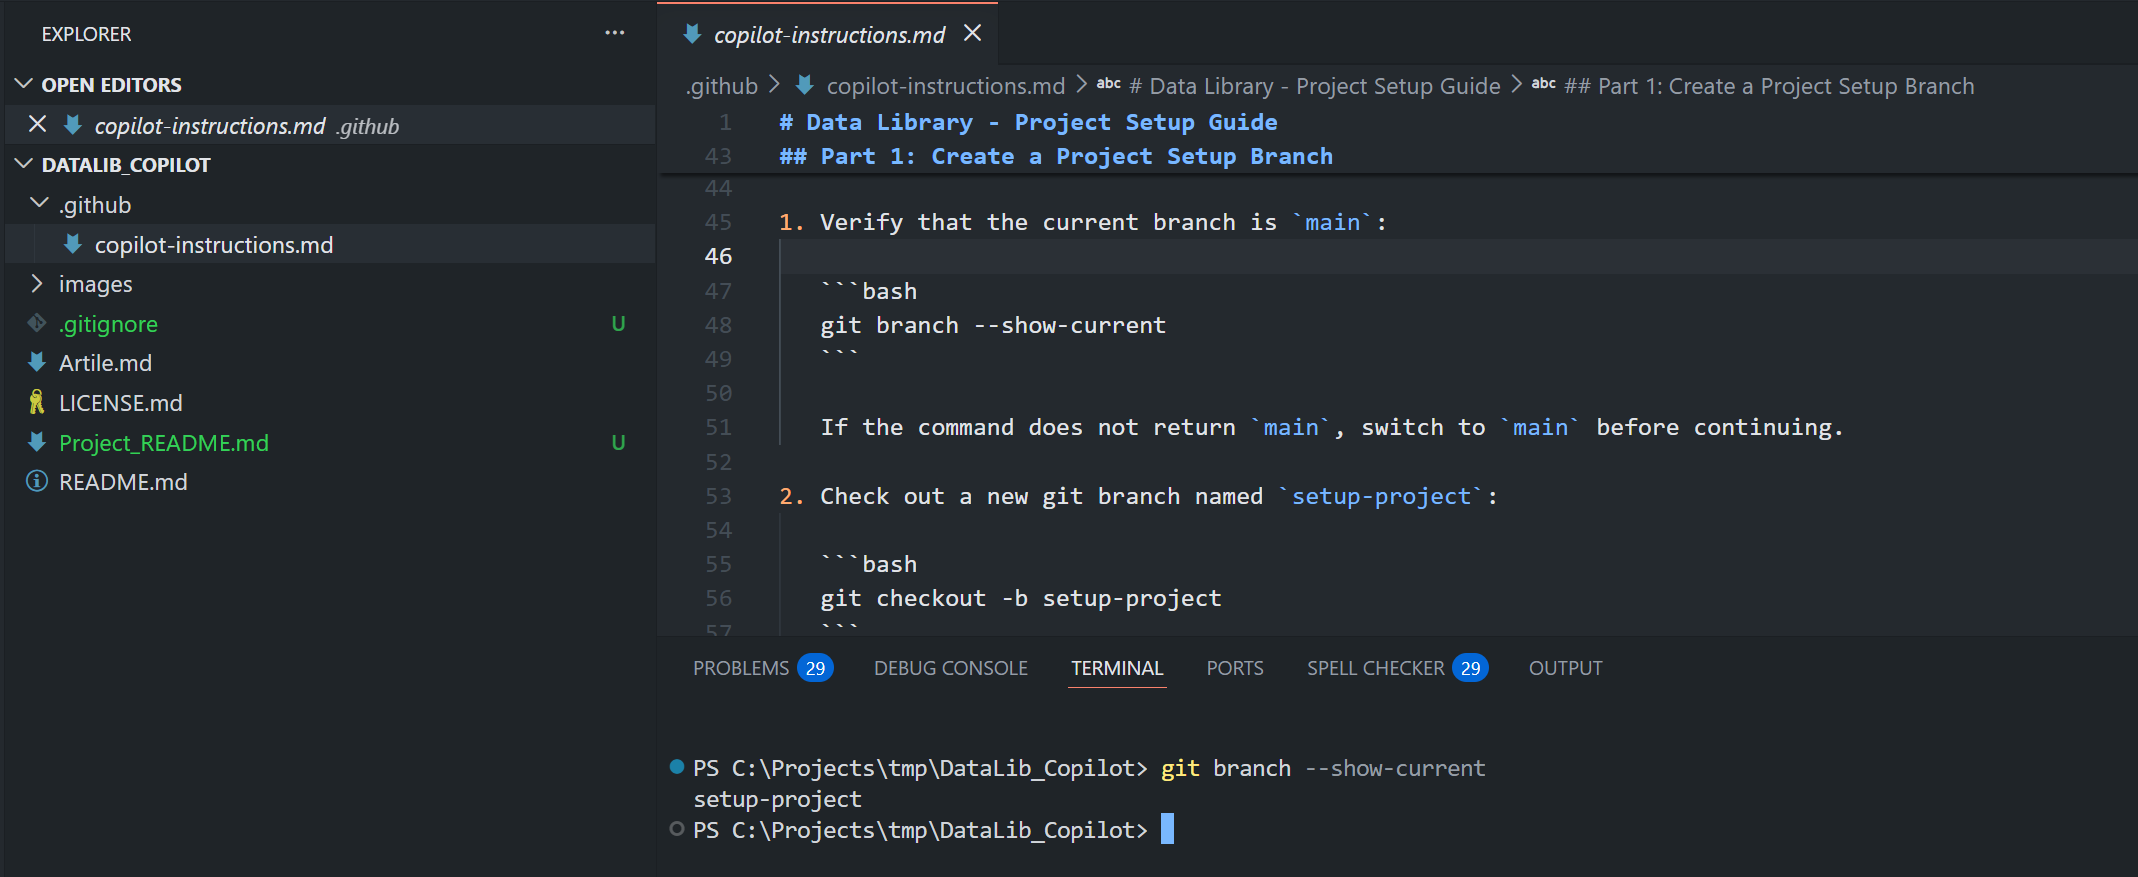
## Part 1: Create a Project Setup Branch
1. Verify that the current branch is `main`:
```bash
git branch --show-current
```
If the command does not return `main`, switch to `main` before continuing.
2. Check out a new git branch named `setup-project`:
```bash
git checkout -b setup-project
```
3. Add a `Project_README.md` with `# Data Library Jupyter Notebook` title.
4. Add a `.gitignore` file suitable for Python projects (e.g., from [gitignore.io](https://www.toptal.com/developers/gitignore/api/python)).
5. Add the `.venv/` virtual environment folder to `.gitignore`.
After the part one process is finished, you see the new files and the git branch have been updated.
Please note that if you are creating a development project from scratch, you can modify a .github/copilot-instructions.md file to initiate a main branch in this step.
That’s all I have to say about the project git first set up.
Part 2: Set Up the Python Virtual Environment
Now we come to a very important step of every Python projects — setting up a Python virtual environment and dependencies. A virtual environment keeps the project's dependencies isolated from your system Python, so installing or upgrading packages here will not affect other projects on your machine.
This guide demonstrates with the built-in venv module, but you can adapt the instructions in .github/copilot-instructions.md file to use Anaconda/Miniconda, virtualenv, Pipenv, or Poetry depending on your team's preference.
Once the virtual environment is created and activated, the remaining steps in this part cover: upgrading pip to the latest version, installing the LSEG Data Library for Python and JupyterLab, saving the installed dependencies list and versions to requirements.txt, creating a VS Code settings file, and finally creating an empty notebook file (without code yet) alongside its library configuration file.
## Part 2: Set Up the Python Virtual Environment
1. Create a virtual environment named `.venv` inside the workspace root (same command on all platforms):
```bash
python -m venv .venv
```
This must create `.venv` at the workspace root.
2. Activate the environment:
- **Windows (PowerShell):**
```powershell
.\.venv\Scripts\Activate.ps1
```
- **Windows (CMD):**
```cmd
.venv\Scripts\activate.bat
```
- **macOS / Linux:**
```bash
source .venv/bin/activate
```
3. Update pip to the latest version:
- **Windows (PowerShell/CMD):**
```powershell
python -m pip install --trusted-host pypi.python.org --trusted-host files.pythonhosted.org --trusted-host pypi.org --no-cache-dir --upgrade pip
```
- **macOS:**
```bash
python3 -m pip install --trusted-host pypi.python.org --trusted-host files.pythonhosted.org --trusted-host pypi.org --no-cache-dir --upgrade pip
```
4. Install the required packages:
- **Windows (PowerShell/CMD):**
```powershell
python -m pip install --trusted-host pypi.python.org --trusted-host files.pythonhosted.org --trusted-host pypi.org --no-cache-dir lseg-data jupyterlab
```
- **macOS:**
```bash
python3 -m pip install --trusted-host pypi.python.org --trusted-host files.pythonhosted.org --trusted-host pypi.org --no-cache-dir lseg-data jupyterlab
```
5. Save the installed dependencies to `requirements.txt`:
- **Windows (PowerShell/CMD):**
```powershell
python -m pip freeze > requirements.txt
```
- **macOS:**
```bash
python3 -m pip freeze > requirements.txt
```
6. Create the following file and folder structure under the project root:
```
notebook/
├── ld_notebook.ipynb
└── lseg-data.config.json
```
7. Create `lseg-data.config.json` inside `notebook` with the following content:
```json
{
"logs": {
"level": "debug",
"transports": {
"console": {
"enabled": false
},
"file": {
"enabled": false,
"name": "lseg-data-lib.log"
}
}
}
}
```
You may notice that I intentionally write each instruction with the exact command to run like git checkout -b setup-project, python -m venv .venv, python -m pip freeze > requirements.txt, and so on. This level of detail is deliberate. When Copilot has a precise command to follow, it can execute the step reliably and produce a consistent result every time.
I learned this the hard way. Early on, I tried writing the instructions in a much shorter form, like this:
1. Create a Python venv name .venv
2. Activate .venv
3. Update pip
4. Install lseg-data and jupyterlab
The results were unreliable. Copilot would sometimes interpret the steps differently, create the virtual environment in the wrong location, use incorrect command syntax for the operating system, or skip steps entirely. The environment it produced was inconsistent and sometimes did not work at all.
After asking Copilot to review the instructions and suggest improvements, the feedback was clear: vague, high-level steps are not enough. Copilot needs each step to include the exact command to run, the expected output or file location, and any platform-specific variations. The more detail you provide, the more reliably Copilot can follow and reproduce the setup across different machines and environments.
This is the key lesson when writing a copilot-instructions.md file — treat it less like a quick checklist and more like a precise runbook where nothing is left to interpretation.
Please note that the Part 2's steps are based on the Data Library 's Desktop Session in mind. If you are using the Platform Session (whether Data Platform or Deployed RTDS), please change the lseg-data.config.json template based on your connection. See Data Library Quickstart page for more detail.
- Note: Do not input your credential into a copilot-instructions.md file.
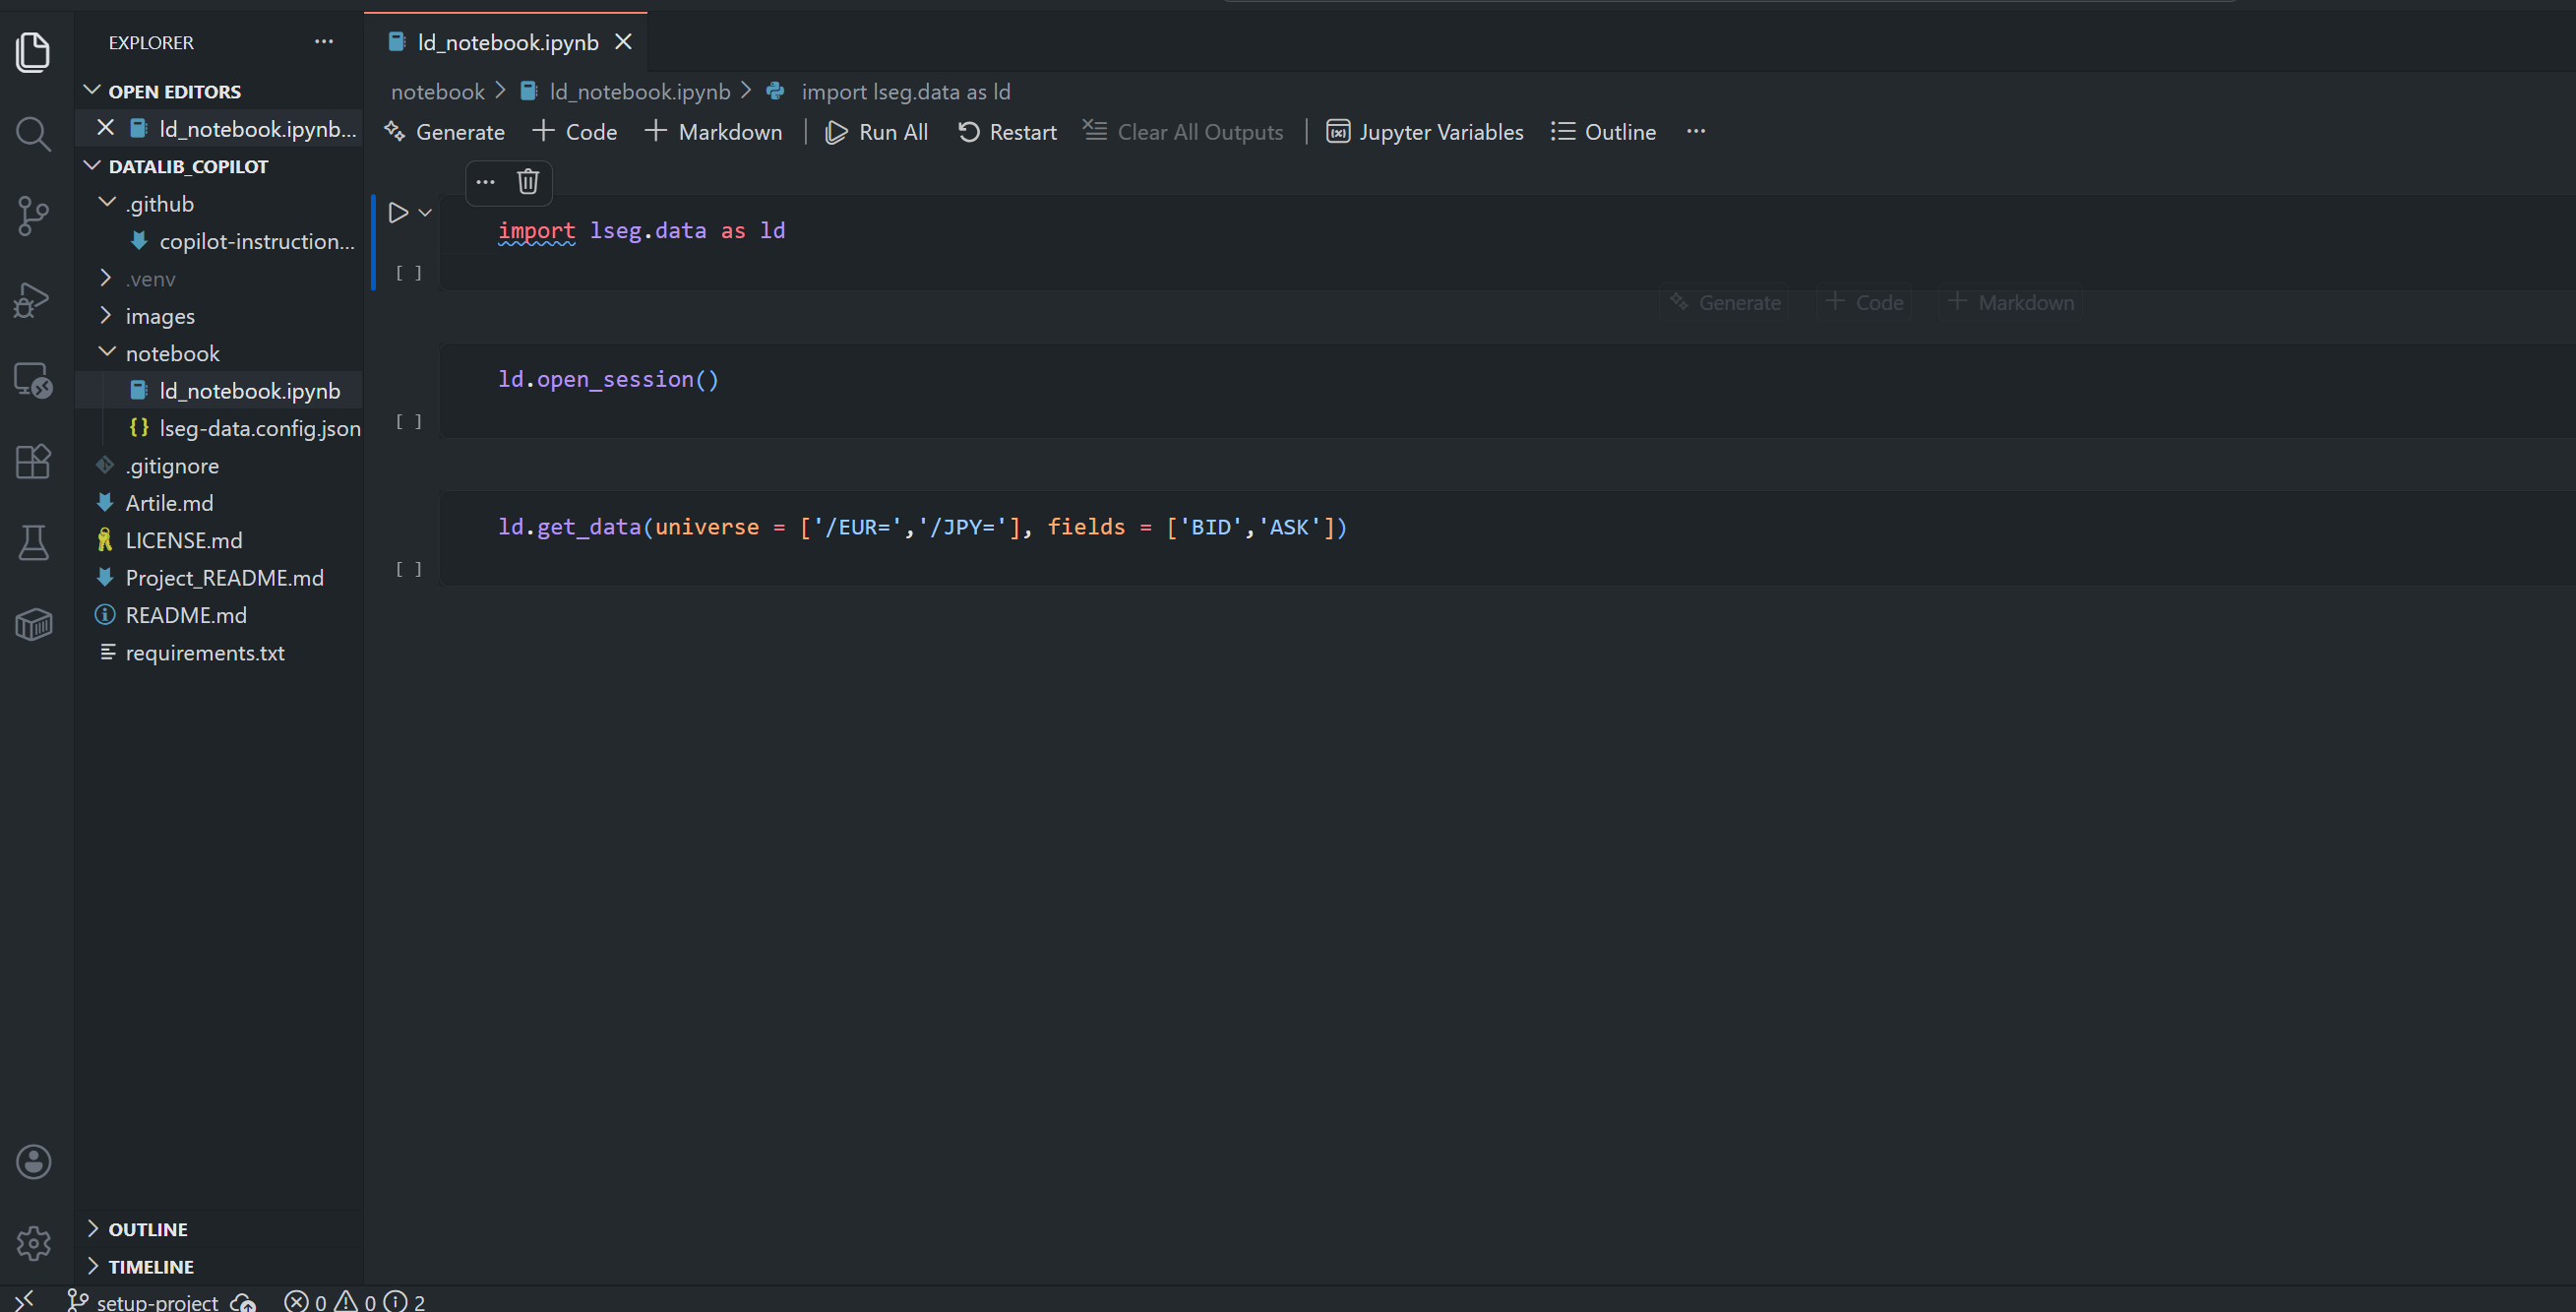
You get the following files and .venv virtual environment (which is grey out because the folder is listed in a .gitignore file). The ld_notebook.ipynb is empty because we did not give instructions to add anything to it yet.

That covers the environment and project folder set up.
Part 3: Notebook Code
Moving on to the Jupyter notebook ld_notebook.ipynb file. This step add some basic Data Library for Python code for verification purpose.
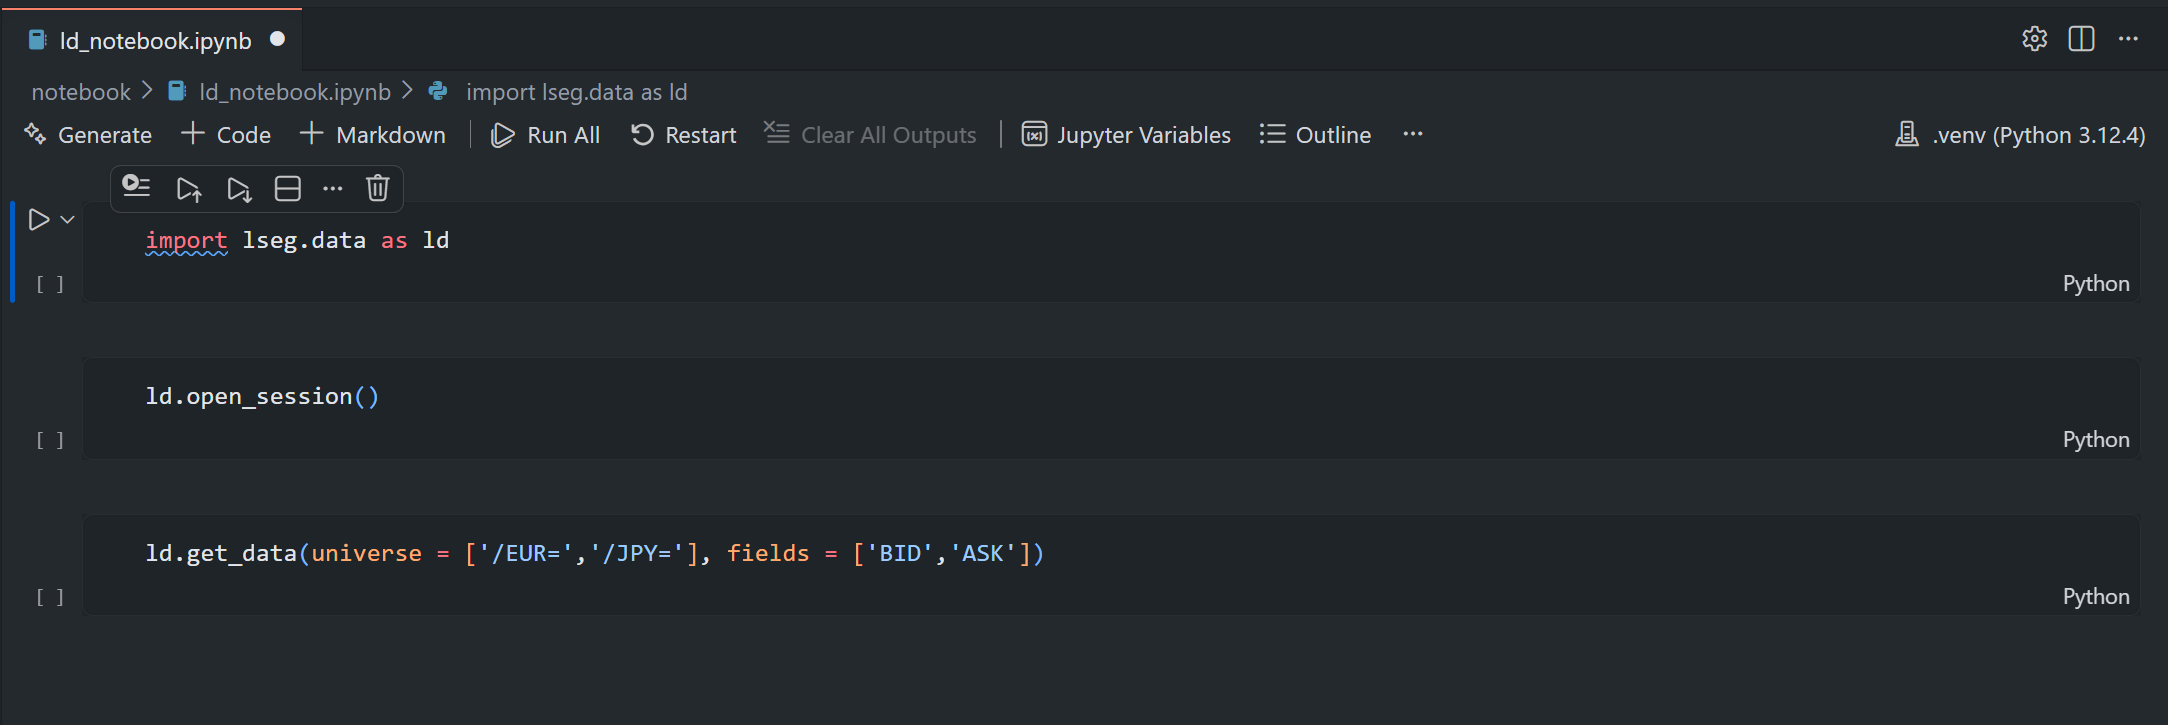
## Part 3: Notebook Code
Open `notebook/ld_notebook.ipynb` in JupyterLab and run the following cells in order.
1. **Import the library:**
```python
import lseg.data as ld
```
2. **Open a session (connects to LSEG Workspace):**
```python
ld.open_session()
```
3. **Retrieve market data** (BID/ASK for EUR and JPY):
```python
ld.get_data(universe = ['/EUR=','/JPY='], fields = ['BID','ASK'])
```
4. Do not execute the notebook cells. Copilot should only add the cells above to the notebook. Developers can run them by themselves to verify the setup is working.
Once this step is completed, you get a basic Jupyter notebook file with a simple Data Library code. You can configure your Workspace Desktop application or your Data Platform/Deployed RTDS setting, then run the notebook to verify your connection and permission.
Part 4: Finish a Project Setup Branch
Now we come to the last step, stage and commit every thing (that should be committed) to the Git setup-project branch.
# Part 4: Finish a Project Setup Branch
> **Prerequisite:** Part 3 must be completed by adding the required notebook cells to `ld_notebook.ipynb`. Running the notebook cells and saving outputs is optional and can be done later by developers.
1. Ensure that the git branch is `setup-project`:
```bash
git branch --show-current
```
If the command does not return `setup-project`, switch to `setup-project` before continuing.
2. Review the changes in the `setup-project` branch to confirm that all expected files are created and updated:
```bash
git status
git diff
```
3. Stage all files and create a commit on `setup-project`:
```bash
git add .
git commit -m "setup: initial project structure with notebook and dependencies"
```
The prerequisite section above simply means the notebook code from Part 3 must already be in place before you commit. Running the cells and saving their outputs is not required at this stage — developers can do that on their own once the setup is complete.
> **Prerequisite:** Part 3 must be completed by adding the required notebook cells to `ld_notebook.ipynb`. Running the notebook cells and saving outputs is optional and can be done later by developers.
The overall process of the part 4 section is clear, check if the current git branch is setup-project, then stages all files and make a commit.
The final project structure is as follows:
Running the copilot-instructions.md file
Now, what about how to use this file. A .github/copilot-instructions.md file enables both GitHub Copilot Chat (VS Code extension) and Copilot CLI to automatically set up your entire project.
- Note: The given .github/copilot-instructions.md file set up the project for the Desktop Session by default.
To run this file, firstly open the project folder in a terminal or VS Code (PowerShell is preferred on Windows).
cd path\to\project_folder
Next, if you are using the Platform Session or Deployed ADS connection type, update the lseg-data.config.json file template content in the Part 1 section of .github/copilot-instructions.md file to match your connection type (see the Data Library Quickstart page). Please do not input your credential to the .github/copilot-instructions.md file.
Then start GitHub Copilot CLI in the project directory (using Powershell is recommended) or Open GitHub Copilot Chat session.
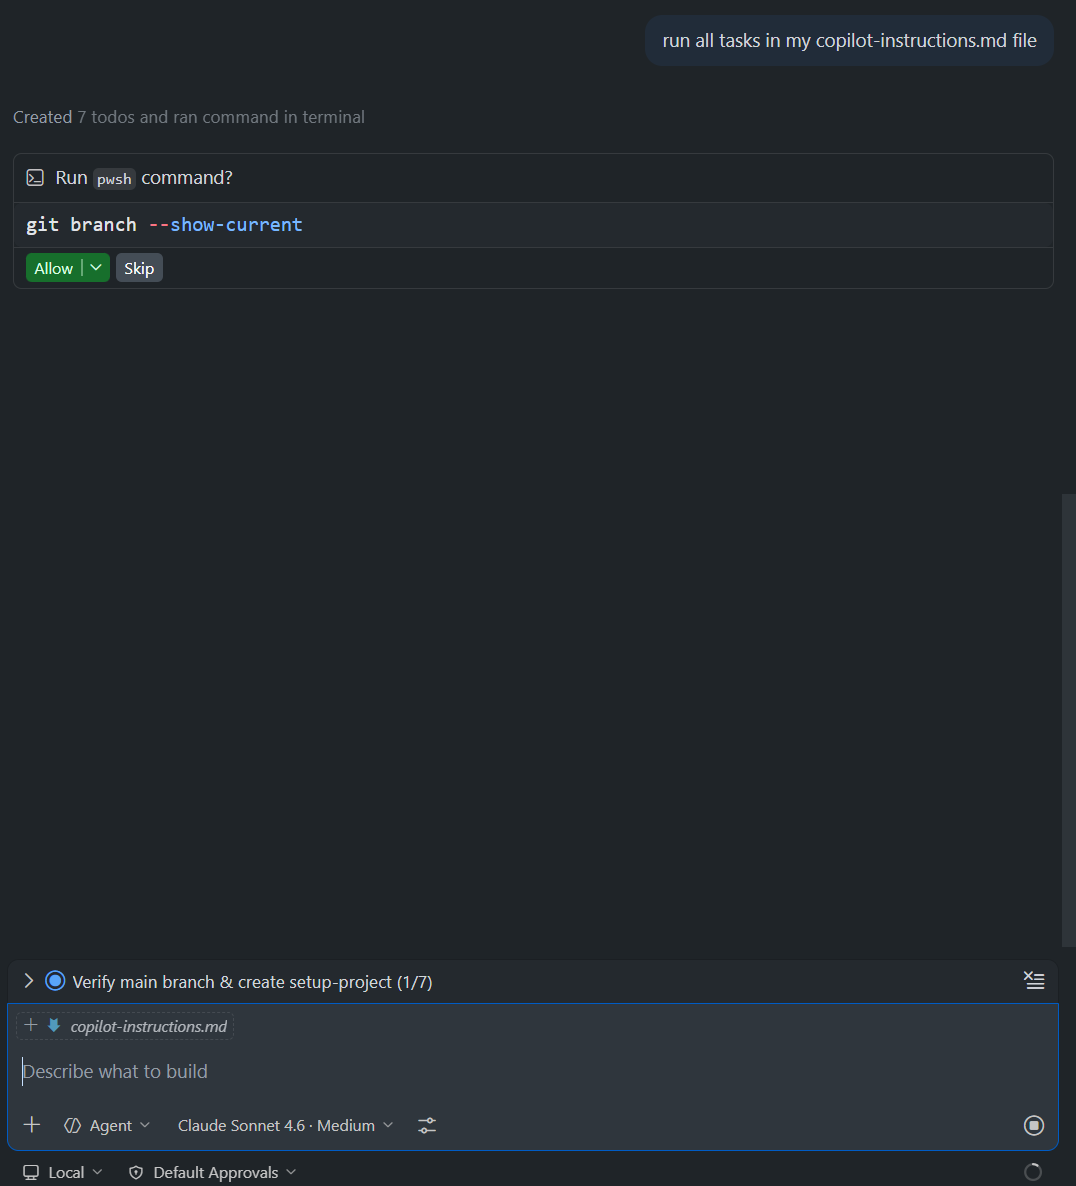
GitHub Copilot Chat example.
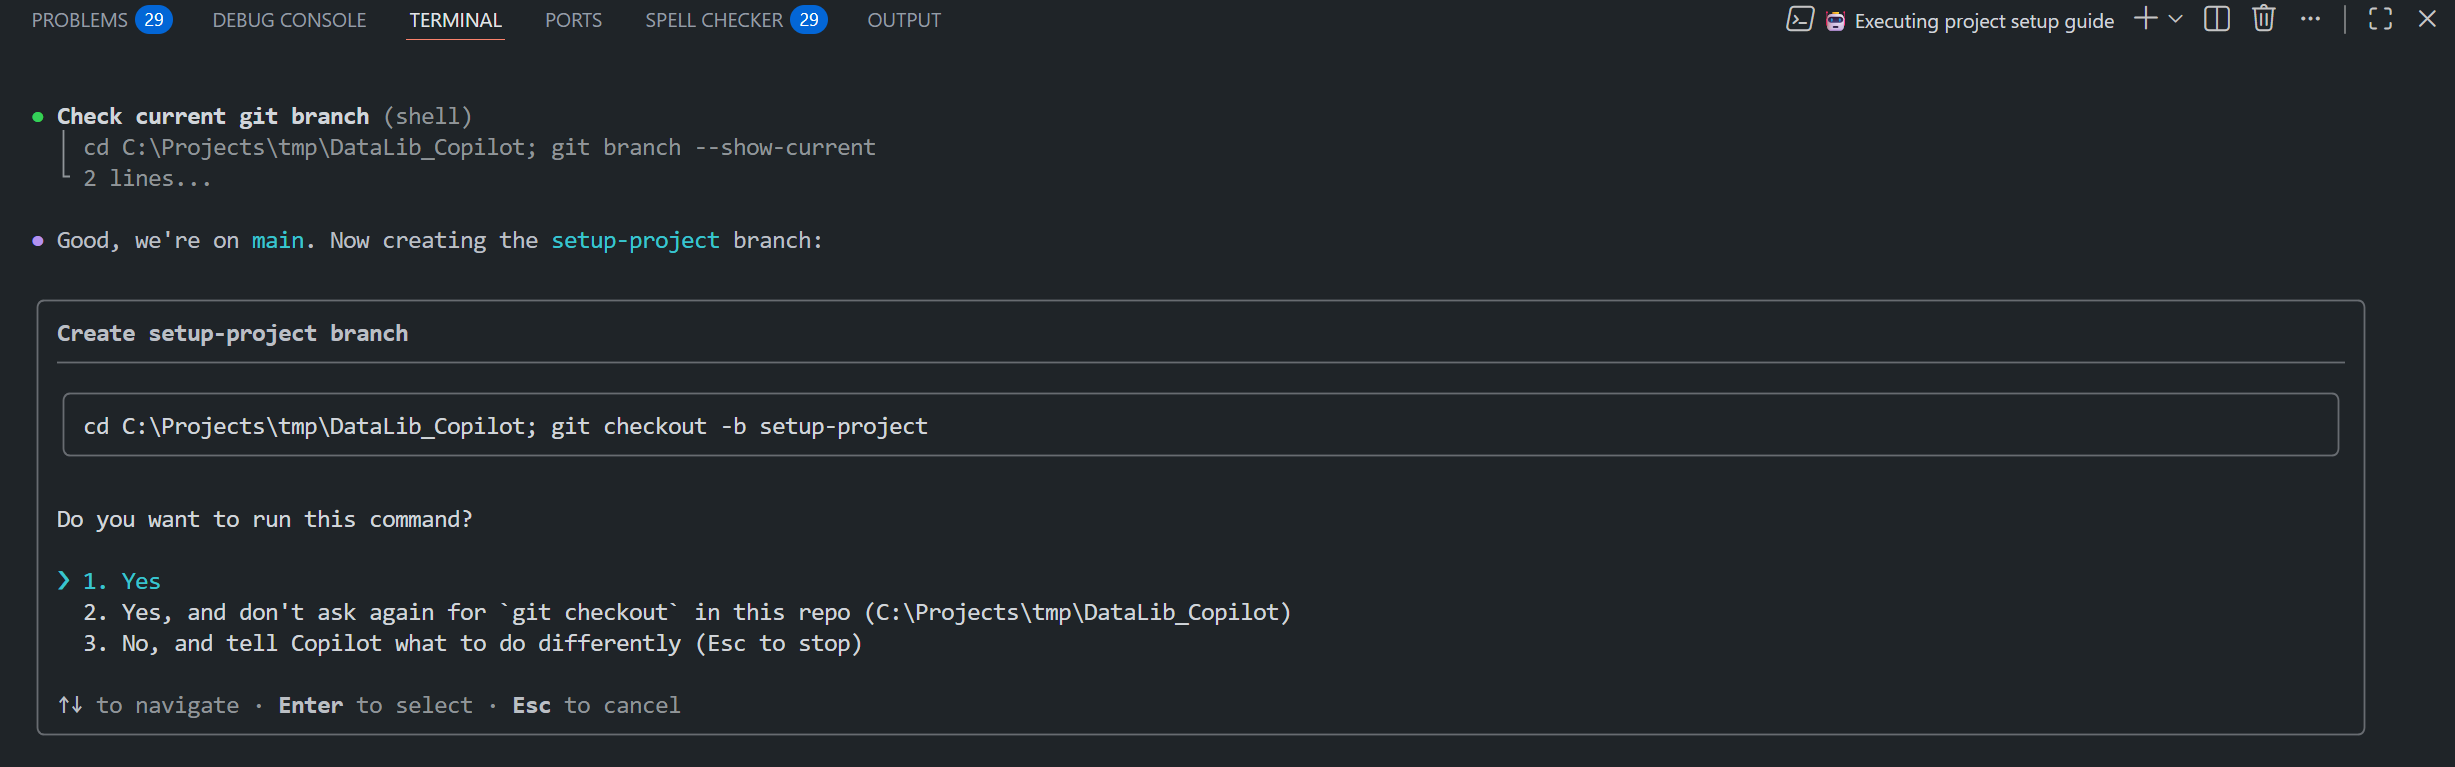
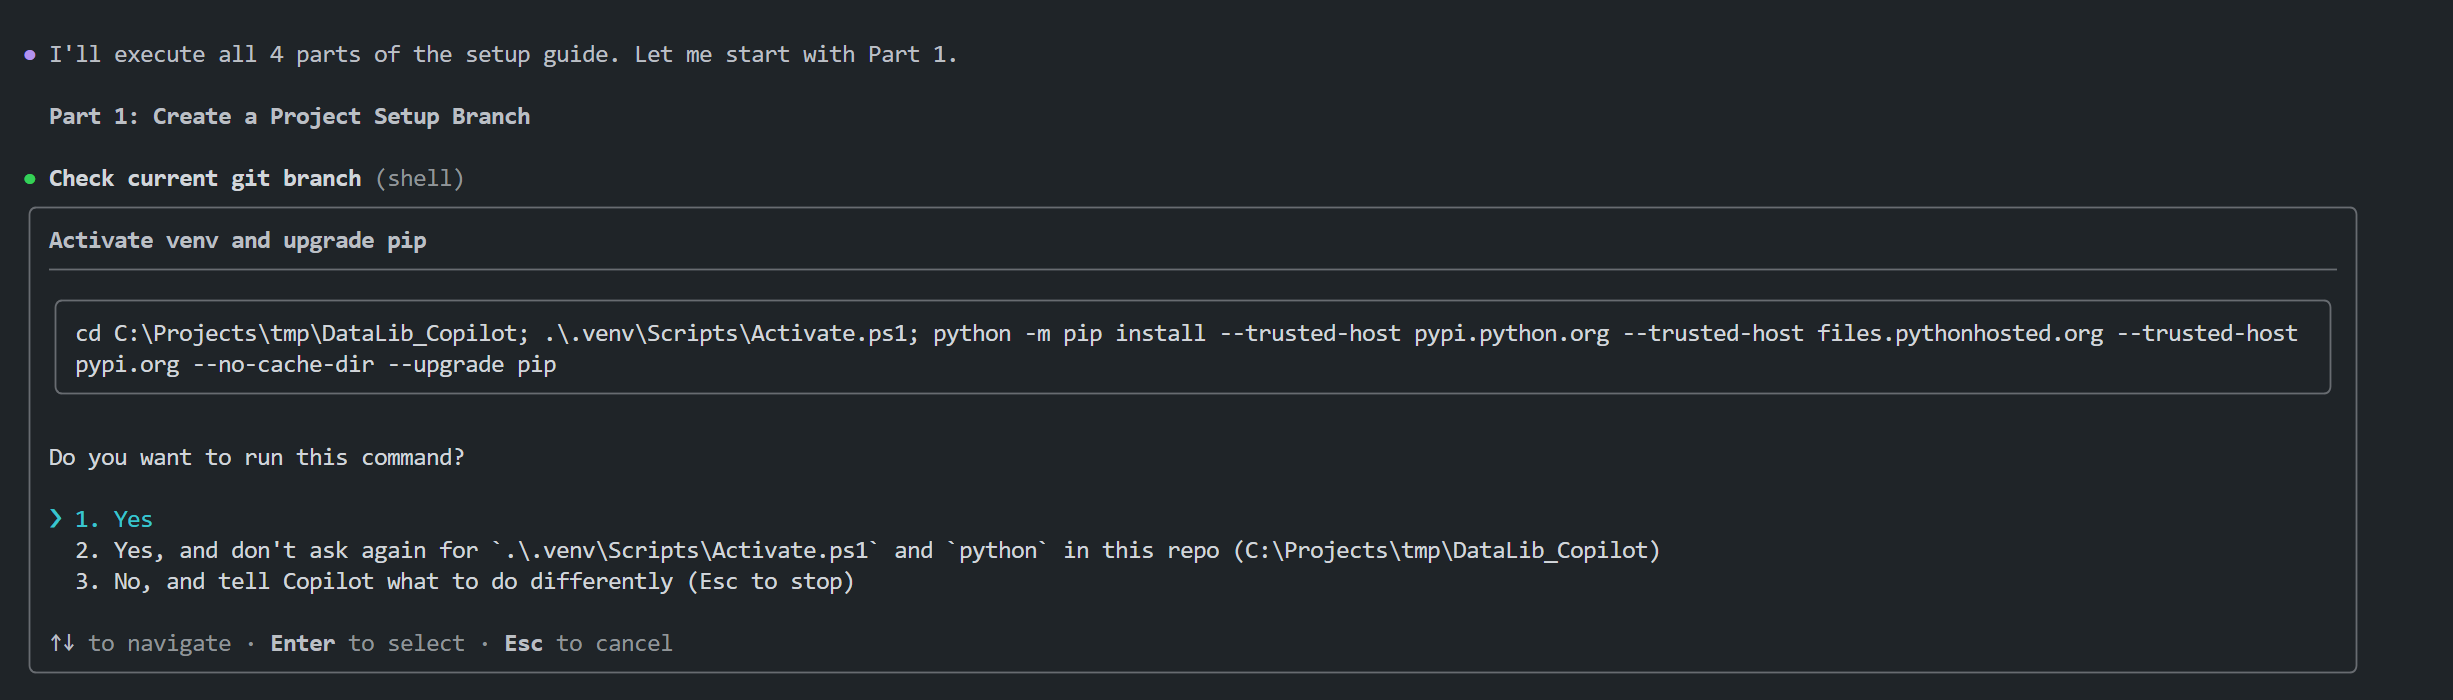
Copilot CLI example.
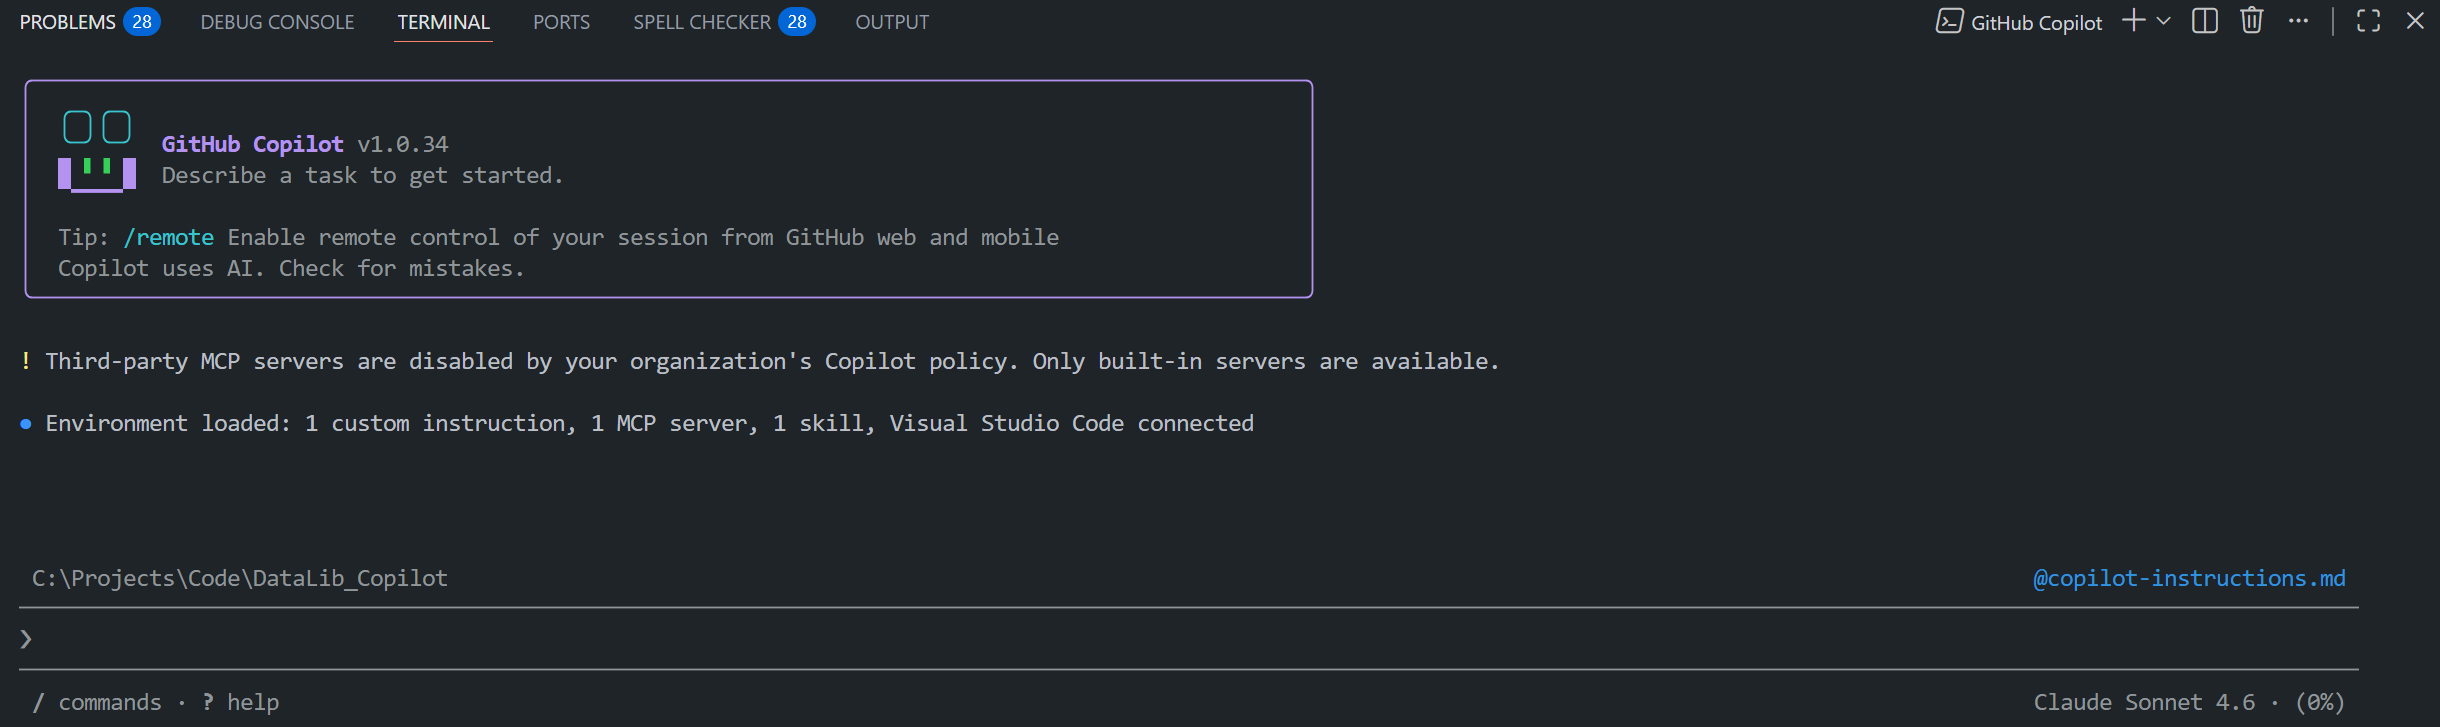
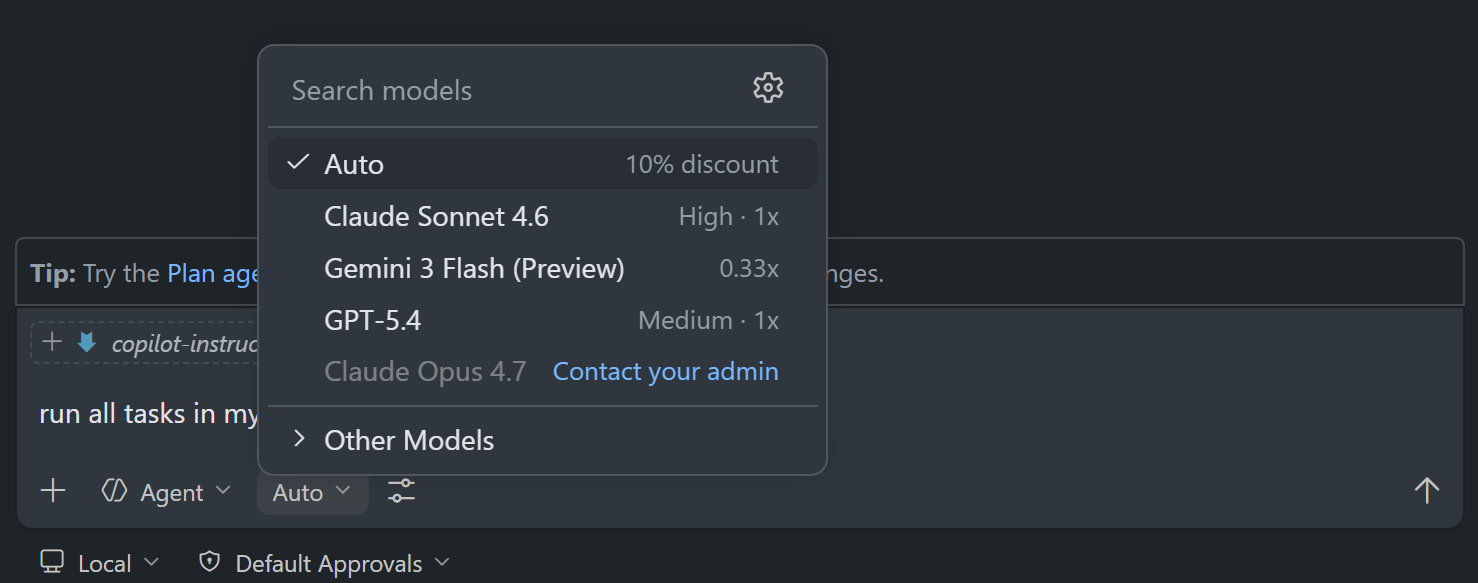
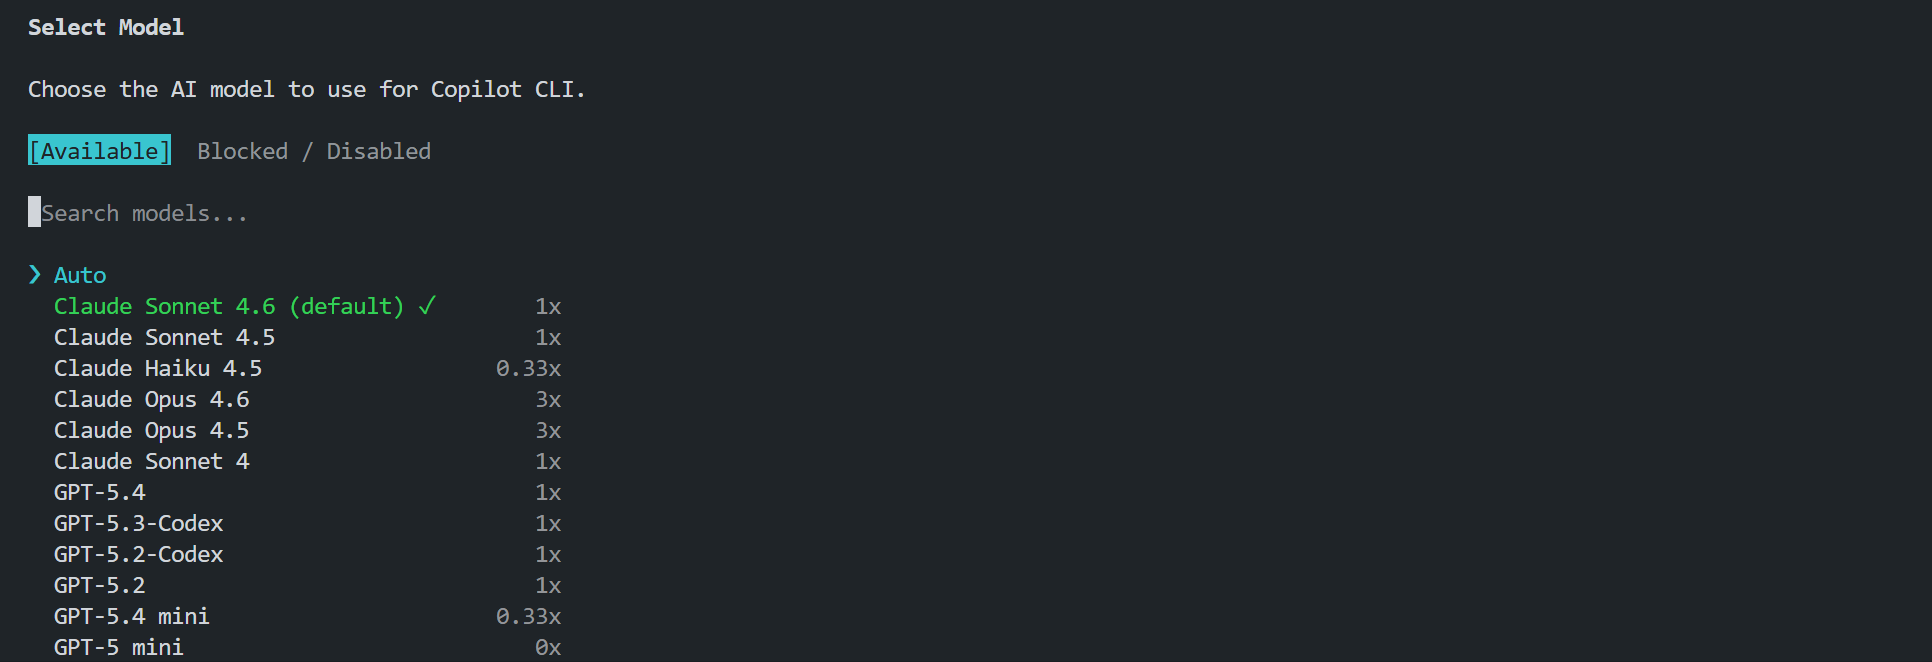
You can select a Copilot model that suits your need. Please note that a .github/copilot-instructions.md file were tested on Windows with the following Copilot models
- Claude Sonnet 4.6
- Claude Opus 4.6
- GPT-5.4
- GPT-5.3-Codex
If you use a different model, review and revise .github/copilot-instructions.md file with your selected model and your review, then retest the instructions until it satisfies your requirements before proceed the next step.
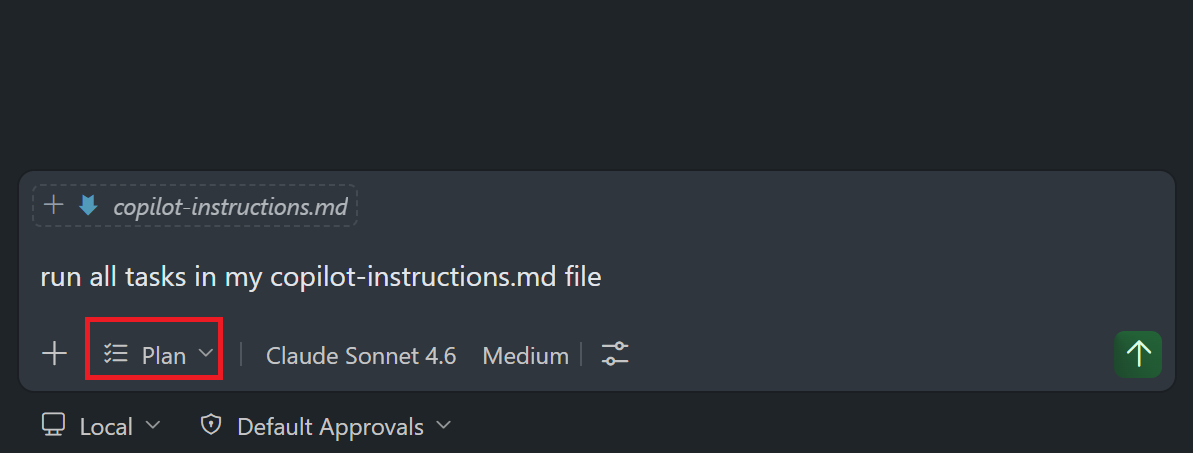
GitHub Copilot Chat example
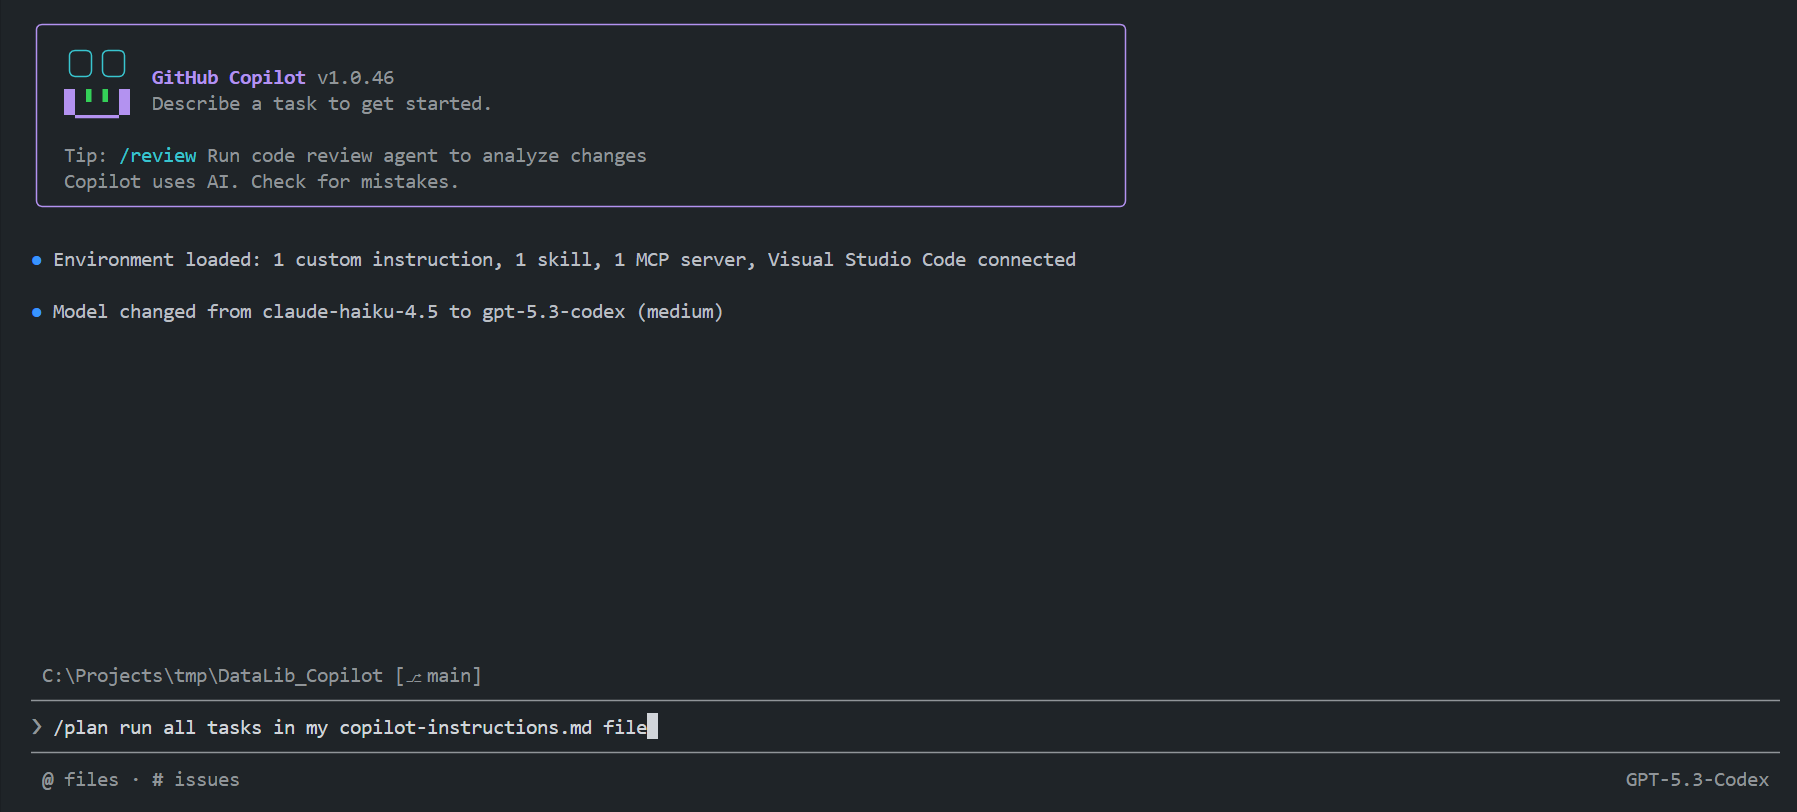
Copilot CLI examples

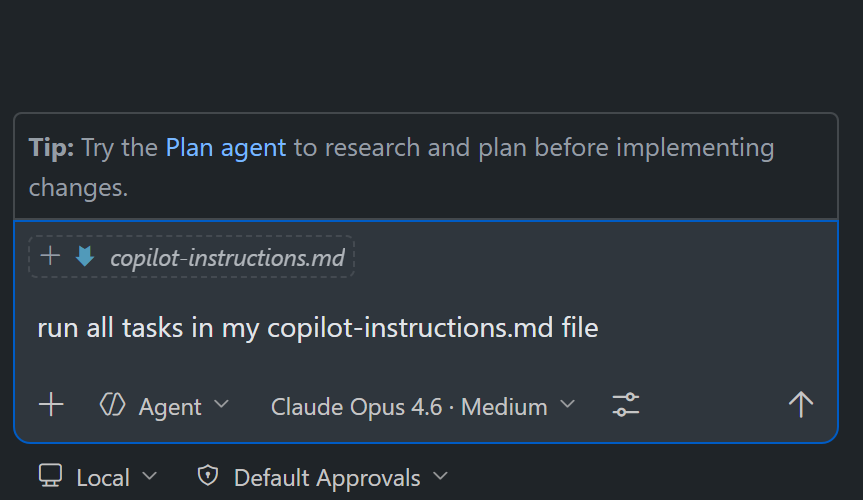
Next, run the following command on the copilot
run all tasks in my copilot-instructions.md file
Please review each Copilot request step with caution. Different models and run times may prompt you for request messages differently — click Approve/Allow only when you are satisfied the action is appropriate to proceed.
GitHub Copilot Chat example
Copilot CLI example
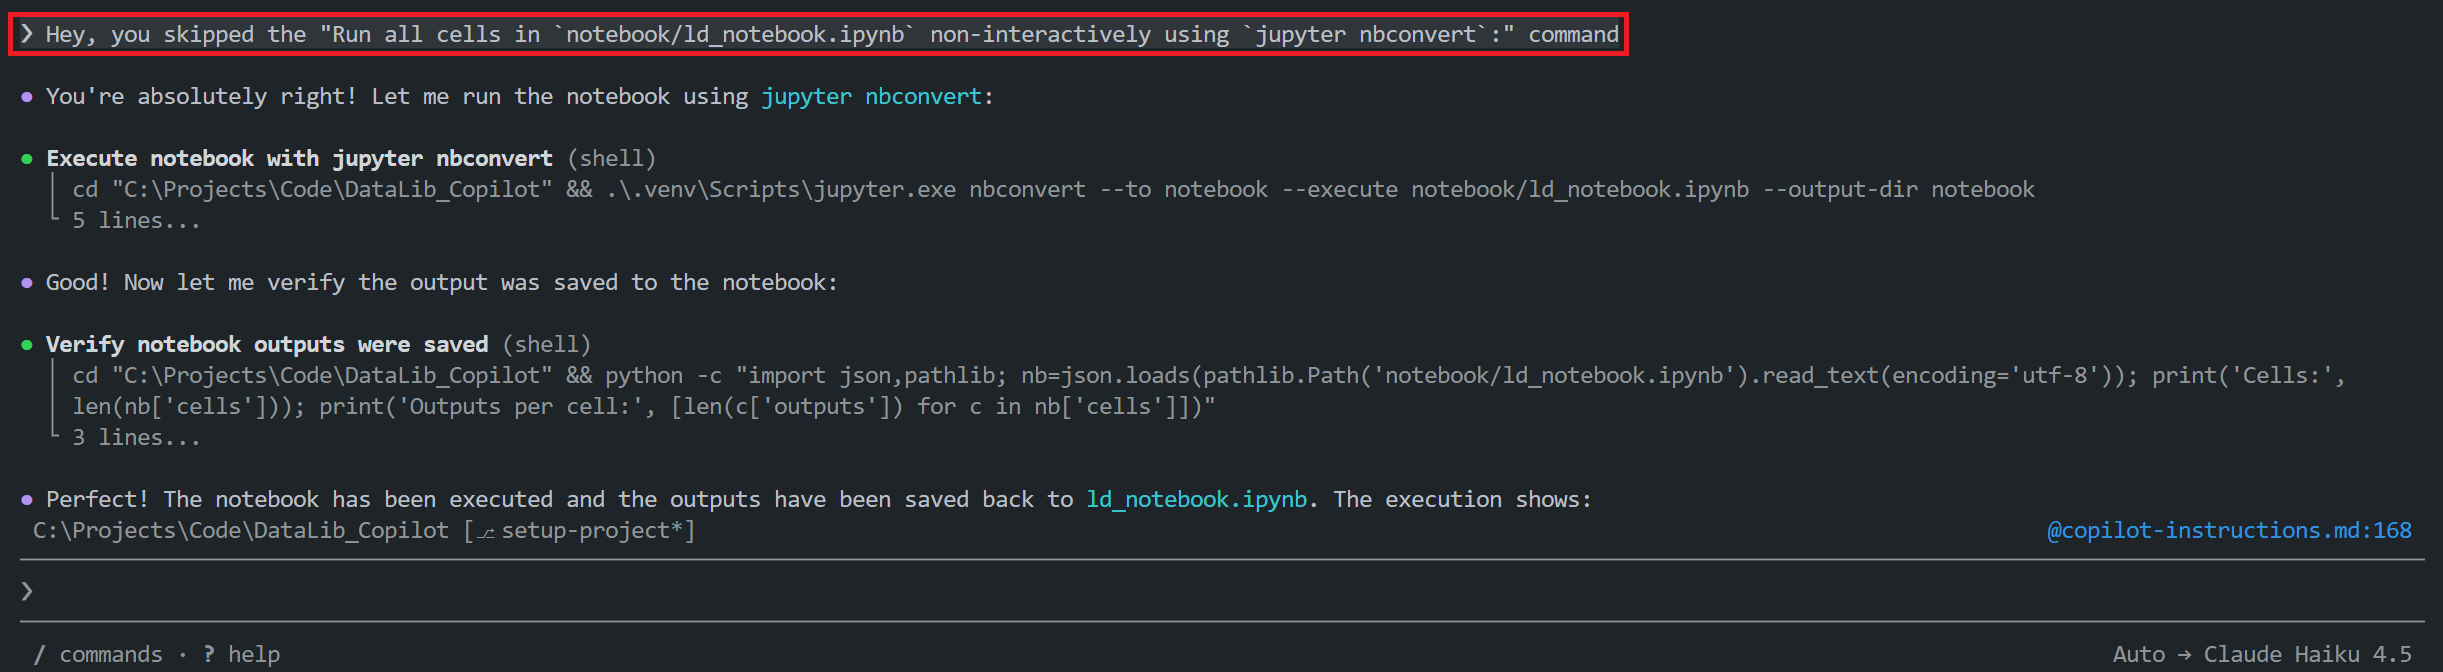
Please note that sometimes Copilot may skip steps or become idle while running tasks; if this happens, send another prompt to make it continues tasks.
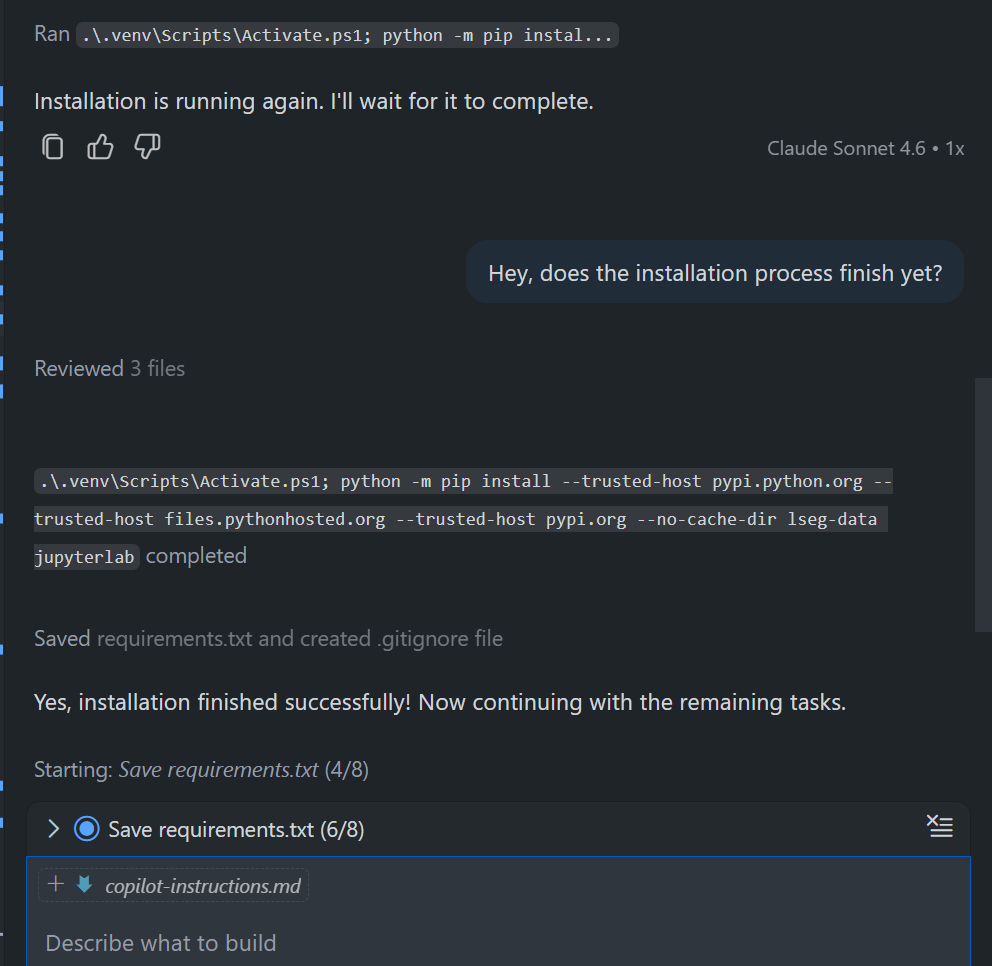
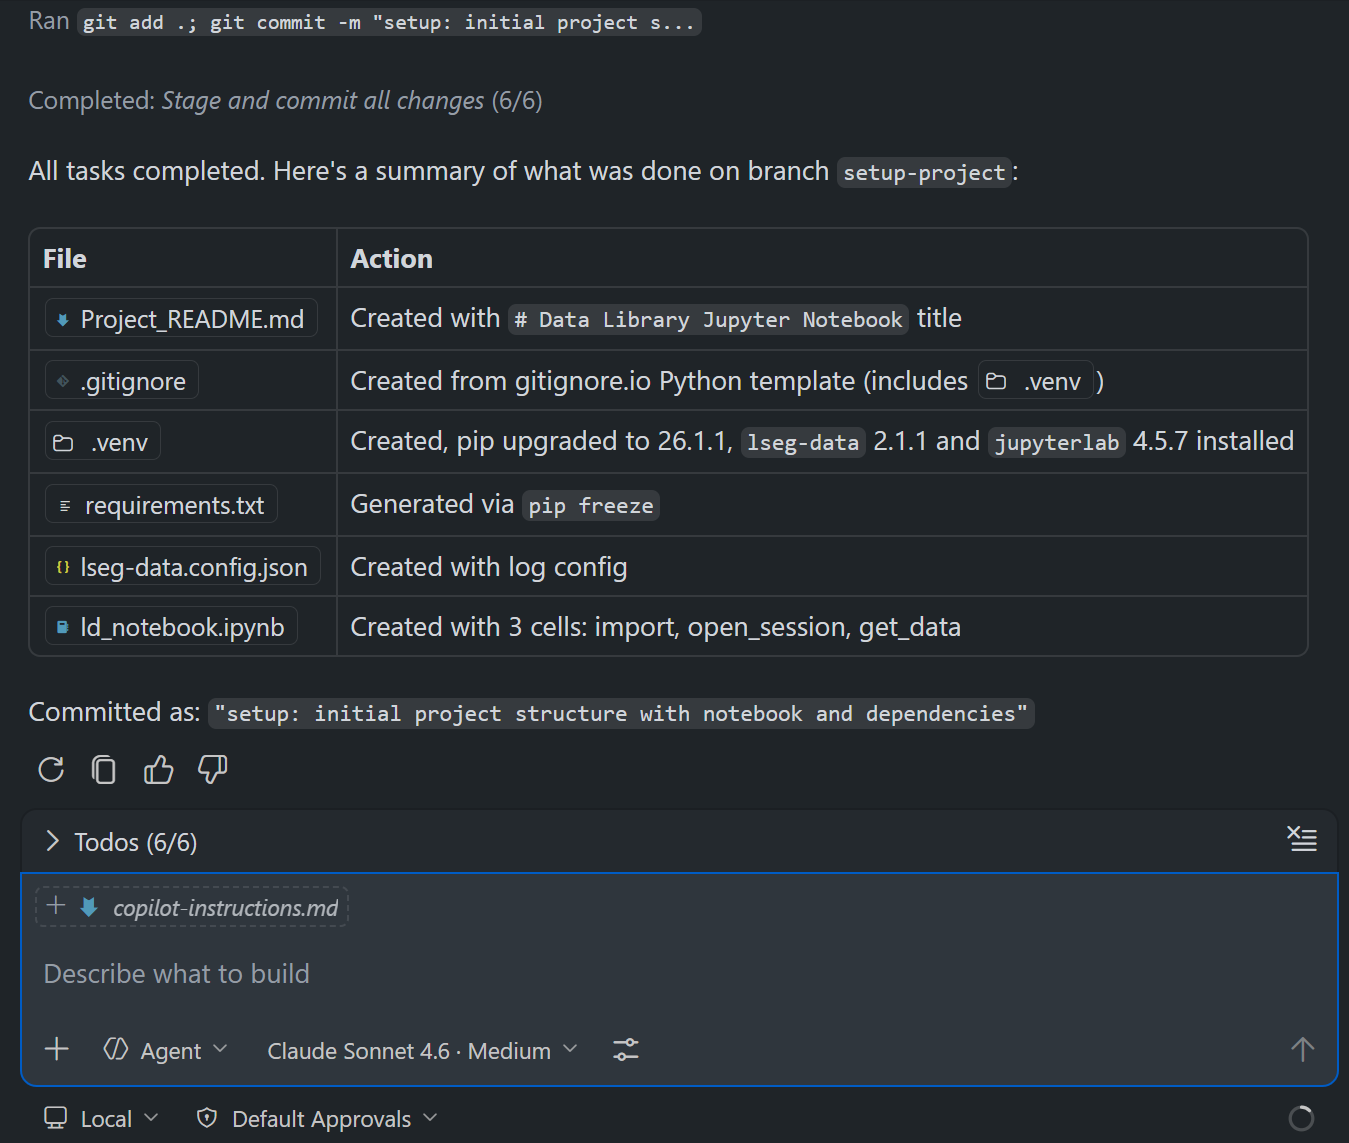
Once the process is completed, you see the following kind of message from Copilot that it has finished all tasks.
GitHub Copilot Chat example
Copilot CLI example
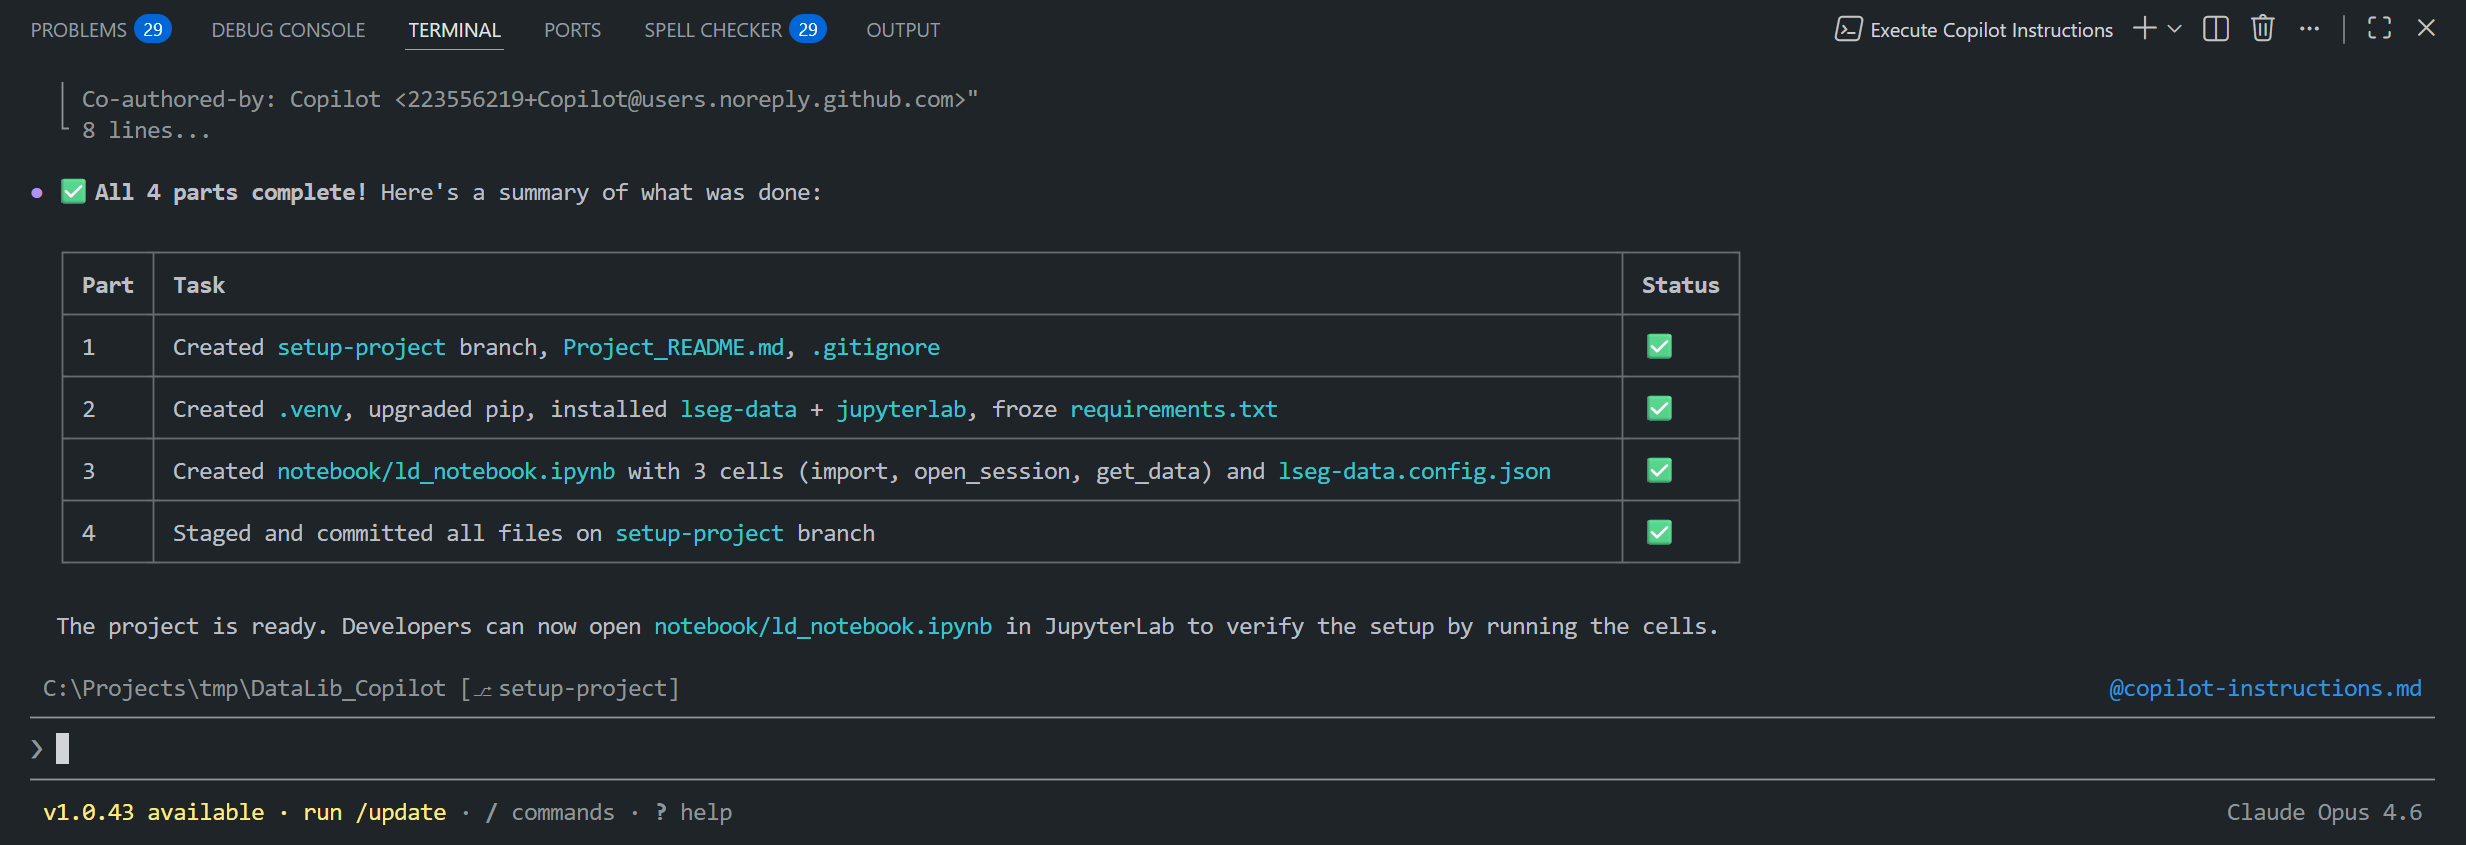
You will get a ready-to-use Data Library Jupyter Notebook application development project with the structure as shown on Part 4: Finish a Project Setup Branch section.
That covers how to run a copilot-instructions.md file.
Post-Setup Guideline
After the automated setup finishes, review these project-specific items before you publish or reuse the repository:
First, start and login the Workspace Desktop application, or configure the notebook\lseg-data.config.json file with your Data Platform/Deployed RTDS credential and information. Then run the notebook ld_notebook.ipynb file to verify your connection and permission.
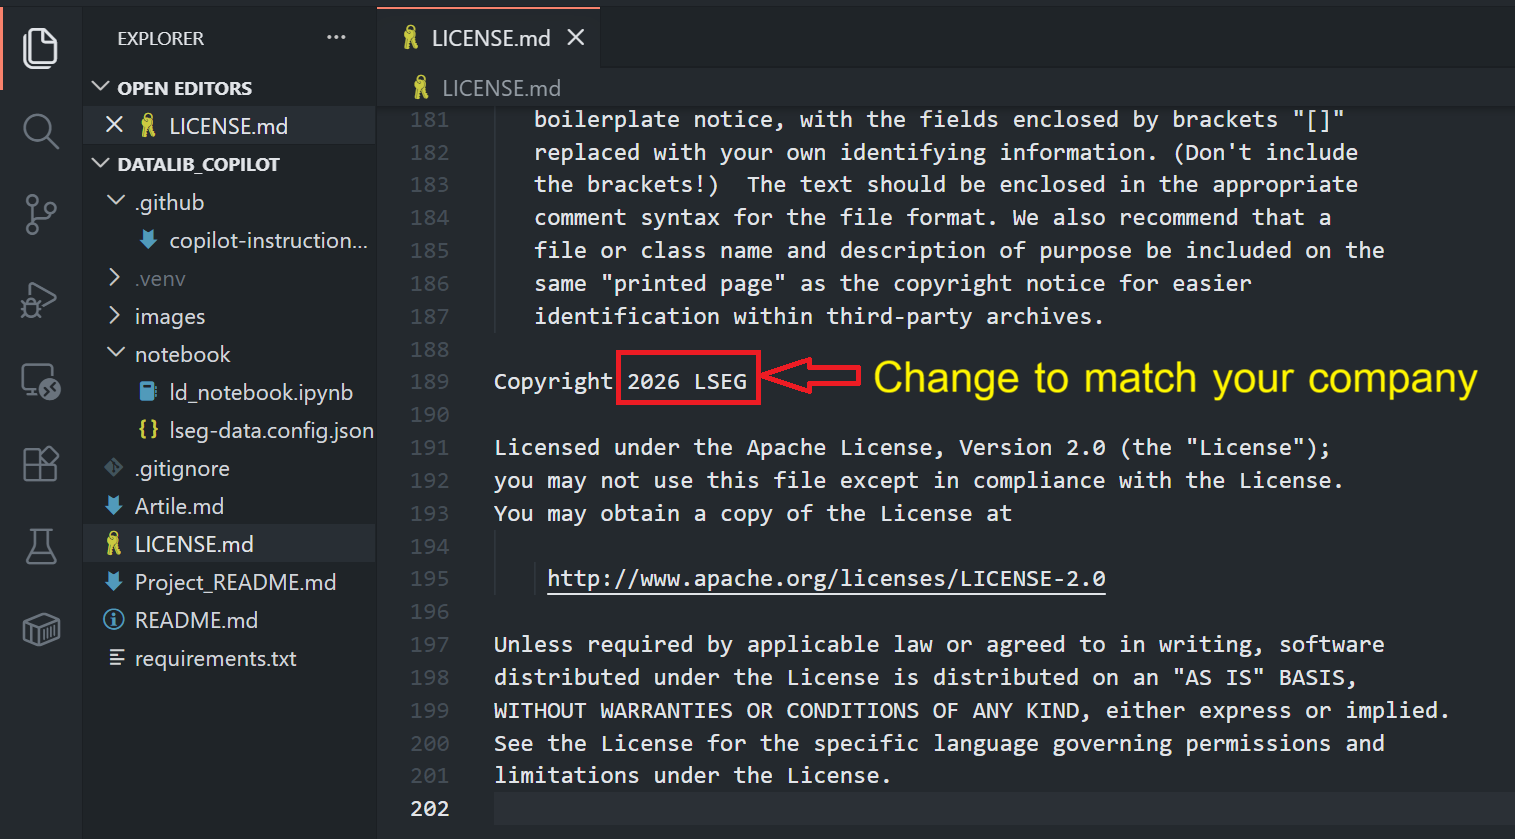
Secondly, update the copyright owner and year content of LICENSE.md file to match your organization.
Thirdly, update the README.md file , Project_README.md file , image folder, and manage the Git branch to match your preference, then start coding!!!.
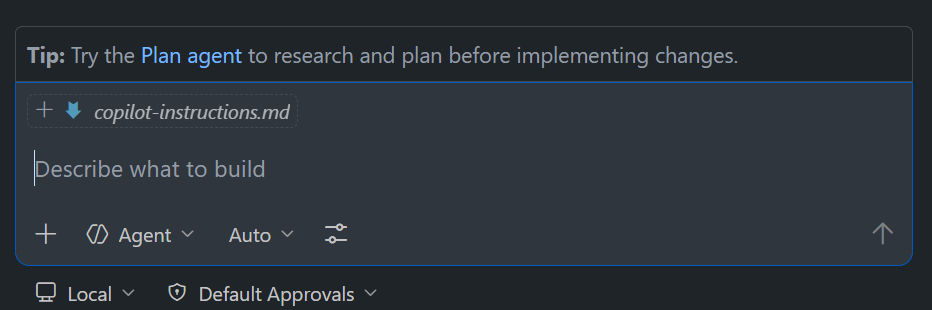
What About A Plan Mode?
The GitHub Copilot Plan mode helps you to create detailed implementation plans before executing them. This ensures that all requirements are considered and addressed before any changes are made. The plan agent does not make any code changes until the plan is reviewed and approved by you.
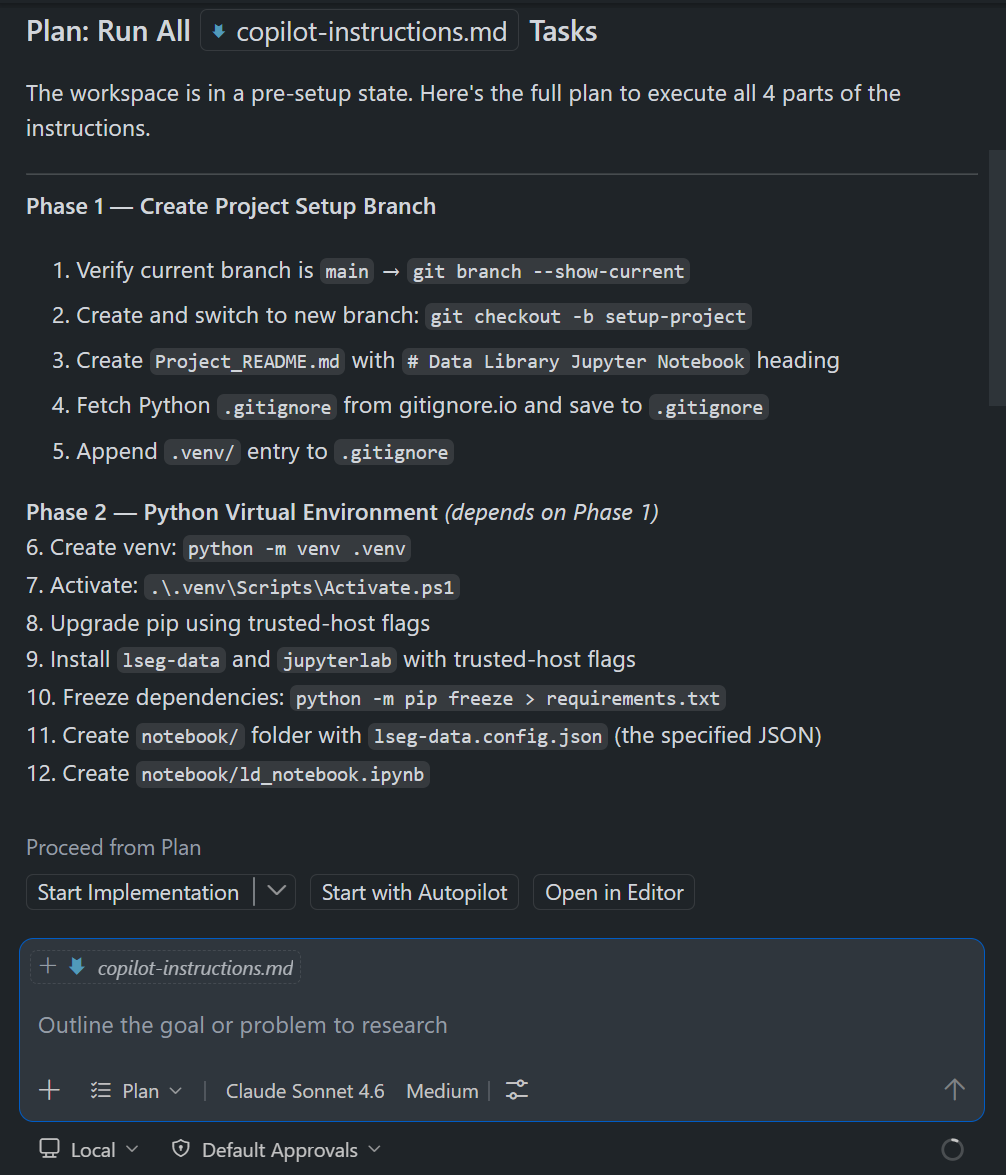
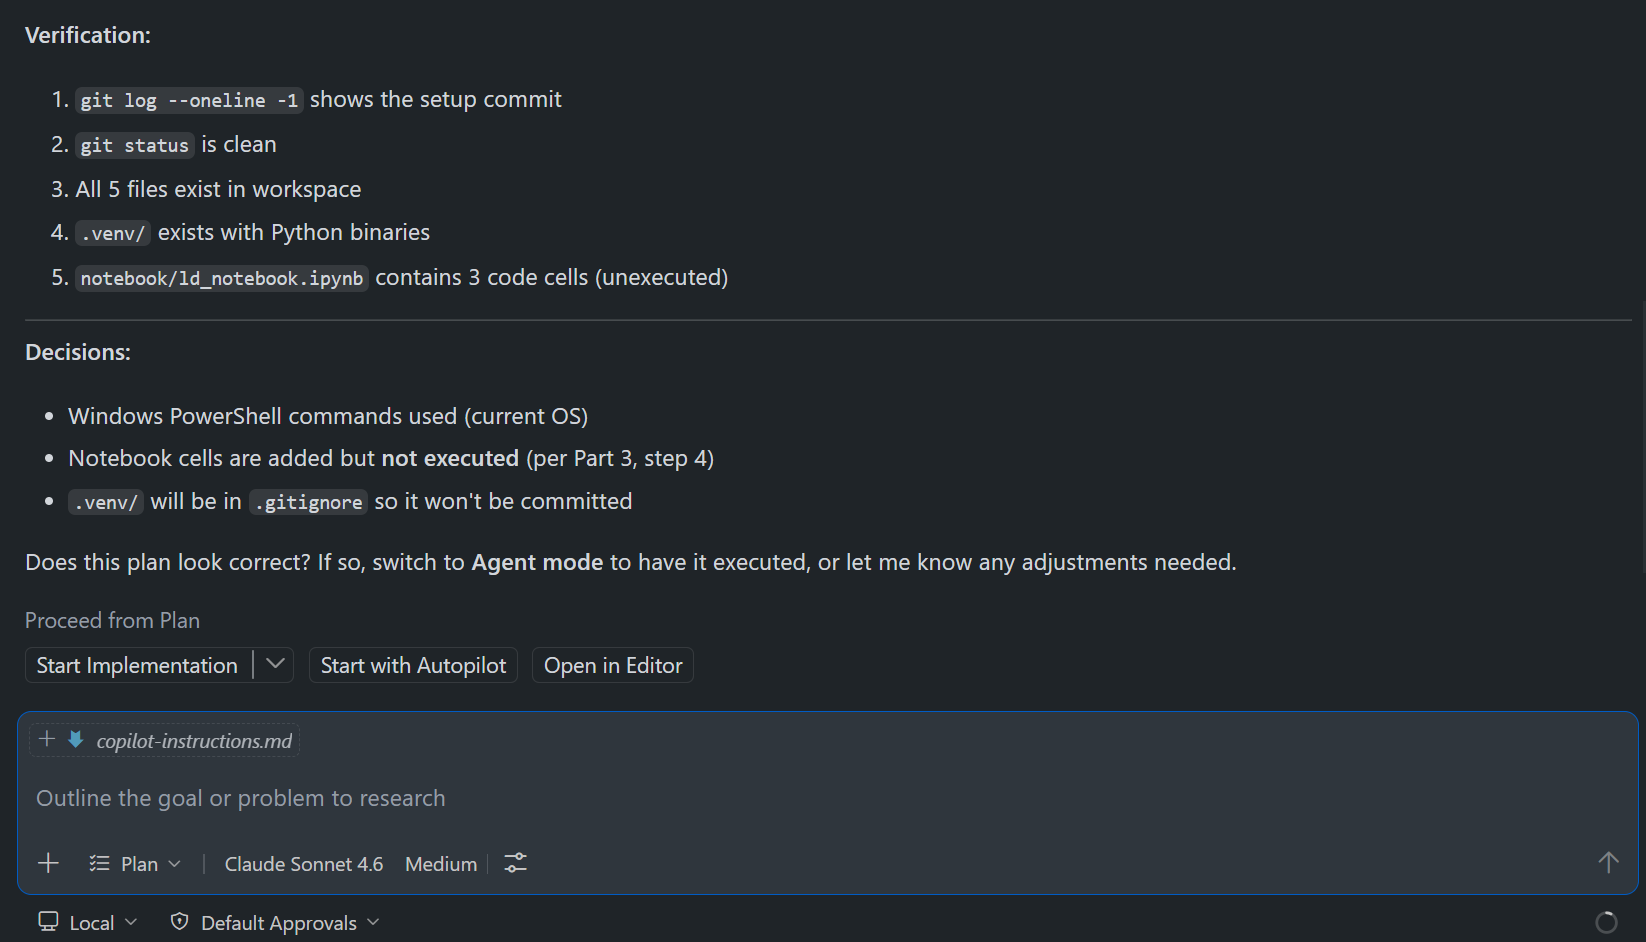
You can use the Plan mode to review and create a plan for the .github/copilot-instructions.md actions, review (or adjust) the plan, then command Copilot to execute the plan.
The Plan mode is available in all GitHub Copilot supported environments such as VS Code Chat extension, Copilot CLI, etc.
VS Code GitHub Copilot Chat: Plan mode examples.
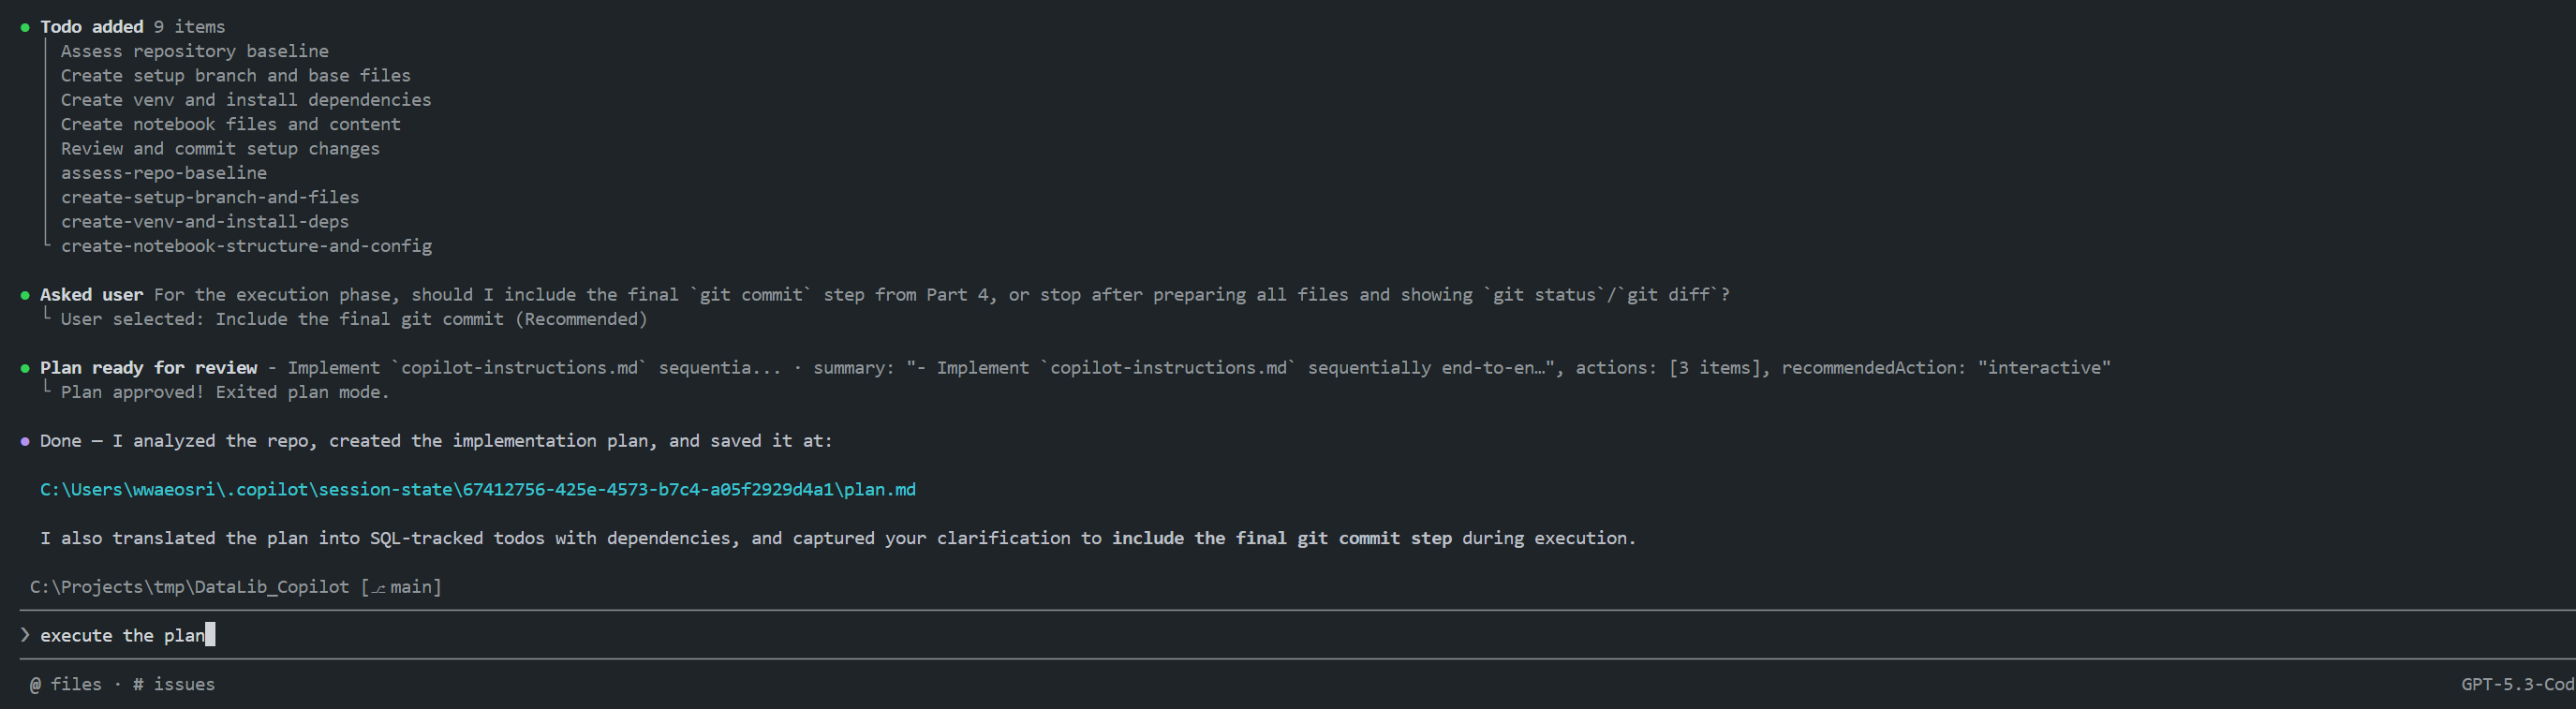
GitHub Copilot CLI: Plan mode examples.
Conclusion
This project demonstrates how a well-crafted copilot-instructions.md file can turn GitHub Copilot into a reliable project setup assistant — capable of automating repetitive environment configuration step-by-step tasks from a single natural language prompt.
Key Takeaways
Repeatable setup: The .github/copilot-instructions.md file acts as a machine-readable runbook. Any developers with access to the repository and GitHub Copilot can reproduce the full environment — virtual environment, dependencies, notebook, and configuration files — without reading lengthy documentation or running commands manually.
Model flexibility: The same instruction file works across multiple Copilot models (Claude Sonnet 4.6, GPT-5.4, and Auto model selection), both in the VS Code Copilot Chat extension and Copilot CLI. This means the workflow is not locked to a single AI provider.
Reduced onboarding friction: New team members can get a working LSEG Data Library Jupyter Notebook environment running in minutes, regardless of their familiarity with the library or its configuration requirements.
Customizable for different connection types: The instruction file is straightforward to adapt — updating the lseg-data.config.json block is all that is needed to switch between Desktop Session, Platform Session, and Deployed ADS workflows.
Version-controlled intent: Storing setup instructions alongside the code in .github/copilot-instructions.md keeps the "how to set up this project" knowledge inside the repository itself, where it is versioned, reviewable, and improvable like any other source file.
When to Use This Approach
This pattern is most valuable when:
- A project requires a non-trivial environment setup (specific packages, configuration files, directory structure).
- The setup needs to be reproducible across different machines or team members.
- You want to reduce reliance on external wikis or onboarding documents that can drift out of sync with the codebase.
By combining GitHub Copilot's agentic capabilities with a structured instruction file, this project shows that AI-assisted automation does not have to be limited to writing application code — it can manage the entire developer environment lifecycle.
Next Steps
The .github/copilot-instructions.md file is not limited to automating project setup. It can also capture project-specific information such as:
- coding style, naming conventions, and project structure
- how to build, run, and test the code
- how to deploy the project
- repository workflow and branching conventions
Keeping this information in one place helps all project members follow the same process consistently. It also gives GitHub Copilot the context it needs to assist you more effectively with day-to-day coding tasks. Check the resources on the Reference section to learn more about the power and benefits of the .github/copilot-instructions.md file.
Reference
You can find more detail regarding the Data Library and GitHub Copilot from the following resources:
- LSEG Data Library for Python on the LSEG Developer Community website.
- Data Library for Python - Reference Guide
- The Data Library for Python - Quick Reference Guide (Access layer) article.
- Essential Guide to the Data Libraries - Generations of Python library (EDAPI, RDP, RD, LD) article.
- Upgrade from using Eikon Data API to the Data library article.
- Data Library for Python Examples on GitHub repository.
- GitHub Copilot documentation.
- Adding custom instructions for GitHub Copilot CLI.
- Adding repository custom instructions for GitHub Copilot.
- Use custom instructions in VS Code.
- VS Code: Use a .github/copilot-instructions.md file.
- Customizing GitHub Copilot in Visual Studio with Custom Instructions video tutorial.
For any question related to this example or Data Library, please use the Developers Community Q&A Forum.
Get In Touch
Related Articles
Related APIs
Source Code
Request Free Trial
Call your local sales team
Americas
All countries (toll free): +1 800 427 7570
Brazil: +55 11 47009629
Argentina: +54 11 53546700
Chile: +56 2 24838932
Mexico: +52 55 80005740
Colombia: +57 1 4419404
Europe, Middle East, Africa
Europe: +442045302020
Africa: +27 11 775 3188
Middle East & North Africa: 800035704182
Asia Pacific (Sub-Regional)
Australia & Pacific Islands: +612 8066 2494
China mainland: +86 10 6627 1095
Hong Kong & Macau: +852 3077 5499
India, Bangladesh, Nepal, Maldives & Sri Lanka:
+91 22 6180 7525
Indonesia: +622150960350
Japan: +813 6743 6515
Korea: +822 3478 4303
Malaysia & Brunei: +603 7 724 0502
New Zealand: +64 9913 6203
Philippines: 180 089 094 050 (Globe) or
180 014 410 639 (PLDT)
Singapore and all non-listed ASEAN Countries:
+65 6415 5484
Taiwan: +886 2 7734 4677
Thailand & Laos: +662 844 9576