

Wasin Waeosri
Developer Advocate
Developer Advocate
Introduction
Disclosure: This article is AI generated content with my reviewed, revised, and correction. The AI is GitHub Copilot with Claude Sonnet 4.5 agent.
The Data Library is latest evolution of library that provides a set of ease-of-use interfaces offering coders uniform access to the breadth and depth of LSEG financial data and services. The Data Library for Python provides a set of ease-of-use interfaces offering coders uniform access to the breadth and depth of financial data and services available on the Workspace, RDP, and Real-Time Platforms via the Python programming language. The API is designed to provide consistent access through multiple access channels and target both Professional Developers and Financial Coders. Developers can choose to access content from the desktop, through their deployed streaming services, or directly to the cloud. With the Data Library, the same Python code can be used to retrieve data regardless of which access point you choose to connect to the platform.
This article is a sequel to my Step-By-Step Guide to install Data Library for Python using Virtual Environment article. This sequel provides a step-by-step guide to set up a Python development environment in Visual Studio Code (VS Code) using the Data Library for Python as an example API. VS Code is a popular, free, and open-source code editor that provides excellent support for Python development through extensions, integrated terminal, debugging capabilities, and more. I strongly recommend you read this article together with the library Quick Start page to cover all basic knowledge that you need to use the library.
Please note that even through the article aims for the LSEG Data Library for Python application development, the steps can be applied to other Python libraries with VS Code too.
Prerequisite
Python
You need the Python programming language installed on your machine.
This article is based on Python version 3.12.
Visual Studio Code
You need Visual Studio Code installed on your machine. You can download it from the official website.
This article is based on VS Code version January 2026 (update version 1.109.3).
Access to Python Package Repository
You need an access to Python Package Repository. The public repositories are PyPI, Anaconda, and Conda-forge.
Some organization might deployed the Data Library for Python and other packages in their internal repository (example: LSEG), so you need to configure the Python and the Package Manager to connect to your internal repository.
Please contact your local IT support to help you access your company internal repo.
I am demonstrating with the Python venv and PyPI repository in this article. If you are using Conda, please see the steps on the first article for more detail.
The Basic Rule
Please let me remind you again, do not install the Data Library for Python in the based or global Python installation.
The reason is to avoid dependencies conflict between libraries requirements such as the following example.
A module that was compiled using NumPy 1.x cannot be run in
NumPy 2.0.2 as it may crash. To support both 1.x and 2.x
versions of NumPy, modules must be compiled with NumPy 2.0.
Some module may need to rebuild instead e.g. with 'pybind11>=2.12'.
If you are a user of the module, the easiest solution will be to
downgrade to 'numpy<2' or try to upgrade the affected module.
We expect that some modules will need time to support NumPy 2.
Traceback (most recent call last): File "c:\python\LDP_Library\LDP_Library\Examples\tempCodeRunnerFile.py", line 3, in <module>
import pandas as pd
This error message means the Python already has the NumPy library version 1.x (from other projects) installed. However, the Data Library for Python requires NumPy version 2 (as of version 2.1.1) which both version cannot be installed together.
We can handle this dependencies conflict issue with a Python virtual environment. A Python virtual environment is an isolated directory containing its own Python interpreter and a set of installed packages. This isolation prevents conflicts between dependencies of different Python projects and ensures project reproducibility.
VS Code has excellent support for Python virtual environments through the Python extension. This article demonstrates how to set up and use Python virtual environments with VS Code using venv.
It is recommend that you create and use one virtual environment per one Python project.
Setting Up VS Code for Python Development
Step 1: Install the Python Extension
Open Visual Studio Code and navigate to the Extensions view by clicking the Extensions icon in the Activity Bar on the side of the window or by pressing Ctrl+Shift+X (Windows/Linux) or Cmd+Shift+X (Mac).
Search for Python in the Extensions marketplace and install the official Python extension published by Microsoft.
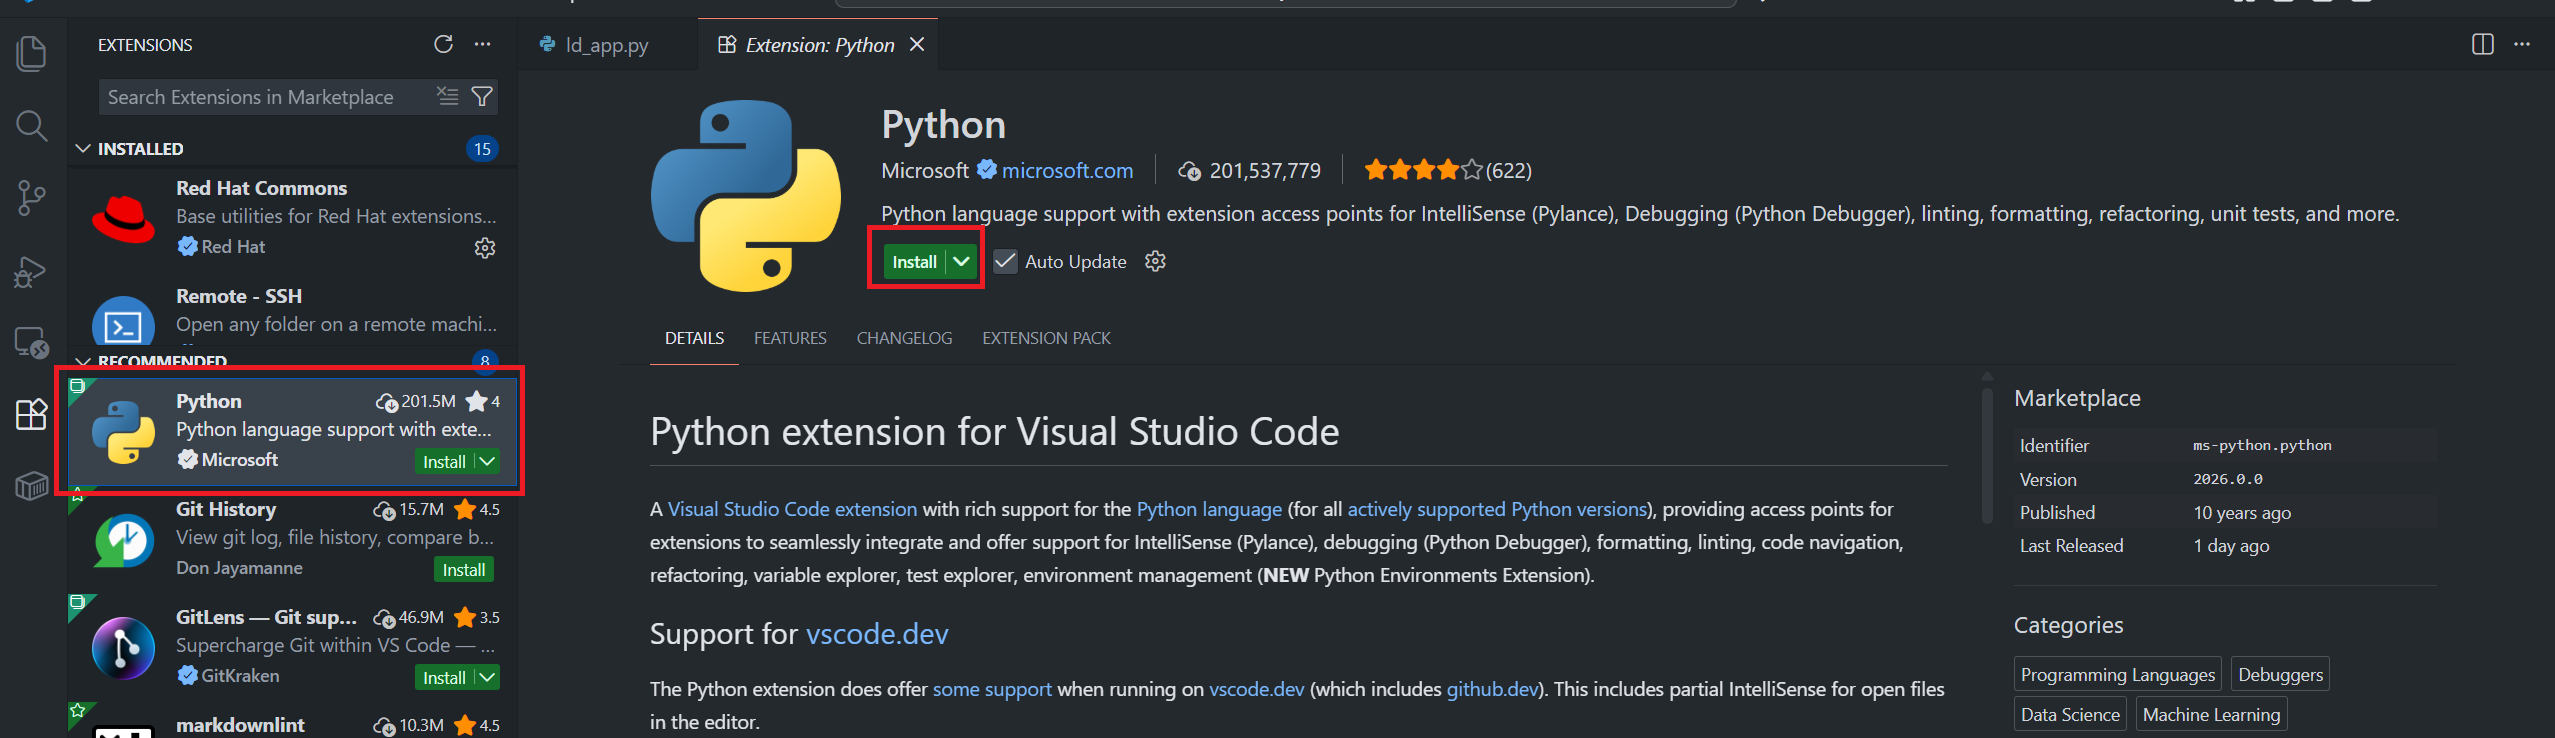
This extension provides:
- IntelliSense (code completion)
- Linting
- Debugging
- Code formatting
- Unit testing support
- Python environment management
Step 2: Verify Python Installation
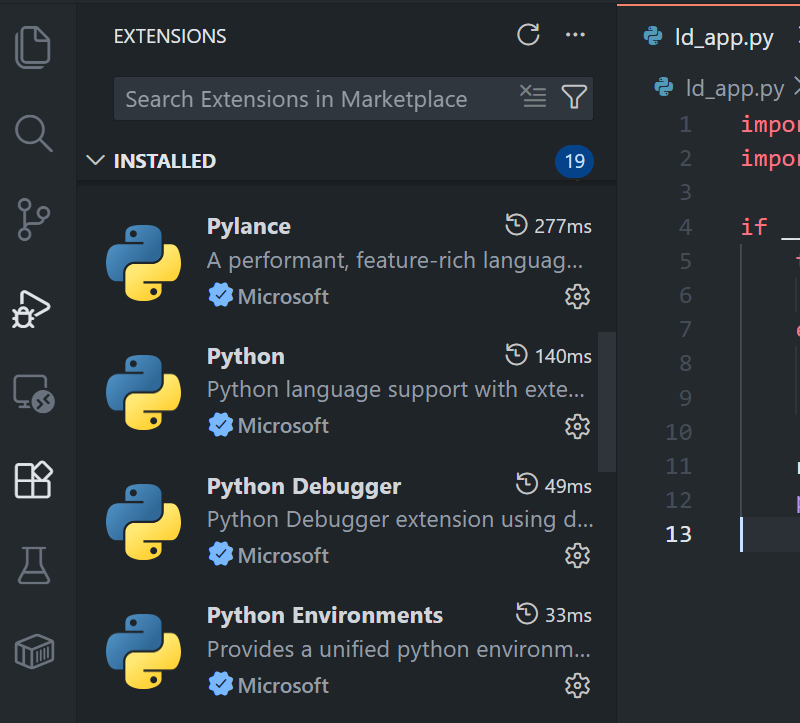
After installing the Python extension, you see the list of extensions that bundled with the Python extension as follows:
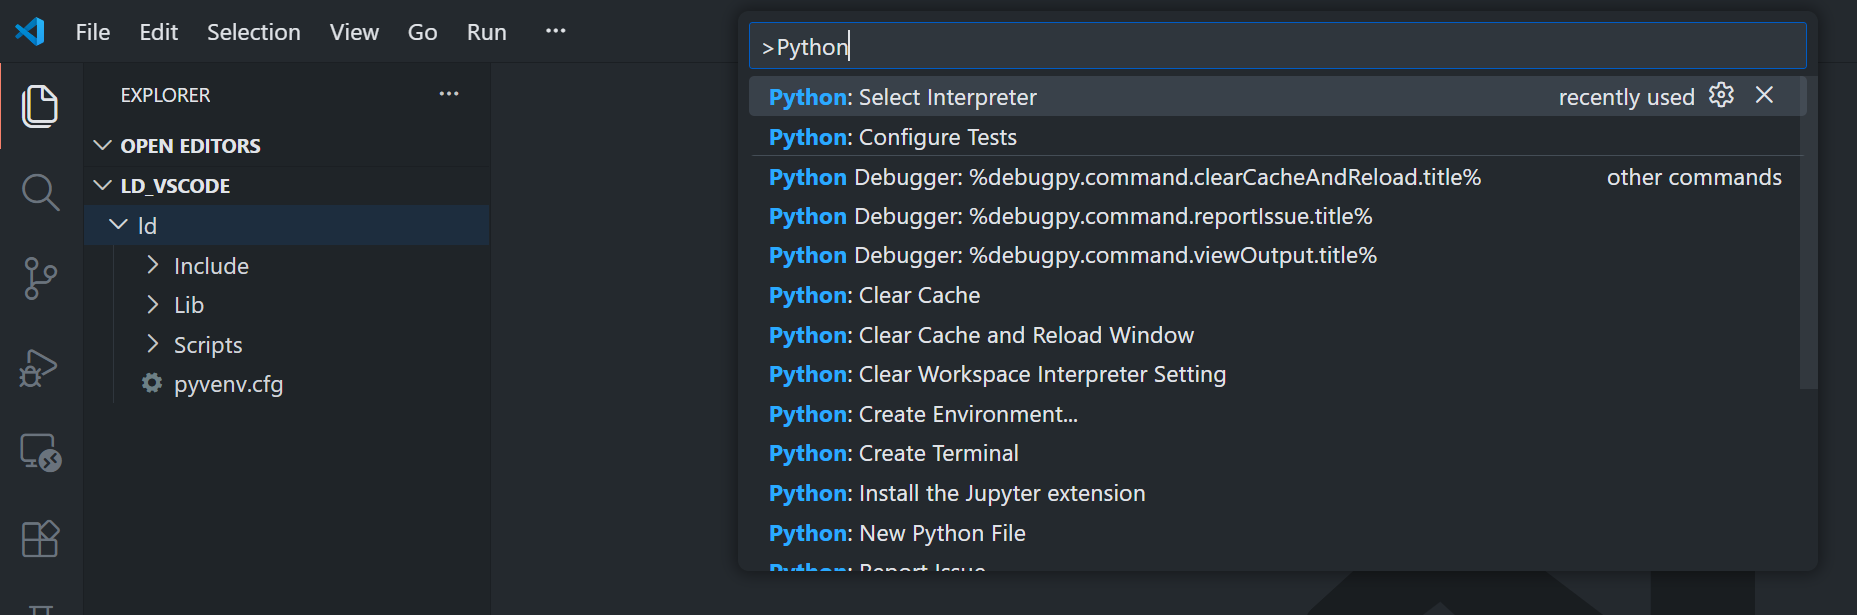
you can verify your Python installation by opening the Command Palette (Ctrl+Shift+P or Cmd+Shift+P) and typing "Python: Select Interpreter".
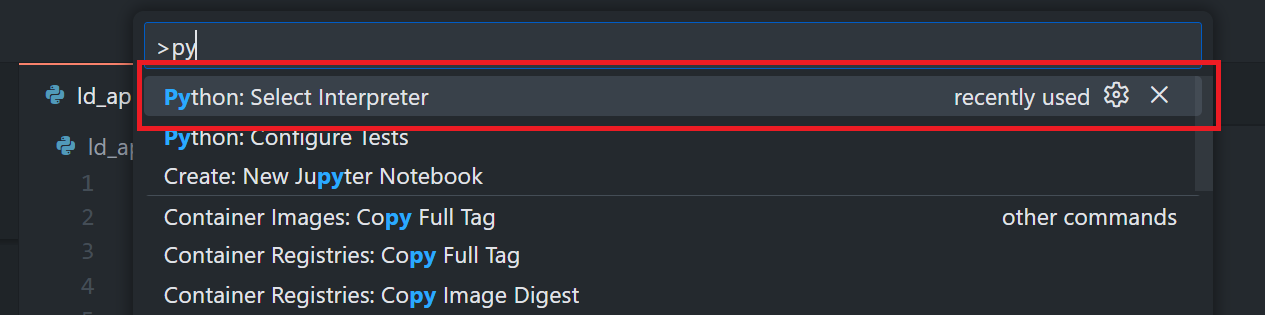
You should see a list of available Python interpreters installed on your system.
You can find more detail on the Python in Visual Studio Code official document page.
Step 3: Install the Jupyter Notebook Extensions
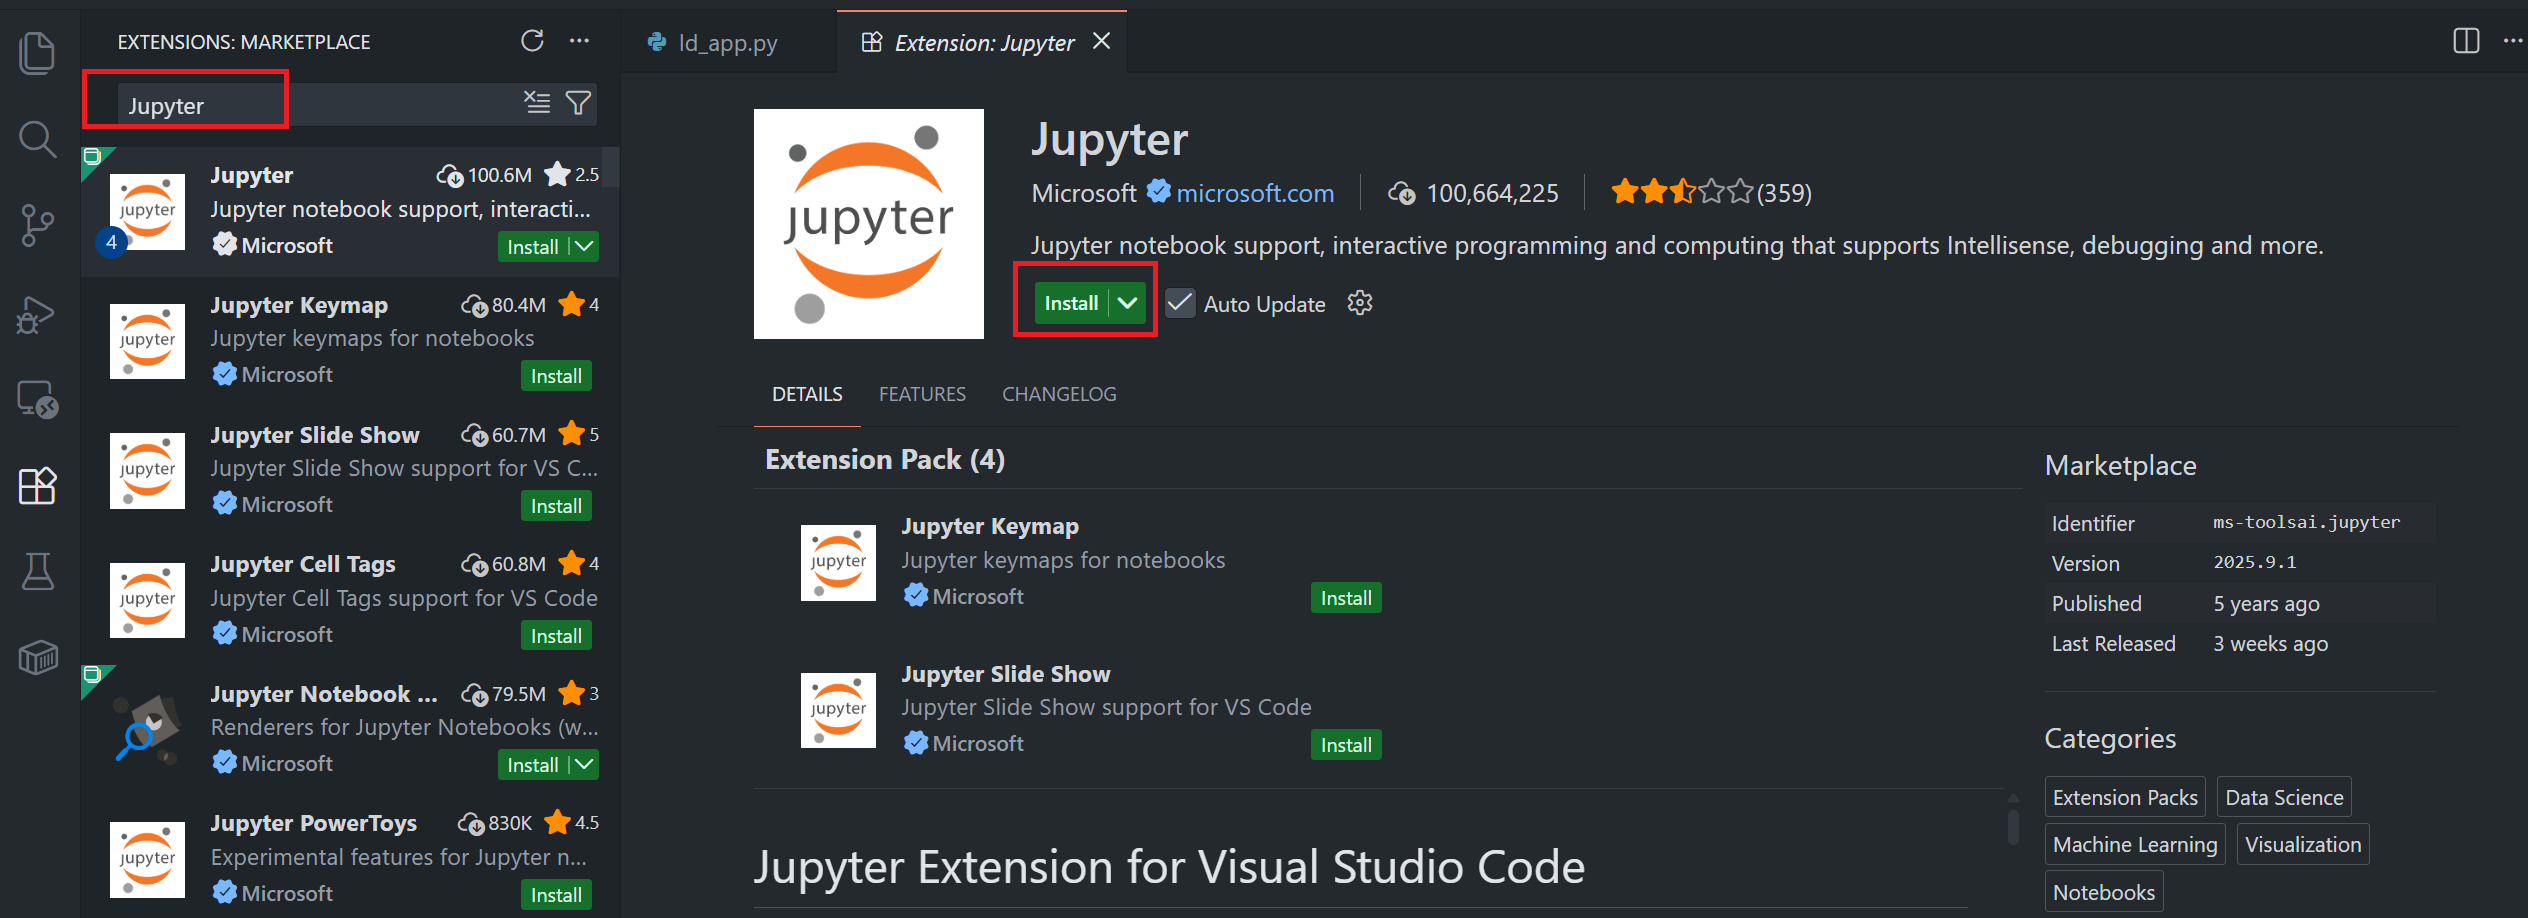
Next, open VS Code Extensions panel and search for Jupyter to install Jupyter Notebook extensions.
After installing the Jupyter extension, you see the list of extensions that bundled with the Jupyter extension as follows:

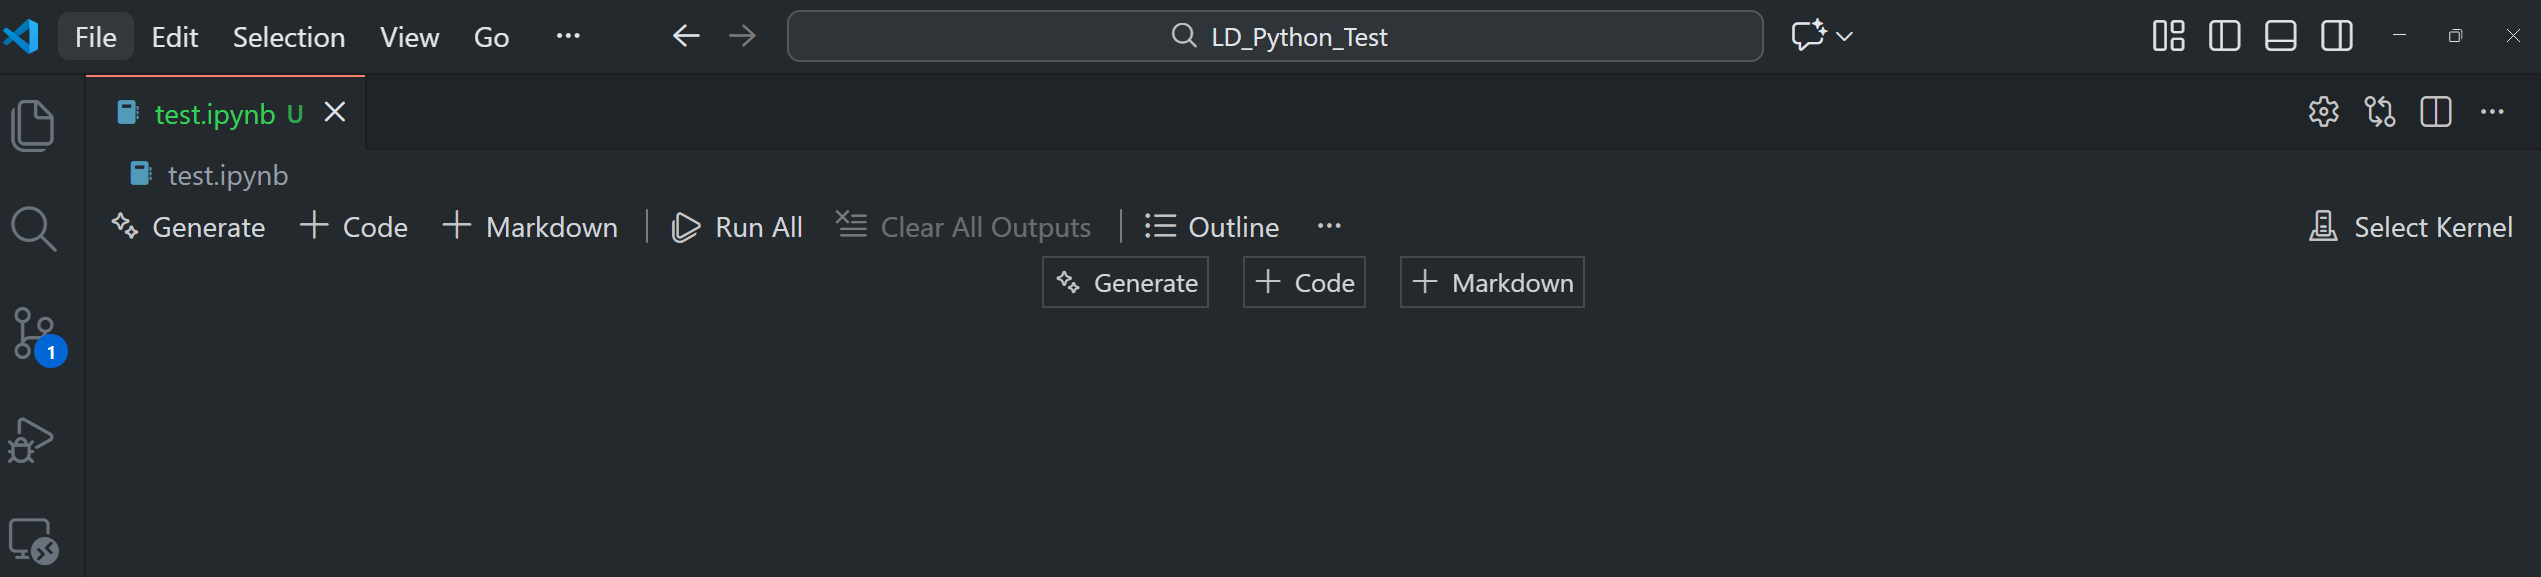
You can verify your Jupyter extension installation by creating any .ipynb file and see if it shows a notebook application like this.
Working with venv in VS Code
I am demonstrating the Data Library for Python on VS Code setup using the venv. The Python venv is a Python built-in module that lets developers create and manage Python virtual environment. The venv lets developers manage and install Python packages from PyPI with a pip tool.
With the venv, a virtual environment always uses the same Python version as the based version.
Step 1: Create a Virtual Environment
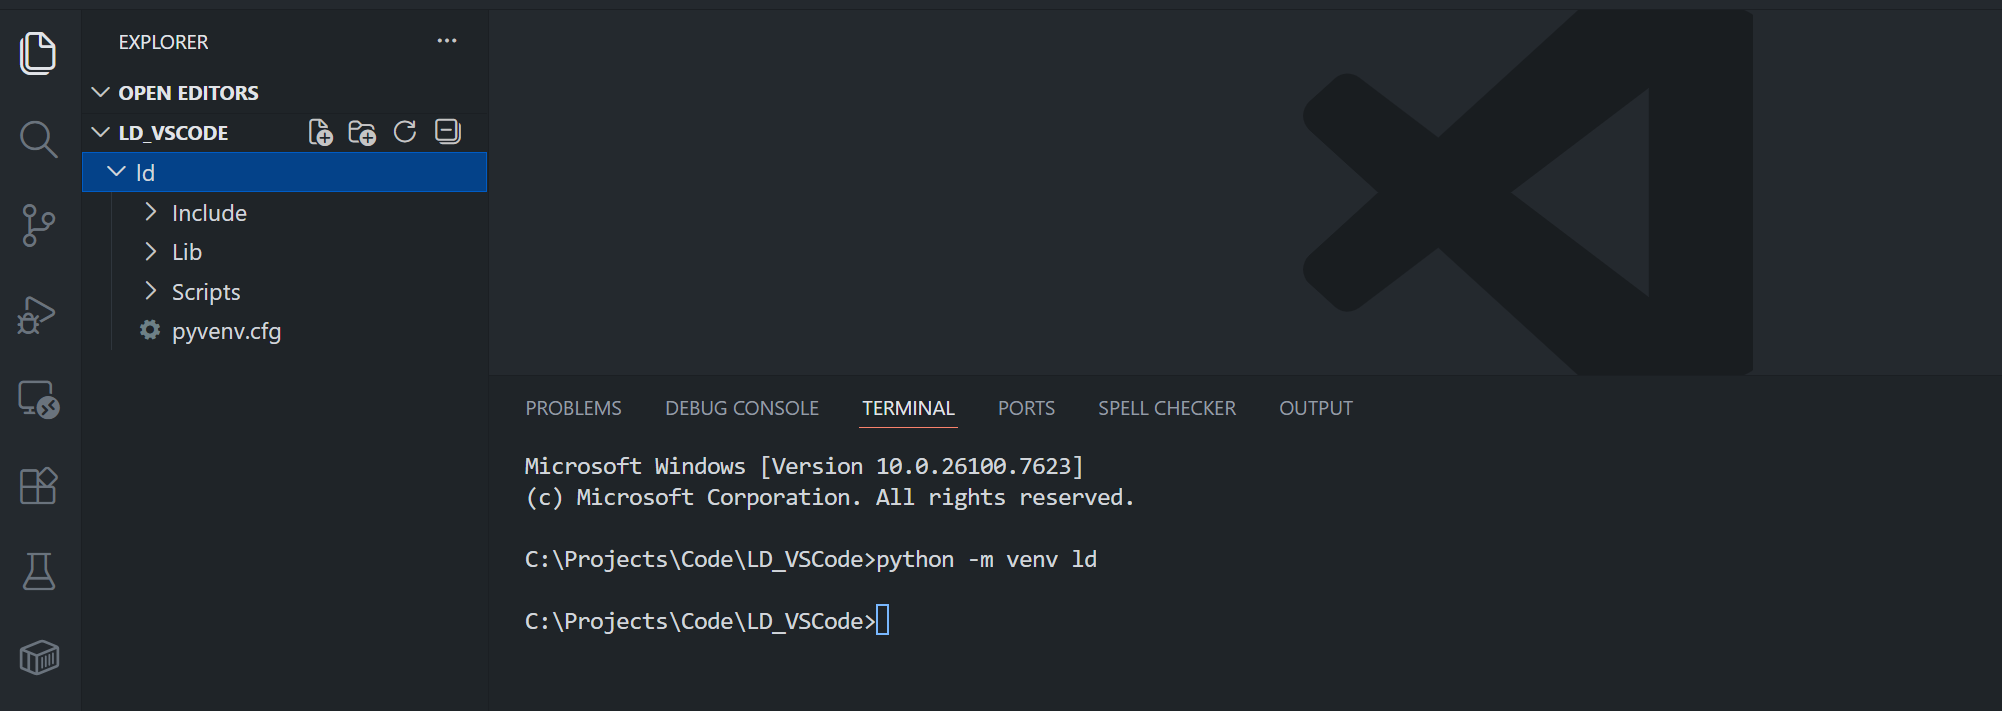
Open a project folder in VS Code and then, open the integrated terminal in VS Code (Ctrl+ or View > Terminal) and run the following command to create a virtual environment:
python -m venv ld
This creates a new virtual environment in a folder named ld within your project directory.
Note: You can name your virtual environment anything you like. Some developers prefer .venv_name (with a dot prefix) to keep it hidden on Unix-like systems.
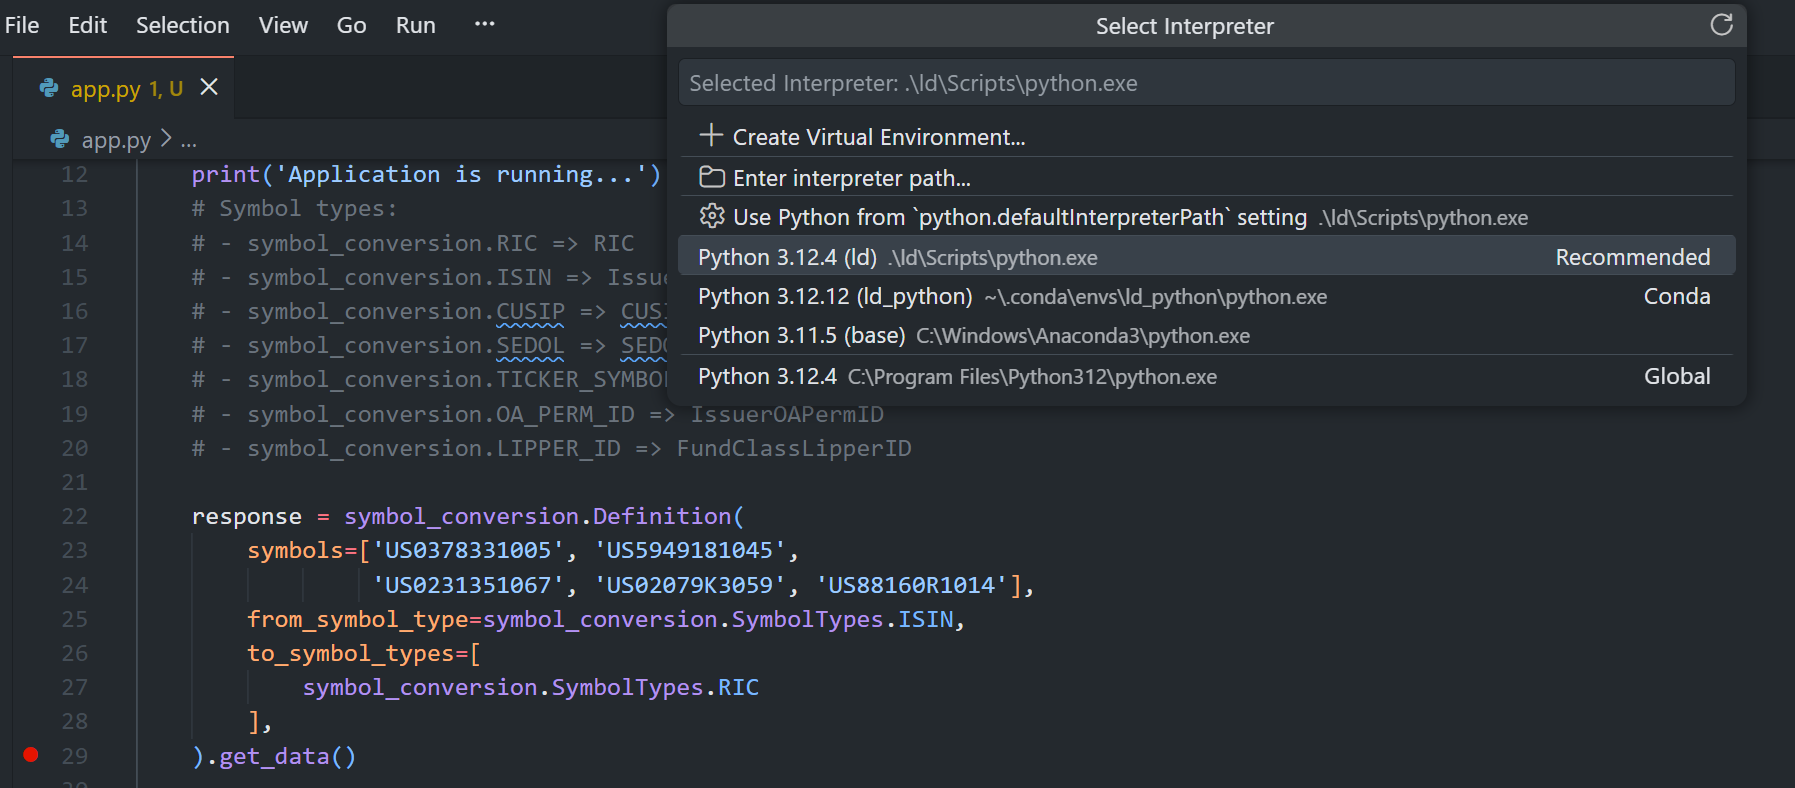
Step 2: Select the Virtual Environment in VS Code
After creating the virtual environment, VS Code may automatically detect it and prompt you to select it. If not, you can manually select it:
- Open the Command Palette (Ctrl+Shift+P or Cmd+Shift+P)
- Type "Python: Select Interpreter"
- Select the ld virtual environment
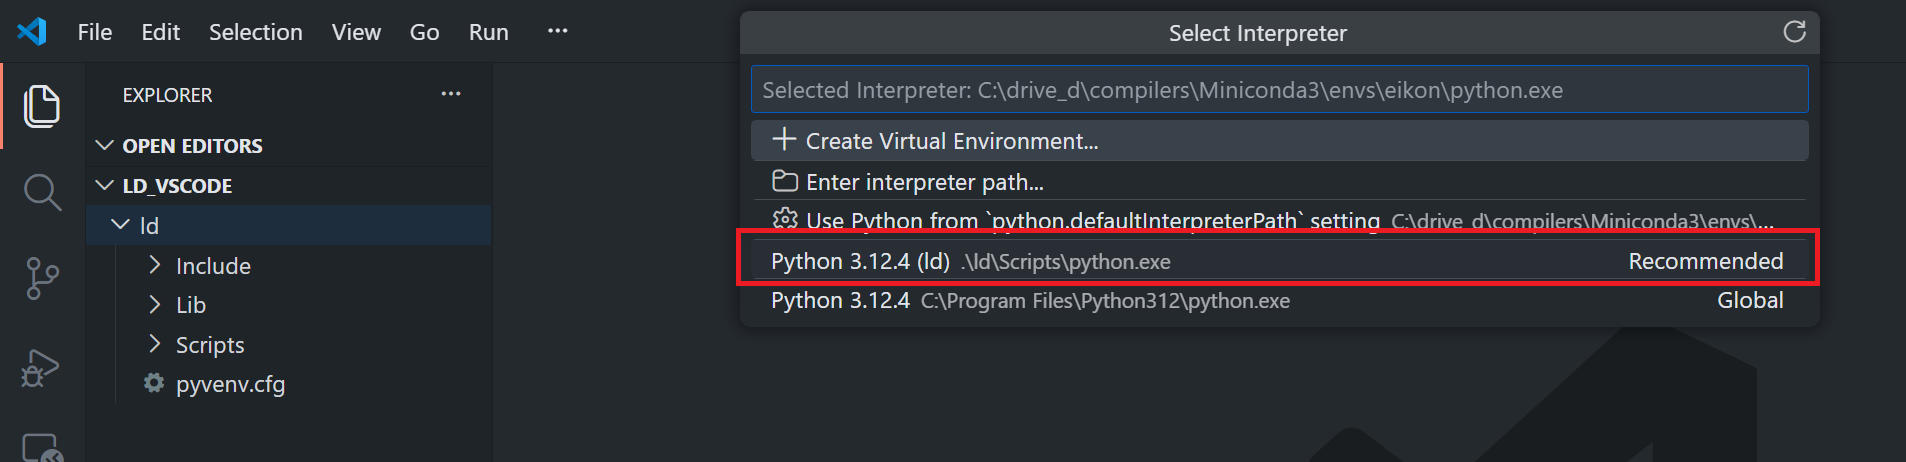
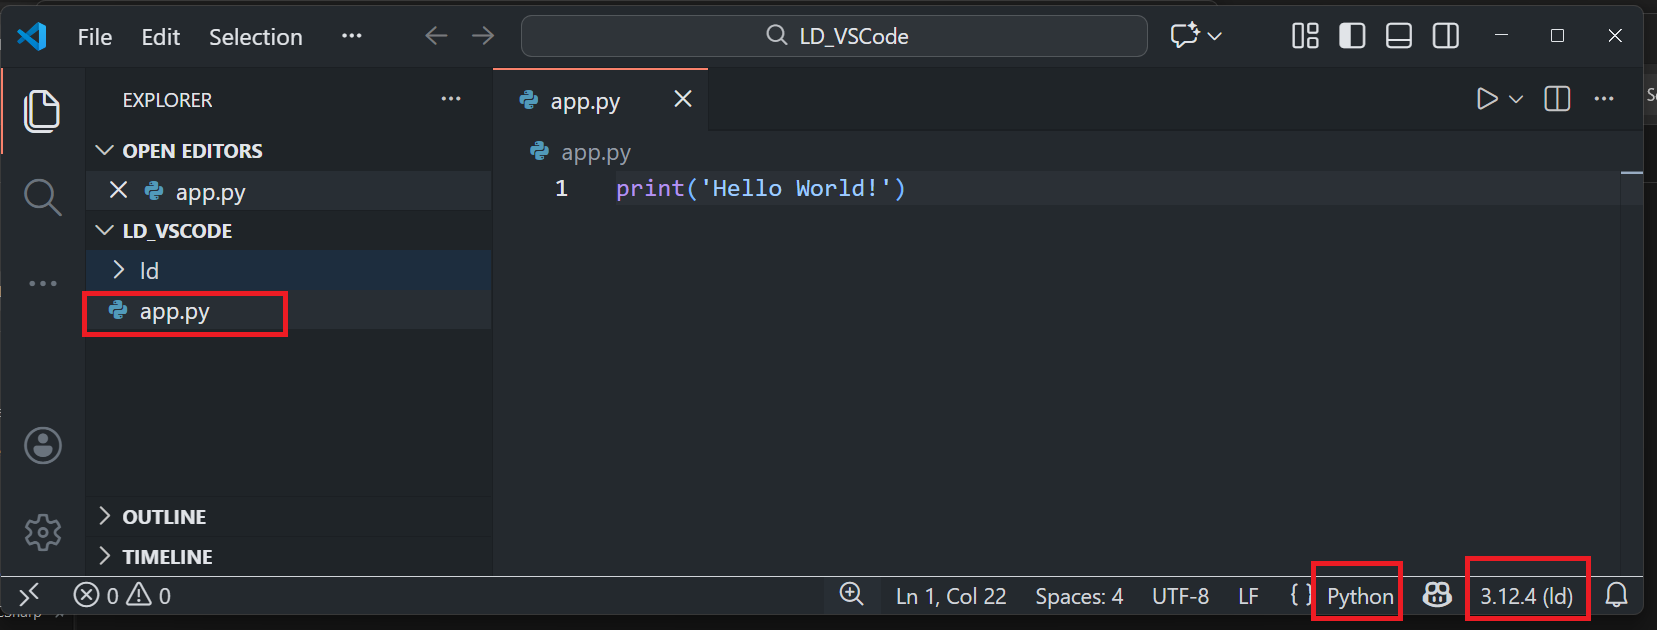
The selected interpreter will be displayed in the status bar at the bottom of VS Code when you open the Python file.
Step 3: Activate the Virtual Environment
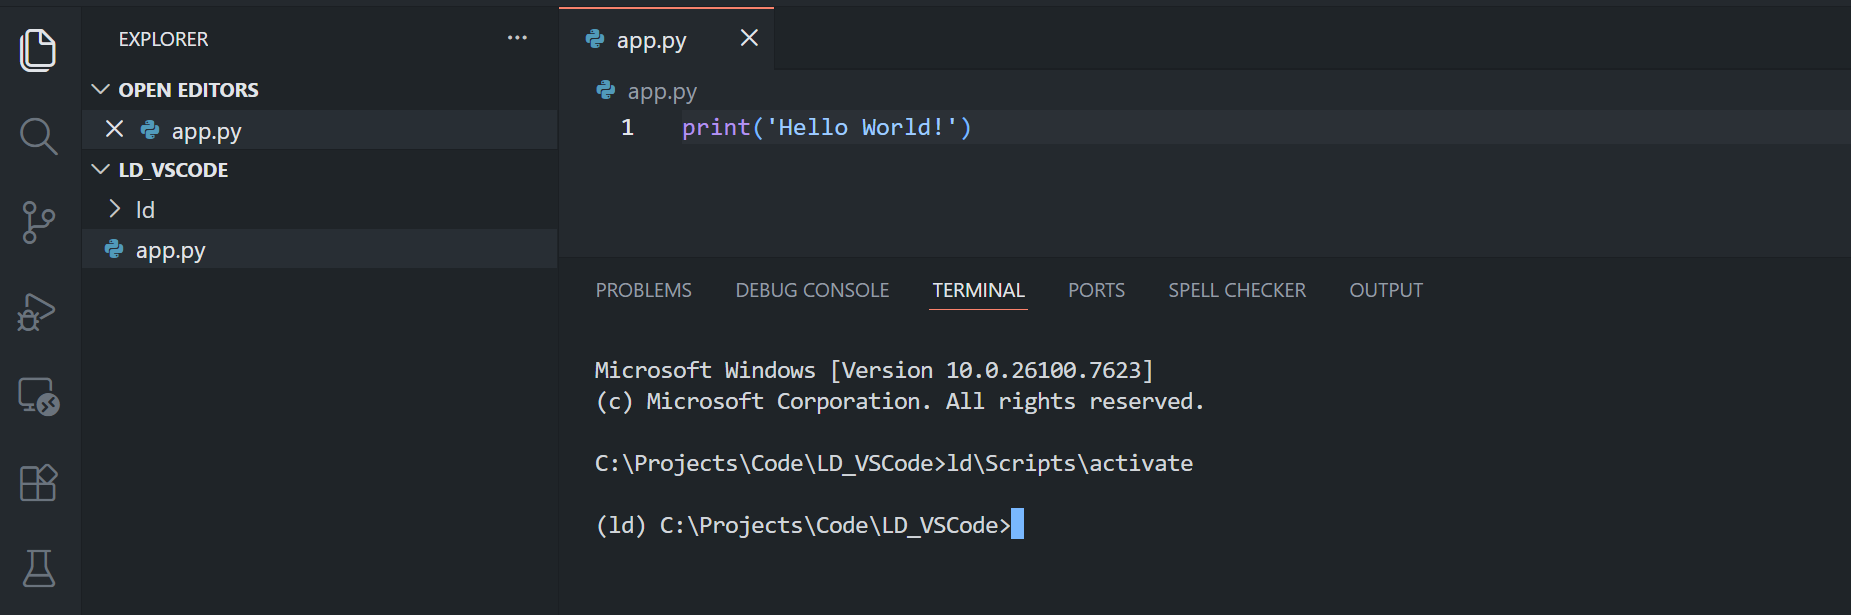
VS Code automatically activates the selected virtual environment when you open a new terminal. However, if you need to manually activate it:
Windows:
ld\Scripts\activate
Linux and MacOS:
source ld/bin/activate
You should see the virtual environment name in parentheses at the beginning of your terminal prompt.
Step 4: Install the Data Library for Python
Note: If your organization uses internal repository to store Python packages, please contact your local IT support to help you configure the pip system to access that repository first.
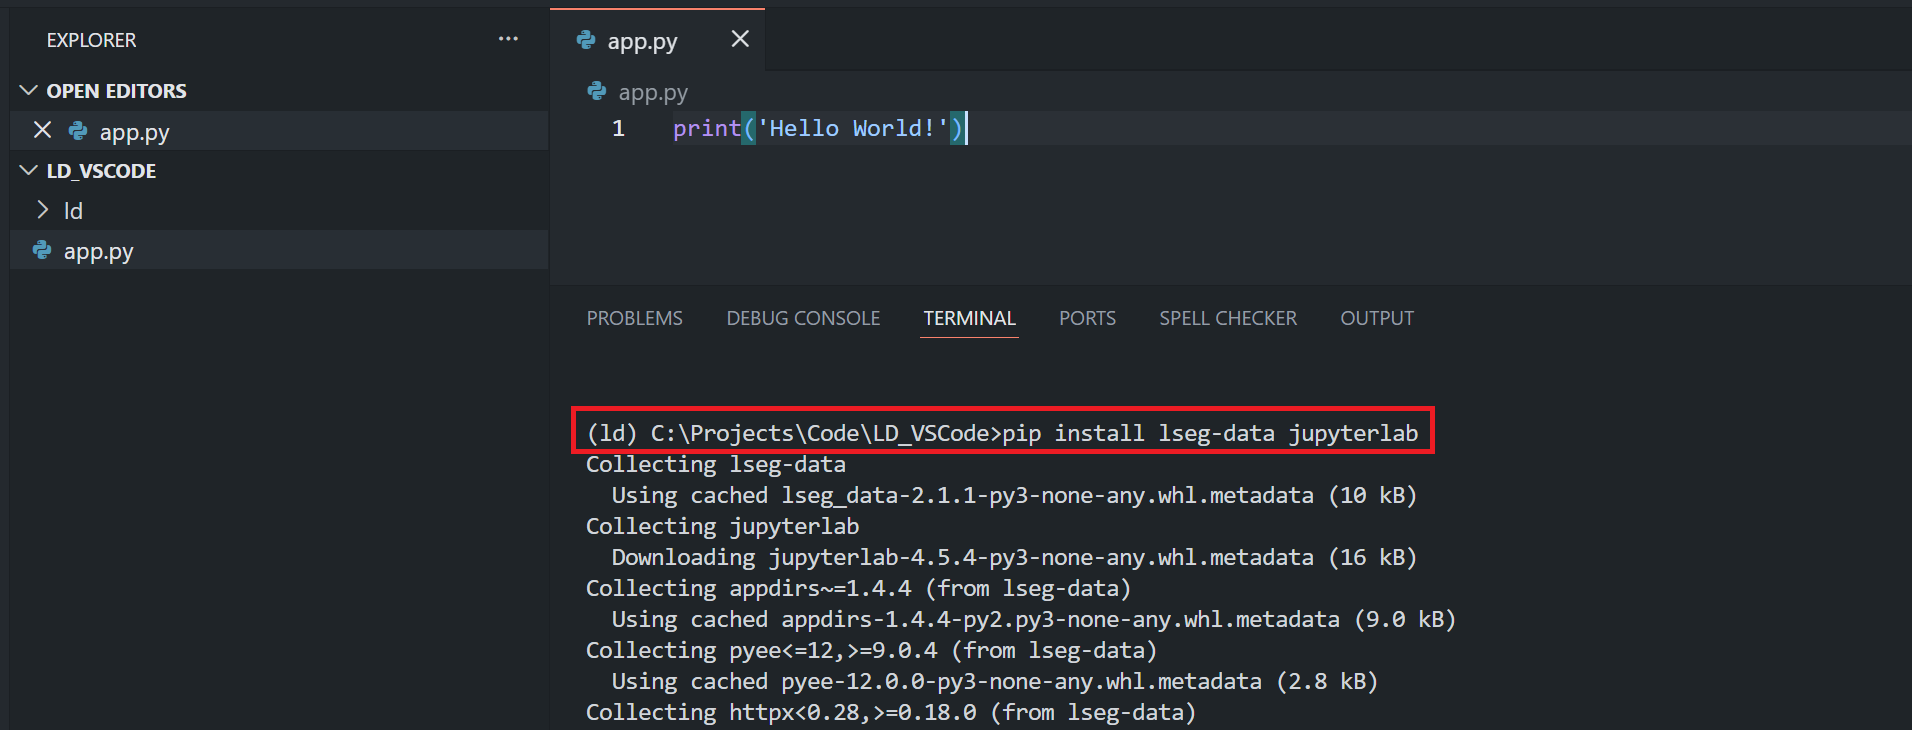
Now install the Data Library for Python with the following command in the VS Code terminal:
pip install lseg-data
You can install multiple packages at the same time:
pip install lseg-data jupyterlab matplotlib pandas
Note: In some environment behind proxy, you might need the following command instead.
pip install --trusted-host pypi.python.org --trusted-host files.pythonhosted.org --trusted-host pypi.org --no-cache-dir lseg-data
Step 5: Verify the Installation
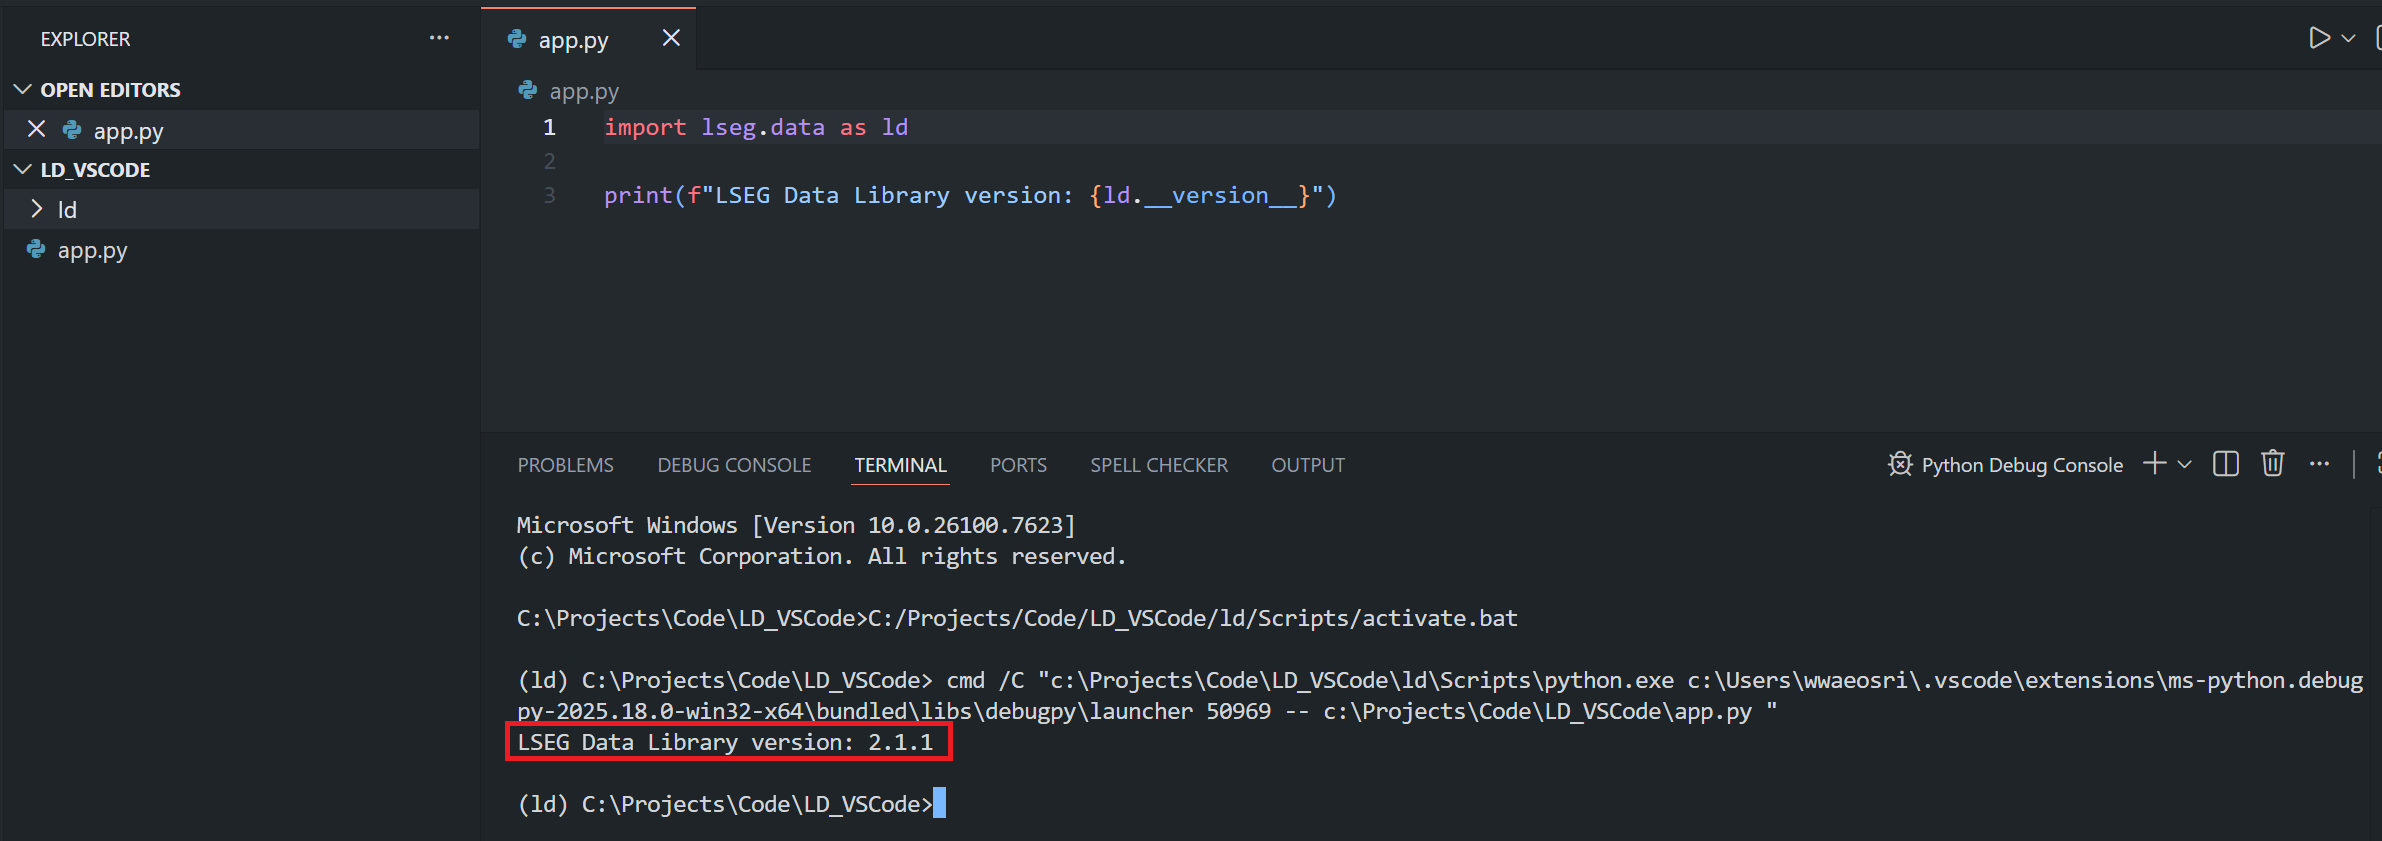
Create a new Python file in VS Code (File > New File or Ctrl+N) and save it with a .py extension. Add the following code to verify the installation:
import lseg.data as ld
print(f"LSEG Data Library version: {ld.__version__}")
Run the file by clicking the "Run Python File" button in the top-right corner of the editor, or by pressing Ctrl+F5 and choose.
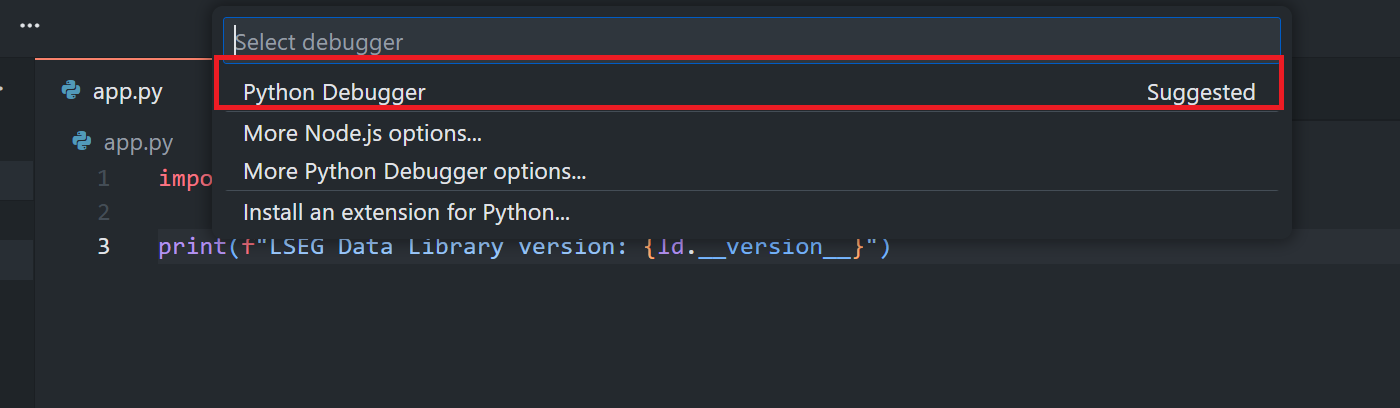
You should see the Data Library version printed in the terminal output.
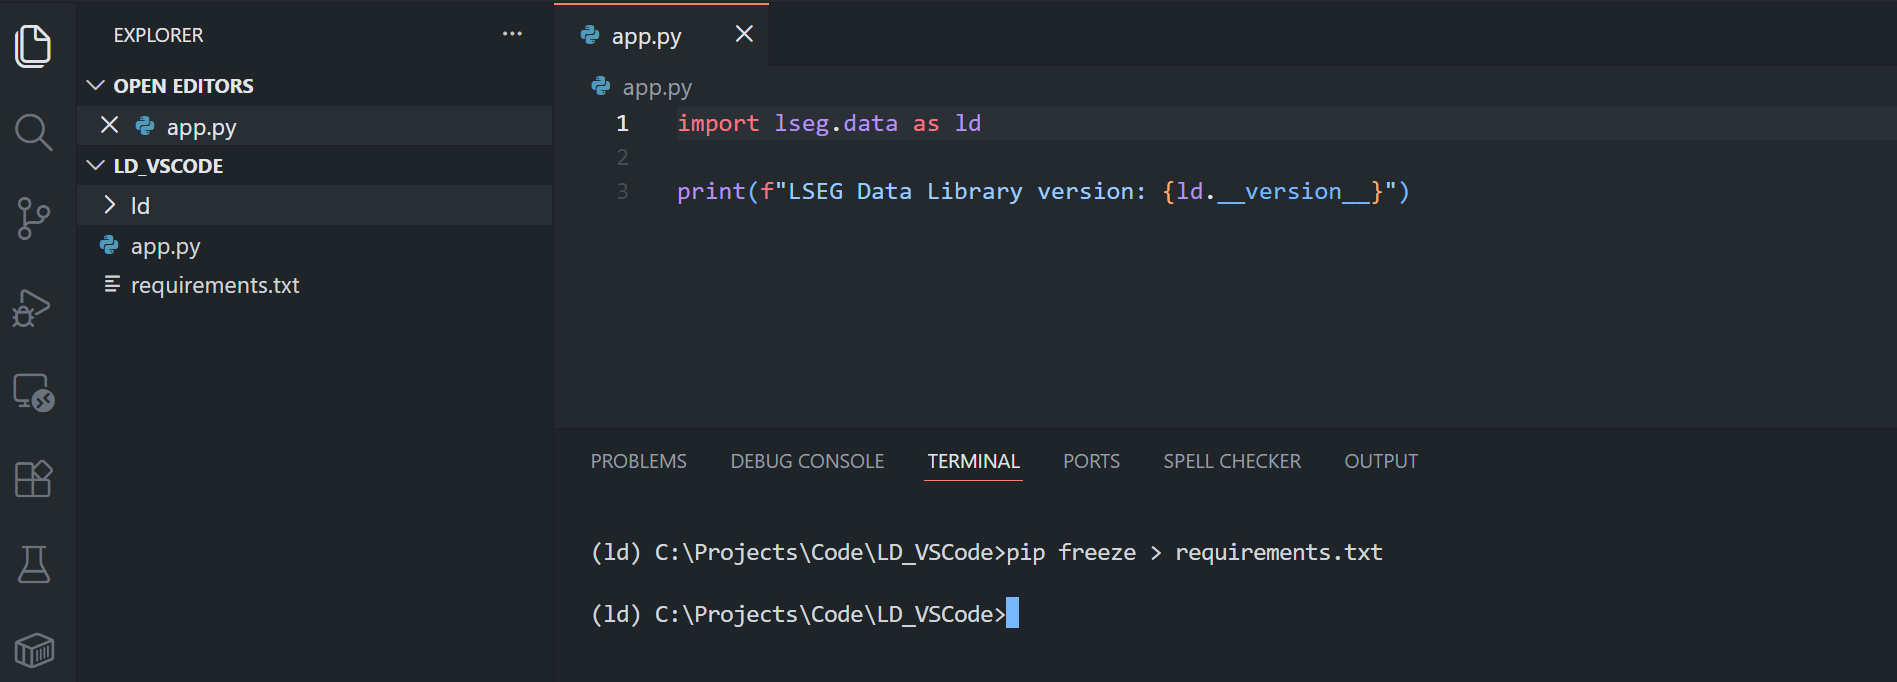
Step 6: Create a Requirements File
To track your project dependencies, create a requirements.txt file. In the VS Code terminal, run:
pip freeze > requirements.txt
To install dependencies from this file in the future, use:
pip install -r requirements.txt
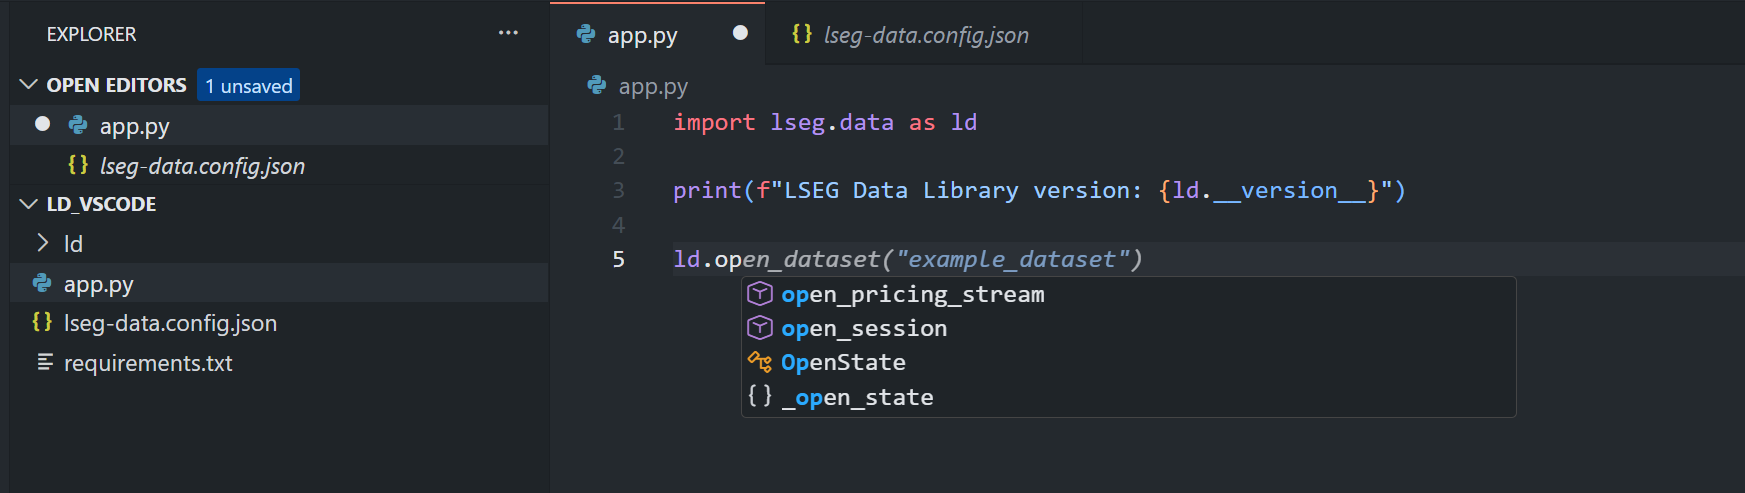
Step 7: Working with Python Files in VS Code
Note: Do not forget to create your lseg-data.config.json configuration file with your connection credential in the same location as an application. See Library Quick Start and GitHub pages for more details.
VS Code provides excellent features for Python development:
IntelliSense and Code Completion: As you type, VS Code provides intelligent code completion suggestions.
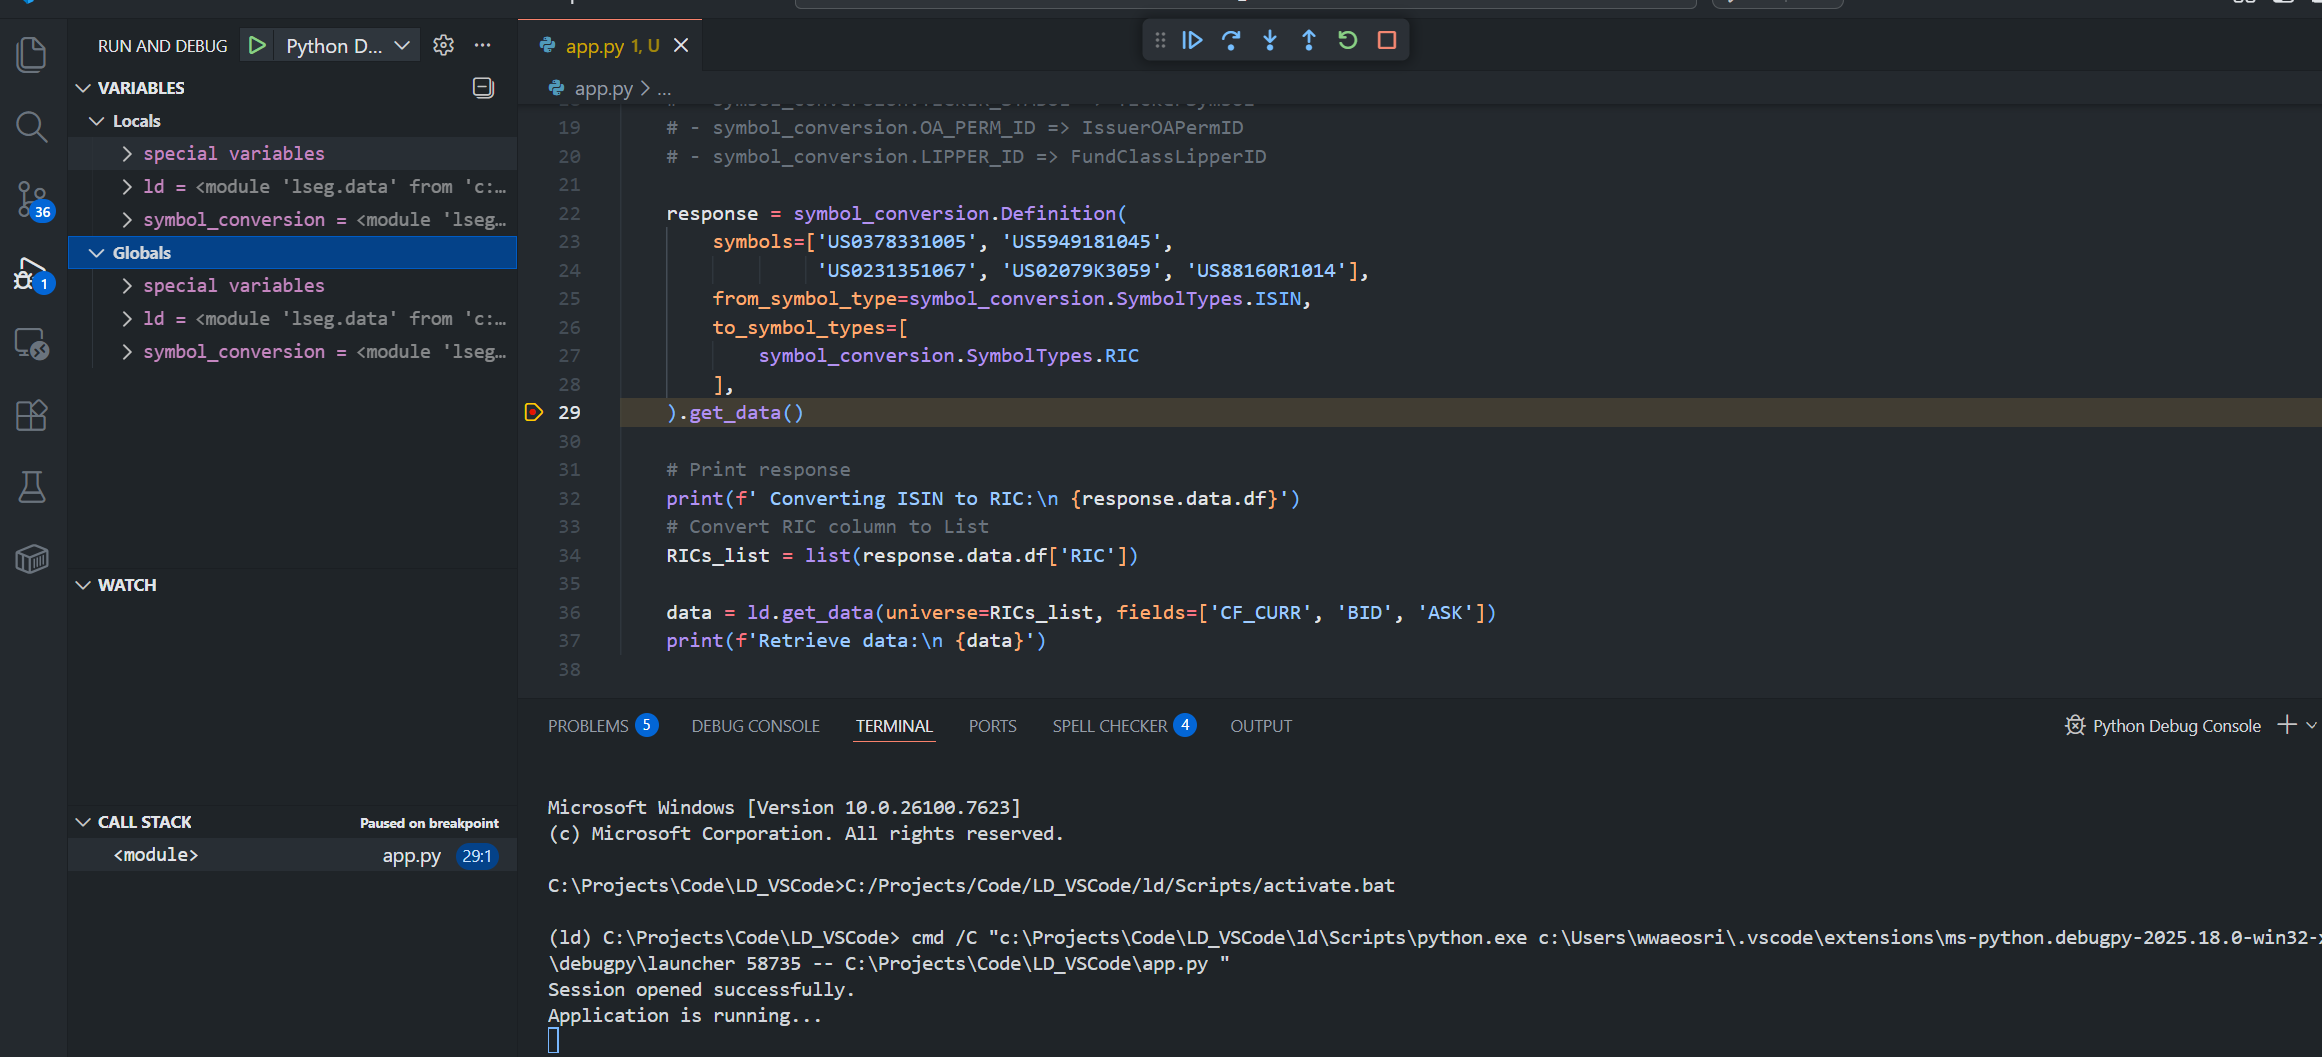
Debugging: Set breakpoints by clicking in the left margin of the editor, then press F5 to start debugging.
If you interested in Linting and code formatting, you can follow instructions on the Linting Python in Visual Studio Code and Formatting Python in VS Code pages.
Other recommended extension:
- Microsoft Pylint extension
- Microsoft autopep8 extension
Setting Up Python Virtual Environment with Anaconda in VS Code
Please check my Step-By-Step Guide to install Data Library for Python using Virtual Environment article about how to create a Conda environment. The VS Code Python and Jupyter Extensions can recognize the Conda environment as Python environment for working too.
Working with Jupyter Notebooks in VS Code
VS Code has excellent support for Jupyter Notebooks, allowing you to work with .ipynb files directly in the editor.
Step 1: Create a New Notebook
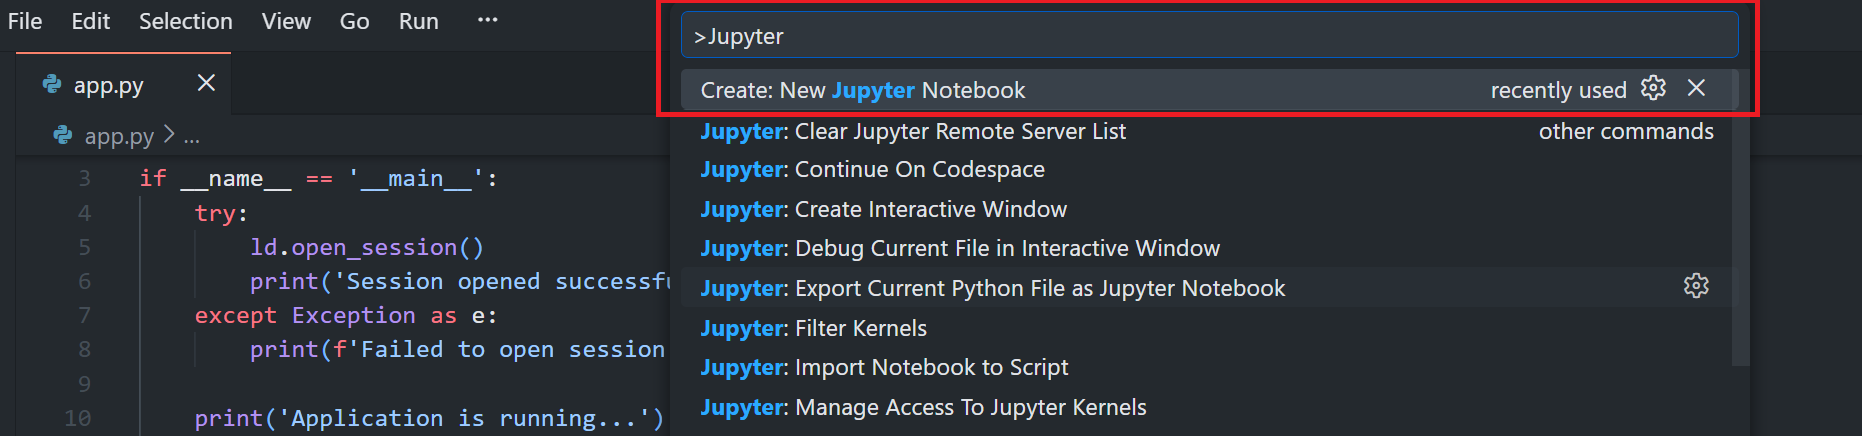
Firstly, Open the Command Palette (Ctrl+Shift+P), and type "Create: New Jupyter Notebook". Alternatively, you may create a file with .ipynb extension manually.
Next, Save the newly created .ipynb file to the name that you prefer (I am using notebook.ipynb name).
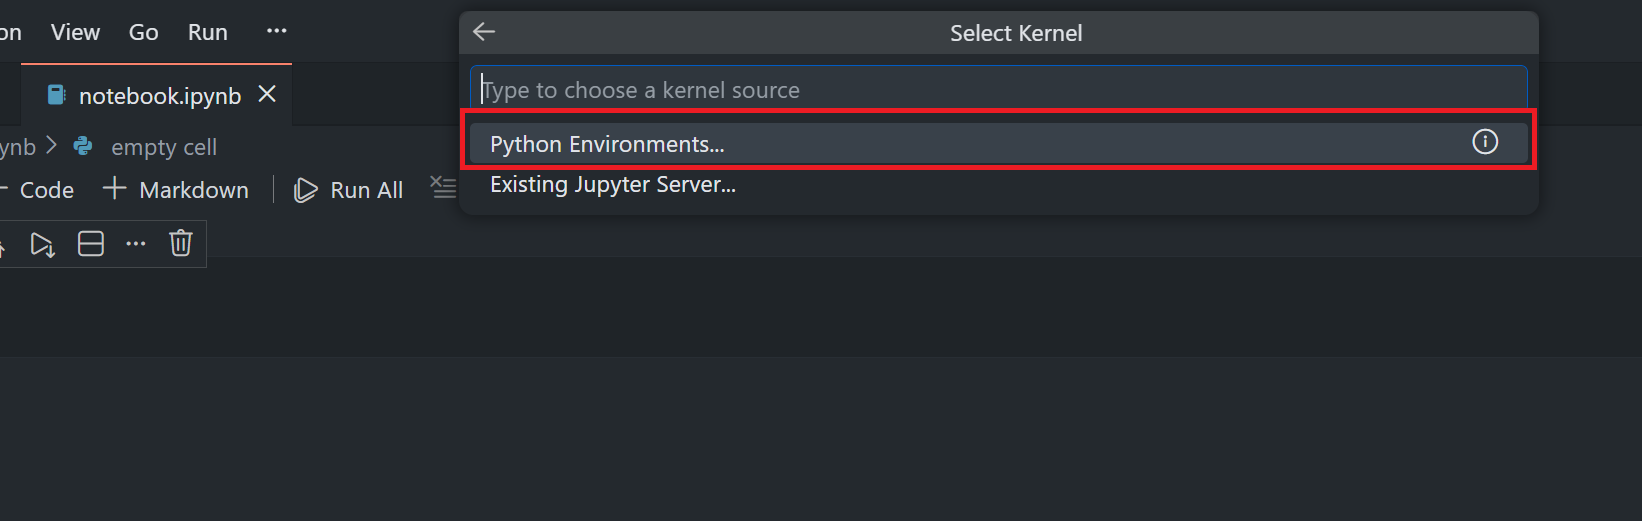
Then, select your virtual environment as the kernel by clicking on the "Select Kernel" button.

Then choose, "Python Environments" (If you already have existing Jupyter Server, you can choose this option, but it is out of scope of this article)
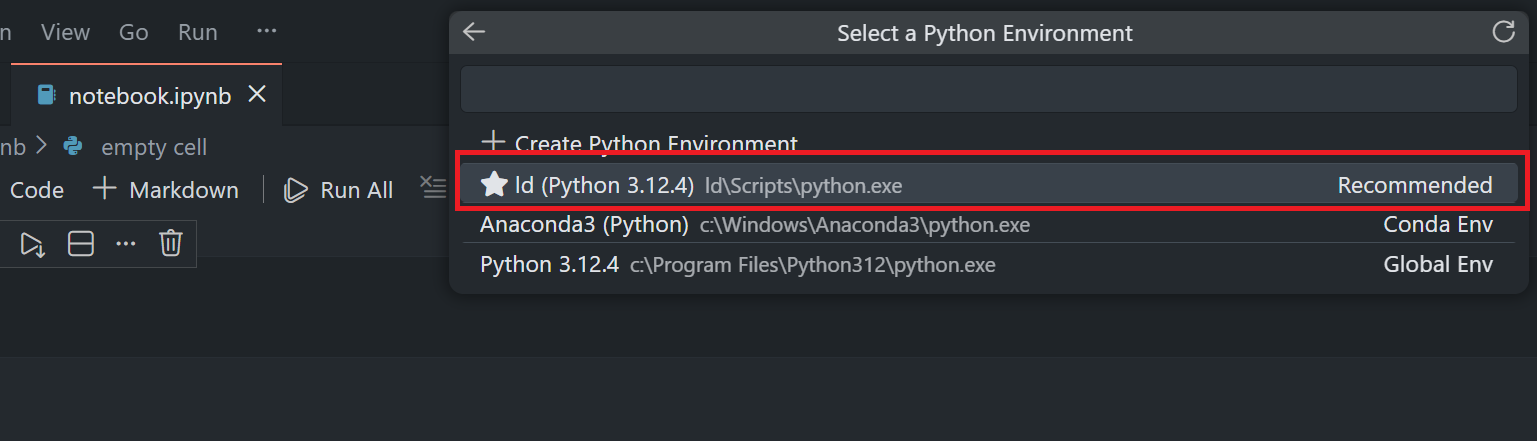
Choose an environment with Jupyterlab installation.
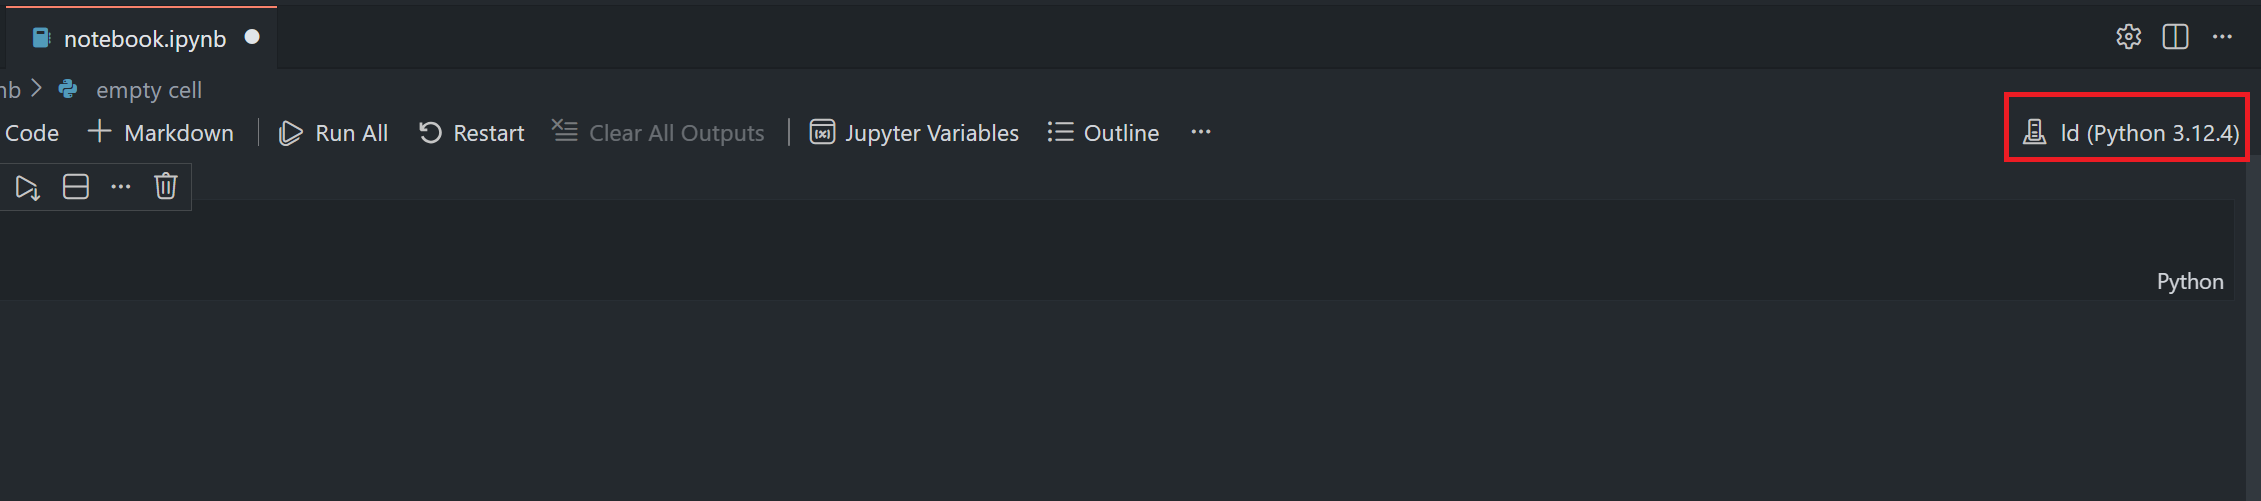
You see that the selected environment named is shown on the notebook kernel button.
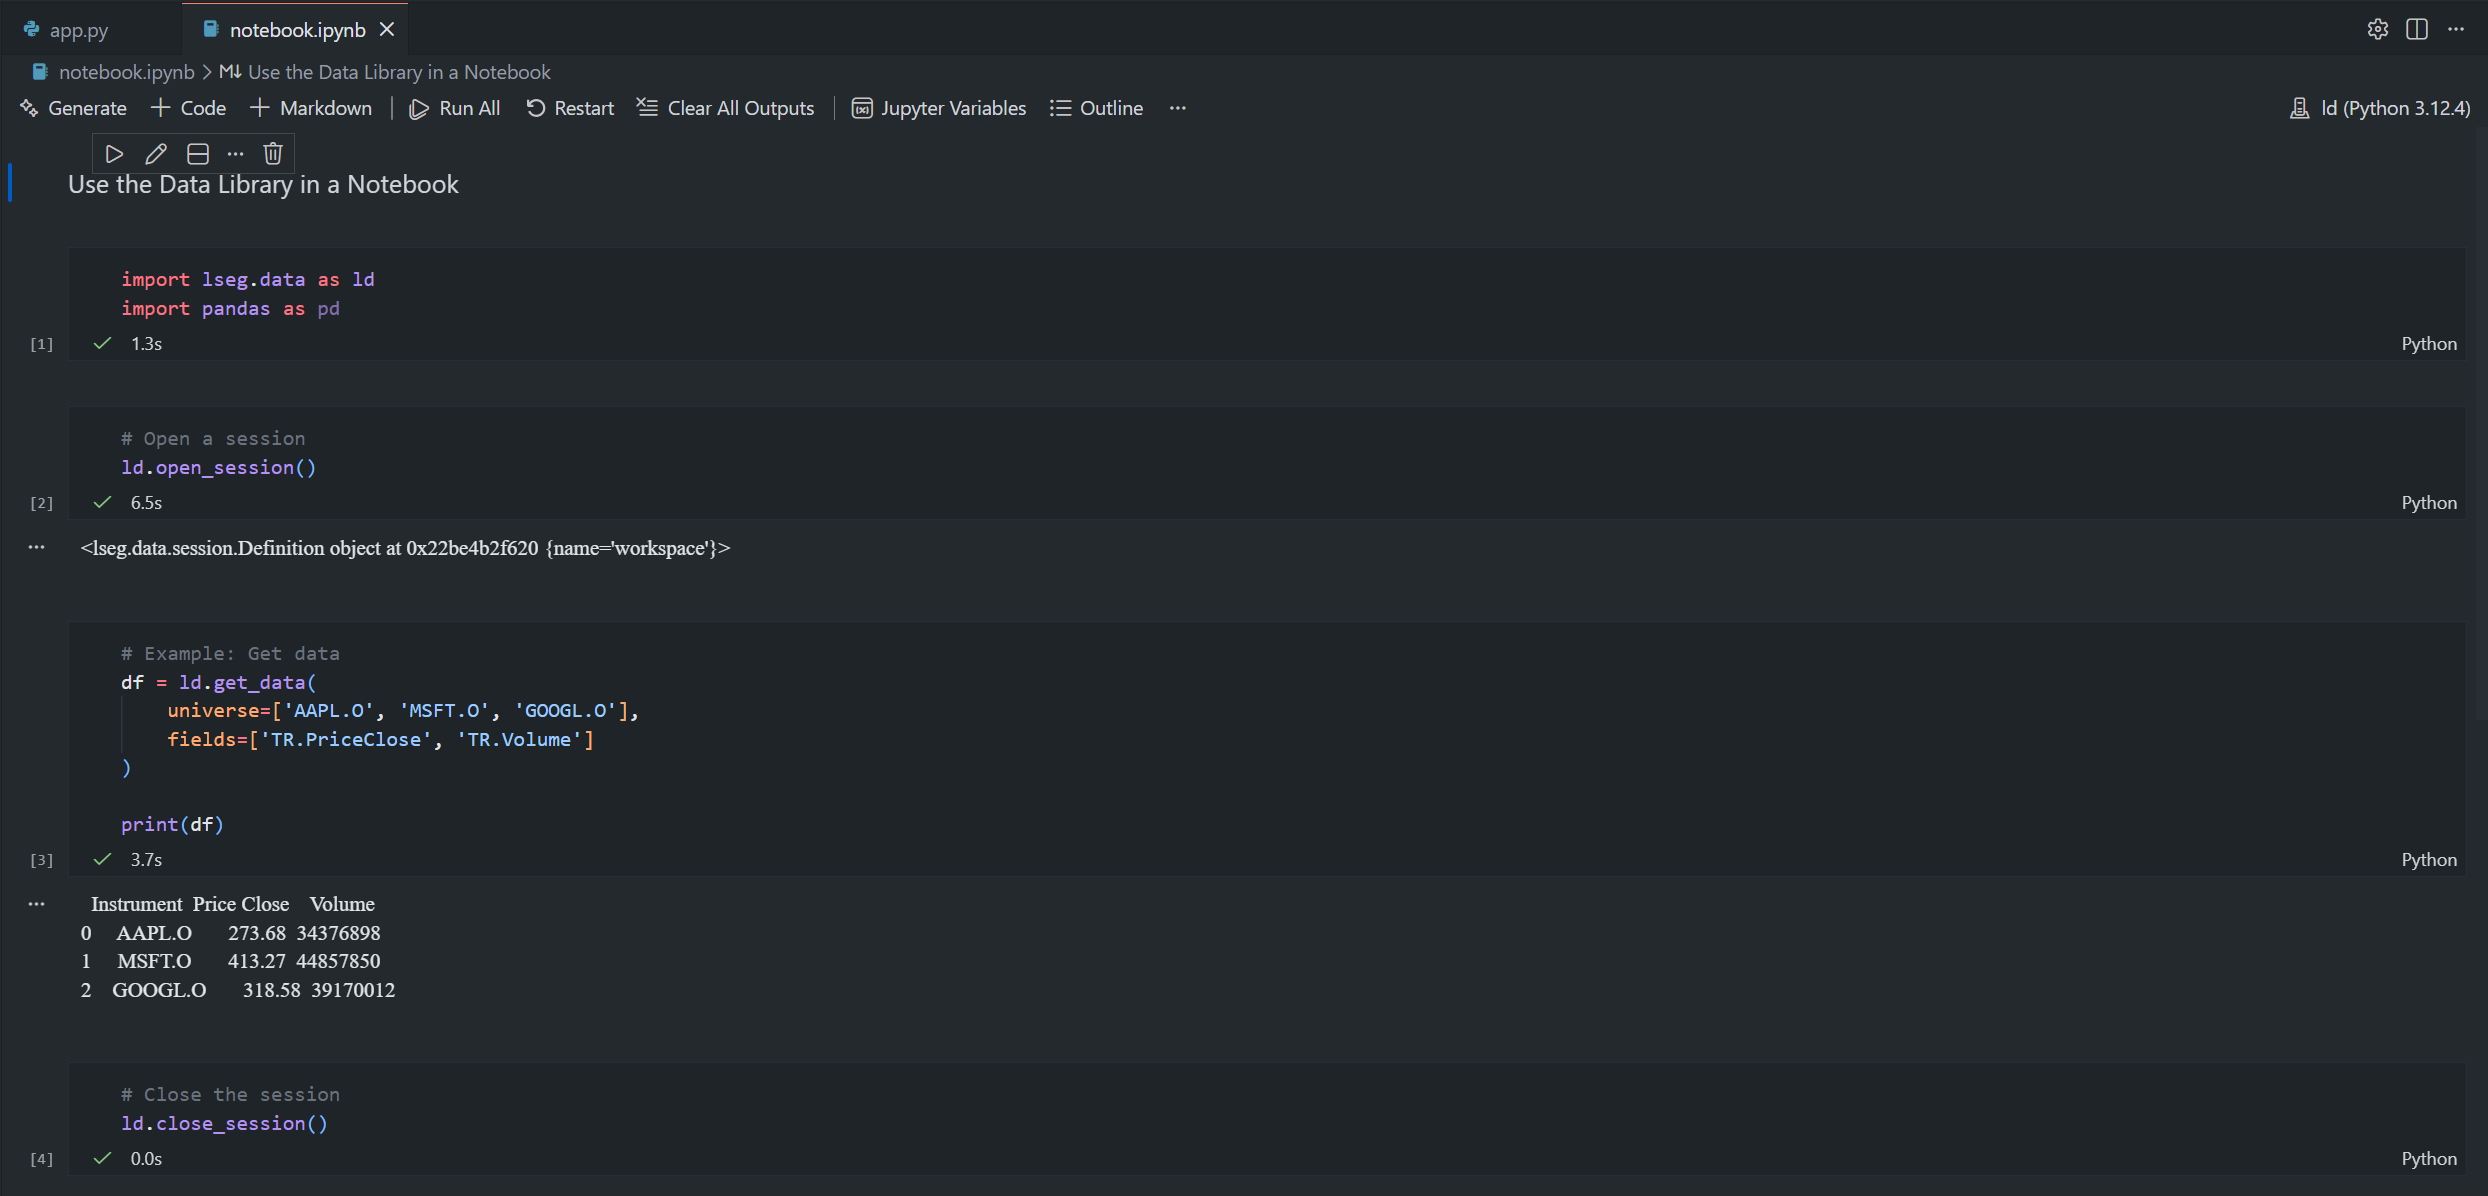
Step 2: Use the Data Library in a Notebook
Create new code cells and import the Data Library:
import lseg.data as ld
import pandas as pd
# Open a session
ld.open_session()
# Example: Get data
df = ld.get_data(
universe=['AAPL.O', 'MSFT.O', 'GOOGL.O'],
fields=['TR.PriceClose', 'TR.Volume']
)
print(df)
# Close the session
ld.close_session()
Note: Do not forget to create your lseg-data.config.json configuration file with your connection credential in the same location as an application. See Library Quick Start and GitHub pages for more details.
Run the cell by clicking the play button or pressing Shift+Enter.
VS Code's Jupyter integration provides:
- Interactive cell execution
- Rich output display (charts, tables, images)
- Variable explorer
- IntelliSense and code completion
- Debugging support
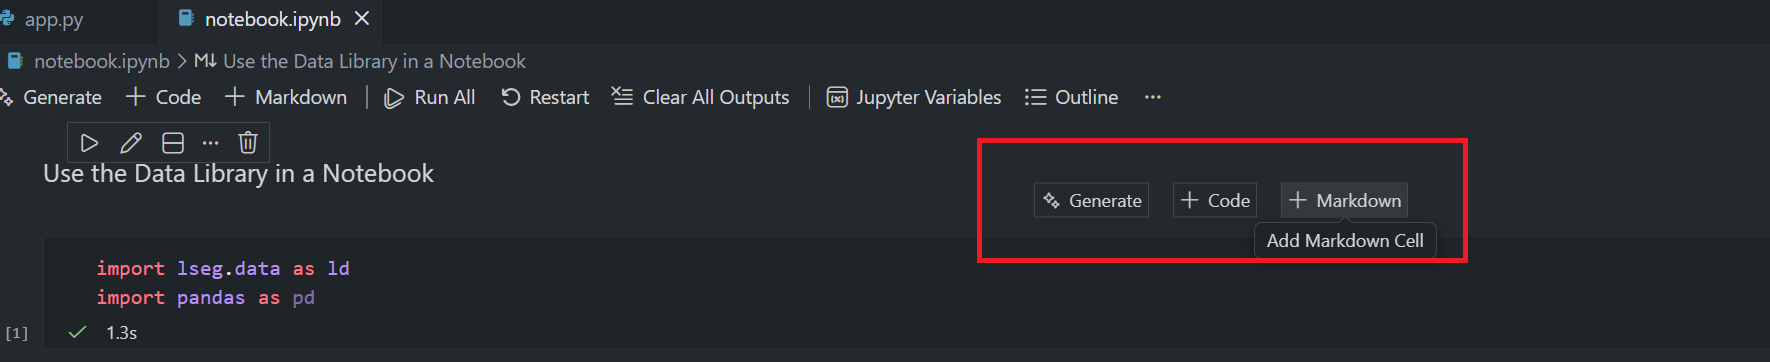
With the Jupyter Notebook, you can create markdown cells for documentation and code cells for the code.
Please see more detail about how to use the Jupyter Notebooks in VS Code via the VS Code official document page.
Managing Multiple Python Environments in VS Code
VS Code makes it easy to work with multiple Python projects, each with their own virtual environment:
Workspace Settings
You can configure Python settings per workspace by creating a .vscode/settings.json file in your project folder:
{
"python.defaultInterpreterPath": "${workspaceFolder}/<prefer venv name>/Scripts/python.exe",
"python.terminal.activateEnvironment": true,
"[python]": {
"editor.defaultFormatter": "ms-python.autopep8",
"editor.formatOnSave": true
}
}
This ensures VS Code always uses the correct environment for your project.
Switching Between Environments
You can easily switch between different Python environments:
- Click on the Python version in the status bar, or
- Open Command Palette and select "Python: Select Interpreter"
- Choose the environment you want to use
Tips for Efficient Development in VS Code
1. Use Code Snippets
Create custom code snippets for common Data Library operations. Go to File > Preferences > Configure Snippets and select Python:
{
"Import Data Library": {
"prefix": "ldimport",
"body": [
"import lseg.data as ld",
"import pandas as pd",
"",
"ld.open_session()",
"$0"
],
"description": "Import and open LSEG Data Library session"
}
}
2. Keyboard Shortcuts
Learn these useful keyboard shortcuts:
- Ctrl+` - Toggle integrated terminal
- Ctrl+Shift+P - Command Palette
- Ctrl+/ - Toggle line comment
- Shift+Alt+F - Format document
- F5 - Start debugging
- Ctrl+F5 - Run without debugging
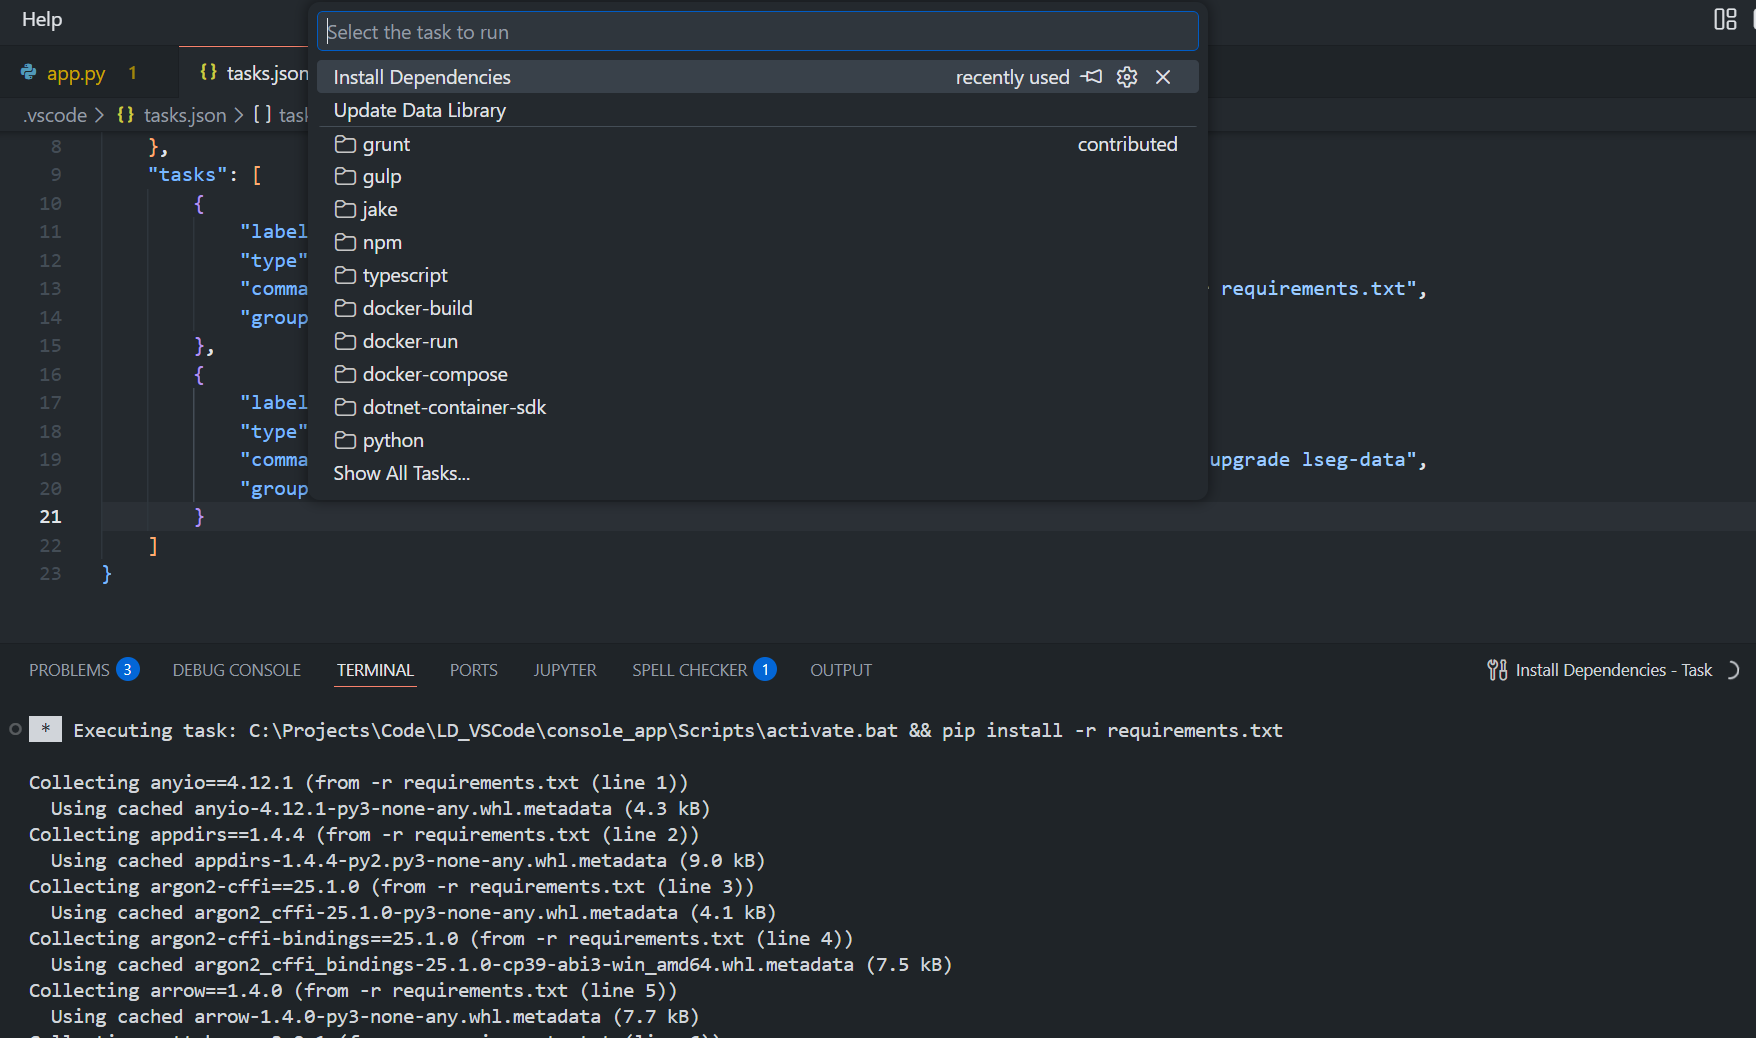
3. Use Tasks for Common Commands
Create a .vscode/tasks.json file to define common tasks:
{
"version": "2.0.0",
"options": {
"shell": {
"executable": "cmd.exe",
"args": ["/d", "/c"]
}
},
"tasks": [
{
"label": "Install Dependencies",
"type": "shell",
"command": "${workspaceFolder}\\<venv_name>\\Scripts\\activate.bat && pip install -r requirements.txt",
"group": "build"
},
{
"label": "Update Data Library",
"type": "shell",
"command": "${workspaceFolder}\\<venv_name>\\Scripts\\activate.bat && pip install --upgrade lseg-data",
"group": "build"
}
]
}
Run tasks via Terminal > Run Task command.
4. Configure Git Integration
Initialize a Git repository and create a .gitignore file to exclude virtual environment folders:
# Virtual Environment
venv/
.venv/
env/
ENV/
# Conda
.conda/
# VS Code
.vscode/
# Python
__pycache__/
*.py[cod]
*.so
.Python
# Jupyter Notebook
.ipynb_checkpoints
# Environment files
.env
For more detail about the Source Control in VS Code, please check an official document.
Troubleshooting
Issue 1: VS Code Not Detecting Virtual Environments
Solution:
- Reload the window: Ctrl+Shift+P > "Developer: Reload Window"
- Manually select the interpreter: Ctrl+Shift+P > "Python: Select Interpreter"
- Check that the virtual environment is created in your project folder
Issue 2: Terminal Not Activating Virtual Environment
Solution:
- Check VS Code settings: python.terminal.activateEnvironment should be true
- On Windows, you may need to change the execution policy for PowerShell:
Set-ExecutionPolicy -ExecutionPolicy RemoteSigned -Scope CurrentUser
Issue 3: Import Errors or Module Not Found
Solution:
- Verify the correct interpreter is selected (check status bar)
- Ensure packages are installed in the active environment:
pip list
- Reload the window after installing packages
Issue 4: IntelliSense Not Working
Solution:
- Install Pylance extension
- Reload the window
- Check Python language server settings: Ctrl+, > search for "Python Language Server"
Issue 5: SSLCertVerificationError When Installing Packages
Solution:
pip install --trusted-host pypi.python.org --trusted-host files.pythonhosted.org --trusted-host pypi.org --no-cache-dir lseg-data
If this doesn't help, contact your local IT support.
Best Practices
- One Environment Per Project: Always create a dedicated virtual environment for each project
- Use Requirements Files: Keep track of dependencies with requirements.txt or environment.yml
- Version Control: Use Git and create a proper .gitignore file
- Code Formatting: Configure and use code formatters like autopep8 or black
- Linting: Enable linting to catch potential errors early
- Documentation: Add docstrings to your functions and classes
- Testing: Write unit tests for your code
- Regular Updates: Keep your packages updated, especially security-related packages
Conclusion
Visual Studio Code provides a powerful and flexible environment for developing with the LSEG Data Library for Python. By setting up proper virtual environments and leveraging VS Code's extensive Python support, you can create efficient and maintainable data analysis applications.
Key takeaways:
- Always use virtual environments to isolate project dependencies
- Take advantage of VS Code's Python extension features
- Use Jupyter Notebooks integration for interactive data exploration
- Configure your workspace settings for consistent development experience
- Utilize extensions and shortcuts to boost productivity
References
You can find more detail regarding the Data Library and VS Code from the following resources:
Data Library Resources:
- LSEG Data Library for Python on the LSEG Developer Community website
- Data Library for Python - Reference Guide
- The Data Library for Python - Quick Reference Guide (Access layer) article
- Essential Guide to the Data Libraries - Generations of Python library (EDAPI, RDP, RD, LD) article
- Data Library for Python Examples on GitHub repository
- Step-By-Step Guide to install Data Library for Python using Virtual Environment article.
VS Code Resources:
- Visual Studio Code - Python Tutorial
- VS Code - Python Environments
- VS Code - Jupyter Notebooks
- Python in VS Code
For any question related to this example or Data Library, please use the Developers Community Q&A Forum.
Get In Touch
Related Articles
-
Step-By-Step Guide to install Data Library for Python using Virtual Environment
-
Essential Guide to the Data Libraries - Generations of Python library (EDAPI, RDP, RD, LD)
-
The Data Library for Python - Quick Reference Guide (Access layer)
-
LSEG's Refinitiv Data Library for Python and its Configuration Process
Related APIs
Source Code
Request Free Trial
Call your local sales team
Americas
All countries (toll free): +1 800 427 7570
Brazil: +55 11 47009629
Argentina: +54 11 53546700
Chile: +56 2 24838932
Mexico: +52 55 80005740
Colombia: +57 1 4419404
Europe, Middle East, Africa
Europe: +442045302020
Africa: +27 11 775 3188
Middle East & North Africa: 800035704182
Asia Pacific (Sub-Regional)
Australia & Pacific Islands: +612 8066 2494
China mainland: +86 10 6627 1095
Hong Kong & Macau: +852 3077 5499
India, Bangladesh, Nepal, Maldives & Sri Lanka:
+91 22 6180 7525
Indonesia: +622150960350
Japan: +813 6743 6515
Korea: +822 3478 4303
Malaysia & Brunei: +603 7 724 0502
New Zealand: +64 9913 6203
Philippines: 180 089 094 050 (Globe) or
180 014 410 639 (PLDT)
Singapore and all non-listed ASEAN Countries:
+65 6415 5484
Taiwan: +886 2 7734 4677
Thailand & Laos: +662 844 9576