
Nipat Kunvutipongsak
Senior Software Engineer
Last Updated: Sep 2025
Expanding the EMA Java Consumer example to provide web services: REST
the Enterprise Message API (EMA, formerly known as Elektron Message API) was designed to be an easy to learn and easy to use, high level, high performance API. Now, we are going to demonstrate how to enhance its featureset to be able to support a request from a remote system or machine via web service.
In this article, we will focus on the REST technology which gains more popularity nowadays.
What is a REST Web Service?
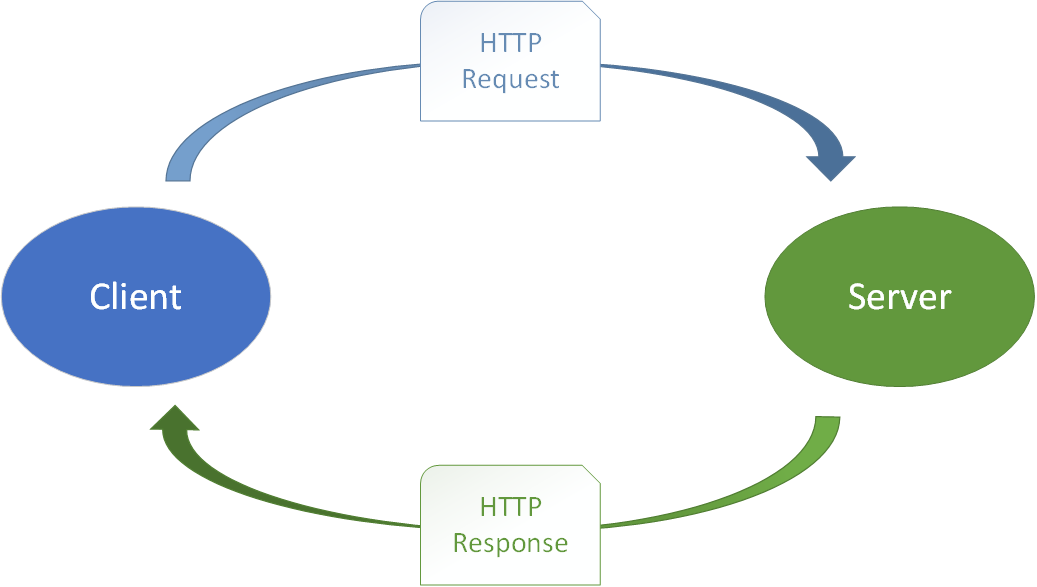
REST (short for REpresentational State Transfer) or RESTful web service is an architectural style defined to help create and organize distributed systems. Comparing to the rival web service technology, REST technology works on top of the HTTP protocol, provides simpler implementation & maintenance, and allows a greater variety of data formats, whereas SOAP only allows XML, and control data-structure via WSDL.
REST Web Service Architecture
REST does not contain or define a structure or header. It focuses on design rules for creating stateless services. A client can access the resource using the unique URI and a representation of the resource is returned. A client can access RESTful resources with HTTP protocol, the URL of the resource serves as the resource identifier and GET, PUT, DELETE, POST and HEAD are the standard HTTP operations to be performed on that resource.
Software & tools required
- Java EE
- Eclipse IDE
- Apache Tomcat 11.0
- Apache Axis2
- RealTime-SDK Java
Step 1: Setup developing environment
This section is for a new developer who has never had experience with the Eclipse IDE or Apache Tomcat Server before.
First of all, you need to have a Java runtime installed on your machine. If you don't have one, please download and install it from the Oracle website. This article uses Java 21.
Then, you need to have Eclipse IDE for Java EE Developers, and we also use Apache Tomcat in this demonstration as well.
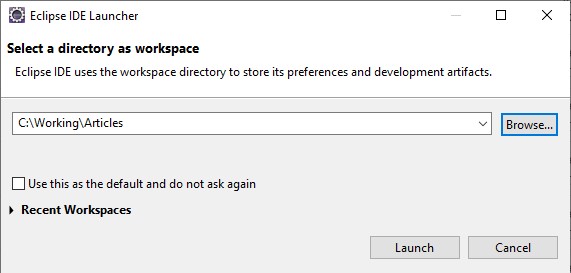
Once you firstly open Eclipse IDE, specify a target workspace directory and click OK
Then, you need to set the Server Runtime Environments.
Navigate to menu > Window > Preferences. Type 'runtime', and find Runtime Environments at the left pane.
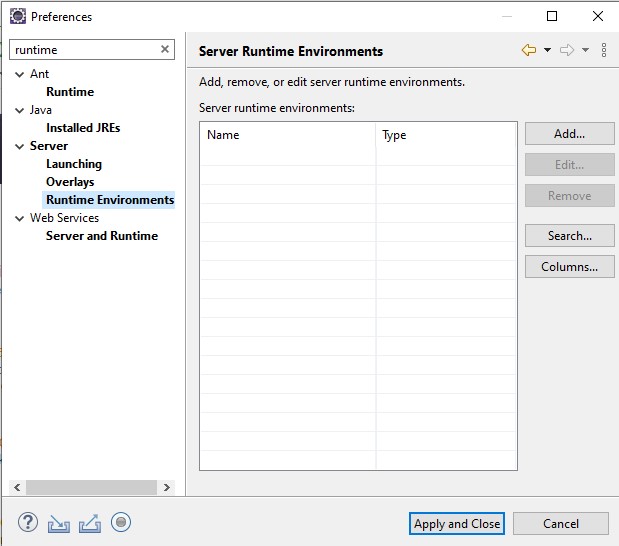
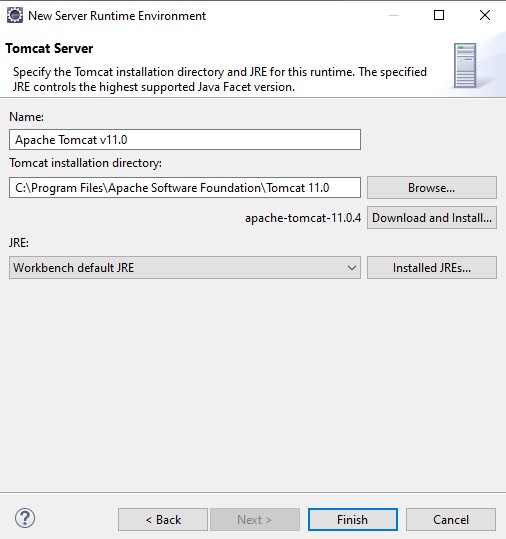
Click the add button and select Apache Tomcat v11.0, mark the Create a new local server check box. Then, click Next button.
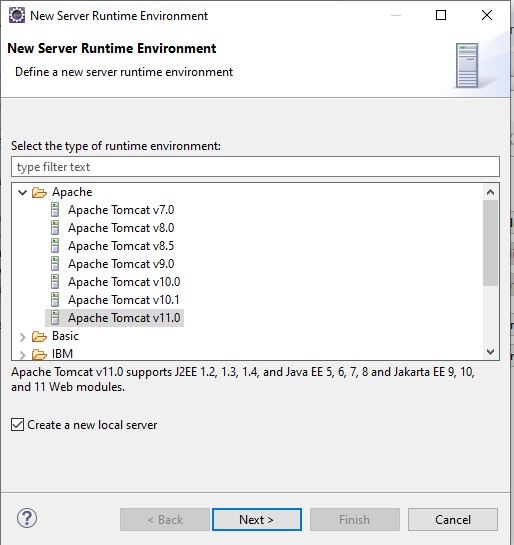
Specify Tomcat installation directory to the location that you installed Apache Tomcat 11.0 on your machine. Click the Finish button to exit the New Server Runtime Environment window.
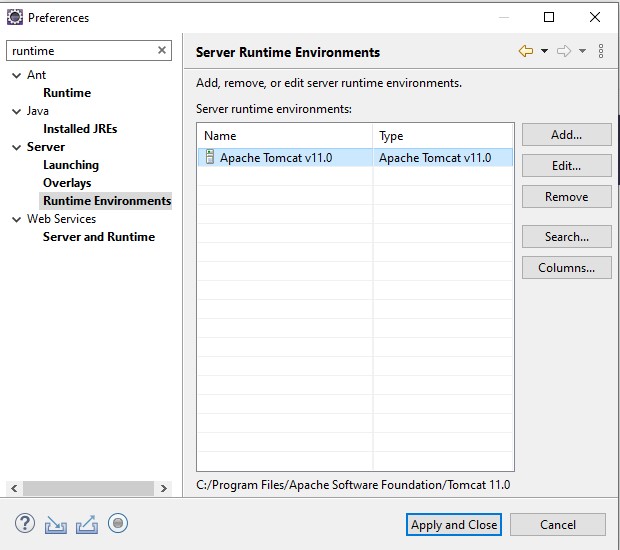
Then, click the Apply and Close button. Now, you are ready to develop a new application.
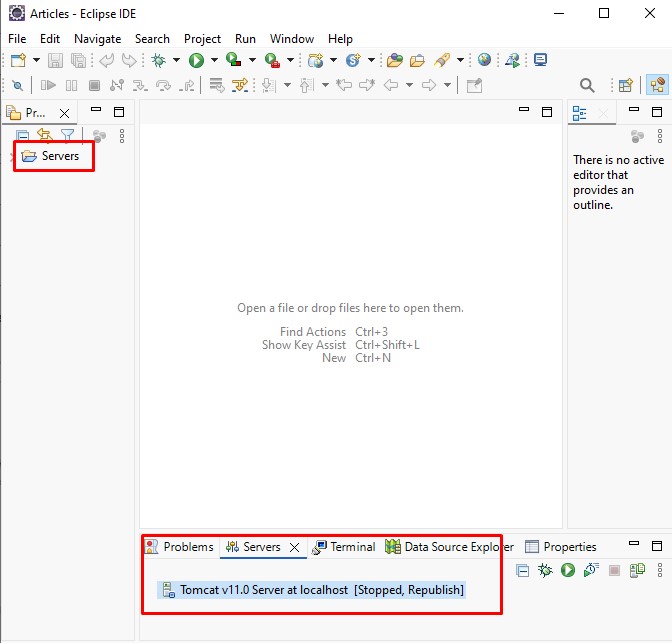
Remark: Once you add the Tomcat server, it will show in the Project Explorer tab, and Servers tab.
Step 2: Create an EMA Java-based project
First of all, you need to have LSEG Real-Time SDK (RTSDK) Java package. You can find it from LSEG Developer Community: Real-Time SDK - Java (Download). Once you get the file, extract the package to a location desired.
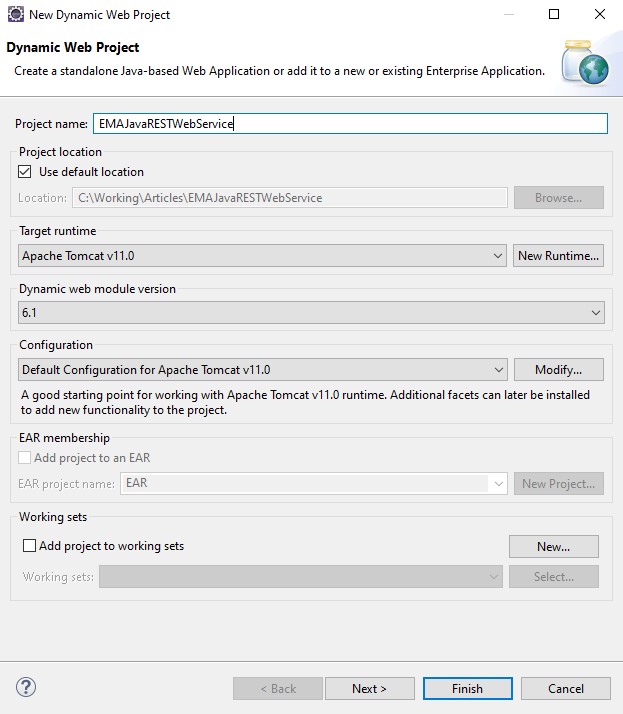
Since Web Services Technologies are available in Java EE platforms, so we need to create a Web project instead of a normal Java Project by navigating to menu > File > New > Dynamic Web Project. Then, a New Dynamic Web Project window appears.
Name the project 'EMAJavaRESTWebService', select Target runtime to Apache Tomcat v11.0 server (from step 1). Then, click the Finish button.
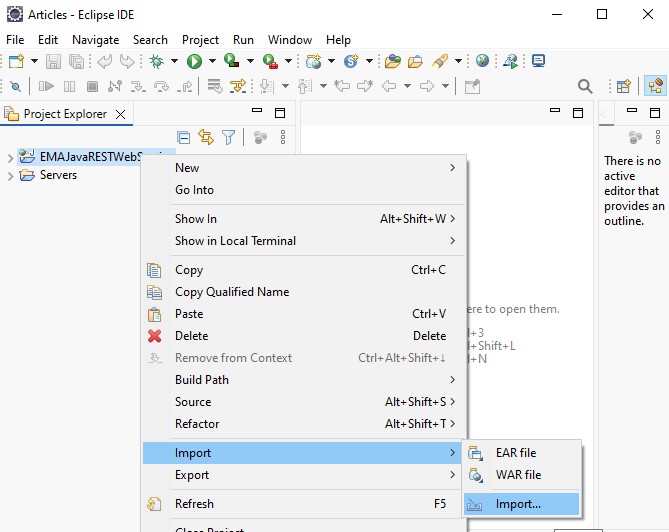
Right-click at the EMAJavaRESTWebService project, and select Import > Import...
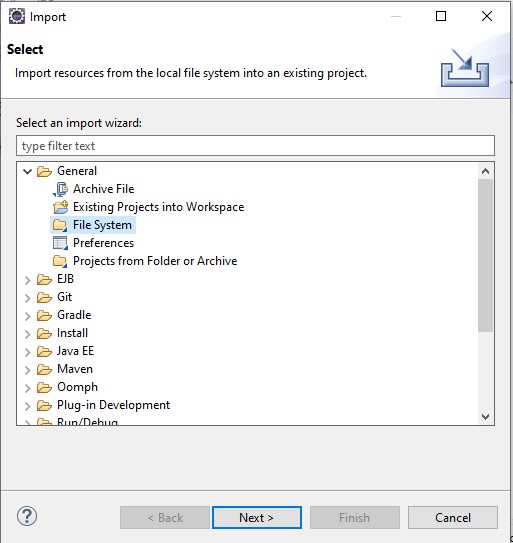
In the Import window, choose General > File System, and click the Next > button.
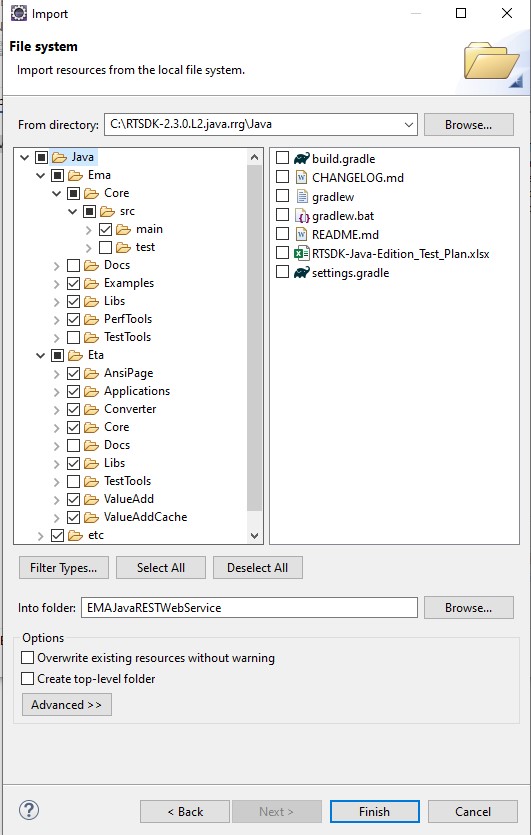
Browse the location of RTSDK Java that you extracted the package earlier. Then, select all subfolders except Docs both of Ema and Eta folders, and click the Finish button
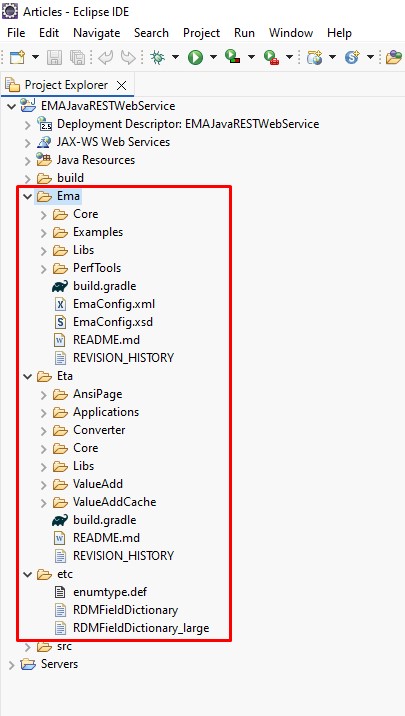
After you imported the previous files/folders, they will appear under the EMAJavaRESTWebService project.
Next, we are going to run and test one of the EMA sample application; ex102_MP_Snapshot. Start with creating a new empty package under EMAJavaRESTWebService/Java Resources/src folder.
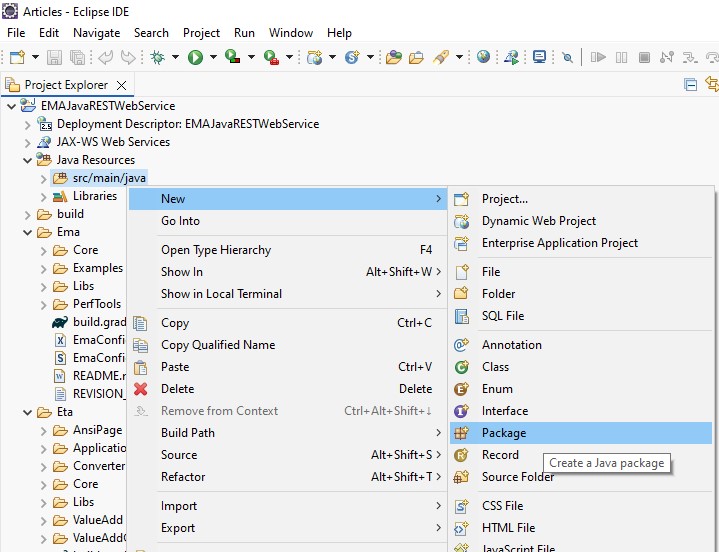
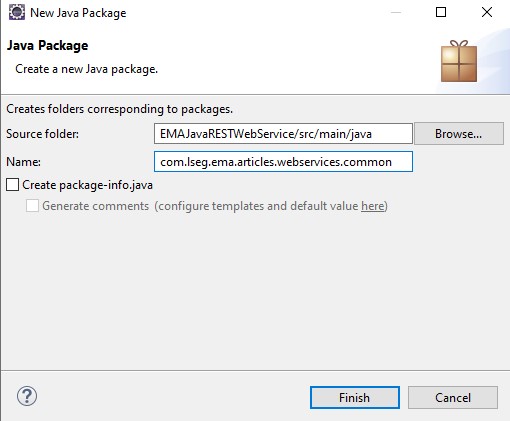
When the New Java Package window shows up, put a package name; com.lseg.ema.articles.webservices.common, and click the Finish button.
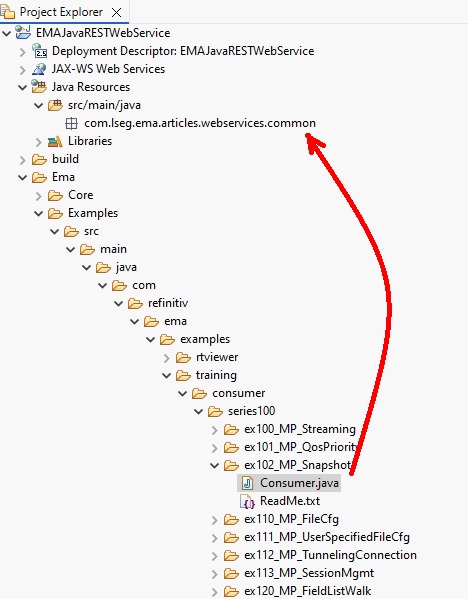
Then, navigate to the imported folders, go to Ema > Src > examples > java > com > refinitiv> ema > examples > training > consumer > series100 > ex102_MP_Snapshot, and copy Consumer.java to the com.lseg.ema.articles.webservices.common package created previously.
You'll notice that there are a lot of compilation errors in the Consumer.java file. We are going to solve the errors step-by-step.
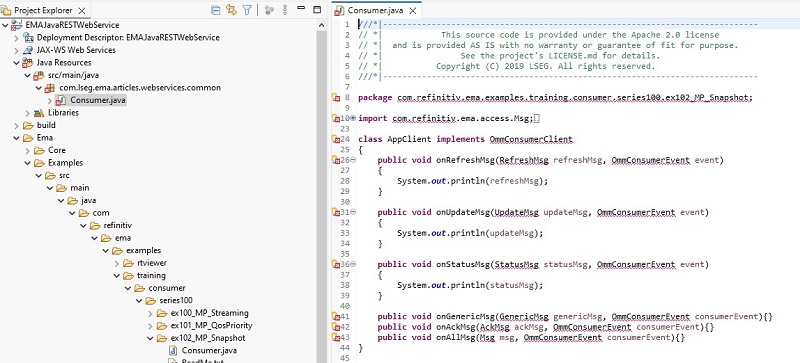
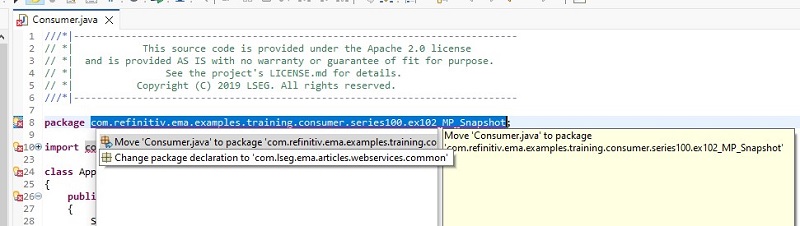
- Click the yellow light bulb in front of the package com.refinitiv.ema.examples.training.consumer.series100. ex102_MP_Snapshot; statement, choose com.lseg.ema.articles.webservices.common instead.
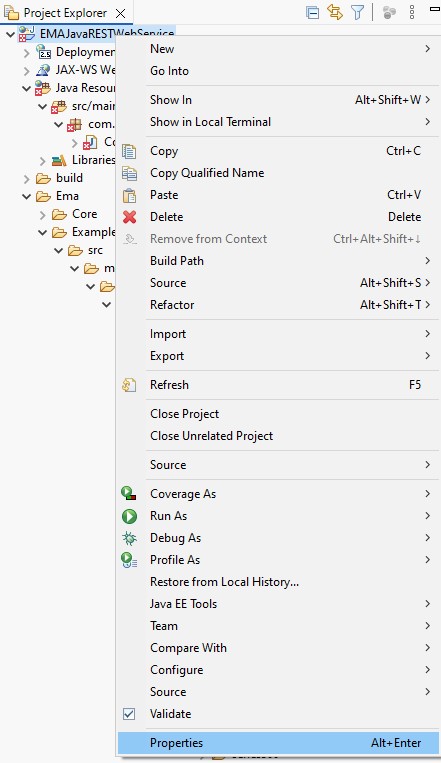
- Right-click at the EMAJavaRESTWebSerice project, select the Properties menu.
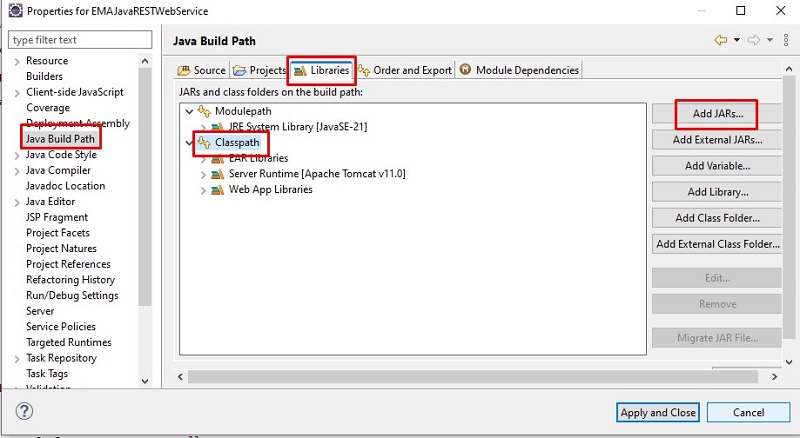
- In the Properties for EMAJavaRESTWebService window, click Java Build Path on the left pane. On the right pane, click Libraries tab, and then click the Add Jars... button.
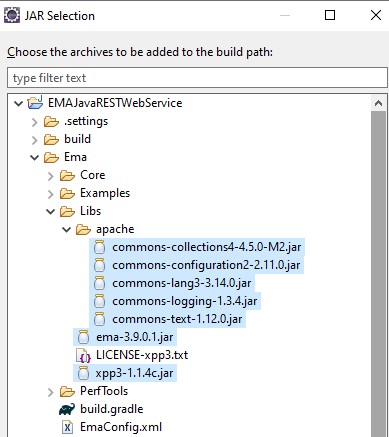
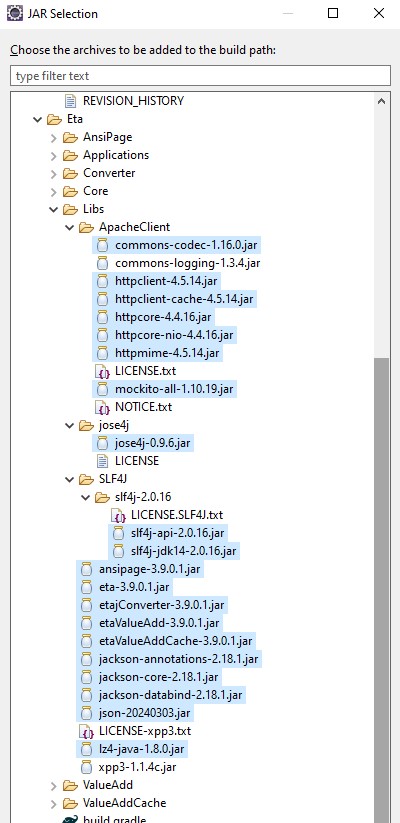
Then, select the following jar files under Ema/Libs and Eta/Libs folders, and click OK button to exit the JAR Selection window.
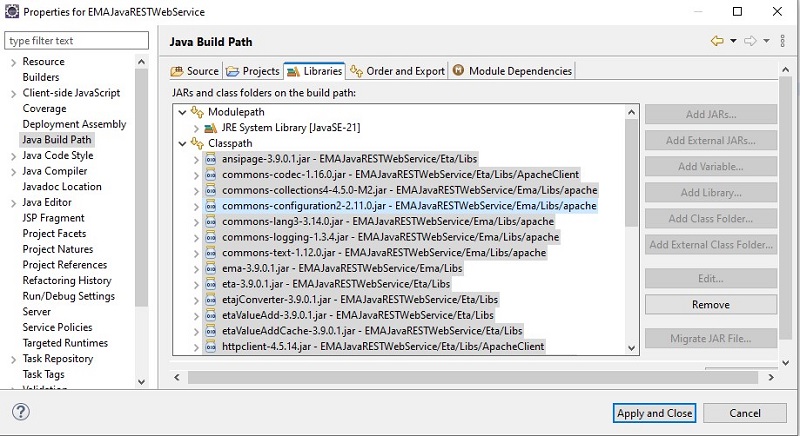
- The list of selected jar files will show up, click OK button to exit the Properties for EMAJavaRESTWebService window.
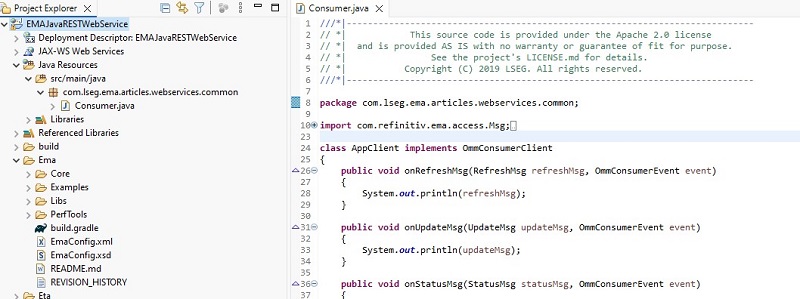
- When you save the Consumer.java file in the com.lseg.ema.articles.webservices.common package, the compilation errors will disappear.
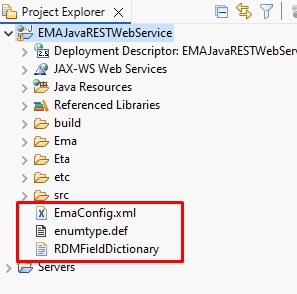
After fixing all the errors, the next step is to copy required configuration and data dictionary files to the root folder. Find enumtype.def, RDMFieldDictionay (under the Ema/etc folder) and EmaConfig.xml (under Ema/Src/examples/java), and copy them to the root EMAJavaRESTWebService project.
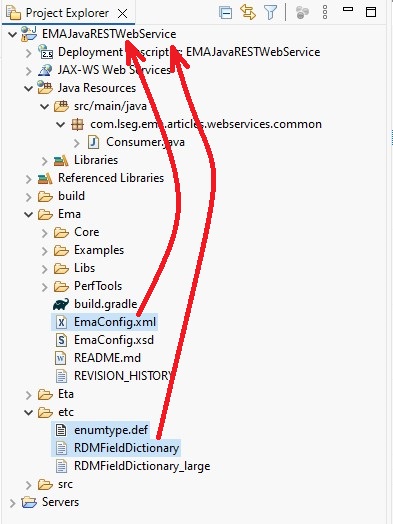
These files will show up under the root level project.
Before running the Consumer.java file, you need to change its configuration first.
Double click the EmaConfig.xml file, click the Source tab and edit a Consumer_1 configuration to use local dictionary files. Then, save it. The application will read dictionary data from the local files instead.
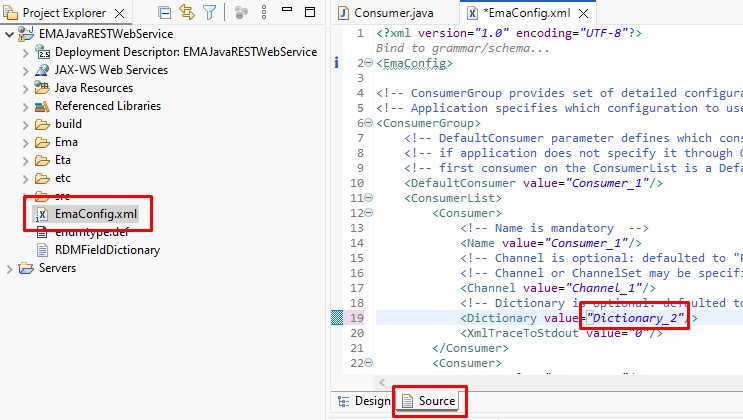
Here this is the snippet code where Dictionary_2 points to.
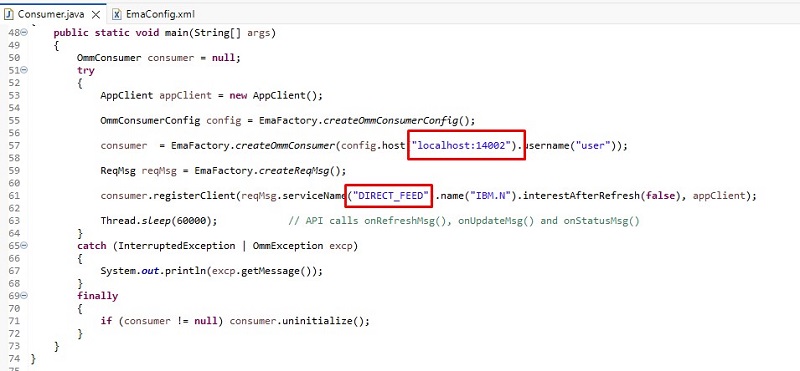
Back to the Consumer.jar file, change the destination hostname, and the service name corresponding to your server, and save it.
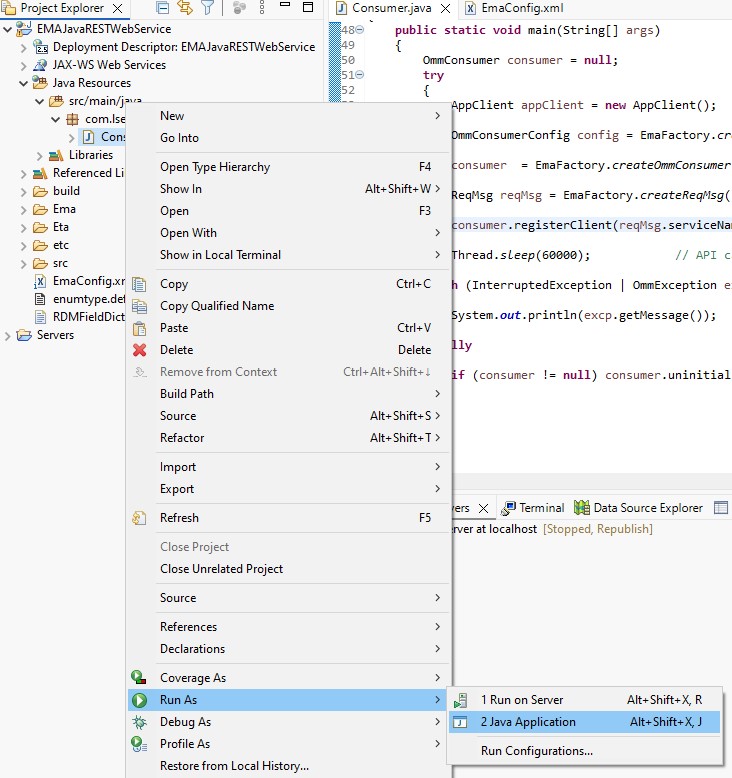
To run the Consumer.java, right-click this file, select Run As > Java Application
Check the output result in the Console tab. If there is no problem, the application should show a subscription result without any error messages.
Here this is the example log output:
Step 3: Prepare Web Service auxiliary classes
After we test run the EMA Java example in the com.refinitiv.ema.examples.training.consumer.series100. ex102_MP_Snapshot package to ensure that your development machine can use EMA Java to connect to the server and get data, the next step is that we design an application that consists of three classes as follows:
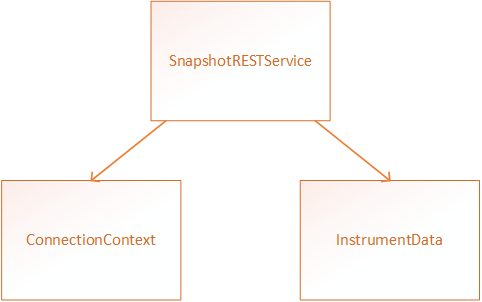
- InstrumentData is a POJO (Plain old Java object) class which is used to store instrument data from the subscription.
- ConnectionContext represents a connection establishment and provides an OmmConsumer instance that encapsulates subscription functionality.
- SnapshotRestService is the main interface class. It will receive requests and send responses to clients.
We'll start with creating a new InstrumentData class under the com.refinitiv.ema.articles.webservices.common package by right clicking the package, New > Class.
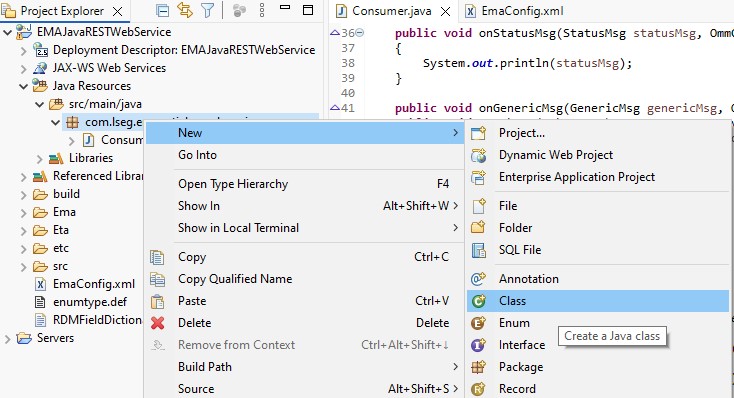
There will be a New Java Class window appears, put the class name as InstrumentData, click the Finish button to exit this window.
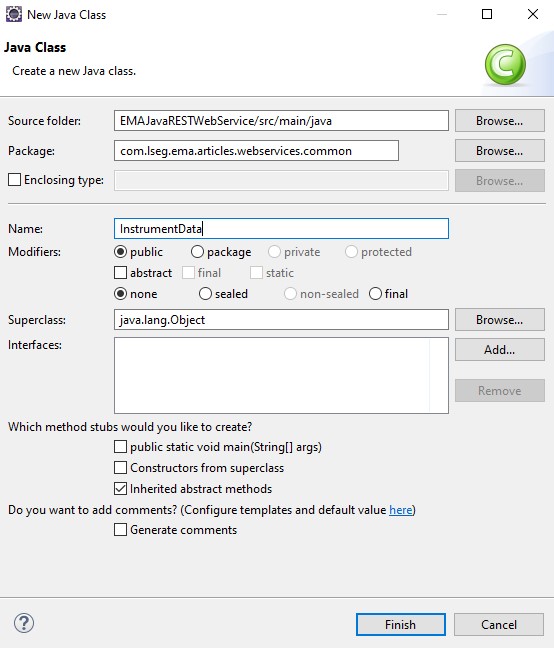
As InstrumentData will be used to store instrument record and fields. Here this is the example source code of this class to keep a RIC name, subscription status, and fields' data (e.g. BID, ASK).
Repeat the step to create a new class for the ConnectionContext class.
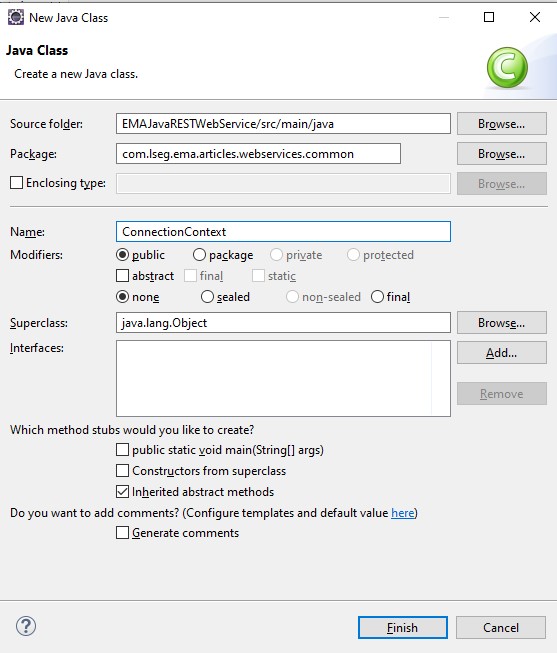
For this ConnectionContext class, it will initialize an OmmConsumer instance by giving a server host and DACS user (if required).
In this ConnectionContext class, it will establish a connection using information defined in the string variables hard-coded.
Then, repeat the step to create a new class named SnapshotRESTService under a new package named com.lseg.ema.articles.webservices.rest.
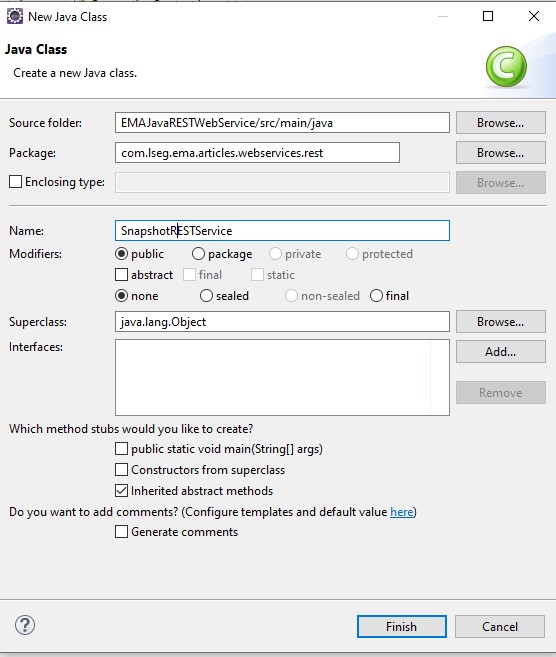
This SnapshotRESTService class will receive a RIC parameter, contact ConnectionContext to use OmmConsumer, subscribe to data, and return a subscription result using an instance of InstrumentData.
You can also perform a unit test by running this class as a standalone application as well. For this case, we create SnapshotRESTServiceTest, and print a result from SnapshotRESTService.subscribe() method.
Here this is the result when it can get data successfully.
Step 4: Integrate Web Service and test a result
JAX-RS (Java API for RESTful Web Services) is a Java programming language API spec that provides support in creating web services according to the Representational State Transfer architectural pattern. In this article, we use Jersey as a JAX-RS reference implementation, which seamlessly supports exposing data in a variety of representation media types and abstract away the low-level details of the client-server communication. Once you obtain a bundle zip file, it contains many jar files as follows:
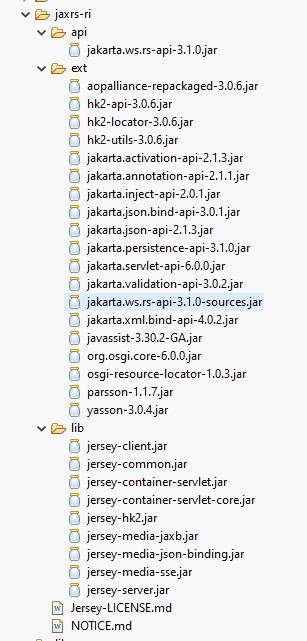
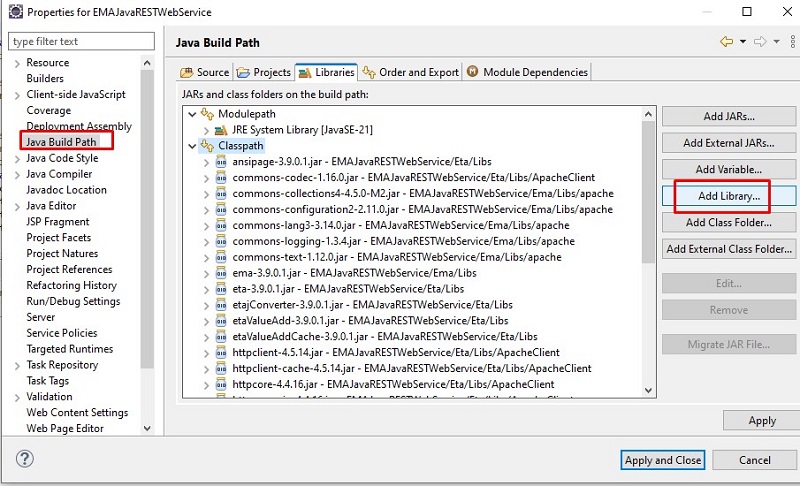
After that, we will map these files to be a single user library by right-clicking the EMAJavaRESTWebService project and select the Properties menu. Once the Properties for EMAJavaRESTWebService window appears, click the Libraries tab, then click the Add Library... button.
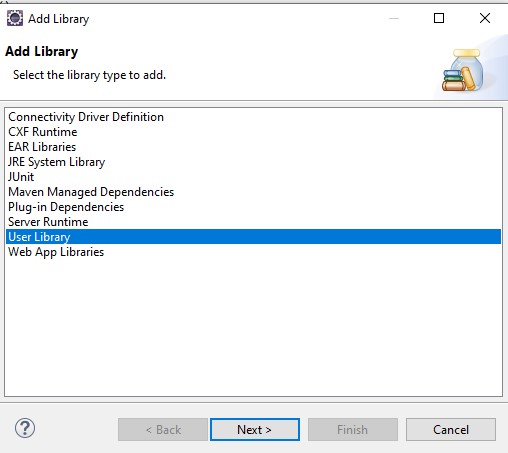
An Add Library window will appear, select User Library and click the Next > button.
On the next page, click the User Libraries... button, there will be a new window named Preferences (Filtered) appears. Then, click the New... button.
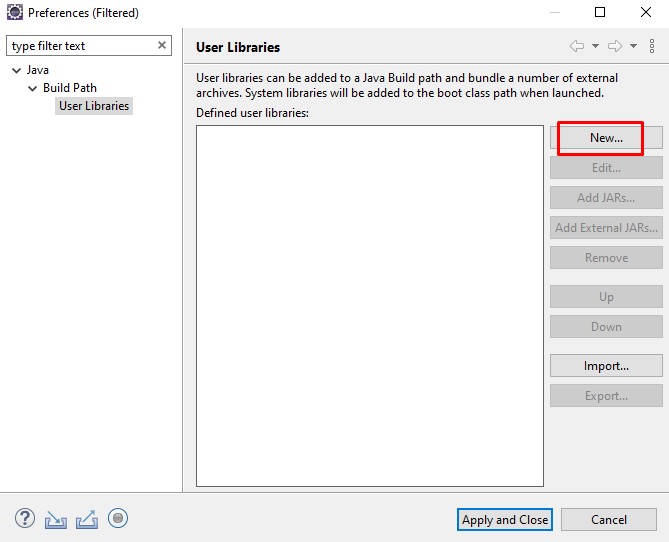
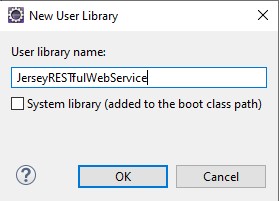
Input the new user library name: JerseyRESTfulWebService. Click the OK button to go back to the previous window.
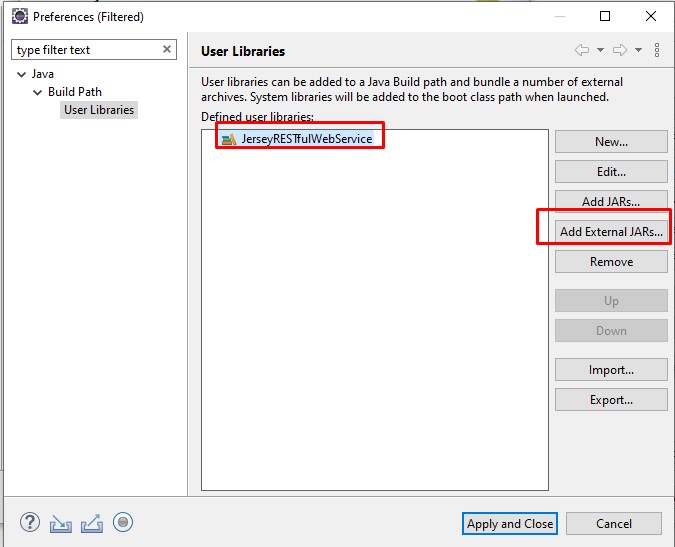
Please make sure that you are selecting the JerseyRESTfulWebService created previously. Then, click the Add External JARs... button.
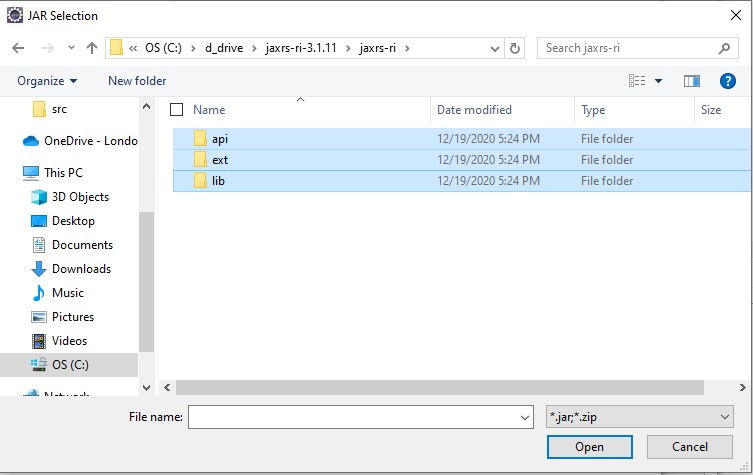
Add all jar files under the subfolder extracted from the Jersey zip file.
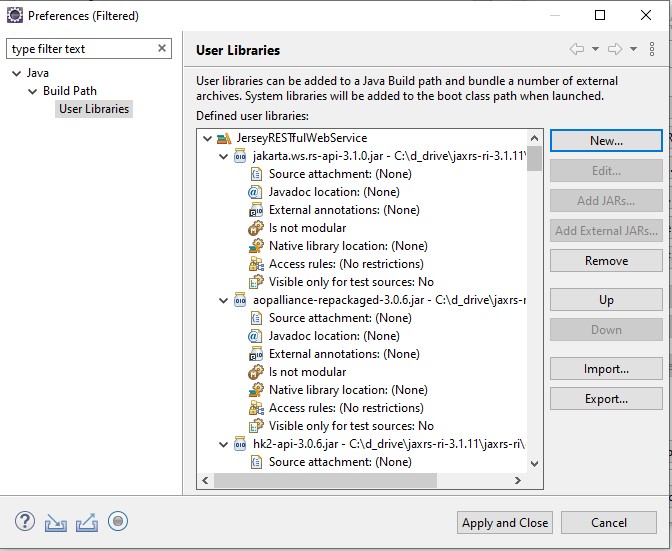
After finish adding jars, they will appear under the JerseyRESTfulWebService user library.
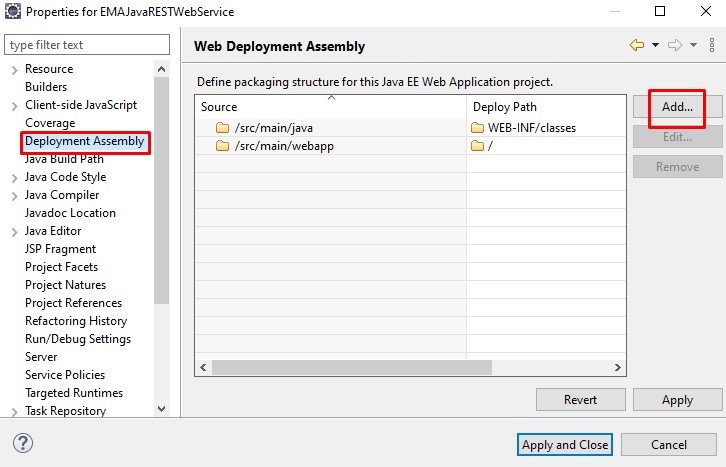
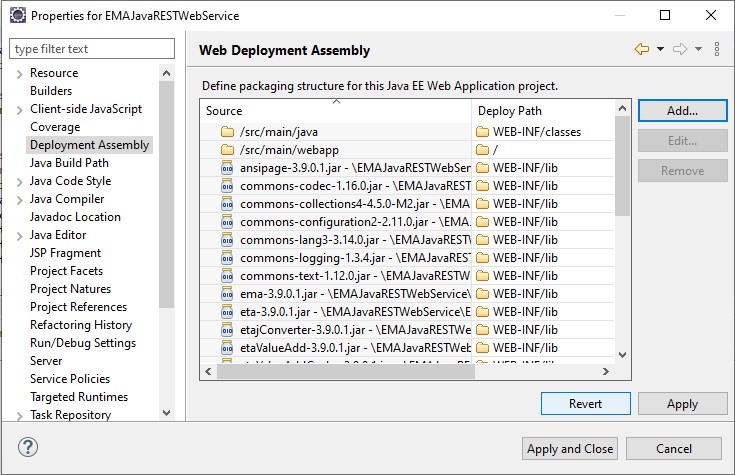
Apply all settings, until you go to the base project's properties setup window. Then, click the Deployment Assembly menu on the left panel.
On this Web Deployment Assembly setting option, Click the Add... button.
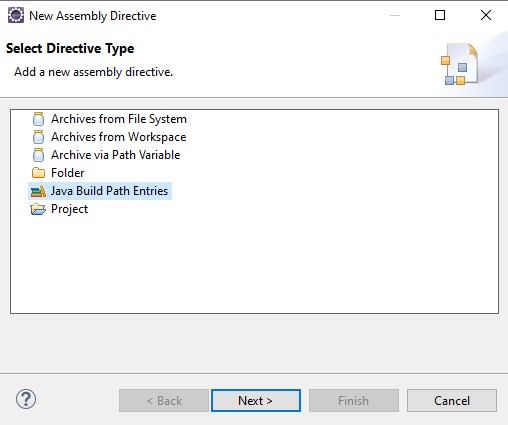
On a New Assembly Directive window, select Java Build Path Entries option and click the Next > button.
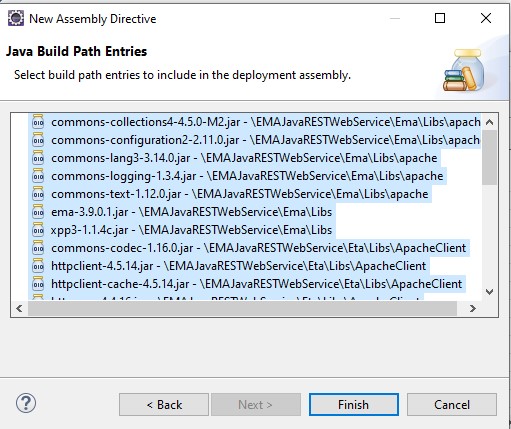
Select all entries and click the Finish button to exit this New Assembly Directive window.
Click the Apply and Close button to exit this Properties for EMAJavaRESTWebService window.
Once you finishing setting all libraries for this tutorial, Open the SnapshotRESTService and add more code as depicted below:
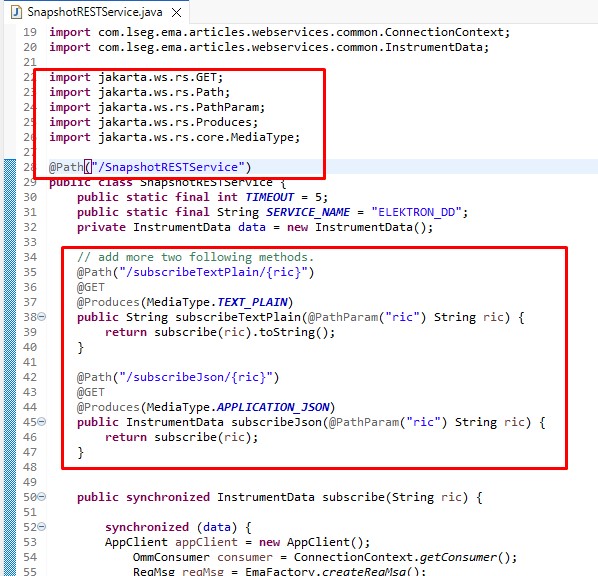
Here this is the snippet code:
The @Path("/SnapshotRESTService"), @Path("/subscribeTextPlain/{ric}"), and @Path("/subscribeJson/{ric}") statements are annotations to be resources path for the EMAJavaRESTWebService application. So, if a client requests /EMAJavaRESTWebService/SnapshotRESTService, it will access to this SnapshotRESTService class file. But if the client requests more specifically such as /EMAJavaRESTWebService/SnapshotRESTService/subscribeJson/IBM.N, the request will invoke SnapshotRESTService.subscribeJson method with IBM.N as the ric argument.
Referring to the new methods previously, they provide a response in a particular format corresponding to the name (plain text, and JSON).
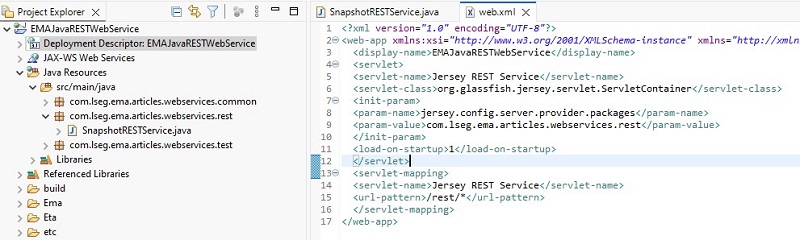
Last but not least, you need to edit the Deployment Descriptor file -- web.xml to make Jersey manages REST requests by selecting Deployment Descriptor: EMAJavaRESTWebService, and add the following lines into this file.
The result will look like the similar figure.
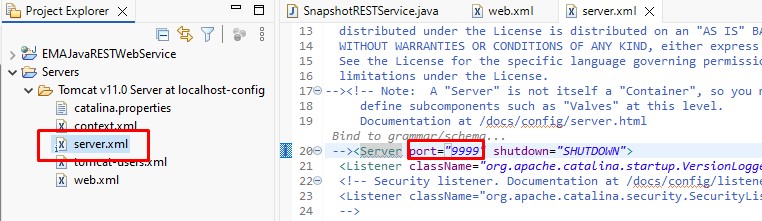
Next, change the Tomcat v11.0 server port in the server.xml file, as shown below.
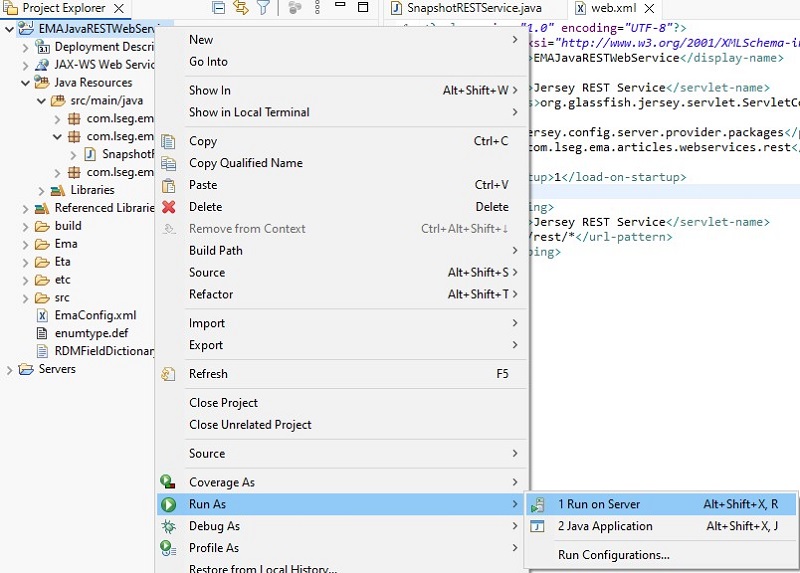
Now, you are ready to test this EMAJavaRESTWebService application. Right-click at the project, select Run as > Run on the server
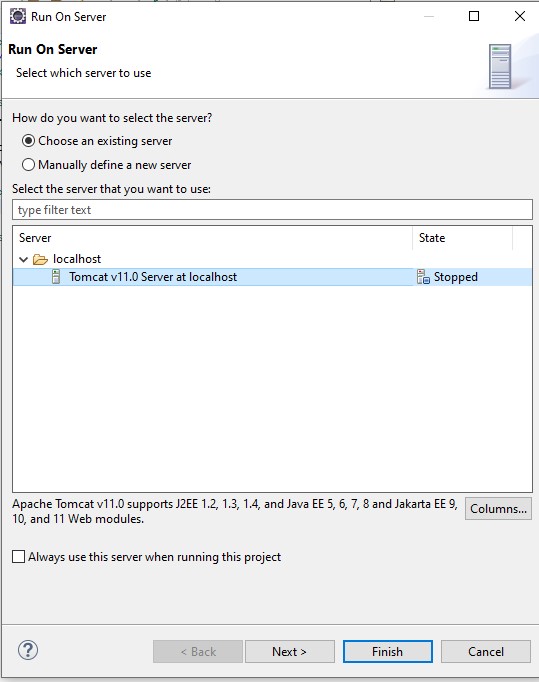
When the Run On Server window appears, select the Tomcat v11.0 Server at localhost (configured at step 1 or other desired servers), then click the Finish button.
Eclipse will open http:// localhost :8080/EMAJavaRESTWebService using its native web browser engine. However, it will encounter HTTP Status 404 - Not Found, but don't worry. This error happens because we haven't created any HTML files in this project. We recommend you use another web browser (e.g. Chrome) to demonstrate the result.
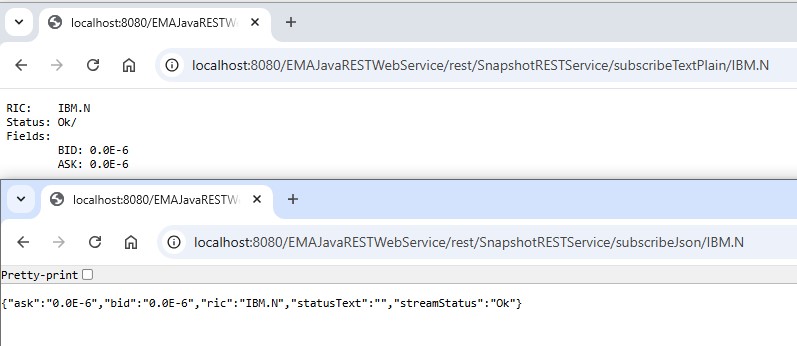
As described earlier, you can get content results in various formats.
- Plain Text: http:// localhost:8080/EMAJavaRESTWebService/rest/SnapshotRESTService/subscribeTextPlain/IBM.N
- JSON: http:// localhost:8080/EMAJavaRESTWebService/rest/SnapshotRESTService/subscribeJson/IBM.N
Get In Touch

Related Articles

Related APIs
Source Code
Request Free Trial
Call your local sales team
Americas
All countries (toll free): +1 800 427 7570
Brazil: +55 11 47009629
Argentina: +54 11 53546700
Chile: +56 2 24838932
Mexico: +52 55 80005740
Colombia: +57 1 4419404
Europe, Middle East, Africa
Europe: +442045302020
Africa: +27 11 775 3188
Middle East & North Africa: 800035704182
Asia Pacific (Sub-Regional)
Australia & Pacific Islands: +612 8066 2494
China mainland: +86 10 6627 1095
Hong Kong & Macau: +852 3077 5499
India, Bangladesh, Nepal, Maldives & Sri Lanka:
+91 22 6180 7525
Indonesia: +622150960350
Japan: +813 6743 6515
Korea: +822 3478 4303
Malaysia & Brunei: +603 7 724 0502
New Zealand: +64 9913 6203
Philippines: 180 089 094 050 (Globe) or
180 014 410 639 (PLDT)
Singapore and all non-listed ASEAN Countries:
+65 6415 5484
Taiwan: +886 2 7734 4677
Thailand & Laos: +662 844 9576