Introduction
Docker is an indispensable tool for a today's developer working with diverse environments. Docker allows us to virtualize environments, eliminating the need to continuously maintain multiple physical machines and various operating systems. It allows to design, develop and test an application for a specific operating system within a docker container, instead.
Application testing constitutes a very common, very large set of use cases that are covered by docker use. That is because being able to test on docker saves us the need to have a physical machine installed and setup with the required environment, saving much effort, but also saving us time that is required to have this done; we are able to get to design, development and testing much quicker. And being able to use docker effectively, use it easily, saves developers even more time all throughout the lifecycle of the application.
In this article I would like to go over the approaches and the best practices that allow for effective use of docker for application testing.
General Best Practices
Saving Current State
It's useful to save the current state of the running docker container often, to save it at every meaningful stopping point during the installation and configuration, and not only when the final desired setup is completed.
To do so, we take a brief pause in our setup, and from a different window look up the container ID of the container we are working on, the container in which we are preparing environment.
This is the container that we save.
It's convenient to choose an image label that is descriptive, that immediately and unambiguously reflects what image we are looking at.
For example, label oralinux74_rsdk20 describes the testing setup of:
- OS = Oracle Linux
- Version = 7.4
- And the main component being setup for testing stored in this docker image = Refinitiv Real-Time SDK version 2.0
We have saved the running container 4bb1c4490499 into image oralinux74_rsdk20. We can save each meaningful intermediate state into a different image, and once the testbed setup is fully completed, then just remove the multiple redundant images. This may require significant image space. Or we can periodically save the current state into the same image, in this example oralinux74_rsdk20:
In truth, we never know ahead of time, when we are going to mess up our installation by selecting the very latest and incompatible version of a library, and would like to retract to the last valid state that we have saved; or when life is going to mess up our plans, and suddenly interrupt our setup. Whether the interruption is going to occur in the form of our machine powering itself down for running out of battery, an update process or a scheduled task running at the back unexpectedly clawing at the docker container, or our kids, having reached the machine left just for a minute unlocked, hitting unexpected key combination and achieving a sudden reboot. In retrospect, we wish that we would know of this coming... All of these interrupt the docker container mid-setup, but having saved the current state regularly, we will be able to run the saved image and pick up exactly where we've last saved our progress. So, saving the current state often - often saves the day.
Cleaning Up Intermediate Images
The more complex the required application test setup is, the longer it is likely to take us, and the more times we will save our state, leaving unneeded, intermediate state in the form of <None> images.
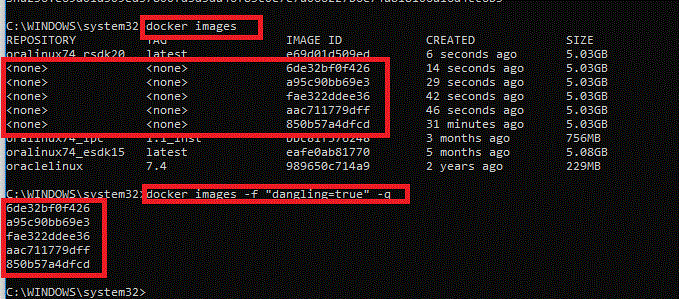
In the next example, we observe 5 of the useless intermediate states or dangling images. The cannot be used to recover a useful state, they are taking up space and muddling the overall picture, making useful images such as oralinux74_rsdk20 harder to see on the list:
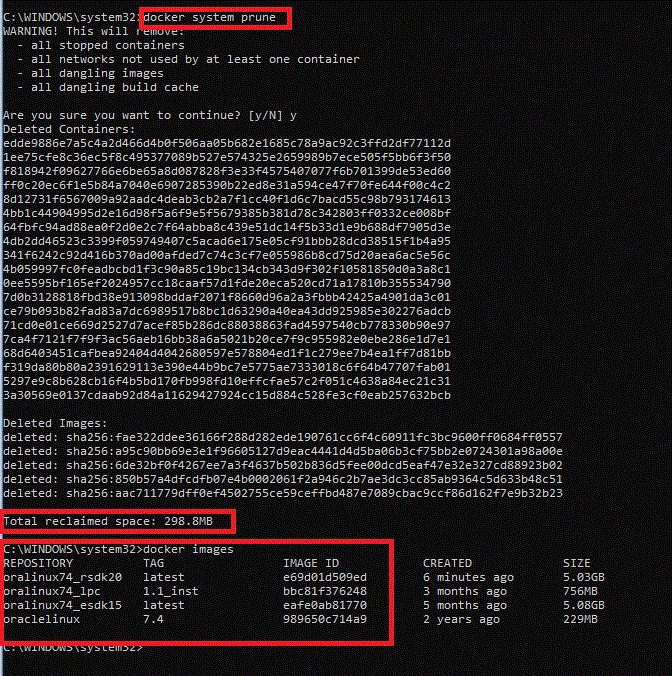
We are going to remove those dangling images and reclaim the wasted space:
Networking
When testing an application in a docker container networking is very often required. We expose ports, enabling applications that are being tested inside docker container to connect and interruct with outside applications.
When we are testing applications that use Refinitiv APIs and tools, the most likely ports that we will need to expose are:
- HTTPS = 443
- RSSL = 14002
- SSL = 8101
To expose these ports, we can run the container as:
We can expose other ports, if required, exact same way. This allows us to test applications within docker container, connecting to endpoints and servers, just like we would test them on a physical machine on our local network .
Working from Multiple Shells
It's very convenient to work on application testing in a single docker container from multiple shells. For example, to execute a script in one shell while monitor it from another; or run a server in one shell and connect a client to it from another shell.
We attach a shell to a running container via exec command:
Installing Tools
Installing modules on Oracle linux is very straightforward, usually this is done on a per need basis, for example, if we try running unzip, and it is not found we would then install:
This is how the majority of the modules that we use gets installed- when we first have the need of them.
However, there are some packages of tools, that are very convenient to install as package, as we are likely to need multiple tools in them, so might as well install:
That sets us up with network tools and with several common gnu compilers and libraries that we will, undoubtedly, use a lot in testing. These are just examples, any other packages of tools that we use repeatedly, we take a note of, and next time might as well install upfront and as a package.
Increasing Memory and Image Space
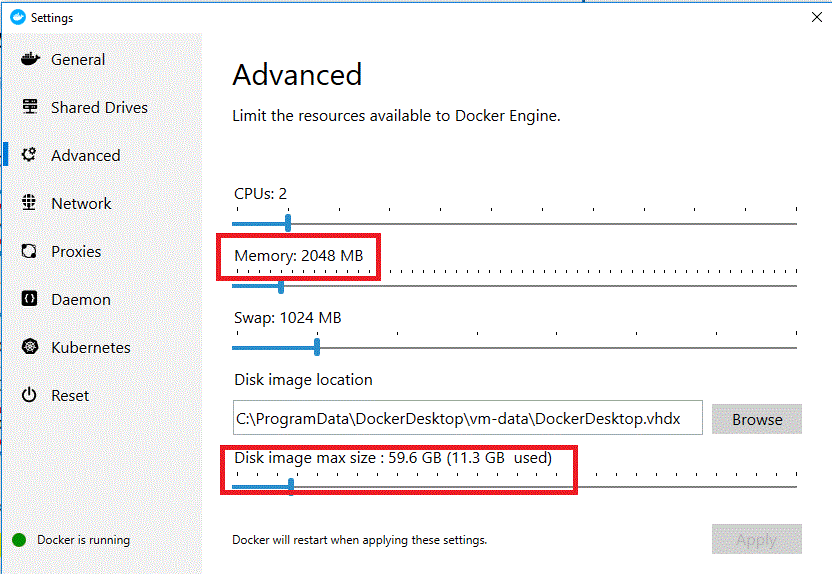
Increasing memory and image space is sometimes necessary and can be done from
Docker Desktop -> Settings
For example:
Memory of 2048 MB that is the default setting, and it may not be enough for multiple testing requirements.
Disk image max size has allow for plenty of growth. As we see on the example above, 11.3 GB is used, while the majority of 59.6 GB remains available. Where do these 11.3 come from? As we look at our images:
We observe that only 4 images, 3 initial small ones and one of a developed testbed already constitute 6.25 GB in image size. So, although currently we are very low on usage, when we have 10 or so of the developed testbed images, they would take up this available Disk Image size easily. And as we like to always keep the sufficient room for growth, for saving our new images, the work in progress that we do not want to loose, we keep an eye on this usage, and increase this setting in advance of approaching it being fully used.
Setting Hostname and Meaningful Instance Name
By default, on every run a container gets a unique generated hostname that is also new on every run:
and often, this is not what we are looking for in application testing.
We need the hostname of the test instance to stay the same across the runs, and be easily recognizable and meaningful, so that it can be used by test scripts.
So, we can select a hostname, for example "testhost7":
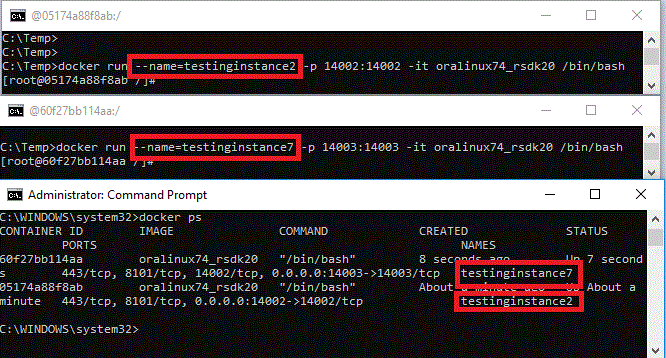
if we are testing with several instances, it may be useful to mark in a meaningful way which instance is which, for example, here we use testinstance2 and testinstance7:
Now by looking at the running containers with "docker ps" we can know which one is which, and for example, stop the specific instance when our testing with it requires it to end the test.
References
https://developers.refinitiv.com/en/article-catalog


