Author:

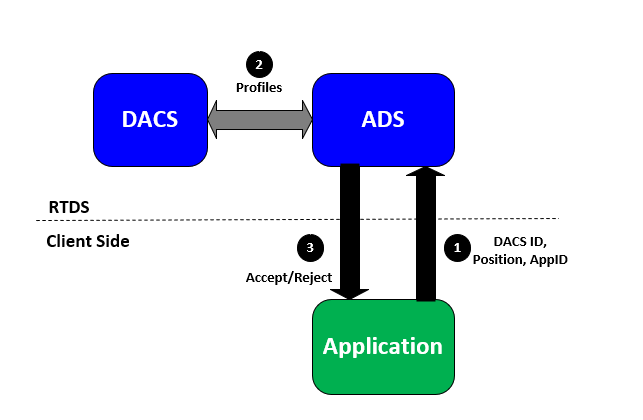
Refinitiv Real-Time Distribution System uses Data Access Control System (DACS) to authenticate and authorize users to access real-time data. DACS requires DACS IDs, positions, and application IDs to authenticate users. To connect to Refinitiv Real-Time Distribution System, an application supplies a DACS ID, position, and application ID. Then, those items are sent to DACS for authentication. The connection is accepted if the following conditions are met:
• The DACS ID is defined within Data Access Control System
• The position does not offend simultaneous login rules
• The application is allowed to the username.
After a connection is established, username entitlements are enforced according to the entitlements of that DACS ID/application combination.
As security concerns increase, a stronger authentication model is required. Fortunately, Refinitiv Real-Time Distribution System supports the UserAuthn Authentication model which allows users to integrate any existing local authentication systems into Refinitiv Real-Time Distribution System.
UserAuthn Authentication
The UserAuthn authentication is based on a token-based Authentication model which is commonly used in the financial industry. In a token-based model, the client-side application obtains a token (typically a random string), generated by a token generator based on the user’s credentials. Then, a retrieved token is sent to Refinitiv Real-Time Distribution System for authentication. Some advantages associated with token-based authentication are:
· Performance
· Client-side storage (Refinitiv Real-Time Distribution System does not know the password)
· Limited life-span (i.e., tokens expire)
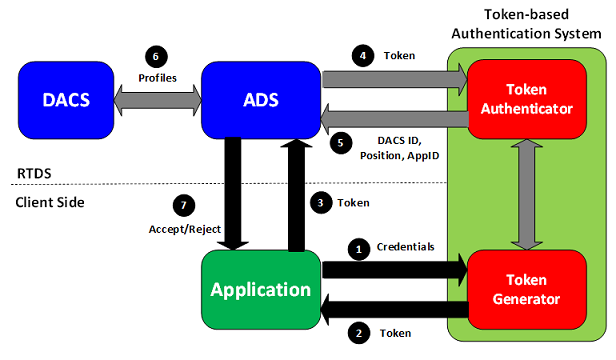
The following diagram illustrates the steps of using the Refinitiv Real-Time Distribution System with a token-based authentication system.
- An application passes its authentication credentials (username/password) to a Token Generator
- A Token Generator responds with a token
- An application sets a token into a login request message and then sends the request message to ADS. RFA applications can set a token in the username field. RTSDK applications can set a token in the message key attributes
- ADS passes a token to a token authenticator to validate a token
- If a token is valid, a token authenticator responds with an indication, DACS ID, position, and application ID
- ADS checks a DACS ID, position, and application ID against DACS profiles
- ADS sends a login response to an application. The login response indicates whether login is accepted or rejected
Configuring UserAuthnServerExample and ADS
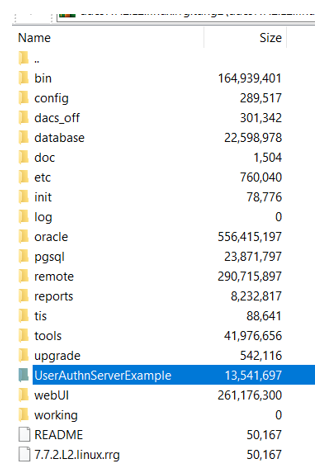
DACS package contains an example of a token-based authentication system called UserAuthnServerExample. It is a node application that provides interfaces for applications to get tokens and for ADS to verify tokens.
Before configuring the UserAuthnServerExample, you should have:
- Data Access Control System installed on the system
- Refinitiv Real-Time Advanced Distribution Server 3.1 configured with Data Access Control System enabled
- Node.js version 4.4.5 or above installed on the machine
Next, I will show steps to configure and run the UserAuthnServerExample on CentOS 7.
1. Verify the version of Node.js
The following command can be used to verify the version of Node.js
# node –version
v16.13.0
To run the UserAuthnServerExample, the version of Node.js must be 4.4.5 or above. You can download the latest version of Node.js from https://nodejs.org/.
2 Install curl and curllib on the machine
Run the following command to install curl and curlib on the machine
# yum install curl-devel curl
3. Install openssl and openssl-dev on the machine (Optional)
This step is optional. It is required if you want to use https for communication to the UserAuthnServerExample. To install openssl and openssl-dev, run the following command
# yum install openssl-devel openssl
4. Copy the UserAuthnServerExample
The UserAuthnServerExample is available in the DACS package.
You need to extract the example from the DACS package and copy the UserAuthnServerExample to the machine.
5. Configure Token Generator/Authenticator
In the configuration file (config/configDB.json), I will disable SSL and use the file authentication model.
{
"form" : {
"enable_ssl" : false,
"port" : "8443",
"client_certificate_required" : false,
"server_certificate_type" : "Self"
},
"curl" : {
"enable_ssl" : false,
"port" : "9443",
"client_certificate_required" : false,
"server_certificate_type" : "Self"
},
"sweep_token_rate" : 3600,
"debug": {
"file" : "./debug.log"
},
"operation_mode" : {
"authen_model" : "file",
"active_directory" : {
"root_dn" : "Client's OU, DC information",
"ad_url" : "Client's ad_url information"
},
"file" : {
"password_hash" : "md5"
}
}
}
For more information regarding configurations, please refer to the UserAuthn Authentication document in the DACS package.
6. Start the UserAuthnServerExample
In the UserAuthnServerExample directory, run the following command.
# node app.js&
The output is:
[root@CentOS25 UserAuthnServerExample]# node app.js&
[1] 17487
…
Token Authenticator server listens on port 8443 for http form request
Token Authenticator server listens on port 9443 for curl json request
Now, the UserAuthnServerExample is ready to accept requests.
7. Configure ADS
Add the following configurations to the ADS (with DACS enabled) configuration file.
*ads*authentication*tokenAuthenticationHosts : http://<AuthServer>:9443/authenticateToken
*ads*authentication*authThreads : 1
*ads*authentication*connectTimeout : 15
*ads*authentication*compatibilityMode : allow
*ads*authentication*iauth2Trace : True
<AuthServer> is a hostname or IP address of the machine on which the UserAuthnServerExample is running.
Then restart ADS. If ADS is configured properly, you will see the following output.
…
License : Feature values in license file
CONFLATION : ENABLED
CASCADING : ENABLED
PRIVATE_STREAM : ENABLED
DELAY : ENABLED
VISIBLE_PUBLISHER_IDENTIFIER : ENABLED
ADS_PREMIUM : ENABLED
SNAP_AND_DYNAMIC_VIEW : ENABLED
CUSTOM_DISTRIBUTOR_NAME : ENABLED
versionInfo.what rrcp6.1.F45
Authentication is enabled.
DACS permission checks are enabled.
The “Authentication is enabled.” text indicates that the token authentication is enabled.
Adding a new user to the UserAuthnServerExample
We can manage the UserAuthnServerExample via the web GUI. Please follow these steps to add a new user to the UserAuthnServerExample.
1. Access the http://<AuthServer>:8443
Open a web browser and visit the http://<AuthServer>:8443. <AuthServer> is a hostname or IP address of the machine on which the UserAuthnServerExample is running.
Login with admin as a username and use Welcome1 as a password.
2. Add a new user
Select Add User from the menu and enter the following information.
· Username: A username that the authentication system uses to identify the user
· Password: A password for the user
· DACS_ID: a DACS ID by which the Data Access Control System system identifies the user
Then, click the Add User button. The following message displays:
{"success":true,"message":"User successfully added."}
The user is now added to the ./config/userList.json file. See the following example entry in this file.
{
"username": "authuser1",
"password": "lJwrFpdhhdb33acda3a3007eb5a2f256aa25f9903",
"dacsId": "alluser",
"tokens": []
}
At this point, we can use this username and password to get a token from the UserAuthnServerExample
Getting a token
You can get a token from the web GUI by selecting the Get Token (http://<AuthServer>:8443/gettoken) from the menu and then entering a username and password.
If authentication was successful, a JSON response with a token will return.
{"success":true,"message":"Enjoy your token!","token":"<token>"}
The token returned by the token authentication generator is a completely random sequence of characters that can be used in a login request of an application when an application connects to ADS with authentication enabled.
Otherwise, you can send an HTTP POST request to this http://<AuthServer>:8443/getToken endpoint. The body of the request contains a username and password in the x-www-form-urlencoded format.
POST /getToken HTTP/1.1
Host: localhost:8443
User-Agent: curl/7.53.1
Accept: */*
Content-Length: 38
Content-Type: application/x-www-form-urlencoded
=> Send data, 38 bytes (0x26)
username=<username>&password=<password>
The following picture shows how to use Postman to get a token.
EMA Examples
EMA UserAuthn Authentication examples are available on GitHub.
· EMA C++: https://github.com/Refinitiv-API-Samples/Example.EMA.CPP.AuthExample
· EMA Java: https://github.com/Refinitiv-API-Samples/Example.EMA.Java.AuthExample
These examples send a username and password to the token generator to get a token and then use the token to log in to ADS.
The examples accept the following parameters.
| Parameter | Description |
|---|---|
| -authurl | Required: An authentication URL to get a token (e.g. http://<AuthServer>:8443/getToken) |
| -username | Required: A username |
| -password | Required: A password |
| -service | Required: A servicename |
| -item | Optional: A RIC |
Summary
DACS UserAuthn Authentication allows users to integrate any existing local authentication systems into Refinitiv Real-Time Distribution System. It is based on a token-based Authentication model which is commonly used in the financial industry. An application sends credentials to a token generator to get a token. A token is sent to ADS via a login request message. ADS verifies a token with a token authenticator. If a token is valid, ADS checks a retrieved DACS ID, position, and application ID against DACS profiles and then sends a login response to an application to accept or reject a connection. DACS package contains a UserAuthnServerExample that is a node application. It provides interfaces for applications to get tokens and for ADS to verify tokens. EMA token authentication examples are also available on GitHub. The examples demonstrate how to get a token from a token generator and send a login request with a token to ADS.
References
1. 2020. Data Access Control System 7.7.x: USERAUTHN AUTHENTICATION. Refinitiv.


