
Moragodkrit Chumsri
Developer Advocate
Developer Advocate
Last Updated: August 2025
Introduction
It's been a while we receive a question from the .NET developer about easy to use solutions that can help them save the time to develop the application for retrieving market data from the data feed via both the LSEG Real-Time Distribution System and Real-Time – Optimized.
Typically, Real-Time – Optimized and Real-Time Distribution System version 3.2.x and later version provide a Websocket connection for a developer so that they can use any WebSocket client library to establish a connection and communicate with the WebSocket server directly. Anyway, to retrieve data from Real-Time – Optimized, it requires additional steps that the connecting user must authenticate themselves before a session establishing with the server. Moreover, the application also needs to design the application's workflow to control the JSON request and response message along with maintaining the ping and pong, which is a heartbeat message between the client app and the server-side. As a result, the workflow to create the application is quite a complicated process.
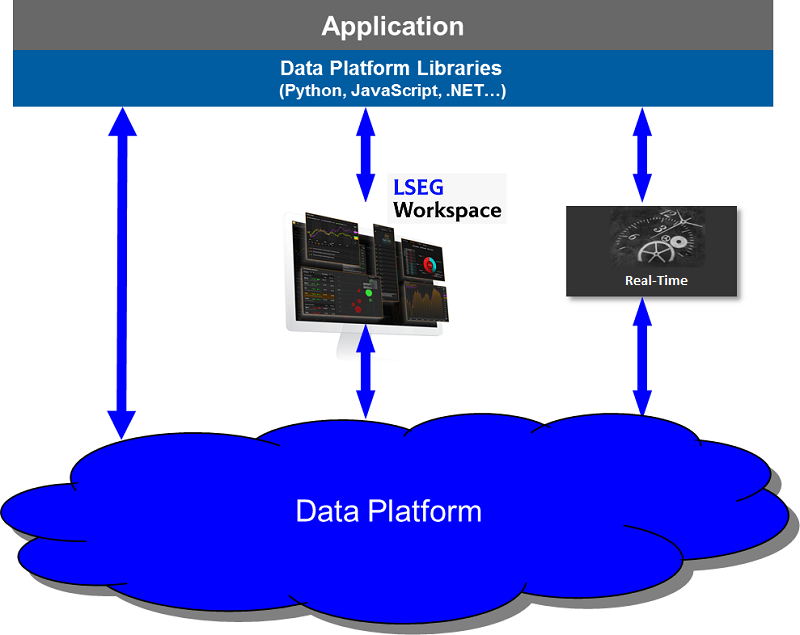
The LSEG Data Library for .NET (LD.NET) is a new community-based library that is designed as ease-of-use interfaces, and it can help eliminate the development process complexity. The below picture depicts the architecture of LSEG Data Library.
And the following picture is an architecture and layers from the Libraries.
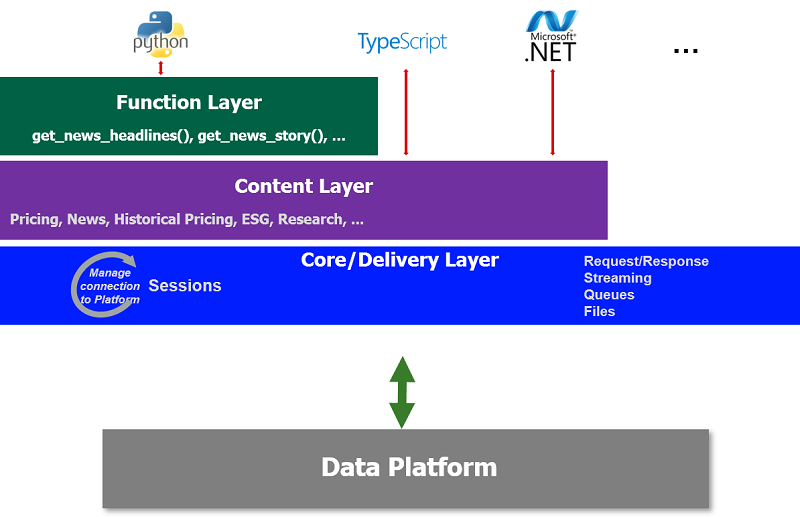
The LD.NET are ease-of-use APIs defining a set of uniform interfaces providing the developer access to the Data Platform and Real-Time – Optimized. The APIs are designed to provide consistent access through multiple access channels; developers can choose to access content from the desktop, through their deployed streaming services or directly to the cloud. The interfaces encompass a set of unified Web APIs providing access to both streaming (over WebSockets) and non-streaming (HTTP REST) data available within the platform.
This article will provide a sample usage to create a .NET Core console app to retrieve MRN News Story from the infra using the LSEG Data Library for .NET. It will describe how to use an interface from Core/Delivery Layer, to request a Streaming data, especially real-time News from MRN Story data. This article also provides an example application that implements a function to manage a JSON request and response message. It will show you how to concatenate and decompress MRN data fragments manually. Moreover, the article will show you alternate options from a Content Layer to retrieve the same MRN Story data.
Prerequisites
- .NET Core SDK 8.0 or later versions.
- Visual Studio Code/Text editor or Visual Studio 2022
- Understand concepts and primary usage of LSEG Data Library for .NET
Using .NET Core with LD.NET Library
At the time we write this article, the developer can get the library from nuget.org. There are two main libraries you can add to your project.
- LSEG.Data is a Core/Delivery Layer.
- LSEG.Data.Content is a library for the Content Layer.
We will use the LD.NET library with .NET Core SDK so that you can test the codes on a various platform which support .NET Core SDK such as Linux and macOS. You can write the codes in Visual Studio Codes and use the command line or terminal to run the sample app.
Add LD.NET to .NET Core Console App
Let start by creating a .NET Core console app. Run command prompt or terminal and create a folder named rdpmrnconsumer. Then Navigate to the folder you created and type the following:
dotnet new console
dotnet run
dotnet new creates an up-to-date rdpmrnconsumer.csproj project file with the dependencies necessary to build a console app. It also creates a Program.cs, a file containing the entry point for the application. It will show the message "Hello World" when you type dotnet run command.
Next step type following command to add LSEG.Data and its dependencies from Nuget to the project. The current version at the time we write this article is LSEG.Data version 2.1.0.
dotnet add package LSEG.Data --version 2.1.0
Then add the following modules to Program.cs.
using LSEG.Data;
using LSEG.Data.Core;
Create Session and use Stream API to retrieve real-time content
According to the LD.NET Quickstart, accessing the platform via the Data Platform session requires authentication and connection semantics to communicate and retrieve content. The LSEG Data Library provides this managed access through an interface called a Session. The session is the interface to a specific access channel. It is responsible for defining authentication details, managing connection resources, and implementing the necessary protocol to manage the Session's life cycle.
The Session corresponds to each of the access channels available and provides unique properties to support that interface's specific requirements. Once the Session has been established, developers can use a Stream API, the streaming interface that delivers real-time content over WebSockets to request and process the response. As part of the Delivery layer, a Stream provides a simple, yet flexible design to access streaming content delivered using Event-driven callbacks defined within your application.
The Stream allows you to subscribe to the different supporting models (MarketPrice, MarketByPrice, Machine Readable News (MRN), etc.) available via a streaming connection to the platform. With the current design, a Stream is meant to be used with the Event-Driven operation mode.
Create Session for local Real-Time Advanced Distribution Server
Open Program.cs and add the following codes, which defined a credential required by WebSocket connection to Program class.
#region RTDSCredential
private const string RTDSUser = "<DACS Username>";
private const string appID = "<App ID>";
private const string position = "<Ip or Hostname>/net";
private const string WebSocketHost = "<ADS/Websocker Server IP or Hostname>:<port>";
#endregion
Add the following codes to the Main method to create a Session for DeployedPlatform (RTDS) and pass parameters under region "Credential for local WebSocket server" to generate the session. In this example, we print the state and message returned by the callback to console output.
session = PlatformSession.Definition()
.Host(WebSocketHost)
.DacsUserName(RTDSUser)
.DacsApplicationID(appID)
.DacsPosition(position)
.GetSession()
.OnState((state, msg, s) =>
{
Console.WriteLine($"{DateTime.Now}: {msg}. (State: {state})");
_sessionState=state;
})
.OnEvent((eventCode, msg, s) => Console.WriteLine($"{DateTime.Now}: {msg}. (Event: {eventCode})"));
Note that we will add _sessionState variable to the class to sync the session state after we call Open or OpenAsync. We will check the session state before sending the Item Request. Please add the following codes to the Program class.
private static Session.State _sessionState = Session.State.Closed;
Then you need to pass a callback function to OnState and OnEvent to monitor the Session state and receiving events from RDP internal library. The msg variable in the OnEvent message is a JObject, which is a JSON message containing the content for a specific event. It could be an error from the backend, and below is a sample JSON message when the DACS user is not valid.
{
"Contents": "api, unknown to system."
}
Create Session for Real-Time – Optimized
Add the following codes which defined a credential required by RTO WebSocket connection to Program class.
#region DPUserCredential
private const string DPClientID = "<Client ID>";
private const string DPClientSecret = "<Client Secret>";
#endregion
Then add the following codes in the Main method to create PlatformSession. The Library's internal mechanism will handle the request token and maintain the life cycle of the token on behalf of the application. The application does not need to add any codes to manage an access token.
session = PlatformSession.Definition().OAuthGrantType(
new ClientCredentials().ClientID(DPClientID).ClientSecret(DPClientSecret))
.GetSession()
.OnEvent((eventCode, msg, s) => Console.WriteLine($"{DateTime.Now}: {msg}. (Event: {eventCode})"))
.OnState((state, msg, s) =>
{
Console.WriteLine($"{DateTime.Now}: {msg}. (State: {state})");
_sessionState = state;
});
After we created the session, then we need to call the session.Open() Or session.OpenAsync() to open the session. The Websocket library used by LD.NET will establish a connection to the server and manage to send authentication requests and process the response and maintain the connectivity between the client app and server.
As we said earlier, when it has an error about the credential, the LD.NET library returns the error message with the code from the Data Platform gateway. Below is a sample JSON message when the user passes an invalid client ID or client secret.
{
"error": "invalid_client",
"error_description": "Invalid client or client credentials."
}
Retrieving MRN Story content
There are two approaches the application can use to retrieve data for market price or another domain model.
Using Stream API to retrieve MRN Story data The first approach is to use the Stream API provided by the Delivery layer to request data and implement the application's codes to handle the data returned from the callback. Stream API also provides an interface for the user to set the item name and domain model so that the application can use the Stream API to request data for any supported domain model. However, the application has to understand the structure of the JSON message for the specific domain it requested. In the example, we will request MRN Story data from the NewsAnalystics domain. Therefore, we will apply instructions from MRN Data Model to process the data correctly.
Using the LSEG.Data.Content library to retrieve MRN Story The second one is to add the Nuget package LSEG.Data.Content and then use method MachineReadableNews.Definition to create MachineReadableNews object. MachineReadableNews is the class from Content Layer from the Introduction topics, and it was designed to retrieve MRN contents and provide callback OnNews to return MRN JSON Message to the application layer.
We will create a separate project to demonstrate the usage of each approach.
Using Stream API to retrieve MRN Story data
Let start with the first approach. The following sample codes demonstrate how to open the item stream request using Stream API, which is the class under the Delivery layer. The API provides OMMStream.Definition() to create an item stream. After the application call stream.open() it will send a new item request to Real-Time – Optimized. Then the application can process the JSON data returns from the callback functions defined in OnRefresh, OnUpdate, and OnStatus. The application can use method Fields() to specify field lists for a view request, and it can set Streaming(false) to send snapshot requests.
To use the class from the Delivery layer, you need to use the following modules.
using LSEG.Data.Delivery;
using LSEG.Data.Delivery.Stream;
Then you can add the following codes to the Main method. The application will print the value of the variable msg to console output.
using var stream = OMMStream.Definition().Name("<Item>").Domain("<Domain>").GetStream()
.OnRefresh((item, msg, s) => Console.WriteLine($"{msg}\n\n"))
.OnUpdate((item, msg, s) => ProcessMRNUpdateMessage(msg))
.OnError((item, msg, s) => Console.WriteLine(msg))
.OnStatus((item ,msg, s) => Console.WriteLine($"{msg}\n\n"));
{
stream.Open();
...
}
Variable msg is a JObject, and it contains the JSON message provided by the server. The following sample JSON message is a result when an application requests ItemName "AUD=" with the "MarketPrice" Domain Model. If you did not call method WithDomain, it would use "MarketPrice" as default.
{
"ID": 2,
"Type": "Refresh",
"Key": {
"Service": "ELEKTRON_DD",
"Name": "AUD="
},
"State": {
"Stream": "Open",
"Data": "Ok",
"Text": "All is well"
},
"Qos": {
"Timeliness": "Realtime",
"Rate": "TickByTick"
},
"PermData": "AwEsUmw=",
"SeqNumber": 23280,
"Fields": {
"PROD_PERM": 526,
"RDNDISPLAY": 153,
"DSPLY_NAME": "OTP BANK RT BUD",
"TIMACT": "08:53:00",
"NETCHNG_1": 0.0032,
"HIGH_1": 0.6732,
"LOW_1": 0.668,
"CURRENCY": "USD",
"ACTIV_DATE": "2020-02-04",
"OPEN_PRC": 0.6691,
"HST_CLOSE": 0.6691,
"BID": 0.6723,
"BID_1": 0.6723,
"BID_2": 0.6722,
"ASK": 0.6724,
"ASK_1": 0.6724,
"ASK_2": 0.6725,
"ACVOL_1": 31157,
...
"ASKHI1_MS": "08:29:57.721",
"ASKHI2_MS": "08:29:21.89",
"ASKHI3_MS": "08:28:54.218",
"ASKHI4_MS": "08:28:36.991",
"ASKHI5_MS": "08:27:56.986",
"ASKLO1_MS": "01:10:43.164",
"ASKLO2_MS": "01:10:33.66",
"ASKLO3_MS": "01:09:33.74",
"ASKLO4_MS": "01:03:14.09",
"ASKLO5_MS": "00:39:09.974",
"BIDHI1_MS": "08:29:57.381",
"BIDHI2_MS": "08:29:22.909",
"BIDHI3_MS": "08:28:49.656",
"BIDHI4_MS": "08:28:38.286",
"BIDHI5_MS": "08:28:00.819",
"BIDLO1_MS": "01:10:54.241",
"BIDLO2_MS": "01:10:43.426",
"BIDLO3_MS": "01:09:52.16",
"BIDLO4_MS": "00:55:01.75",
"BIDLO5_MS": "00:39:30.107",
"MIDHI1_MS": "08:29:57.38",
"MIDLO1_MS": "01:10:43.164",
"BID_HR_MS": "08:00:00.727"
}
}
Typically the structure of the response message is the same as the structure mentioned in the Websocket API document. Hence it could say that the LD.NET API responsible for managing the connection, send a request, and process a response message. It also maintains connectivity between the client app and the server on behalf of the application. The application has to create its function or data model to process the content returned from the callback. The developer needs to know the item name, domain name, and structure of the JSON message returned from the Websocket Server to process data correctly.
In our example app, we need to set the Name param to "MRN_STORY" and set Domain Model to "NewsTextAnalytics". Refer to the structure of MRN Story from MRN DATA MODELS GUIDE, the refresh and update message provided by MRN feed is a list of key-value pairs of the FID provided under the Fields. The data inside the update message of the MRN Story is quite different from the Market Price domain. It is because the FRAGMENT FID is compressed with gzip compression technology, thus requiring the consumer to concatenate and decompress the fragment data to reveal the JSON plain-text from that FID. What we need to add to this application is the data caching and the way to verifying and decompressing the MRN Story fragment to the JSON plain-text.
The following JSON message is a sample of MRN update and fragment data the application needs to handle correctly.
{
"ID": 2,
"Type": "Update",
"Domain": "NewsTextAnalytics",
"UpdateType": "Unspecified",
"DoNotConflate": true,
"DoNotRipple": true,
"DoNotCache": true,
"Key": {
"Service": "ELEKTRON_DD",
"Name": "MRN_STORY"
},
"PermData": "AwEBEBU8",
"SeqNumber": 30910,
"Fields": {
"TIMACT_MS": 30796584,
"ACTIV_DATE": "2020-02-05",
"MRN_TYPE": "STORY",
"MRN_V_MAJ": "2",
"MRN_V_MIN": "10",
"TOT_SIZE": 816,
"FRAG_NUM": 1,
"GUID": "Pt66HqTl__2002052OxPAmtJPzgacG/ircD/ehPTGzrtAlbTUohheh",
"MRN_SRC": "HK1_PRD_A",
"FRAGMENT": "H4sIAAAAAAAC/8VUTXPjNgy991dgNHu0LPkj6UY3J07TdBJHjbWHttvZoSTYYkNRWhK04+30vy9grdN0Jp3prSeBEAE8vgfgz0gZuq2jLLI5nZ//+Lkw0ShSodZoK/RR9lu0yrP85jL6fRSVXX3gm+nZD1hO0wTS97MZLO7helkkR/vmvvho4/hkZ5AbReThMtgndC9Hhx7dDj1Qg+D0tiGwHQF10IfSaN+Asgcode2hc9BtNug8VJ31ukaHtVwsEYJ1qHxnVWlwBD5UHOZBgen2EiuhChrOPmTgYoqg7risFHPYCwxL0Cr3hAQ7ZQKO/4a4MVixoW3lsOV7ykDVKLtF8UmBZEhrcIfGD9m3eodctOqCJXS9cnQA1fYGgXSLghufsQrEdW4t9E5VpCsGr9vedbtjmbezsw+fWQ8mZAPvJuM0TVqSF05SqCQqKZVzaKDnmFZbLsHvOghNHtEKMUM8A3x5o1zYKXcQGTwCw1UtknC919R04ajKEV+NPdpa2y109sQX61Fr0qzKmPU9SJiyNZcz5iiXskwisUQkQYpz2fg1maXy2kPJVURsH0qPn4Po8QYZPvnWBG3wJI9qVY2vpTEH2LiuPTbUkTLhet9o7glxlYJP6BrQnYBhzTpsGNu//PeSRX1L+Kr/3uq8U8sNsu21MYKTSTeh5pAXdMp7lkFQs/6dSDKG99lslk3Ox7P52WmE/jE4sGBQFMcfLc/mRjtPVwN8HsZpOk3jdBqnZ0V6yjO/mP3KNxtUtdEW+VZ+tyiKdQYXF9/H8Qr38EvnnmD+vw0oo9OC/rRzPn2apvyQs+nDc75o6af8y1ZVN4l21TLBJi9uvjhamLL40DUNNhJtPSnZUA8b3lG8mwyPZlBbeSwKTS0zy8fi0LNrymcewOEQET5T0hul5Z70mqBm/2qd5XfFWpyhXJOiwPsv4jqUBS+P4D/cp3/IXpDFeJ1N2HOdzdPhM+fPfTb5ecnfR96Zi5TpPtmDuZpml4urYrCu8seH5WDerpYfBuvuejUYD4/LR1m6pJ5wfRyNisFPRlFwW7Z5Ec9G0Y6J5xH8D+3w13dfAbNX2PnrBQAA"
}
}
The FRAGMENT field is a fragment of compressed JSON for the MRN Story. We will add the data structure to the console application to concatenate the data fragment correctly.
Convert the MRN update message to Object
To process the data from the update message, we will create a model class to keep a Fields value, which is a list of key-value pairs for all the fields related to the item and the first or subsequent fragment. Then we need to use the Newtonsoft JSON.NET library to deserialize the JSON data to the object and access the field and its value from the object instead.
Below is a MrnStoryData class, which is a model class for the update message. We will add the class to a new file MRNStoryData.cs.
public class MrnStoryData
{
public MrnStoryData()
{
}
public MessageTypeEnum MsgType { get; set; }
public long PROD_PERM { get; set; }
public long RECORDTYPE { get; set; }
public string RDN_EXCHD2 { get; set; }
public double CONTEXT_ID { get; set; }
public long DDS_DSO_ID { get; set; }
public string SPS_SP_RIC { get; set; }
public string ACTIV_DATE { get; set; }
public long TIMACT_MS { get; set; }
public string GUID { get; set; }
public string MRN_V_MAJ { get; set; }
public MrnTypeEnum MRN_TYPE { get; set; }
public string MRN_V_MIN { get; set; }
public string MRN_SRC { get; set; }
public long FRAG_NUM { get; set; }
public long TOT_SIZE { get; set; }
public byte[] FRAGMENT { get; set; }
public long FragmentSize { get; set; }
...
}
Then we will change the Stream API to request MRN Story data instead:
using var stream = OMMStream.Definition().Name("MRN_STORY").Domain("NewsTextAnalytics").GetStream()
.OnRefresh((item, msg, s) => Console.WriteLine($"{msg}\n\n"))
.OnUpdate((item, msg, s) => ProcessMRNUpdateMessage(msg))
.OnError((item, msg, s) => Console.WriteLine(msg))
.OnStatus((item ,msg, s) => Console.WriteLine($"{msg}\n\n"));
{
stream.Open();
...
}
The application should verify the completion of the update message before calling the JSON.NET library to deserialize the JSON data to the class. We will add ProcessMRNUpdateMessage to Program class and add below snippet of codes to verify the data before converting it to the MrnStoryData object.
private static void ProcessMRNUpdateMessage(JObject updatemsg)
{
if (updatemsg == null) throw new ArgumentNullException(nameof(updatemsg));
if (updatemsg.ContainsKey("Domain") && updatemsg["Domain"].Value<string>() == "NewsTextAnalytics" && updatemsg.ContainsKey("Fields") && updatemsg["Fields"]!=null)
{
var mrnUpdateData=updatemsg["Fields"].ToObject<MrnStoryData>();
ProcessFieldData(mrnUpdateData);
}
}
Next step, we will keep the MrnStoryData in the .NET Dictionary, where the number of a new Story Fragment is a key in the Dictionary. Below is a snippet of codes of the Dictionary object.
#region MRNDataProcessing
private static readonly Dictionary<int, Model.MrnStoryData> _mrnDataList = new Dictionary<int, Model.MrnStoryData>();
private static int UpdateCount { get; private set; }
#endregion
To process content from MrnStoryData object, we will create the ProcessFieldData function in the Program class and add two main app logics to the function. You can find the full source files from Github.
private static bool ProcessFieldData(Model.MrnStoryData mrnData)
{
//Codes to handle MRN fragments
}
The first step in this function is to add a new Fragment or updating Fragment with the data from the subsequent updates. The second step is the codes to verify whether or not the update is the last fragment, and we can decompress the data using the JSON library.
Below is the snippet of codes for the first part. It uses the UpdateCount variable to keep track of the Fragment Count.
mrnData.MsgType = Enum.MessageTypeEnum.Update;
var newUpdateByteArray = mrnData.FRAGMENT ?? throw new ArgumentNullException("mrnData.FRAGMENT");
var newUpdateFragmentSize = (int?)newUpdateByteArray?.Length ?? 0;
if (mrnData.FRAG_NUM == 1 && mrnData.TOT_SIZE > 0)
{
//Shrink FRAGMENT size to TOT_SIZE
mrnData.FRAGMENT = new byte[mrnData.TOT_SIZE];
Buffer.BlockCopy(newUpdateByteArray ?? throw new InvalidOperationException(), 0,
mrnData.FRAGMENT, 0, (int)newUpdateFragmentSize);
mrnData.FragmentSize = newUpdateFragmentSize;
_mrnDataList.Add(UpdateCount, mrnData);
}
else if (mrnData.FRAG_NUM > 1)
{
if (_mrnDataList[UpdateCount].MRN_SRC == mrnData.MRN_SRC && _mrnDataList[UpdateCount].GUID == mrnData.GUID)
{
var tmpByteArray = _mrnDataList[UpdateCount].FRAGMENT;
var tmpTotalSize = _mrnDataList[UpdateCount].TOT_SIZE;
var tmpFragmentSize = _mrnDataList[UpdateCount].FragmentSize;
_mrnDataList[UpdateCount] = mrnData;
_mrnDataList[UpdateCount].FRAGMENT = tmpByteArray;
_mrnDataList[UpdateCount].TOT_SIZE = tmpTotalSize;
_mrnDataList[UpdateCount].FragmentSize = tmpFragmentSize;
Buffer.BlockCopy(newUpdateByteArray, 0,
_mrnDataList[UpdateCount].FRAGMENT,
(int)_mrnDataList[UpdateCount].FragmentSize, (int)newUpdateFragmentSize);
// Calculate current Fragment Size
_mrnDataList[UpdateCount].FragmentSize += newUpdateFragmentSize;
}
else
{
var msg =
$"Cannot find previous update with the same GUID {mrnData.GUID}. This update will be skipped.";
Console.WriteLine($"Error {DateTime.Now} {msg}");
UpdateCount++;
}
}
The next step is to verify whether or not the size of concatenated fragment data equal to Fragment size, and then we can decompress it to JSON plain-text. In the snippet codes, we will create StoryData class, which is a class to hold data for the MRN Story. We will convert the JSON data to the class and pass it to display function or print the value of Headline and Body to console output.
// Check if the update contains complete MRN Story
if (_mrnDataList[UpdateCount].IsCompleted)
{
Console.WriteLine($"GUID:{_mrnDataList[UpdateCount].GUID}");
_mrnDataList[UpdateCount].JsonData = DataUtils
.UnpackByteToJsonString(_mrnDataList[UpdateCount].FRAGMENT).GetAwaiter().GetResult();
if (_mrnDataList[UpdateCount].MRN_TYPE == Enum.MrnTypeEnum.STORY)
{
var mrnobj = JsonConvert.DeserializeObject<Model.StoryData>(_mrnDataList[UpdateCount].JsonData);
Console.WriteLine($"========================= Story update=======================");
Console.WriteLine($"AltId:{mrnobj.AltId}");
Console.WriteLine($"Headline:{mrnobj.Headline}\n");
Console.WriteLine($"Body:{mrnobj.Body}");
Console.WriteLine("==============================================================");
//Console.WriteLine($"Story Update {DateTime.Now}\n {_mrnDataList[UpdateCount].JsonData}");
}
else
{
// In case that item name is not MRN_STORY just print JSON message to console
string jsonFormatted = JValue.Parse(_mrnDataList[UpdateCount].JsonData).ToString(Formatting.Indented);
Console.WriteLine(jsonFormatted);
}
UpdateCount++;
;
}
else
{
if (_mrnDataList[UpdateCount].FragmentSize > _mrnDataList[UpdateCount].TOT_SIZE)
{
var msg = $"Received message with GUID={_mrnDataList[UpdateCount].GUID} has a size greater than total message size. This update will be skipped.";
Console.WriteLine(msg);
Console.WriteLine($"Error {DateTime.Now} {msg}");
UpdateCount++;
}
}
Note that the sample codes were created to demonstrate the necessary step to concatenate and decompress the MRN data fragments. The algorithm may not cover all scenarios that might happen while running the example app. You can run the project downloaded from Github with either your local Real-Time Advanced Distribution Server or Real-Time Optimized account to see the result. You can modify the codes to use your data structure and add your algorithm to the codes.
The first approach requires more steps and codes to concatenate and verify the fragments before decompressing the MRN Story data to JSON plain-text. This approach may be suitable for a developer who wants to leverage the Session or Delivery layer's functionality or Delivery layer provided by the library. And they want to control the algorithm to handle the MRN data themself. Some peoples may wish to logs or keep all of the response messages in their storage or database system.
Using the LD.NET Content layer to retrieve MRN Story
Let start talking about the second approach, which uses shorter and easier codes. LD.NET library provides an easier way to retrieve particular content such as Price and MachineReadableNews or MRN data. To use the library for the content layer, we need to add the Nuget LSEG.Data.Content library to the project. You can use the following CLI to add the package as well. Note that the current version at the time we write this article still be the LSEG.Data.Content 2.1.0.
dotnet add package LSEG.Data.Content --version 2.1.0
Then add the following modules to Program.cs.
using LSEG.Data.Content.News;
To retrieve MRN Story data, you can use ContentFactory rather than DeliveryFactory to create MachineReadableNews object. The application can use ContentFactory.CreateMachineReadableNews to create the object like the following snippet codes.
using var mrnNews = MachineReadableNews.Definition()
.NewsDatafeed(MachineReadableNews.Datafeed.MRN_STORY).GetStream()
.OnError((err, stream) => Console.WriteLine($"{DateTime.Now}:{err}"))
.OnStatus((status, stream) => Console.WriteLine(status))
.OnNewsStory((newsItem, stream) => ProcessNewsContent(newsItem.Raw));
{
mrnNews.Open();
...
}
From the codes, you need to set NewsDatafeed param to MRN_STORY if you wish to request MRN_STORY. Note that you can also change NewsDataFeed to retrieve MRN_TRNA and MRN_TRSI as well.
When using the Content layer, you don't need to worry about concatenating and verifying the fragments. The Content layer will take care of this process on behalf of the application. The developer needs to define a function to process data from the OnNewsStory callback. The variable named newsItem from OnNewsStory is the IMRNStoryData interface. It holds both the full body text of the news content and the raw data; the data returned to the callback hold an MRN Story property that is the same structure described in the MRN Data Model. Anyway, if you need to process the MRNStory data yourself, you can get the raw data by calling newsItem.Raw and then deserialize the raw data to StoryData class and access a value from the class instead.
The second approach is easier to use, and it saves time. Also, it suitable for application developers who required shorter lines of codes to retrieve MRN content.
Troubleshoot LD.NET issue
If you found a problem when using the library, the LD.NET library creates a log file for you typically. Therefore, you can open the file to review the messages that the library sends and receive.
LD.NET library uses the NLog library inside, and by default, it will create a logger file name RDPLog_<pid>.log under a running directory. You can change the default logger level to trace all messages so you can review the credentials and JSON messages the application send and receive from the server from a log file.
To change the Log level, you can add the following codes before creating the session.
Log.Level = NLog.LogLevel.Trace;
You can use the information from the RDP.NET log file to analyze the data behavior and investigate the issue. The log also contains the authentication request and response along with the headers it sends and receives from the server.
Build and Run example application
You can download the solution from Github. There are two project folders in the solution. The first project is a folder named MRNStoryConsumer_Method1. It's the project for the first approach. And the second one is folder MRNStoryConsumer_Method2. It's the project for the latter approach.
Before you build and run the app, you have to modify the credential for either Real-Time Advanced Distribution Server or Real-Time – Optimized on the Data Platform in the Program.cs file. If you wish to test with the Real-Time Advanced Distribution Server, please set the useRDP variable in the Main method to false and then save the file.
Build and Run the project
In command-line mode, go to the project folder which contains .csproj and type the following command:
dotnet run
Or if you want to build the project to executable file you can type the following command:
dotnet build -c release -r win10-x64 -o ./release-x64
It will create an executable file in a release-x64 folder. Then you can run MRNStoryConsumer_Method1.exe directly from the release folder.
The above command is for windows 10 64 bit. If you want to build it on Linux or macOS, you can change it to one of the lists from .NET Core RID Catalog.
For example,
On the macOS, you have to change it to "osx-x64".
dotnet build -c release -r osx-x64 -o ./release-x64
It should generate executable file MRNStoryConsumer_Method1 under the release-x64 folder.
You can use the same command to build any project.
Anyway, if you have Visual Studio Code and installed .NET Core Development plugin, you can open the project folder and click Start Debug or Start without Debug from the editor.
Summary
This article provides brief details of the LSEG Data Library for .NET (LD.NET). It shows a sample usage to demonstrate how to use the library to retrieve real-time MRN Story data from the local WebSocket server on Real-Time Advanced Distribution Server and Real-Time – Optimized on the Data Platform. There are two main approaches provided in this article to process the MRN data. The first one is to use Stream API to request an item such as MRN_STORY and then manually process the MRN Story update message and implement data caching algorithm to verify the MRN fragment and decompress the MRN Story data to JSON plain-text. The second approach is an easier way to retrieve the MRN Story data using the LD.NET Content library. The LD.NET Content library provides a MachineReadableNews class which provides OnNewsStory callback function, which returns MRN Story JSON data. The second approach is quite easy to use and should save development times. By the way, it may not be suitable for the project that requires access to original data from the Refresh and Update message provided by the WebSocket Server. Hence the recommended approach depending on the condition and preference of the user.
Download
You can download full source files and projects from GitHub.
References
Get In Touch
Related APIs
SOURCE CODE
Request Free Trial
Call your local sales team
Americas
All countries (toll free): +1 800 427 7570
Brazil: +55 11 47009629
Argentina: +54 11 53546700
Chile: +56 2 24838932
Mexico: +52 55 80005740
Colombia: +57 1 4419404
Europe, Middle East, Africa
Europe: +442045302020
Africa: +27 11 775 3188
Middle East & North Africa: 800035704182
Asia Pacific (Sub-Regional)
Australia & Pacific Islands: +612 8066 2494
China mainland: +86 10 6627 1095
Hong Kong & Macau: +852 3077 5499
India, Bangladesh, Nepal, Maldives & Sri Lanka:
+91 22 6180 7525
Indonesia: +622150960350
Japan: +813 6743 6515
Korea: +822 3478 4303
Malaysia & Brunei: +603 7 724 0502
New Zealand: +64 9913 6203
Philippines: 180 089 094 050 (Globe) or
180 014 410 639 (PLDT)
Singapore and all non-listed ASEAN Countries:
+65 6415 5484
Taiwan: +886 2 7734 4677
Thailand & Laos: +662 844 9576