

Gurpreet Bal
Platform Application Developer
Platform Application Developer
Python programming offers several advantages, making it a popular choice for developers. Python's high-level nature and dynamic typing allow developers to focus more on application logic and less on intricate details. Although, the language is mostly used in the terminals or interactive notebooks, sometimes a user needs to develop an application with a Graphical User Interface (GUI). These applications are a better choice for deployment to end users and are suited for application with a well defined purpose. Developing GUI application in Python offers some advantages like - inherently cross-platform. The app can run seamlessly on multiple operating system (e.g., Windows, Linux or macOS) without significant modifications. GUI frameworks often provide tools for rapid development, allowing you to create functional interfaces quickly.
The Tick History data using the REST interface and a subset of this data - Venue By Day (VBD) delivery is a prime candidate for an interactive application with user interface. In this article, we will explore the GUI options for Python and use the Model-View-Controller (MVC) design pattern to develop a sample VBD application. The VBD application will allow a user to login - browse, select and download the files interactively.
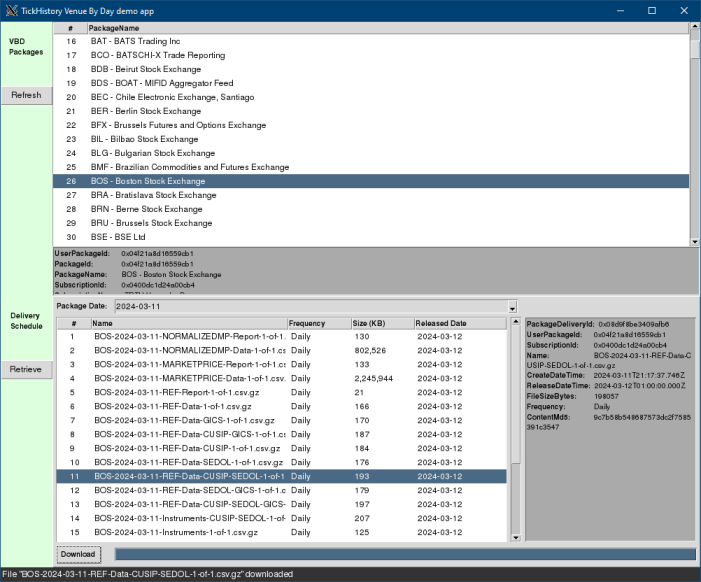
Here is how the final application will look like:
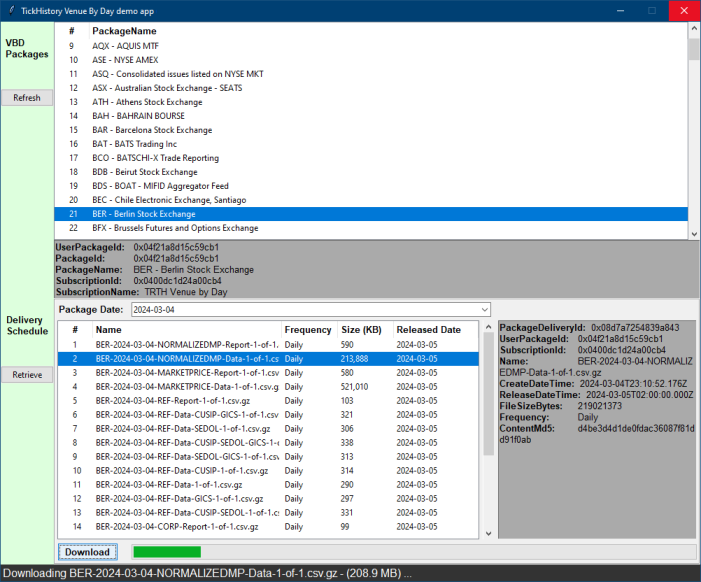
Venue By Day data
The Tick History Venue-by-Day is a service where the whole day's worth of data on any trading venue or marketplace is available in a single file. These files are an easy and complete extraction of every tick for all the instruments for a given venue on a specific day. The data becomes available after embargo period enforced by the venue expires - e.g. after the stock market stops trading for the day.
The VBD feeds are organized by Subscription and Packages. Packages represent a Venue (e.g. stock exchange), and each client has access to these based on their purchased commercial package. Each Package delivers its content at specific intervals as User Package Deliveries which provide some information about the file content such as the name, release date, frequency, and file size etc. Typical workflow of getting data from VBD involves:
- Browse all the available packages.
- Retrieve the delivery schedule for a particular package.
- Narrow down the available data files. Select based on date, delivery frequency or size.
- Download the file.
The VBD files are delivered in the compressed .gz format and the file size can vary from few KiloBytes (trading summary) to few GigaBytes (trade data for whole day on an active market). So, application must take care during download and de-compression - to not run out of memory!
There are several types of files for Venue By Day data:
- Market data files (formatted or raw):
- NORMALIZEDMP - Tick-by-tick: Auction, Correction, Market Condition, Quote and Trade
- NORMALIZEDLL2 - Market by price (25 levels)
- MARKETPRICE - NORMALIZEDMP in raw format
- LEGACYLEVEL2 - NORMALIZEDLL2 in raw format
- CORP - Corporate Actions (dividend, earning, capital change, share type & stock split)
- REF - Asset specific reference data: metadata, terms & conditions, symbology changes, etc.
- Instruments - All the venue’s active instruments. Based on entitlements, there can be one or more files.
Python GUI options
There are numerous GUI frameworks available for Python, such as Tkinter, PyQt, and Kivy. These provide an easy-to-use tools and documentation for creating graphical interfaces.
In this article, we will use Tkinter. Tkinter is an open source, portable graphical user interface library for use in Python. It is included as a part of standard Python installation; is cross platform and provides an easy to use widgets and a powerful layout manager for creating useful displays. Tkinter relies on the Tk library which is used by Tcl/Tk and Perl.
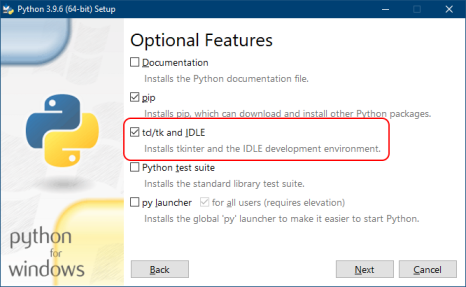
Note: Windows users have to enable TCK/Tkinter when installing Python package!
Application
The VBD application has two main screens -
- Login prompt for logging into TickHistory and get an OAuth access token.
- Browse, navigation and download screen.
The application itself is structured into three distinct classes:
- The main window class acts like a controller and co-ordinates the data with user interface. This class extends from the Tkinter Tk class, and also responsible for the root window display and event dispatches.
- The series of classes in the Frames module act like a view and are responsible for actual rendering of the user interface. The key classes are the Login frame which displays the dialog box for userID/password input and the Main frame which shows the content.
- The model for the UI comes from the TickHistory module in the class named TH. This class abstracts all the data requests from the view and controller. This class is reusable and it should be possible for another application to re-purpose the TickHistory module for its own use.
To create an GUI application, we will create a window and then place a few Tkinter widgets on them. The widgets are pre-defined objects like a Text Box, Label, Button etc, which do the job of rendering on the screen. To view a list of all the available widgets, please visit the Tkinter API documentation.
The complete source code of this application is available at LSEG GitHub Repository. Lets take a look at the key components of our GUI application.
Root Window
The root window is the base of the whole application and closing this window will terminate the program. The main window class of the application extends the Tk class. Hence, it is important that when the window object is instantiated, the super class object is initialized as well. This is achieved but calling the __init__ function of the super class when this object is created.
def __init__(self, *args, **kwargs):
tk.Tk.__init__(self, *args, **kwargs)
The window class uses grid layout for positioning the controls on the window. First widget is a Frame object, which is the main display area where all the other sub frames will be placed. Other widget is the Label which displays the status messages at the bottom of the window.
self.columnconfigure(0, weight=1)
self.rowconfigure(0, weight=1)
# create a frame where are sub widgets are placed
cont = tk.Frame(self)
cont.grid(row=0, column=0, sticky=(tk.N, tk.S, tk.W, tk.E))
cont.grid_rowconfigure(0, weight=1)
cont.grid_columnconfigure(0, weight=1)
# drop a status bar at the bottom
self.statusMsg = tk.StringVar()
lbl1 = tk.Label(self, textvariable=self.statusMsg, anchor='w', font=(None, 12), bg='#333', fg='#fff')
lbl1.grid(row=1, column=0, sticky=(tk.W, tk.E))
Here, the status label is set to expand horizontally, but the content frame is set to expand in all four directions as the root window size changes. This code will produce a blank window with one frame and a status bar like this:
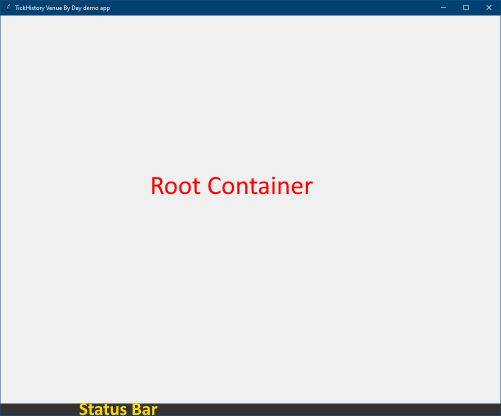
All the other displays will be placed on this root frame named cont rather then the root window. The child-frames will be confined to the bounds of this frame and can expand/contract to resize as the window changes. The first of these child-frames is a login frame.
Login Frame
Login frame is responsible for requesting the user credentials (username/password) and a button to execute the request. Here is the code to generate the login frame:
def __init__(self, parent, controller):
ttk.Frame.__init__(self, parent, relief=tk.GROOVE, borderwidth=5, padding=20)
...
lbl1 = ttk.Label(self, text='Login to TickHistory', font=(None, 25))
btn = ttk.Button(self, text="Login", command=lambda: controller.login(self, username.get(), password.get()))
...
self.grid(row=0, column=0)
lbl1.grid(row=0, column=0, columnspan=2, pady=10)
entUser.grid(row=1, column=1, pady=10, sticky=(tk.W, tk.E))
...
entUser.focus()
In this code, we begin by initializing the parent frame which has a grooved border. Then a few widgets like prompt header, text entry boxes, labels which describe these boxes and a button are initialized. Grid layout manager is used for placement of widgets in a 4 rows X 2 column arrangement and the prompt header spans across both the columns. Since the login frame does not specify any stickiness, this sub-frame floats in the middle of root-content frame. Finally, we set the focus on the username text box. The button click-event is tied the the controller class in a lambda (inline function). In Python lambda's are great way to execute a single line of code, and execute within the context of the object itself, and help to write concise and readable code.
Main Frame
Main frame takes over the whole display once the user has successfully authenticated with the TickHistory REST API and received an OAuth token. This token is to be used with all subsequent data REST calls and is added to the header of all the request messages.
Main frame also uses a grid layout of 4 rows x 2 columns. It instantiates two sub-frames for Packages and Schedule - which are the main data display areas. These sub frames use rownspan feature of grid layout to span multiple cells. The labels and buttons on the navigation bar do not specify any stickiness, while the sub frames expand in all the direction. This causes the sub-frames to take over all the available space and expand when the window size is changed.
pFrame = Package(self, controller)
btn1 = ttk.Button(self, text="Refresh", command=self.loadPackages)
...
sFrame = Schedules(self, controller)
btn2 = ttk.Button(self, text="Retrieve", command=self.getSchedules)
...
self.grid(row=0, column=0, sticky=(tk.N, tk.S, tk.W, tk.E))
self.columnconfigure(1, weight=1)
self.rowconfigure(1, weight=2)
self.rowconfigure(3, weight=2)
pFrame.grid(row=0, column=1, rowspan=2, sticky=(tk.N, tk.S, tk.W, tk.E))
sFrame.grid(row=2, column=1, rowspan=2, sticky=(tk.N, tk.S, tk.W, tk.E))
...
In this class, the button click-events require a lot of pre-processing before invoking an actual function in the controller class - hence a lambda function cannot be used. These trivial tasks, like checking if an item is selected before calling the VBD function, etc are best performed at the source, and so are implemented in the Main class itself. The final layout of the Main class looks like this - with navigation bar on the left and content frames on the right:
Package and Schedule Sub-Frames
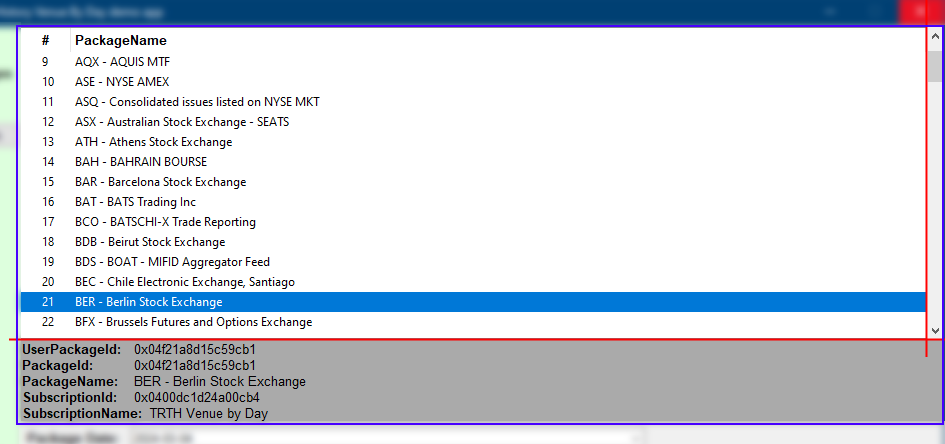
The Package and Schedule subframes are the objects which actually implement the View feature of MVC. These frames are responsible for rendering the data on the display and allow a user to interact with that data. The response message from the VBD REST API is in JSON format. When presented with this data, the frames parse the data and display the result in a tabular data format. Ttk Treeview widget in conjunction with Scrollbar widget is used for this data display. Treeview is a standard widget provided for displaying hierarchical data like directories and files etc. Since, our JSON data is flat in nature, it is displayed in a tabular format. Additional widgets are placed on the frame and attached to the Item Selected event of the Treeview to display contextual information about the selection.
The Package frame only displays all the available packages to the user and few additional details about selected package, and looks like this:
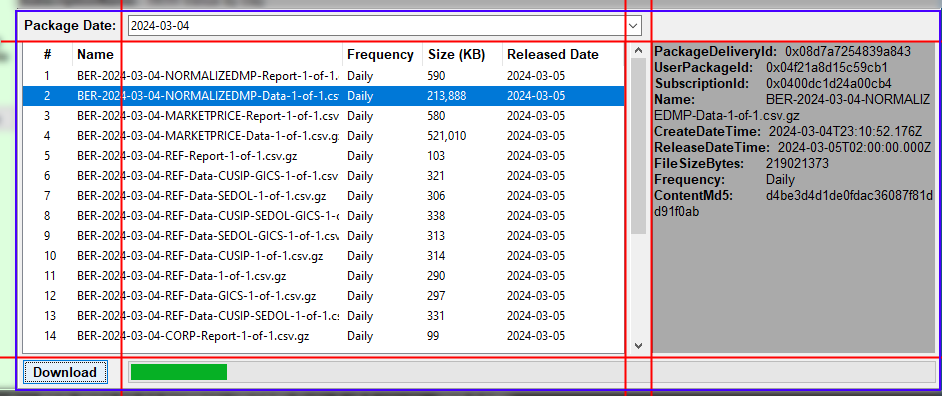
The Schedule frame is more involved, since it allows viewing delivery schedules on a per-date basis and also allows a user to download the selected file. The grid layout of Schedule frame is made up of 3 rows x 4 columns. Most of the widgets are confined to a single cell, but the Treeview, Combobox and Progressbar span multiple cells. The most weight is attached to the cell containing Treeview, so it expands to fill up all the available window space. There are three events raised by the widgets -
- ComboboxSelected - clears the old table data and renders the data for selected date.
- TreeviewSelect - displays additional details about selected item.
- Button click - validates the selection and downloads the VBD file.
The Schedule frame looks like this:
The source code for generating the Package and Schedule frames is similar to the main frame. User can view the complete application source code in the attached GitHub repo.
TickHistory Venue By Day
The TickHistory API and the VBD data is quite well described in the Quickstart, Tutorials and other articles on the developers forum. We will briefly look at the TH class which implements this workflow in Python.
The function _getJsonAsync requests the data from server in an async manner using HTTP-GET. When respond-async is specified in the request header, the server may respond with a status code 202, which implies that the request has been received, but the response is not ready yet. The link to check the updated status of request is presented to client in the Location response header, and should be tried after a while. When the response status changes to HTTP 200, this means the data is ready on the server and can be read from the response body. All the responses from TickHistory REST API are in JSON format.
# Tickhistory REST-GET function
def _getJsonAsync(self, uri):
dResp = requests.get(uri, headers=self.hdrs)
# is it a 202 (in progress)
while dResp.status_code == 202:
self.controller.setMsg("waiting for response...")
# check if the response completed yet
nURL = dResp.headers['Location']
dResp = requests.get(nURL, headers=self.hdrs)
if (dResp.status_code == 200):
return dResp.json(), ''
else:
# return error message
return None, dResp.json()
The very first step in connecting to TickHistory is to log-in to the server. The login function, exchanges the user credentials for an OAuth access token. This token should be used in all subsequent data calls to the server - hence this function permanently adds it to the outgoing HTTP request header.
def login(self, username, password):
...
if (dResp.status_code == 200):
aToken = dResp.json()['value']
# keep a copy of the oAuth token for other calls
self.hdrs["Authorization"] = "Token " + aToken
return aToken, ''
else:
return None, dResp.json()['error']['message']
Other important function in the TH class is downloadFile. Each VBD file is uniquely identified by a Delivery ID. The download function takes in the Delivery ID of the selected schedule. The file can be either downloaded directly from LSEG TickHistory or from AWS cloud by specifying an optional parameter in the call to this function. The parameter stream signals that we would like to read the data as it arrives.
The VBD files can be huge - up to few GigaBytes in size. To avoid running out of memory, we specify that data not be decompressed on the fly. The whole compressed file is written to the disk in chunks and then a user can use file utilities like gzip or 7zip to decompress the file.
def downloadFile(self, view, deliveryID, fileName, fileSize, downloadFromAWS=True):
...
if downloadFromAWS:
downloadHdrs['X-Direct-Download'] = 'true'
dResp = requests.get(uri, headers=downloadHdrs, stream=True)
# do not auto decompress the data
dResp.raw.decode_content = False
...
The TH class invokes the setProgress(%) of the view to update the file download progress. This interface must be provided by the application which calls the downloadFile function.
Summary
Python GUI toolkits are a powerful option for developing user applications which are also cross platform. The biggest challenge is understanding the intricacies of widget layout managers. Once the developer has the grasp on these concepts, or uses 3rd party layout designers, which drag and drop widgets, it becomes an easy task to hook up events and data to the application.
Here is the screenshot of the same application running on Linux (CentOS) without any code modifications:
To view the complete source code of the application described here, please visit the LSEG GitHub Repository.
Get In Touch
SOURCE CODE
Request Free Trial
Call your local sales team
Americas
All countries (toll free): +1 800 427 7570
Brazil: +55 11 47009629
Argentina: +54 11 53546700
Chile: +56 2 24838932
Mexico: +52 55 80005740
Colombia: +57 1 4419404
Europe, Middle East, Africa
Europe: +442045302020
Africa: +27 11 775 3188
Middle East & North Africa: 800035704182
Asia Pacific (Sub-Regional)
Australia & Pacific Islands: +612 8066 2494
China mainland: +86 10 6627 1095
Hong Kong & Macau: +852 3077 5499
India, Bangladesh, Nepal, Maldives & Sri Lanka:
+91 22 6180 7525
Indonesia: +622150960350
Japan: +813 6743 6515
Korea: +822 3478 4303
Malaysia & Brunei: +603 7 724 0502
New Zealand: +64 9913 6203
Philippines: 180 089 094 050 (Globe) or
180 014 410 639 (PLDT)
Singapore and all non-listed ASEAN Countries:
+65 6415 5484
Taiwan: +886 2 7734 4677
Thailand & Laos: +662 844 9576