
-
 Raksina SamasiriDeveloper Advocate
 -
 Yao Koffi KouassiSolutions Consultant
Introduction
Writing a Python script that retrieves data from the data platform is often the first milestone for developers using the Data Library.
The next challenge is usually operational rather than technical:
How can I run the script automatically every day without manually opening a terminal and executing it?
Whether you're generating daily reports, updating watchlists, refreshing dashboards, or exporting market data, automation can save time and eliminate repetitive tasks.
In this article, we'll build a simple automation workflow using:
- The Data Library for Python
- LSEG Workspace (for the Desktop Sessions of Data Library)
- A Windows batch file
- Windows Task Scheduler
The example intentionally keeps the implementation simple so that you can understand the core automation pattern and then adapt it to your own workflow. The project is designed as a bare minimum demonstration consisting of a Python script, a batch file, and Task Scheduler configuration examples.
A Note Before We Begin
This article was inspired by a question we frequently receive from developers:
"I already have a Python script that uses the Data Library. Can I run it automatically every morning?"
The solution presented here demonstrates one way to automate that workflow using LSEG Workspace, a Windows batch file, and Windows Task Scheduler.
While this approach works well for many personal, departmental, and proof-of-concept workflows, it should be viewed as a practical example rather than an officially recommended LSEG scheduling architecture.
As with any automated process, be sure to evaluate the operational, security, monitoring, and support requirements of your own environment before moving to production.
Disclaimer
This example demonstrates a desktop session automation workflow for individual users. Customers should confirm that their intended usage complies with their Workspace subscription, user entitlements, and any applicable market data agreements before deploying automated solutions in production.
Prerequisites
Before getting started, ensure that you have:
- Windows 10 or Windows 11
- Python 3.9+
- LSEG Workspace installed
- LSEG Data Library for Python
This example uses a Desktop Session, so Workspace must be installed and authenticated before the Python script can connect successfully.
Solution Overview
The workflow looks like this:
Windows Task Scheduler |
The idea is straightforward:
- Task Scheduler launches a batch file.
- The batch file starts Workspace and waits for initialization.
- The Python script retrieves data using the Data Library.
- Results are saved locally.
Project Structure
The implementation guide provides a quick start path, while additional documentation explains scheduling and production considerations.
The project contains the following files:
Step 1: Create a Simple Data Retrieval Script
The heart of the workflow is a small Python script.
The example script:
- Opens an LSEG session
- Retrieves market data for IBM and Microsoft
- Retrieves the closing price field
- Saves the results to a date-stamped CSV file
- Returns a success or failure exit code
The actual project includes basic exception handling to return either a success (0) or failure (1) exit code.
The simplified version looks like this:
Step 2: Test the Script Manually
Before introducing automation, always test the script manually.
You should see a CSV file generated in the working directory.
This step helps verify:
- Workspace connectivity
- Data Library access
- File creation
- Permissions
Always confirm the script works manually before attempting to automate it.
Step 3: Create a Batch File
Next, create a Windows batch file that launches LSEG Workspace and executes your Python script.
In this example, the batch file performs three actions:
- Launches LSEG Workspace
- Waits for Workspace to initialize
- Runs the Python script
Create a file named: run_market_data.bat
with the following content:
Understanding the Batch File
Launch Workspace
This starts LSEG Workspace.
Since this example uses a Desktop Session, Workspace must be running and authenticated before the Data Library can connect.
Note: The installation path may differ depending on your environment. Update the path if Workspace is installed elsewhere. And please login to the Workspace before running the script
First-Time Setup
Before scheduling the script for the first time, launch Workspace manually and sign in with your account.
When signing in, enable the: "Sign me in automatically" option shown on the Workspace login screen.
This allows Workspace to automatically restore your authenticated session when launched by the batch file, avoiding the need for manual login each time the scheduled task runs.
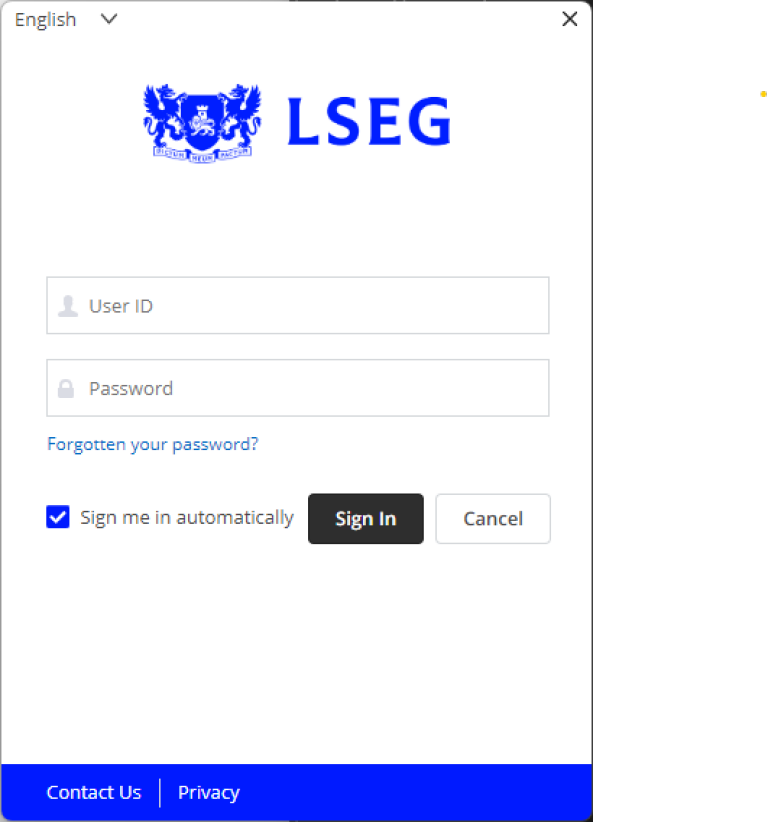
Without automatic sign-in enabled:
- Workspace may stop at the login screen
- The Desktop Session may not initialize
- The Python script may fail to connect to the Data Platform
Important: Test the workflow manually at least once after enabling automatic sign-in. Verify that launching Workspace automatically signs you in before configuring Windows Task Scheduler.
Wait for Initialization
This gives Workspace time to start and establish the necessary session.
Depending on your machine and environment, you may need to increase or decrease the delay.
Run Python
Using the Correct Python Environment
One of the most common issues when scheduling Python scripts is that Windows Task Scheduler executes a different Python interpreter than the one you used during development.
For example:
- The Data Library may be installed in a Conda environment
- The scheduled task may execute the system Python installation
- The script then fails because required packages cannot be found
To avoid this problem, always ensure that the batch file uses the same environment that was used to develop and test the script.
Option 1: Conda Environment
If you're using Conda, activate the environment before running the script.
(In this example Conda environment named "ldlib" is being used, you can check available Conda environments by running command "conda env list")
Example script:
Option 2: Virtual Environment (venv)
If you're using a virtual environment, call the Python executable directly.
Typical virtual environment paths look like any of the below:
- C:\Projects\venv\Scripts\python.exe
- C:\Users\username\project\.venv\Scripts\python.exe
Example script:
Option 3: Conda Environment Using Full Path
Instead of activating the environment, you can execute its Python interpreter directly.
This approach is often more reliable when running through Task Scheduler because it does not depend on Conda initialization.
Example script:
Option 4: Base Python Installation
If the Data Library is installed in your main Python installation, you can execute Python directly.
or, if Python has already been added to the system PATH.
Using the full Python path removes ambiguity and ensures that the scheduled task always uses the expected environment.
Note: If the scheduled task fails with messages such as ModuleNotFoundError: No module named 'lseg', the task is likely using a different Python interpreter than the one where the Data Library was installed. The first thing to verify is the Python executable being used by the batch file.
Step 4: Test the Batch File
Before scheduling anything, execute the batch file "run_market_data.bat" manually, then
Verify that:
- Workspace launches
- The Python script runs
- Market data is retrieved
- CSV files are created
If this step works successfully, you're ready to move on to scheduling.
Step 5: Configure Windows Task Scheduler
Windows Task Scheduler allows the batch file to run automatically.
Open taskschd.msc
Then Create a task with settings similar to:
The full step-by-step configuration is included in the accompanying Task Scheduler guide.(TASK_SCHEDULER_SETUP.md)
Once configured, Windows will automatically execute the workflow according to the schedule you define.
Example Output
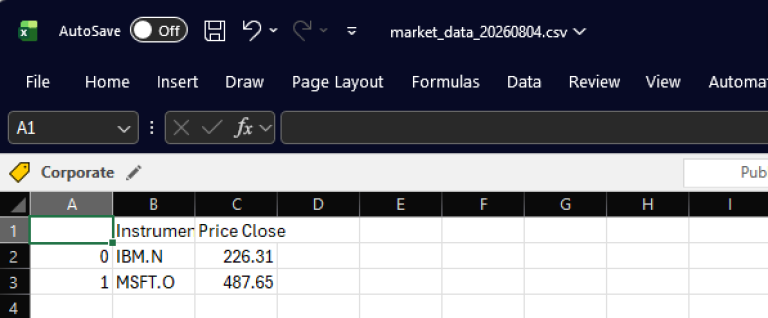
After a successful run, you'll find a date-stamped CSV file such as: market_data_20260804.csv, the generated file can then be used for reporting, analytics, dashboards, or downstream processing.
Example output:
Start Simple, Then Improve
The example project is intentionally minimal. It demonstrates the automation pattern without adding unnecessary complexity. The project documentation outlines several enhancements that should be considered before moving a workflow into production.
Examples include:
- Logging: Replace simple console output with log files.
- Data Validation: Check for:
- Empty datasets
- Missing instruments
- Unexpected row counts
- Configuration Files: Move hard-coded instruments and fields into external configuration files.
- Monitoring and Alerts: Notify users if data retrieval fails.
- Retry Logic: Handle temporary connectivity issues gracefully.
- Unit Testing: Validate expected behaviour before deploying changes.
These enhancements can be introduced incrementally as requirements evolve.
Common Use Cases
Once the automation workflow is working, you can replace the sample request with your own.
Examples include:
- Daily pricing reports
- AI watchlist updates
- Portfolio monitoring
- Economic indicator tracking
- Dashboard refreshes
- Excel exports
- Power BI data feeds
The scheduling mechanism stays exactly the same. Only the Python script changes.
Key Takeaways
- The Data Library can be integrated into automated workflows using Desktop Sessions.
- A simple Windows batch file can launch Workspace and execute Python code.
- Windows Task Scheduler provides an easy way to run jobs on a schedule.
- Using the full path to the Python interpreter helps avoid environment-related issues.
- Start with a simple proof of concept and gradually add production features as needed.
Conclusion
Automation doesn't need to be complicated.
With a small Python script, a batch file, and Windows Task Scheduler, you can transform a manual data retrieval process into a repeatable workflow that runs automatically.
The example shown here is intentionally minimal, making it easy to understand, customize, and extend. Once you've verified the basic workflow, you can gradually add logging, monitoring, validation, and other production features to meet the needs of your environment
- Register or Log in to applaud this article
- Let the author know how much this article helped you
If you require assistance, please
contact us here
Get In Touch

Source Code
Related APIs
Related Articles
-
Check LSEG Data Library for Python Usage Limits Remaining
-
The Data Library for Python - Quick Reference Guide (Access layer)
-
Step-By-Step Guide to install Data Library for Python using Virtual Environment
-
LSEG Data Library for Python: News Pagination
-
LSEG’s Refinitiv Data Library for Python and its Configuration Process
Request Free Trial
Call your local sales team
Americas
All countries (toll free): +1 800 427 7570
Brazil: +55 11 47009629
Argentina: +54 11 53546700
Chile: +56 2 24838932
Mexico: +52 55 80005740
Colombia: +57 1 4419404
Europe, Middle East, Africa
Europe: +442045302020
Africa: +27 11 775 3188
Middle East & North Africa: 800035704182
Asia Pacific (Sub-Regional)
Australia & Pacific Islands: +612 8066 2494
China mainland: +86 10 6627 1095
Hong Kong & Macau: +852 3077 5499
India, Bangladesh, Nepal, Maldives & Sri Lanka:
+91 22 6180 7525
Indonesia: +622150960350
Japan: +813 6743 6515
Korea: +822 3478 4303
Malaysia & Brunei: +603 7 724 0502
New Zealand: +64 9913 6203
Philippines: 180 089 094 050 (Globe) or
180 014 410 639 (PLDT)
Singapore and all non-listed ASEAN Countries:
+65 6415 5484
Taiwan: +886 2 7734 4677
Thailand & Laos: +662 844 9576