| Tutorial Source Code |
Examples:
|
| Last Update | May 2021 |
| .NET/C# Requirements | See Getting Started with .Net. |
| Pre-requisites | Enable the session environment as outlined within the Getting Started guide. To build and run the above examples:
|
Table of contents
Overview
Many popular logging frameworks such as NLog, log4net, Serilog would be more than sufficient to provide basic logging for the Refinitiv Data Library for .Net. The ability to easily define basic logging targets such as sending data to a file, echoing messages to the console, and controlling log levels is expected. In addition, providing a rich set of logging destinations, controlling the format of the output, and providing API access would be ideal. Further, it was also important to consider that applications may choose to use their own logging and not depend nor rely on the chosen library logging framework when building their applications. Based on these and other requirements of the library, the NLog logging framework was chosen.
The following tutorial will provide some examples of configuring the logging within the Refinitiv Data Library for .Net. While there are many features available within the NLog framework, it is the intention of this tutorial to highlight a few useful ones application developers will find beneficial. Feel free to peruse the NLog documentation to discover more advanced usage.
Configuring the logging framework
When building against the library, application developers are not required to provide configuration to see basic logging within the library. By default, the library will create a unique log file with the following naming convention:
RDPLog_<pid>.log
The log will contain basic messages indicating general activity, warnings, errors, etc. A simple example can look like this:
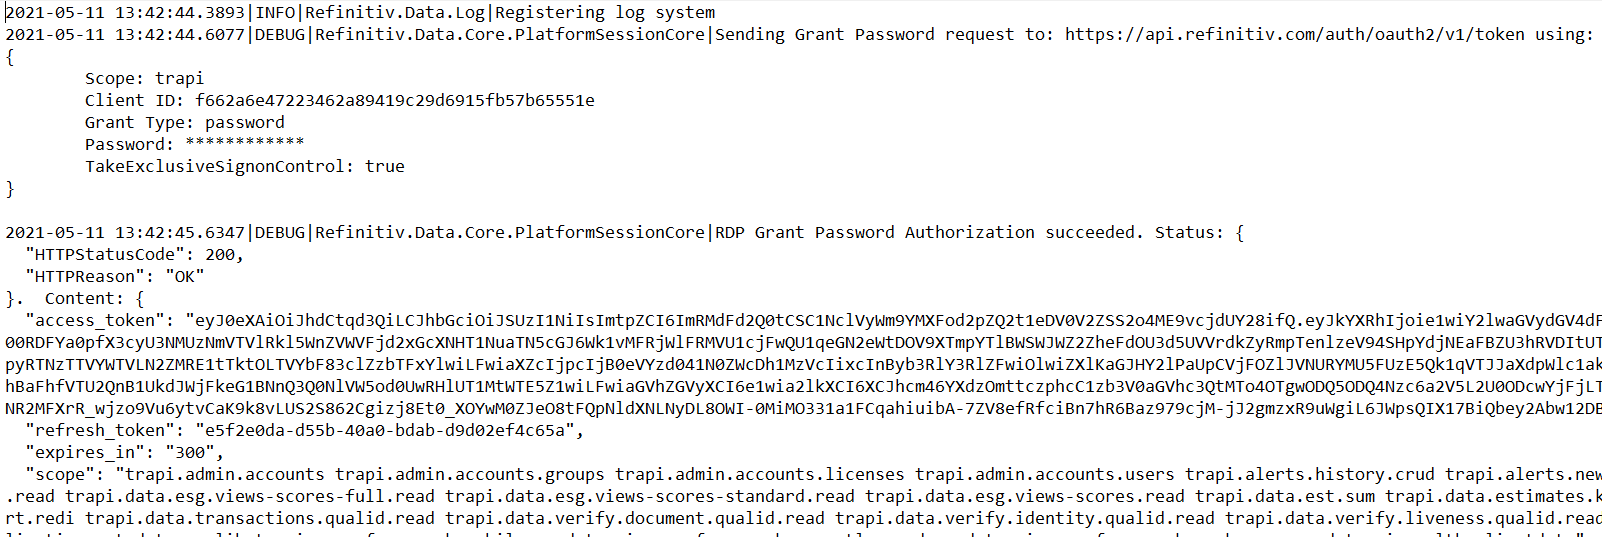
2021-05-06 16:33:03.4097|Info|Refinitiv.Data.Core.PlatformSessionCore|7|PlatformSession (Cloud) successfully authenticated
2021-05-06 16:33:04.1821|Info|Refinitiv.Data.Core.PlatformSessionCore|7|Successfully retrieved 9 streaming endpoints from the service discovery.
2021-05-06 16:33:04.2014|Info|Refinitiv.Data.Delivery.Stream.RDPWebSocket|1|Created IWebSocket Interface: Microsofts ClientWebSocket
2021-05-06 16:33:04.2086|Info|Refinitiv.Data.Delivery.Stream.OMMConnection|1|Streaming Connection initiated using:
Host: amer-3-t3.streaming-pricing-api.refinitiv.com
AuthToken: eyJ0eXAiOiJhdCtqd3QiLCJhbGciOiJSUzI1NiIsImtpZCI6ImRMdFd2Q0tCSC1Ncl...
AuthPosition: 10.46.216.121
ApplicationID: 256
2021-05-06 16:33:04.5607|Info|Refinitiv.Data.Delivery.Stream.OMMConnection|7|Successfully connected into the WebSocket server: amer-3-t3.streaming-pricing-api.refinitiv.com...
2021-05-06 16:33:04.5711|Info|Refinitiv.Data.Delivery.Stream.OMMConnection|7|Sending login request to amer-3-t3.streaming-pricing-api.refinitiv.com
2021-05-06 16:33:05.3019|Info|Refinitiv.Data.Delivery.Stream.OMMConnection|5|Successfully logged into streaming server amer-3-t3.streaming-pricing-api.refinitiv.com
At a minimum, application developers can rely on default logging to provide some basic troubleshooting. However, to override the default, developers can either:
Define a log config file to manage logging behavior
- Utilize the NLog.config configuration file to fine-tune logging within the library - see The NLog.config configuration file.
Programatically configure the logging environment to manage logging behavior
- For example:
using Refinitiv.Data;
...
// Programmatically override the default log level defined for the Refinitiv Data Library.
Log.Level = NLog.LogLevel.Debug;
See Programmatically manage log output below.
The NLog.config configuration file
When you include an NLog configuration file (NLog.config) within the running directory, the Library will automatically override the default logging settings and use those defined within this configuration.
Let's look at the relevant section defined within the configuration file used in our example:
<targets>
<!-- Define a file target for the Refinitiv Library log messages -->
<target xsi:type="File" name="RDPLogFile" fileName="refinitivLib.log" />
</targets>
<rules>
<logger name="Refinitiv.*" minlevel="Debug" writeTo="RDPLogFile" />
</rules>
The above defines a single target (text file) and the rule to reference that target. In this example, the rule specifies that any Debug (or higher) log messages from the "Refinitiv.*" namespace will be sent (appended) to the refinitivLib.log text file.
Note: The Refinitiv.* namespace references all log messages defined within the Refinitiv Data Library for .Net.
Using the NLog framework within your application
When using NLog.config, an application can utilize the NLog framework for its own application use. To do this, we simply add a new target and rule within the configuration file. For example:
<targets>
<!-- Define a file target for the Refinitiv Library log messages -->
<target xsi:type="File" name="RDPLogFile" fileName="refinitivLib.log" />
<!-- Define a file target for the Application log messages. Override the default output format by
specifying a new layout -->
<target xsi:type="File" name="ApplicationLogFile" fileName="application.log"
layout="${longdate} ${level} ${message}" />
</targets>
<rules>
<!-- Instruct the application to define 2 log targets. One for our main application, one for the
Data Library. The 'name' parameter filters the namespace to control the destination of log
messages.
-->
<logger name="_4._0._02_LogConfig.*" minlevel="Info" writeTo="ApplicationLogFile" />
<logger name="Refinitiv.*" minlevel="Debug" writeTo="RDPLogFile" />
</rules>
In the above configuration, we've added a new target (text file) that will capture log messages used exclusively within our application. In addition, we modified the default format of each log message by specifying a layout.
To enable logging, a new rule has been added which specifically targets the application namespace (_4._0._02_LogConfig.). With this rule, we chose to simply capture log messages with a level of Info (or higher).
Using multiple rules, we can effectively separate areas within our application that log messages and send that output to specific targets.
How to use logging within an application
In order to use logging within your application, you need to specify a Logger within each source file as:
private static readonly NLog.Logger logger = LogManager.GetCurrentClassLogger();
and start logging messages using the following syntax:
logger.Info("Application launched. Attempting to create our session...");
This is what our application looks like:

Building and Running the Application
Within the source code package, select the 4.0.02-Log-Config example within the Delivery section. Follow the general instructions outlined within the pre-requisite section to configure, build, and run.
The expected output should look similar to this:

This will confirm the application simply opened/closed a session. What we're really interested in here is where our log messages were sent. Looking within the output directory, you should see 2 log files - as we defined within our configuration log:
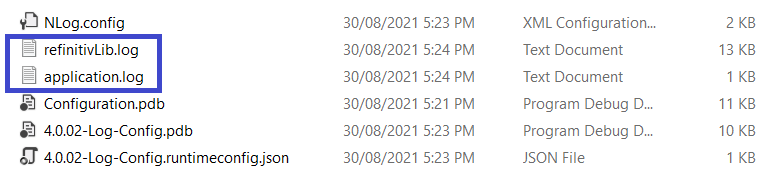
Our application log should contain a couple of entries:

And our log file will contain Debug, Info, Warning, or Error log messages. For example:
It's worth pointing out that the format of the output within each log is different. If you recall from our configuration, when we defined our application target, we provided a layout. You can see the difference between the layout we defined and the default when comparing both output results.
Programmatically manage log output
Application developers may need to provide more advanced usage when dealing with log messages generated from the Data Library for .Net. For example, when debugging applications or monitoring specific elements while an application is running, there may be the need to change the log levels at runtime. In addition, applications may require that all log messages be consumed by their own logging frameworks or monitoring displays. In these situations, providing a simple API will enable these features.
The Data Library for .Net provides a very simple interface to support the basic features to programmatically manage log output within the library.
Log Level
// Library Log Level getter/setter
NLog.LogLevel Log.Level {get; set;}
// Eg: Set the log level to Debug
Log.Level = NLog.LogLevel.Debug;
// Eg: Get the current log level
NLog.LogLevel level = Log.Level;
// Intercept all library log messages within a application lambda expression
Action<NLog.LogEventInfo, object[]> Log.Output {get; set;}
// Eg: Capture all library log messages and print to the console
Log.Output = (logInfo, obj) => Console.Writeline($"{logInfo.FormattedMessage}");
Note: It's worth noting that applications can utilize configuration to implement a similar solution. Refer to the MethodCall target documentation.
Utilizing the above API features, this is what our application looks like:

Building and Running the Application
Within the source code package, select the 4.0.01-Log-Api example within the Delivery section. Follow the general instructions outlined within the pre-requisite section to configure, build, and run.
Depending on the type of session you defined, the expected output should look similar to this:

Because we instructed the lambda expression to send log output to the console, we are presented with mixed output from both the application as well as log messages generated from the API Library. Any message not highlighted in yellow represents the log output from the Library.
While this is a simple demonstration of intercepting log messages from the library, applications can utilize this capability to control how they want to manage these messages.