.Net SDK Tutorial 2: Retrieving VBD files
| Last update | Jan 2026 |
| Environment | Windows |
| Language | C# |
| Compilers | Microsoft Visual Studio |
| Prerequisites | DSS login, internet access, having done the previous tutorial |
| Source code | Download .Net SDK Tutorials Code |
Tutorial purpose
This is the second tutorial in a series of .Net SDK tutorials. It is assumed that the reader has acquired the knowledge delivered in the previous tutorial before following this one.
In this one we follow a simple scenario: download the latest Venue by Day (VBD) files of interest, once a day, for a set of exchanges:
- Retrieve the list of user packages for which we have permission (for the VBD subscription this corresponds to the list of venues, i.e. exchanges).
- Select a few, based on a list of exchange names we are interested in.
- For each selected user package, we:
- Retrieve the full list of users package deliveries (data files);
- Select those with the most recent date (i.e. the previous or current day);
- Select those where the file type is in our list of interest;
- Retrieve and save those files to local disk.
These steps illustrate a typical use case and use the API calls, except the filtering steps which do not require the API.
Table of contents
- Additional details on the prerequisites
- Getting ready
- Domain objects: explanations
- Understanding the code
- Building and running the code
- Code run results
- Understanding the refactored version
- Conclusions
Additional details on the prerequisites
An installed copy of Microsoft Visual Studio is required to experiment with the code.
A DSS user account (user name and password) is required, because the API uses it to authenticate to the server. These username and password will be provided to LSEG Tick History customers and are valid in the API and the GUI.
An internet connection is required to download the software, and run it, as it connects to the DataScope server.
If you have not yet gone through Tutorial 1, which includes the installation of the SDK and the code of all tutorials, do it now before proceeding further.
Getting ready
Opening the solution
The code installation was done in Tutorial 1.
Opening the solution is similar to what was done in Tutorial 1:
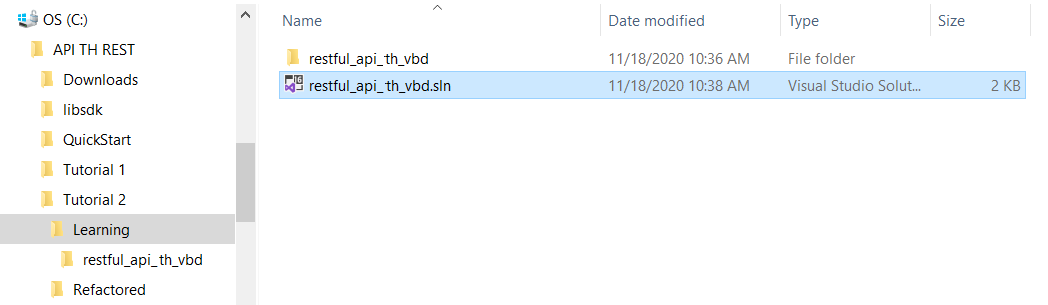
- Navigate to the \API TH REST\Tutorial 2\Learning folder.
- Double click on the solution file restful_api_th_vbd.sln to open it in Microsoft Visual Studio:
Referencing the DSS SDK
Before anything else, you must reference the LSEG Tick History REST API .Net SDK in the Microsoft Visual Studio project.
Important: this will have to be done again for every single tutorial, for both the learning and refactored versions.
In Microsoft Visual Studio, in the Solution Explorer, right click on the References folder, select Add Reference...
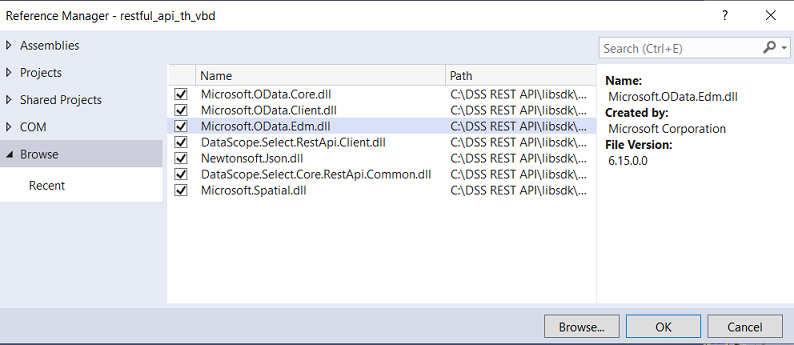
If you are running this tutorial just after the previous one, the reference manager will directly display the list of DLL files:

If that is the case, just select all 7 DSS SDK DLL files by clicking the selector box for each one, then click on OK:
If the 7 DSS SDK DLL files are not displayed, then reference the DSS SDK by following the instructions in Tutorial 1, under section: Referencing the LSEG Tick History SDK.
Viewing the C# code
In Microsoft Visual Studio, in the Solution Explorer, double click on Program.cs and on DssClient.cs to display both file contents. Each file will be displayed in a separate tab:
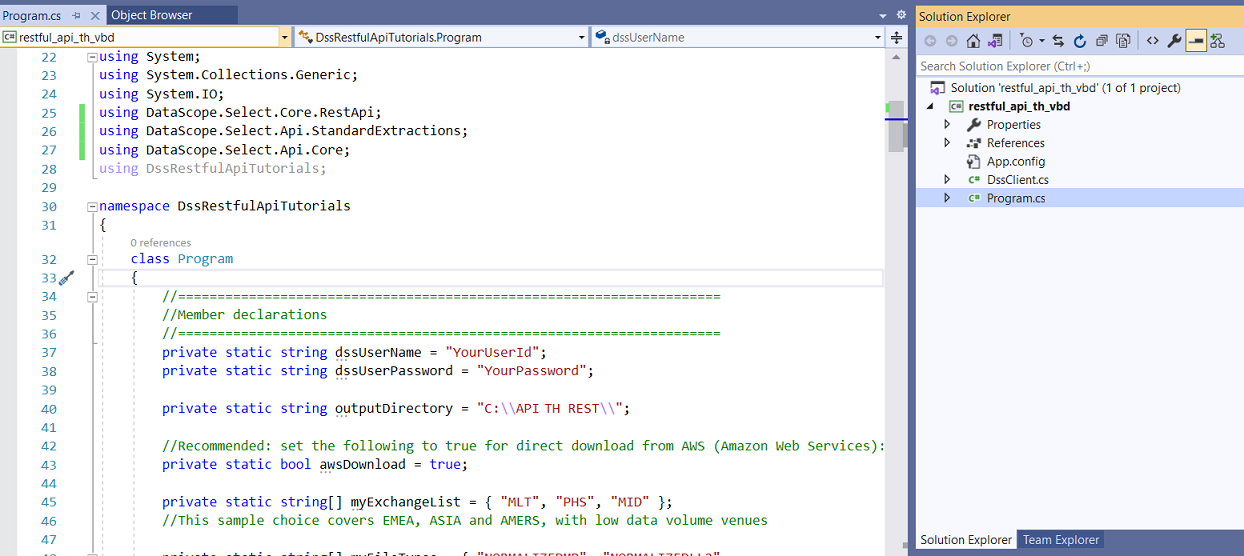
private static string dssUserName = "YourUserId";
private static string dssUserPassword = "YourPassword";
Important reminder: this will have to be done again for every single tutorial, for both the learning and refactored versions.
Failure to do so will result in an error at run time (see Tutorial 1 for more details).
Domain objects: explanations
This section explains some key concepts, illustrated with the relevant API calls. These concepts are essential to understand the code. For more information, refer to the API User Guide.
Subscriptions
An account can have permission for one or several subscriptions, like Ownership and Profiles, StreetEvents, Insider, or Venue by Day.
Each subscription has a subscription Id and name, which does not change. For Tick History Venue by Day they are 0x0400dc1d24a00cb4 and Venue by Day respectively.
Code to retrieve the list of all subscriptions (regardless of permissions), and display their Ids and names:
IDssEnumerable<Subscription> subscriptions =
StandardExtractionsContext.SubscriptionOperations.GetAll();
foreach (Subscription subscription in subscriptions)
Debug.WriteLine(subscription.SubscriptionId + " " + subscription.Name);
Packages
Each subscription delivers a set of packages. For the Venue by Day subscription the package list is the list of venues (exchanges or data providers).
Each package has a package Id.
Code to retrieve the list of all available packages for all subscriptions, and display all package Ids and names:
IDssEnumerable<Package> packages = StandardExtractionsContext.PackageOperations.GetAll();
foreach (Package package in packages) Debug.WriteLine(package.PackageId + " " + package.Name);
Code to retrieve all available packages for a specific subscription Id:
IDssEnumerable<Package> packages = StandardExtractionsContext.PackageOperations.GetPackagesBySubscriptionId(subscription.SubscriptionId);
Code to retrieve the list of all user packages, i.e. packages to which I am entitled (for all subscriptions), and display the user package Id, user package name and the corresponding subscription name:
IDssEnumerable<UserPackage> userPackages = StandardExtractionsContext.UserPackageOperations.GetAll();
foreach (UserPackage userPackage in userPackages)
{
Debug.WriteLine("{0} {1} ({2})", userPackage.UserPackageId, userPackage.PackageName,
userPackage.SubscriptionName);
}
This tutorial uses this last method.
Package deliveries
Package deliveries are data files.
For Venue by Day, these are of several file types:
- Market data file types, formatted or raw:
- NORMALIZEDMP Tick-by-tick: Auction, Correction, Market Condition, Quote and Trade
- NORMALIZEDLL2 Market by price (25 levels)
- MARKETPRICE NORMALIZEDMP in raw format
- LEGACYLEVEL2 NORMALIZEDLL2 in raw format
Formatted files are the preferred choice as they do not require subsequent treatment by the developer.
- Other file types:
- CORP Corporate Actions: dividend, earning, capital change, share type & stock split
- REF Asset specific reference data: metadata, terms & conditions, symbology changes, etc.
- Instruments All the venue’s active instruments. Based on your entitlements, you will receive 1 or more files.
Some file types include not only a data file but also an associated report file that mentions if an instrument was inactive, or its period of activity. Market data is usually active (except for banking holidays and non volatile instruments). Corporate actions and reference data are usually inactive. Here is a small extract for market data:
#RIC,Start (UTC),End (UTC),Status,Details,Count
ABS.MW,,,Inactive,,0
IBM.MW,2016-06-09T05:00:00.605323202Z,2016-06-09T20:00:00.618220426Z,Active,,51
Code to retrieve the list of all user package deliveries for a specific subscription Id and a specific date range, and display the file names and sizes:
DateTime fromDate = DateTime.UtcNow.AddDays(-5);
DateTime toDate = DateTime.UtcNow.AddDays(1);
IDssEnumerable<UserPackageDelivery> userPackageDeliveries =
StandardExtractionsContext.UserPackageDeliveryOperations.GetUserPackageDeliveriesByDateRange(subscription.SubscriptionId, fromDate, toDate);
foreach (UserPackageDelivery userPackageDelivery in userPackageDeliveries)
{
Debug.WriteLine("{0} ({1} bytes)", userPackageDelivery.Name, userPackageDelivery.FileSizeBytes);
}
The servers keep VBD files for 30 days; after that they are discarded.
Code to retrieve the list of all user package deliveries for a specific user package Id, and display the file names and sizes:
IDssEnumerable<UserPackageDelivery> userPackageDeliveries = StandardExtractionsContext.UserPackageDeliveryOperations.GetUserPackageDeliveriesByPackageId(userPackage.PackageId);
foreach (UserPackageDelivery userPackageDelivery in userPackageDeliveries)
{
Debug.WriteLine("{0} ({1} bytes)", userPackageDelivery.Name, userPackageDelivery.FileSizeBytes);
}
This tutorial uses this last method.
Other methods to retrieve user package deliveries (lazy loading, paging and change tracking) are illustrated in the REST API C# example application that was presented in the Quick Start.
Understanding the code
We shall only describe what is new versus the previous tutorial, and leave out some easy code segments not related to the API calls.
DssClient.cs
This is nearly the same as the refactored version of Tutorial 1, except for the leading comment, and the fact that we must expose our standard extractions context to our main program:
//standardExtractionsContexttemporarily set to public, to expose it to our learning program.
public StandardExtractionsContext standardExtractionsContext;
The reason for this lies in the way we coded our main program: as most DSS API calls were put in the learning version of the code (to make it easier to follow), the main program requires access to the extractions context.
No additional explanations are required as the rest of the code was described in Tutorial 1.
Program.cs
The aim is to download the latest Venue by Day (VBD) files of interest, once a day, for a set of exchanges.
Main steps:
- Initialisation and file types choice
- Retrieve the list of (all) user packages
- Select the VBD user packages
- Filter the list based on exchange code (optional)
- Retrieve the list of user package deliveries (data files)
- Select the user package deliveries with the most recent date
- Select the user package deliveries, based on file type (optional)
- Retrieve and save the selected user package deliveries to local disk
Initialisation and file type choice
At the top of the code we see the using directives. As we are using a whole set of API calls, several using directives are required to give us access to the types of the DSS API namespace, so that we do not have to qualify the full namespace each time we use them. As in Tutorial 1, these are followed by a using directive referring to the namespace of our code:
using System;
using System.Collections.Generic;
using System.IO;
using DataScope.Select.Core.RestApi;
using DataScope.Select.Api.StandardExtractions;
using DataScope.Select.Api.Core;
using DssRestfulApiTutorials;
The first member declaration defines the output directory where we will save the downloaded files:
private static string outputDirectory = "C:\\API TH REST\\";
The second member declaration is related to where we want to download the data from. It is now possible to choose to download the data file either from the LSEG Tick History servers, or directly from the AWS (Amazon Web Services) cloud. It is recommended to use AWS as it delivers faster downloads:
private static bool awsDownload = true;
For this example code we want to avoid downloading VBD data for all the exchanges we are entitled for, as it could result in a long runtime. That is why we define a small list of exchanges for which we want to download VBD data. We use standard 3 letter exchange codes, which will serve to filter the available user packages:
private static string[] myExchangeList = { "MLT", "PHS", "MID" };
Depending on the user packages you are entitled to (they will be displayed in a following steps of this tutorial), you may need to change this list to get some data.
Next we define which VBD file types we want to retrieve. For our example we take all files except those in raw format:
private static string[] myFileTypes = { "NORMALIZEDMP", "NORMALIZEDLL2",
//"MARKETPRICE", "LEGACYLEVEL2",
"CORP", "REF", "Instruments" };
In the main code block, after connecting to the server, we expose the standard extractions context from DssClient (to avoid having to use the dssClient. prefix before each use of standardExtractionsContext):
StandardExtractionsContext standardExtractionsContext = dssClient.standardExtractionsContext;
As an added precaution we check if the output directory exists:
if (!DirectoryExists(outputDirectory)) { return; } //Exit main program
IDssEnumerable<UserPackage> userPackages = standardExtractionsContext.UserPackageOperations.GetAll();
Next the entire list is displayed for debugging:
foreach (UserPackage userPackage in userPackages)
{
Console.WriteLine("{0} - {1} - Id: {2}",
userPackage.SubscriptionName, userPackage.PackageName, userPackage.PackageId);
}
Extract of the output, showing the subscription name, package name (the 3 letter venue code followed by the full name) and hexadecimal package Id for 2 venues:

Note: now that you have the list of user packages you are entitled to, you can change the values in myExchangeList if required, to ensure this sample code will download some data for you.
Select the VBD user packages
The results of the previous call include all packages for all subscriptions we are entitled to, so we shall start by selecting only those where the subscription name is Venue by Day.
This is simply done with a string comparison on the subscription name (the code is included in the next section).
Filter the list based on exchange code (optional)
For this example we shall also filter the results to a small list of exchanges (defined in myExchangeList), using a string comparison on the package name, which starts with the 3 letter code of the venue. The purpose is to avoid the tutorial code running for a very long time and downloading huge amounts of data. The result is saved in a new list of selected user packages:
List<UserPackage> selectedUserPackages = new List<UserPackage>();
foreach (UserPackage userPackage in userPackages)
{
if (userPackage.SubscriptionName == "TRTH Venue by Day")
{
foreach (string exchange in myExchangeList)
{
if (userPackage.PackageName.StartsWith(exchange))
{
selectedUserPackages.Add(userPackage);
}
}
}
}
In a real use case this second filtering would usually not be required, as the permissioning should reflect the data needs.
After that the selected list is displayed for debugging (code not shown above). Result:

Note: one could be tempted to consider that the contents of this list will not change, and to just save it instead of using calls to retrieve it. This is not recommended, as permission changes would not be taken into account !
Retrieve the list of user package deliveries (data files)
For each selected user package, we retrieve the full list of user package deliveries (data files):
foreach (UserPackage userPackage in selectedUserPackages)
{
IDssEnumerable<UserPackageDelivery> userPackageDeliveries =
standardExtractionsContext.UserPackageDeliveryOperations.GetUserPackageDeliveriesByPackageId
(userPackage.PackageId);
DebugPrintUserPackageDeliveries(userPackageDeliveries, userPackage);
The servers keep VBD files for 30 days; after that they are discarded.
Next the entire list of package deliveries (per user package, i.e. venue) is displayed for debugging:
foreach (UserPackageDelivery userPackageDelivery in userPackageDeliveries)
{
Console.WriteLine("{0} ({1} bytes)", userPackageDelivery.Name, userPackageDelivery.FileSizeBytes);
}
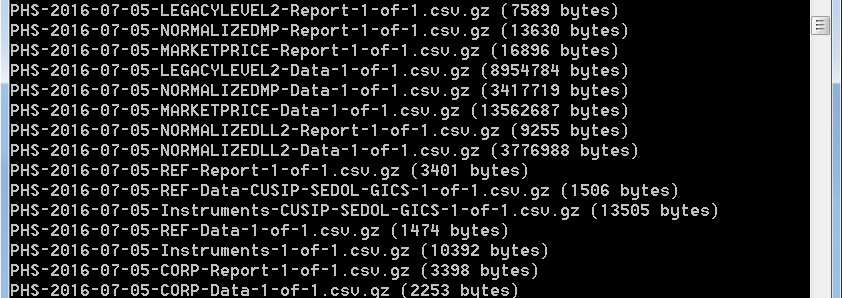
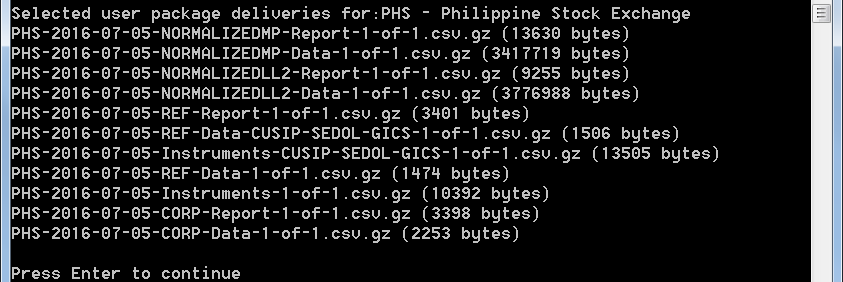
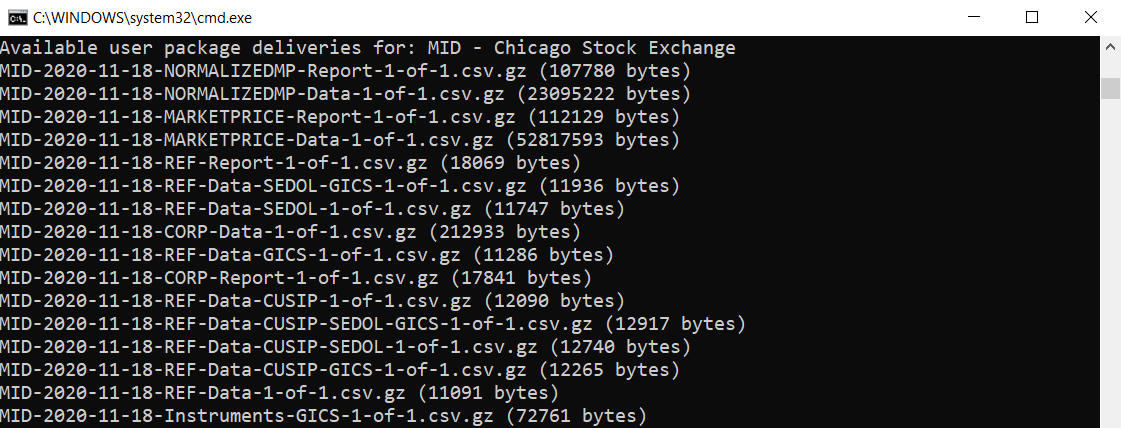
Extract of the output, showing all the package delivery names (and file sizes) for one venue and one specific day. Note the different file types, and the presence of data and report files:
Select the user package deliveries with the most recent date
In this example code we decided to automatically find the most recent data set, per exchange. This is just an example; other workflows can be implemented to fit whatever use case you require. The REST API C# example application described in the Quick Start illustrates other ways of proceeding, like requesting package deliveries by date range, or change tracking to detect new files. It also shows how to manage paging in case the number of results is very large.
Venue by Day data for a specific exchange is made available after the exchange has closed. Depending on the relative geographic location, time of day and time zone of the exchange and the computer where the call is run, the most recent data could be dated of the current or previous day.
To detect the most recent data set, we simply use a string comparison between the package delivery names and a date. We start with today’s date, for the case where data is already available. If this delivers no results we try yesterday’s date:
List<UserPackageDelivery> latestUserPackageDeliveries = new List<UserPackageDelivery>();
//First, try for today:
DateTimeOffset dateTimeToday = DateTimeOffset.Now;
string today = dateTimeToday.ToString("yyyy-MM-dd");
foreach (UserPackageDelivery userPackageDelivery in userPackageDeliveries)
{
if (userPackageDelivery.Name.Contains(today))
{
latestUserPackageDeliveries.Add(userPackageDelivery);
}
}
//If today delivers no results, then try for yesterday:
DateTimeOffset dateTimeYesterday = dateTimeToday.AddDays(-1);
string yesterday = dateTimeYesterday.ToString("yyyy-MM-dd");
if (latestUserPackageDeliveries.Count == 0)
{
foreach (UserPackageDelivery userPackageDelivery in userPackageDeliveries)
{
if (userPackageDelivery.Name.Contains(yesterday))
{
latestUserPackageDeliveries.Add(userPackageDelivery);
}
}
}
Next the results are displayed for debugging.
Select the user package deliveries, based on file type (optional)
File types were described above under section: Package deliveries. Depending on the use case, maybe only a subset of the files might be required. The choice would typically be based on either or both of:
- The file type
Formatted files are the preferred choice as they do not require subsequent treatment by the developer; the raw ones are rarely required. - Report files
These deliver additional information on instruments (in)activity, but require additional processing.
In this example code we decided to create a simple filter on the file type. We simply make a string comparison between the package delivery names and a list of file type names we are interested in (defined in myFileTypes):
List<UserPackageDelivery> selectedUserPackageDeliveries = new List<UserPackageDelivery>();
foreach (UserPackageDelivery userPackageDelivery in latestUserPackageDeliveries)
{
foreach (string fileType in myFileTypes)
{
if (userPackageDelivery.Name.Contains(fileType))
{
selectedUserPackageDeliveries.Add(userPackageDelivery);
}
}
}
Next the results are displayed for debugging (code not shown above):
if (awsDownload) { standardExtractionsContext.DefaultRequestHeaders.Add("x-direct-download", "true"); };
foreach (UserPackageDelivery userPackageDelivery in selectedUserPackageDeliveries)
{
Console.WriteLine("Download: {0} ({1} bytes)",
userPackageDelivery.Name, userPackageDelivery.FileSizeBytes);
using (DssStreamResponse response =
standardExtractionsContext.UserPackageDeliveryOperations.GetReadStream
(userPackageDelivery.PackageDeliveryId))
{
using (FileStream fileStream = File.Create(outputSubdirectory + userPackageDelivery.Name))
response.Stream.CopyToAsync(fileStream).Wait();
}
}
if (awsDownload) { standardExtractionsContext.DefaultRequestHeaders.Remove("x-direct-download"); };
As the additional header is only for data downloads, at the end we remove it from the default request header.
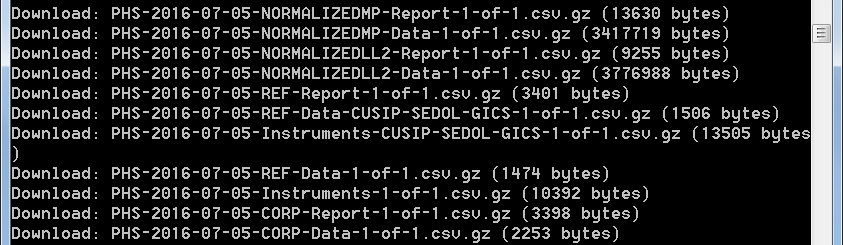
Screen output:
Building and running the code
Build
Open the top menu BUILD, and click on Rebuild Solution. This will check your code for errors, and prepare it to run:
In the lower part of the screen you should get a success message:
If there are errors, they will be displayed and highlighted in the code. Errors must be corrected before the code can run.
Run
Click on Debug -> Start Without Debugging to run the code.
Code run results
Successful run
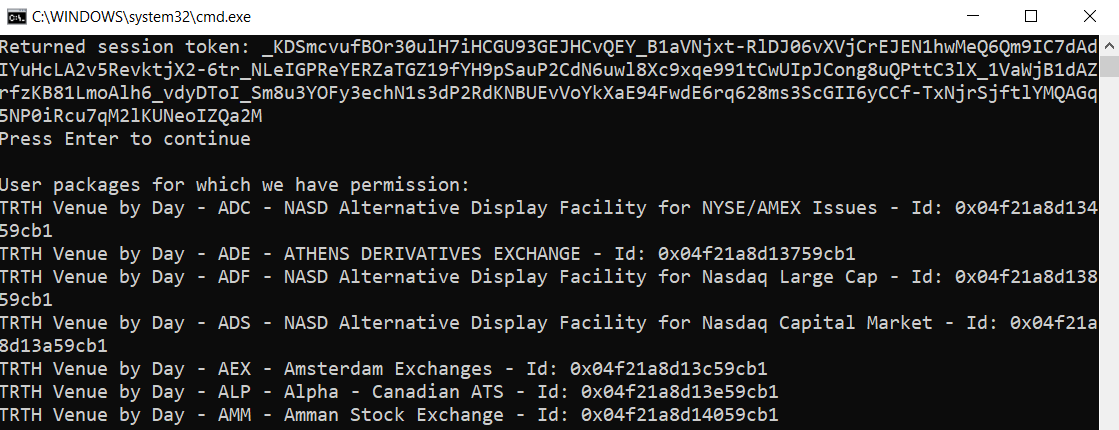
At run time the session token is displayed, that means we have successfully logged into the REST API.
After that the list of user packages for which we have permission is displayed. Note the first user package is Insider, not Venue by Day, because the account we used is entitled for both:
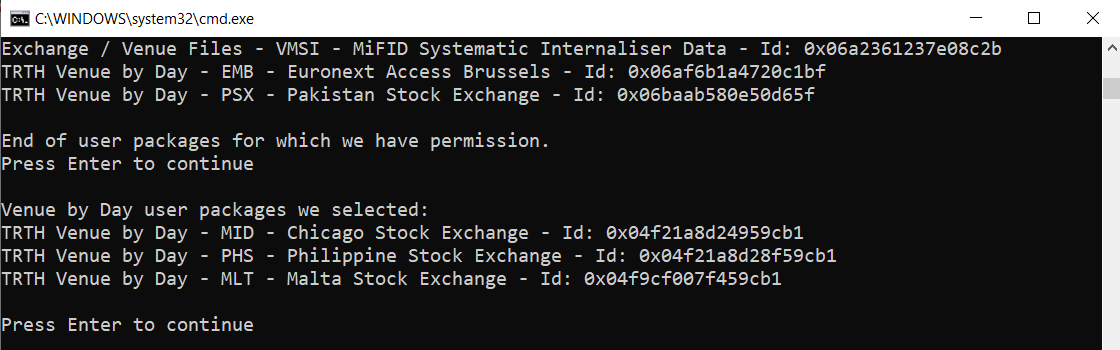
It will be followed by those we selected:
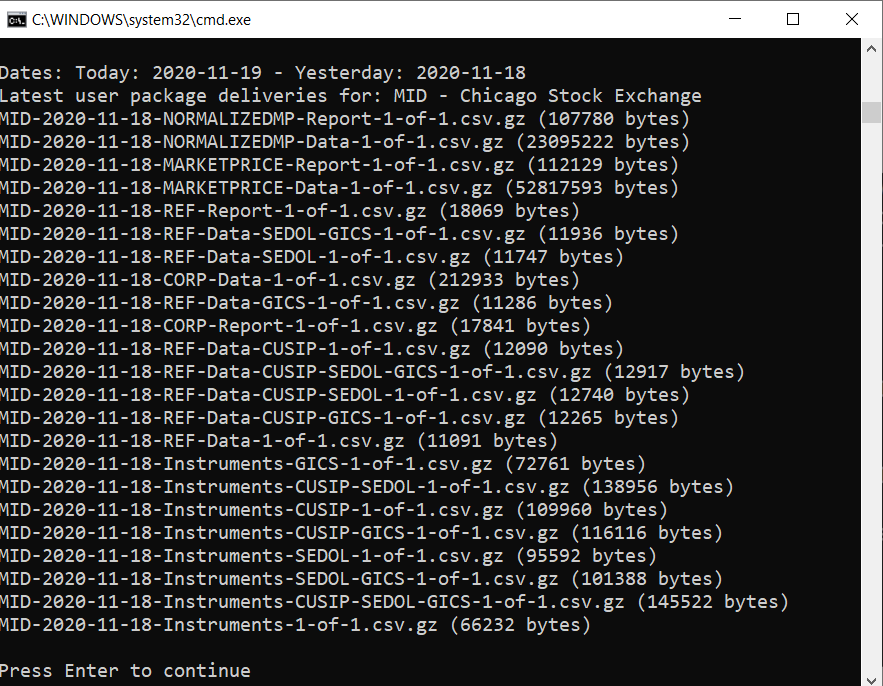
Next comes the processing for each venue. For each one we retrieve display the list of available package deliveries. The list is long; it contains all file types for 30 days:
After that we select the most recent set:
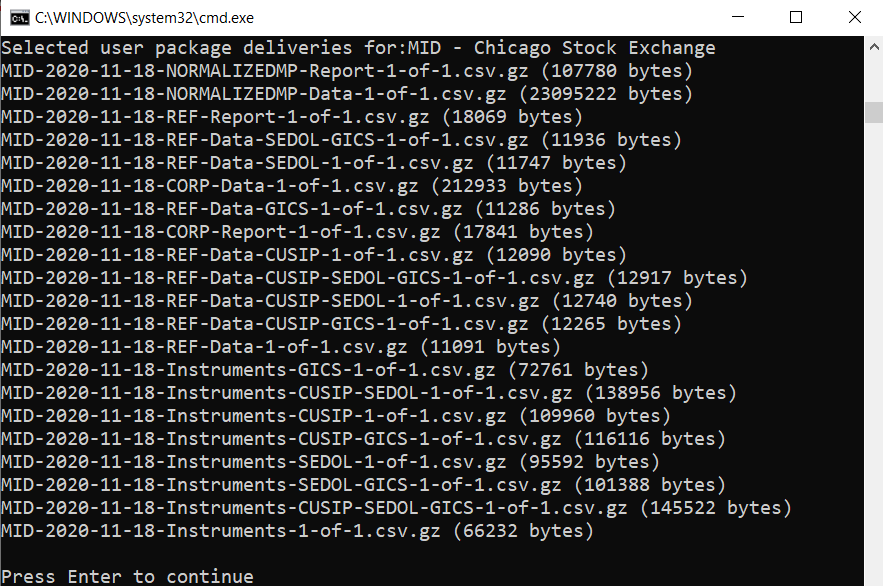
From that set we select only the file types of interest to us:
Finally we download the files:

The sample code automatically creates a subdirectory for each venue.
The other venues are processed in a similar manner. At the end, press Enter to close the pop-up and close the program.
Invalid credentials error
If the user name and password were not set properly, an error will be returned. See Tutorial 1 for details.
Understanding the refactored version
The refactored version is located in directory \API TH REST\Tutorial 2\Refactored
To view the entire code, navigate to that folder and double click on restful_api_rth_vbd.sln to open the solution in Microsoft Visual Studio.
Explanations
DSS client helper class file: DssClient.cs
No change was made to this file.
Main program file: Program.cs
To select the user packages for VBD and filter them to keep only the exchanges we are interested in, we call a helper method:
List<UserPackage> selectedUserPackages =
selectVbdUserPackagesForMyExchanges(userPackages, myExchangeList);
This helper method is not specific to the API, so we declare it in Program.cs, after the main code:
static List<UserPackage> selectVbdUserPackagesForMyExchanges(
IDssEnumerable<UserPackage> userPackages, string[] myExchangeList)
{
List<UserPackage> selectedUserPackages = new List<UserPackage>();
foreach (UserPackage userPackage in userPackages)
{
if (userPackage.SubscriptionName == "TRTH Venue by Day")
{
foreach (string exchange in myExchangeList)
{
if (userPackage.PackageName.StartsWith(exchange))
{
selectedUserPackages.Add(userPackage);
}
}
}
}
return selectedUserPackages;
}
To select the user packages with the most recent date, we call another helper method:
List<UserPackageDelivery> latestDayUserPackageDeliveries =
selectLatestDayUserPackageDeliveries(userPackageDeliveries);
This helper method is not specific to the API, so we declare it in Program.cs, after the main code:
static List<UserPackageDelivery> selectLatestDayUserPackageDeliveries(
IDssEnumerable<UserPackageDelivery> userPackageDeliveries)
{
List<UserPackageDelivery> latestUserPackageDeliveries = new List<UserPackageDelivery>();
//First, try for today:
DateTimeOffset dateTimeToday = DateTimeOffset.Now;
string today = dateTimeToday.ToString("yyyy-MM-dd");
foreach (UserPackageDelivery userPackageDelivery in userPackageDeliveries)
{
if (userPackageDelivery.Name.Contains(today))
{
latestUserPackageDeliveries.Add(userPackageDelivery);
}
}
//If today delivers no results, then try for yesterday:
DateTimeOffset dateTimeYesterday = dateTimeToday.AddDays(-1);
string yesterday = dateTimeYesterday.ToString("yyyy-MM-dd");
if (latestUserPackageDeliveries.Count == 0)
{
foreach (UserPackageDelivery userPackageDelivery in userPackageDeliveries)
{
if (userPackageDelivery.Name.Contains(yesterday))
{
latestUserPackageDeliveries.Add(userPackageDelivery);
}
}
}
return latestUserPackageDeliveries;
}
To select the user packages with a file type in our list of interest, we call another helper method:
List<UserPackageDelivery> selectedlatestDayUserPackageDeliveries =
selectLatestDayUserPackageDeliveriesOfInterest(latestDayUserPackageDeliveries);
This helper method is not specific to the API, so we declare it in Program.cs, after the main code:
static List<UserPackageDelivery> selectLatestDayUserPackageDeliveriesOfInterest(
List<UserPackageDelivery> latestUserPackageDeliveries)
{
List<UserPackageDelivery> selectedUserPackageDeliveries = new List<UserPackageDelivery>();
foreach (UserPackageDelivery userPackageDelivery in latestUserPackageDeliveries)
{
//Select those where the file type is in our predefined list:
foreach (string fileType in myFileTypes)
{
if (userPackageDelivery.Name.Contains(fileType))
{
selectedUserPackageDeliveries.Add(userPackageDelivery);
}
}
}
return selectedUserPackageDeliveries;
}
To retrieve and save the user packages to local disk, we call a final helper method:
saveUserPackageDelivery(standardExtractionsContext, userPackageDelivery, outputSubdirectory);
This helper method is not specific to the API, so we declare it in Program.cs, after the main code:
static void saveUserPackageDelivery(StandardExtractionsContext standardExtractionsContext,
UserPackageDelivery userPackageDelivery, string outputDirectory)
{
//Get the physical read stream for the PackageDeliveryId:
using (DssStreamResponse response =
standardExtractionsContext.UserPackageDeliveryOperations.GetReadStream(
userPackageDelivery.PackageDeliveryId))
{
//Copy the stream to the local file system (overwrite existing files ):
using (FileStream fileStream = File.Create(outputDirectory + userPackageDelivery.Name))
response.Stream.CopyToAsync(fileStream).Wait();
}
}
Full code
The full code can be displayed by opening the appropriate solution file in Microsoft Visual Studio.
Build and run
The refactored version is located in directory \API TH REST\Tutorial 2\Refactored
The actions described above for the learning version are applied similarly to the refactored version. Proceed to:
- Open the solution in Microsoft Visual Studio.
- Reference the LSEG Tick History SDK.
- View the C# code: open both DssClient.cs and Program.cs code files.
- Set your user account in Program.cs.
- Build and run. The results will be exactly the same.
Conclusions
This tutorial illustrated several API calls in a simple scenario to retrieve the latest Venue By Day data, for a set of exchanges. The code of this sample, which you can re-use in your own projects, has been kept simple to concentrate on the API functionality and simultaneously achieve a tangible result.
For more information and code snippets, refer to the the API User Guide and the C# example application described in the Quick Start.