Setting up development environment
| Last update | June 2018 |
| Operating System | Any |
| Interpreter | Python 3.x, Postman |
Overview
Python is one of the most popular programming language. Most Python libraries have a strict version number requirement, and often different libraries will depend on different versions of same library. This version conflict can cause some programs to stop working, when a new library is installed. It is advisable to isolate the Python development environment using containers. In this tutorial, we will install Python, and then we will install Python environment and package installer: miniconda, along with data analysis and related packages: numpy, pandas and matplotlib. We will also install Postman - which is a tool for analyzing raw HTTP request/response messages.
Install Python
Begin by downloading and installing Python 3.x from Python Website. Python 3.x is preferred over older versions.
Once Python is successfully installed:
- Download and install miniconda from here. When prompted on whether you would like to install in for all users or just yourself, choose the latter, so you would not require admin rights to run conda
- Open cmd.exe
- Type conda list, and if it shows a list of installed packages - the installation was successful.
Microsoft Windows [Version 6.1.7601]
Copyright (c) 2009 Microsoft Corporation. All rights reserved.
C:\Users\gsbal>conda list
# packages in environment at C:\Users\gsbal\Miniconda3:
#
asn1crypto 0.22.0 <pip>
certifi 2017.7.27.1 <pip>
cffi 1.9.1 py36_0
conda 4.3.14 py36_1
conda-env 2.6.0 0
console_shortcut 0.1.1 py36_1
cryptography 1.7.1 py36_0
cryptography 1.9 <pip>
defusedxml 0.5.0 <pip>
eight 0.4.2 <pip>
future 0.16.0 <pip>
idna 2.2 py36_0
lxml 3.8.0 <pip>
menuinst 1.4.4 py36_0
pip 9.0.1 py36_1
pyasn1 0.1.9 py36_0
pycosat 0.6.1 py36_1
The conda command is a package installer, so you can add the most popular packages with it easily, however, you can see that pip, wheel and setuptools are also installed.
Isolated development environment
Since, it is important to keep project specific packages separated from one another, we are going to create a separate development environment. All the packages installed in this isolated environment, will not interfere with other environments.
Open cmd.exe and run:
conda create --name edp python=3
This will create an environment by the name edp:
Fetching package metadata ...........
Solving package specifications: .
Package plan for installation in environment C:\Users\gsbal\Miniconda3\envs\edp:
The following NEW packages will be INSTALLED:
certifi: 2016.2.28-py36_0
pip: 9.0.1-py36_1
python: 3.6.2-0
setuptools: 36.4.0-py36_1
vc: 14-0
vs2015_runtime: 14.0.25420-0
wheel: 0.29.0-py36_0
wincertstore: 0.2-py36_0
Now we can activate our environment and list the packages within that environment using following commands:
activate edp
conda list
Let's install the common financial packages: numpy, pandas and matplotlib. On the command prompt run:
conda install requests numpy pandas matplotlib
Once we are done working here, we can easily deactivate the environment with deactivate edp command.
Installing and launching a REST client (Postman)
We will install and launch a REST client - Postman. Postman is one of the many REST clients; feel free to use any other client you might prefer. Postman can be installed as a Google Chrome plugin, or as a standalone application. It is preferable to install it as a standalone application, since Chrome will disable app support in future. To install Postman, download the installation binary for your OS and install it.
Upon launch, Postman screen will look like this:
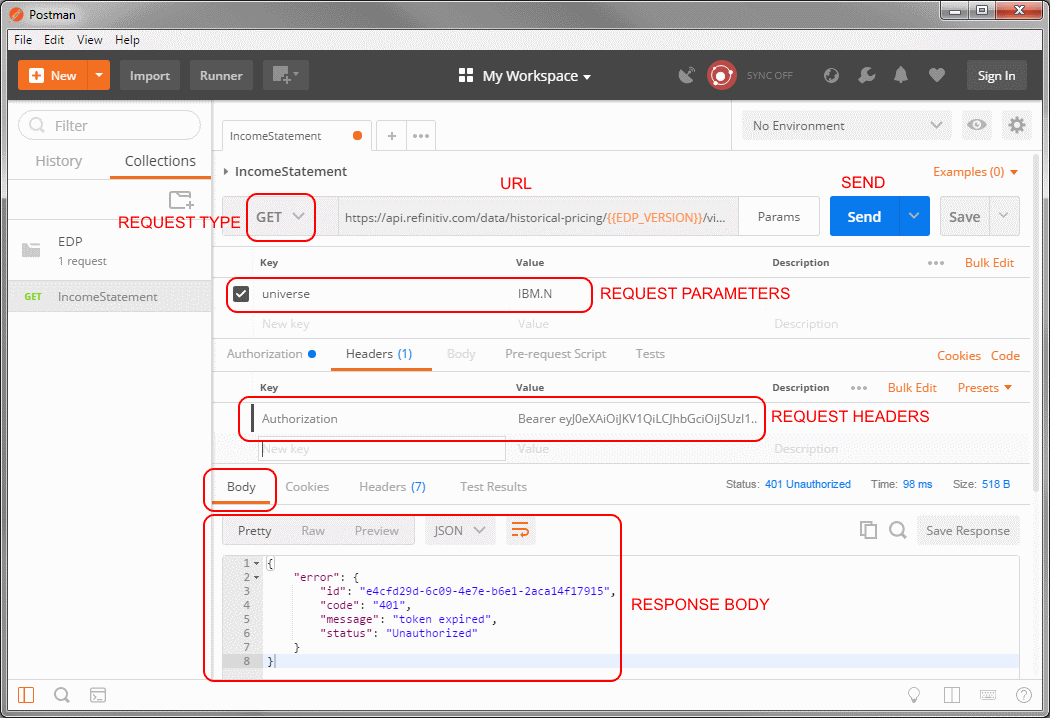
Various buttons and input fields within the application are highlighted in red. The request and parameters/headers are at the top part of screen and the received headers and body at the bottom tab. Each request in Postman will be comprised of several fields:
- URL (includes the host and path)
- Method
- Headers
- An eventual Body
To enter an HTTP request in Postman:
- In the workspace top left, select the method (GET / POST / DELETE) from dropdown list.
- Copy the URL value directly out of the tutorial; paste it into the corresponding field in Postman next to the method.
- Select the Headers tab, click on Bulk Edit, copy the headers directly out of the tutorial and paste them into the field.
- Select the Body tab, select the raw radio button, copy the body contents from the tutorial and paste them into the field.
- Send the request using the SEND button.
The result is displayed in the lower part of the window.
Selecting the bottom Headers tab displays the response headers. Selecting the Body tab displays the response body. Inside the Body tab, selecting the Pretty tab parses the contents based on their format (JSON) to make it easier to read. The status and response time are displayed to the right, above the result.
Tutorial Group:
Introductory Tutorials