Download tutorial source code |
Click here to download |
| Last update | Dec 2020 |
| Compilers | Refer to the ETA Compiler Guides for a complete list. |
| Prerequisites | Downloaded, installed, compiled, and ran an ETA consumer example - Refer to Quick Start. |
Introduction
The goal of these tutorials is to introduce the basic usage of the Enterprise Transport API (ETA) by building a simple market data consumer application. This first tutorial will define the steps to set up your development environment and implement a bare-bones ETA application that performs initialization.
Description
For these tutorials, it is important to familiarize yourself with the contents of the ETA component. Packaged as part of the RTSDK C/C++ stack, the ETA component comes with the standard development components such as header files, static libraries, and Examples. In addition, ETA includes Value-Add Components enabling the developer to leverage OMM-based APIs with more ease and simplicity.
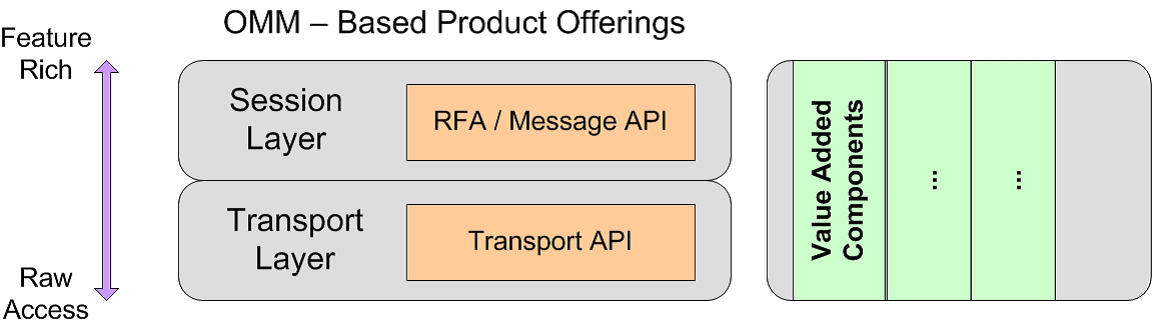
Value-Added Components
There are a number of very useful tools and example applications packaged within the ETA bundle. Located within the Applications directory, these tools and examples provide a feature-rich and highly configurable demonstration of ETA functionality. However, many of the examples are extremely low-level and require a significant amount of code to achieve results. While there are reasons why a developer may choose to go to this level of coding, it is beyond the scope of these tutorials. Instead, the goal of these tutorials is to introduce the basic capabilities of ETA and to utilize some of these very useful, and powerful, value-added components. By utilizing these components, we not only simplify the development effort but also create awareness of the potential ETA capabilities available to developers necessary for building complex and powerful applications.
It is worth noting that although we will be utilizing these value-added components, the amount of code is still somewhat significant. As a result, these tutorials will highlight the relevant sections to give the developer a sense of operation.
Steps
As previously outlined, the goal of this tutorial is to set up an ETA build project, define a basic shell that performs ETA initialization, and build and run this example successfully. The steps include:
- Setting up your development environment
- Implementation Overview - Basic shellcode for ETA initialization
- Build and run
Setting up your development environment
Environment
The basicConsumer project files that come packaged with this set of tutorials are based on the project templates. Both the Windows Visual Studio project files and Linux GCC makefiles include configurations allowing users to build both debug and release versions of the binary, compiled as either static or shared library images.
When building either statically or dynamically, define the following environment variable:
- Windows
EtaInstallPath - Eg: C:\Program Files\LSEG\RTSDK-2.0.0.L1.win.rrg\Cpp-C\Eta - Linux
ETA_INSTALL_PATH - Eg: /opt/lseg/SOFTWARE/RTSDK-2.0.0.L1.win.rrg/Cpp-C/Eta
The project files offer the ability to build and run dynamically, loading shared libraries at runtime. Running dynamically requires additional setup. Refer to the environment sections within the settings table for your build environment.
Note: Within the Linux environment, after installing the RTSDK package, execute the LinuxSoLink script within the root directory of your installation to set up the ETA shared libraries. Refer to the README file for more details.
Implementation Overview - Basic shell code for ETA initialization
The basic shell utilizes a single source file "basicConsumer.c" and its corresponding header file: "basicConsumer.h". For convenience, the shell contains a basic entry point and initialization routine that further tutorials will build on.
int main(int argc, char **argv)
{
// Initialization
init();
exitApp(0);
}
Within our initization routine, we simply execute the proper RSSL initialization call rsslInitialize
/* Initialize RSSL. The locking mode RSSL_LOCK_GLOBAL_AND_CHANNEL is required to use the RsslReactor. */
/* RsslReactor internally utilizes multiple threads */
if (rsslInitialize(RSSL_LOCK_GLOBAL_AND_CHANNEL, &error) != RSSL_RET_SUCCESS)
{
printf("rsslInitialize(): failed <%s>\n", error.text);
exit(RSSL_RET_FAILURE);
}
The RsslReactor class or Transport API Reactor is a Value-Added Component we will be using throughout our tutorials. While our tutorial is designed to be simple, the Transport API Reactor will be used to shield the complexities of the communication necessary for our consumer application. Not only the management of multiple threads but the message exchange between us and the server (Provider). The following tutorials will go into greater depth in the details of the use of the Reactor component.
Build and run
Note: If you are using version RTSDK 1.1.x or lower, you will need to utilize the project files located within the build-1.1.x subdirectory.
To Build
Within Windows:
- Choose your type of build via Visual Studio's dropdown Solution Configuration box.
- Build from the Visual Studio menu: Build - Build Solution
Within Linux:
- Choose your type of build by modifying the configuration at the top of the makefile.
- > make
To Run
Within Windows:
- > <tutorial install dir>\<executable dir>\basicConsumer.exe
- Eg: > .\Debug_WIN_64_VS140\basicConsumer.exe (runs the statically built version using Visual Studio 2015)
- Note:
- The tutorial package contains a convenient batch file (runShared.bat) you can configure to run dynamically built binaries.
- If you are using version RTSDK 1.1.x or lower, execution will occur within the build-1.1.x subdirectory.
Within Linux:
- > <tutorial install dir>/<executable dir>/basicConsumer
- Eg: > ./RHEL6_64_GCC444/Optimized/basicConsumer (runs the statically build version using GCC ver 4.4.4 for RHAS 6.0)
- Note:
- The tutorial package contains a convenient run script (runShared.sh) you can configure to run dynamically built binaries.
- If you are using version RTSDK 1.1.x or lower, execution will occur within the build-1.1.x subdirectory.
When you run the tutorial, you should see no errors and will simply echo "Exiting" at the command line.
References
For more information, refer to the Transport API - C Development Guides.