| Last update | Jan 2026 |
| Environment | Windows |
| Language | C# |
| Compilers | Microsoft Visual Studio 2022 |
| Prerequisites | DSS login, internet access, having done the previous tutorials |
| Source code | Download .Net SDK Tutorials Code |
Tutorial purpose
This is the third tutorial in a series of .Net SDK tutorials. It is assumed that the reader has acquired the knowledge delivered in the previous tutorials before following this one.
This tutorial looks at more programmatic GUI control. Building on the previous tutorial, it covers the following new topics:
- Checking instrument identifiers validation results when creating an instrument list.
- Launching a data extraction on the DSS server, waiting for it to complete, and checking its status.
- Retrieving and displaying the retrieved data.
Table of contents
Getting ready
Opening the solution
The code installation was done in Tutorial 1.
Opening the solution is similar to what was done in the previous tutorials:
- Navigate to the \DSS REST API\Tutorial 3\Learning folder.
- Double click on the solution file restapi_set_runtime.sln to open it in Microsoft Visual Studio.
Referencing the DSS SDK
Before anything else, you must reference the DSS REST API .Net SDK in the Microsoft Visual Studio project.
Important: this must be done for every single tutorial, for both the learning and refactored versions.
This was explained in the previous tutorial; please refer to it for instructions.
Viewing the C# code
In Microsoft Visual Studio, in the Solution Explorer, double click on Program.cs and on DssClient.cs to display both file contents. Each file will be displayed in a separate tab.
Setting the user account
Before running the code, you must replace YourUserId with your DSS user name, and YourPassword with your DSS password, in these 2 lines of Program.cs:
private static string dssUserName = "YourUserId";
private static string dssUserPassword = "YourPassword";
Important reminder: this must be done for every single tutorial, for both the learning and refactored versions.
Failure to do so will result in an error at run time (see Tutorial 1 for more details).
Understanding extraction files
Once a schedule has run, and the requested data was extracted from the DSS server database, 3 (or more) resulting extraction files are generated. They are:
- The RIC maintenance note.
It contains information on instrument identifier name changes, etc. This file could be empty. - The extracted data itself.
Usually there is one file, but in the case of an embargo more could be generated. The next tutorial covers this topic. - The extraction notes.
This file contains details of the extraction, including information on applied embargoes.
The names of the files (generated by a single extraction) share a common root, with differing extensions added. The root file name can be specified when creating a schedule; as this is optional, if none was specified the DSS server will automatically generate a (very complex) root file name.
Example file names, for a specified root file name myExtraction:
- RIC maintenance note: myExtraction.ric.csv
- Extracted data: myExtraction.csv
- Extraction notes: myExtraction.csv.notes.txt
The extraction files are stored on the DSS server. They can be retrieved using various mechanisms:
- FTP (push or pull).
- Manually, through the DSS web GUI.
- Programmatically, through the API.
This tutorial and the following demonstrate the 3rd method, using the API. FTP and manual retrieval are out of the scope of these tutorials; for these, more information is available in the help pages of the DSS web GUI.
When using the API:
- The list of extraction files can be retrieved, as a property of the extraction context. This list allows us to see how many files there are, and what the individual file names are.
- We don’t actually download the extraction files to save them on our local disk. Instead, we use API calls to read the file contents on the server, and return these contents to our program, for further treatment.
Read on to understand how this is done.
Understanding the code
We shall only describe what is new versus the previous tutorials.
DssClient.cs
This is nearly the same as the refactored version of Tutorial 2, except for the leading comment, and the fact that we must expose our extractions context to our main program:
//extractionsContext temporarily set to public, to expose it to our learning program.
public ExtractionsContext extractionsContext;
This is again due to the way we coded our main program: as most DSS API calls were put in the learning version of the code (to make it easier to follow), the main program requires access to the extractions context.
No additional explanations are required as the rest of the code was described in the previous tutorial.
Program.cs
At the top of the code we see some using directives have been added because we are using more API calls:
using System;
using System.Collections.Generic;
using System.Linq;
using System.Text;
using System.IO;
using DataScope.Select.Api.Extractions;
using DataScope.Select.Api.Content;
using DataScope.Select.Api.Extractions.SubjectLists;
using DataScope.Select.Api.Extractions.ReportTemplates;
using DataScope.Select.Api.Extractions.Schedules;
using DataScope.Select.Api;
using DataScope.Select.Api.Extractions.ReportExtractions;
using DataScope.Select.Api.Core;
using DssRestfulApiTutorials;
Validating instrument identifiers after creating the instrument list
In the previous tutorial we created an instrument list, but did not worry about validating the instrument identifiers; we just assumed they were successfully appended to the list. In this tutorial we want to check if any issues occurred.
To illustrate this, this time we intentionally include 2 invalid instrument identifiers (in an array of 7):
new InstrumentIdentifier
{ Identifier = "INVALID", IdentifierType = IdentifierType.Cusip,
UserDefinedIdentifier = "INVALID INSTRUMENT_1" },
new InstrumentIdentifier
{ Identifier = "JUNK.JUNK", IdentifierType = IdentifierType.Ric,
UserDefinedIdentifier = "INVALID INSTRUMENT_2" }
To validate the instrument identifiers, we capture the result returned by the API call that appends instrument identifiers to an instrument list:
InstrumentsAppendIdentifiersResult appendResult =
extractionsContext.InstrumentListOperations.AppendIdentifiers(
instrumentList, instrumentIdentifiers, false);
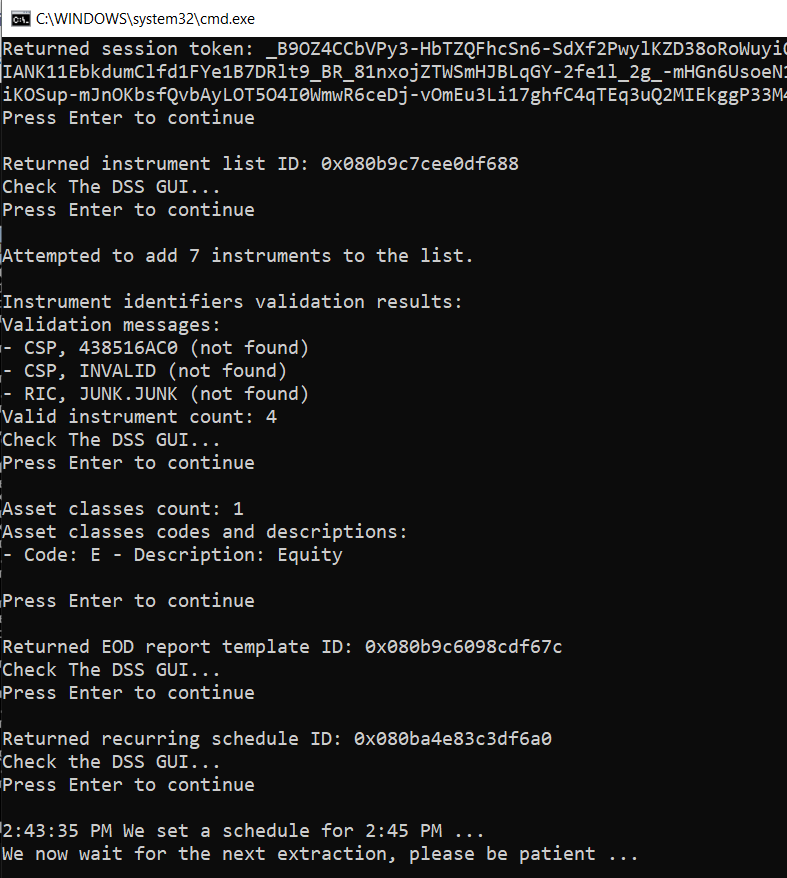
This result contains useful instrument identifier validation information. For each invalid instrument indentifier a message and severity are generated. We can retreive and display them:
foreach (InstrumentValidationMessage message in appendResult.ValidationResult.Messages)
Console.WriteLine("- " + message.Message, message.Severity);
We can also get the valid instrument count:
DebugPrintAndWaitForEnter("Valid instrument count: " +
appendResult.ValidationResult.ValidInstrumentCount + "\nCheck The DSS GUI...");
The output therefore displays 1 line for each invalid instrument, and the valid instrument count:

This API feedback data can be used to log errors when managing instrument lists using the DSS REST API. The bond in our example has matured, that is why it is listed as not found. In the DSS web GUI we see that the instrument list contains only the validated instrument identifiers, those not found were automatically rejected:

Note: the validation process will filter out invalid, inactive or historical instruments, based on your preference settings:

With the above preferences the matured bond was rejected. If the preferences had allowed import of Inactive and Historical instruments, then the matured bond would not have been rejected.
The results also contain some high level information on the segmentation by asset class of the instrument identifiers. The following code displays this information:
Console.WriteLine("Asset classes count: " + appendResult.ValidationResult.StandardSegments.Count);
Console.WriteLine("Asset classes codes and descriptions: ");
for (int i = 0; i < appendResult.ValidationResult.StandardSegments.Count; i++)
{
Console.WriteLine("- Code: " + appendResult.ValidationResult.StandardSegments[i].Code +
" - Description: " + appendResult.ValidationResult.StandardSegments[i].Description);
}
The valid instruments in this tutorial are all equity stocks. The segmentation results will be:

Note: as the only bond we have in the list has matured, and was filtered out due to our preference settings, its asset class is not listed..
Creating a report template
This is exactly the same as what was done in Tutorial 2. In the next step we use the returned report template ID.
Creating an extraction schedule
We create a daily recurring EOD (End Of Day) schedule. This is a variation of the second schedule we created in the preceding tutorial, the difference being in the definition of the trigger. The preceding one waited for corrected data to be available. This one is for a set time, regardless of data availability. For testing purposes it is set to run 2 minutes in the future, that way we quickly get results every time we run the tutorial:
int waitMinutes = 2;
DateTimeOffset dateTimeNow = DateTimeOffset.Now;
DateTimeOffset dateTimeSchedule = dateTimeNow.AddMinutes(waitMinutes);
int scheduleHour = dateTimeSchedule.Hour;
int scheduleMinute = dateTimeSchedule.Minute;
Schedule recurringSchedule = new Schedule
{
Name = "myRecurringSchedule",
TimeZone = TimeZone.CurrentTimeZone.StandardName,
Recurrence = ScheduleRecurrence.CreateWeeklyRecurrence(
new[] { DayOfWeek.Monday, DayOfWeek.Tuesday, DayOfWeek.Wednesday,
DayOfWeek.Thursday, DayOfWeek.Friday }),
//This trigger is on a set time (regardless of data availability):
Trigger = ScheduleTrigger.CreateTimeTrigger(
false, //Limit to today's data: no
new[] { new HourMinute { Hour = scheduleHour, Minute = scheduleMinute } }),
ListId = instrumentListId,
ReportTemplateId = reportTemplateId
};
extractionsContext.ScheduleOperations.Create(recurringSchedule);
string recurringScheduleId = recurringSchedule.ScheduleId;
In the previous tutorial we defined the output file name for the schedule. As we did not do it here, a default name will be generated by the DSS server. This is not important, because we do not intend to retrieve the file manually or via FTP, we want to get the data programmatically, via the API, as described next.
Waiting for the extraction to complete
The extraction will be launched by the schedule.
The next step is to wait for the extraction to complete. This part of the code is inside a try / catch block, to trap exceptions.
We use WaitForNextExtraction, a blocking API call which only returns when the extraction is complete (or times out), so there is no need for code to check for extraction completion. We will see calls that behave differently in the next tutorials.
To achieve this, the API call automatically polls the server at regular intervals, to check if the extraction has completed. The poll period is configurable; it should not be too frequent so as not to unnecessarily burden the network and server. The timeout period is also configurable. In the tutorial code we poll once a minute, and set the timeout to 5 minutes:
TimeSpan timeOut = TimeSpan.FromMinutes(5);
int pollPeriod = 60;
ReportExtraction extraction =
extractionsContext.ScheduleOperations.WaitForNextExtraction(recurringSchedule, pollPeriod, timeOut);
Checking the extraction results
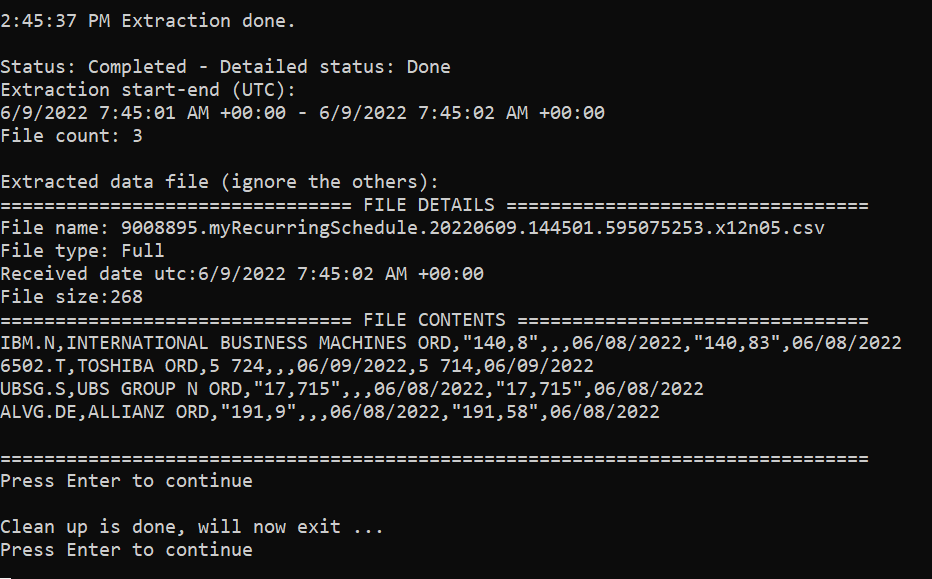
Once the extraction has completed, we can display its status, detailed status, and start and end time stamp (in UTC):
Console.WriteLine("\nStatus: {0} - Detailed status: {1}\nExtraction start-end (UTC):\n{2} - {3}",
extraction.Status, extraction.DetailedStatus,
extraction.ExtractionStartUtc, extraction.ExtractionEndUtc);
Checking the extraction results
Once the extraction has completed, we can display its status, detailed status, and start and end time stamp (in UTC):
Console.WriteLine("\nStatus: {0} - Detailed status: {1}\nExtraction start-end (UTC):\n{2} - {3}",
extraction.Status, extraction.DetailedStatus,
extraction.ExtractionStartUtc, extraction.ExtractionEndUtc);
Here is the result:

Retrieving the extracted data
We can then retrieve the list of files generated by the extraction. Be aware that the toolkit only populates this list in the extractions context when you explicitly call LoadProperty(), so we must do that systematically before checking the file count value which tells us how many extraction files were generated:
extractionsContext.LoadProperty(extraction, "Files");
Console.WriteLine("File count: " + extraction.Files.Count + "\n");
Here is the result:

We see that 3 files were generated. As explained above in the section on Understanding extraction files, they are:
- The RIC maintenance note, with information on instrument identifier name changes, etc.
This file could be empty. - The extracted data itself.
As this extraction is for EOD data, the file type is "Full", independent of DSS preference settings.
File types and related DSS preference settings are covered in the next tutorial. - The extraction notes, containing details of the extraction, including information on applied embargoes.
Embargoes are covered in the next tutorial.
In this tutorial we only retrieve the contents of the data file, we ignore the two others files (they will be covered in the next tutorial). To do that we search for the first file where the file type is “Full” (only the data file will be of this type):
ExtractedFile extractedDataFile =
extraction.Files.FirstOrDefault(f => f.FileType == ExtractedFileType.Full);
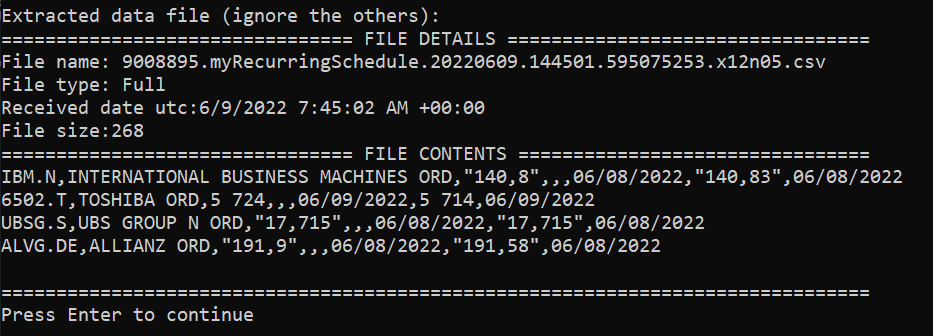
If the result is not null, we display the file name, file type, receive time stamp (in UTC) and its size. Furthermore, if the file size is greater than zero, we read the file contents, and display them:
if (extractedDataFile != null)
{
Console.WriteLine("Extracted data file (ignore the others):");
Console.WriteLine("================================ FILE DETAILS =================================" +
"\nFile name: " + extractedDataFile.ExtractedFileName +
"\nFile type: " + extractedDataFile.FileType +
"\nReceived date utc:" + extractedDataFile.ReceivedDateUtc +
"\nFile size:" + extractedDataFile.Size);
//Don't fetch the content if the file is empty:
if (extractedDataFile.Size > 0)
{
Console.WriteLine("================================ FILE CONTENTS ================================");
DssStreamResponse streamResponse =
extractionsContext.ExtractedFileOperations.GetReadStream(extractedDataFile);
string streamContents;
using (StreamReader reader = new StreamReader(streamResponse.Stream))
Console.WriteLine(streamContents = reader.ReadToEnd());
DebugPrintAndWaitForEnter("===============================================================================");
}
}
else { DebugPrintAndWaitForEnter("ERROR: extracted data file was null"); }
Here is the result (again, as the bond has matured and was filtered out due to our preference settings, it does not appear in the list):
Cleaning up
Like in the previous tutorial, the instrument list, report template and schedule are deleted.
Full code
The full code can be displayed by opening the appropriate solution file in Microsoft Visual Studio.
Summary
List of the main steps in the code:
- Authenticate by creating an extraction context.
- Create an array of financial instrument identifiers.
- Create an instrument list.
- Append the array of financial instrument identifiers to the instrument list, to populate it.
- Check the instrument identifiers validation results.
- Define a record template.
- Create the report template, using the defined template.
- Create an extraction schedule.
- Wait for the extraction to complete.
- Check the extraction results.
- Retrieve the extracted data.
- Cleanup.
Code run results
Build and run
Don’t forget to reference the DSS SDK, and to set your user account in Program.cs !
Successful run
After running the program, and pressing the Enter key when prompted, the final result should look like this:
Intermediary results are discussed at length in the code explanations in the previous section of this tutorial.
Press Enter one final time to close the pop-up and end the program.
Potential errors and solutions
If the user name and password were not set properly, an error will be returned. See Tutorial 1 for details.
If the program attempts to create an instrument list that has the same name as that of an instrument list that is already stored on the DSS server, an error will be generated. Similar errors will arise for report template or extraction schedule that has the same name as an existing one. See Tutorial 2 for details.
Understanding the refactored version
Explanations
DSS client helper class file: DssClient.cs
Obvious comments were removed. We modified the method that appends identifiers, to return validation results:
public InstrumentsAppendIdentifiersResult AppendIdentifiersToInstrumentList(
IEnumerable<InstrumentIdentifier> instrumentIdentifiers, InstrumentList instrumentList)
{
InstrumentsAppendIdentifiersResult appendResult =
extractionsContext.InstrumentListOperations.AppendIdentifiers(
instrumentList, instrumentIdentifiers, false);
return appendResult;
}
A new method was added, to create a timed recurring schedule:
public string CreateTimedRecurringSchedule(
string scheduleName, string instrumentListId, string reportTemplateId,
int scheduleHour, int scheduleMinute, string outputFileName)
{
Schedule schedule = new Schedule
{
Name = scheduleName,
TimeZone = TimeZone.CurrentTimeZone.StandardName,
Recurrence = ScheduleRecurrence.CreateWeeklyRecurrence(
new[] { DayOfWeek.Monday, DayOfWeek.Tuesday, DayOfWeek.Wednesday,
DayOfWeek.Thursday, DayOfWeek.Friday }),
//This trigger is on a set time (regardless of data availability):
Trigger = ScheduleTrigger.CreateTimeTrigger(
false, //Limit to today's data: no
new[] { new HourMinute { Hour = scheduleHour, Minute = scheduleMinute } }),
ListId = instrumentListId,
ReportTemplateId = reportTemplateId,
OutputFileName = outputFileName
};
extractionsContext.ScheduleOperations.Create(schedule);
return schedule.ScheduleId;
}
A new cleanup method was added, to delete the instrument list, report template and schedule, with minimal error trapping:
public void Cleanup(
DssClient dssClient, string instrumentListId, string reportTemplateId, string scheduleId)
{
try { dssClient.DeleteInstrumentList(instrumentListId); } catch { };
try { dssClient.DeleteReportTemplate(reportTemplateId); } catch { };
try { dssClient.DeleteSchedule(scheduleId); } catch { };
}
Main program file: Program.cs
We removed the on screen comments telling us to check the DSS GUI.
To populate the instrument list and retrieve validation results, we call our new DSS client helper method:
InstrumentsAppendIdentifiersResult appendResult =
dssClient.AppendIdentifiersToInstrumentList(
instrumentIdentifiers, instrumentList);
To display the validation results, we call a helper method:
DisplayAppendResults(appendResult);
As this helper method is specific to our workflow, we declare it in Program.cs instead of DssClient.cs, after the main code:
static void DisplayAppendResults(InstrumentsAppendIdentifiersResult appendResult)
{
Console.WriteLine("Instrument identifiers validation results:");
Console.WriteLine("Validation messages:");
foreach (InstrumentValidationMessage message in appendResult.ValidationResult.Messages)
Console.WriteLine("- " + message.Message, message.Severity);
DebugPrintAndWaitForEnter("Valid instrument count: " +
appendResult.ValidationResult.ValidInstrumentCount);
//The standard segments are separations of data by asset class.
//Display them:
Console.WriteLine("Asset classes count: " + appendResult.ValidationResult.StandardSegments.Count);
Console.WriteLine("Asset classes codes and descriptions: ");
for (int i = 0; i < appendResult.ValidationResult.StandardSegments.Count; i++)
{
Console.WriteLine("- Code: " + appendResult.ValidationResult.StandardSegments[i].Code +
" - Description: " + appendResult.ValidationResult.StandardSegments[i].Description);
}
DebugPrintAndWaitForEnter("");
}
To create the schedule, we call our new DSS client helper method:
string recurringScheduleId = dssClient.CreateTimedRecurringSchedule(
"myRecurringSchedule", instrumentListId, reportTemplateId,
scheduleHour, scheduleMinute, "myTimedRecurringExtractionOutput.csv");
As we need the schedule to launch the extraction, we retreive it by name:
Schedule recurringSchedule =
extractionsContext.ScheduleOperations.GetByName("myRecurringSchedule");
To display the result file details and contents, we call a helper method:
if (extractedDataFile != null)
{
Console.WriteLine("Extracted data file (ignore the others):");
DisplayFileDetailsAndContents(extractionsContext, extractedDataFile, 1);
}
Again, as this helper method is specific to our workflow, we declare it in Program.cs instead of DssClient.cs, after the main code:
static void DisplayFileDetailsAndContents(
ExtractionsContext extractionsContext, ExtractedFile file, int fileNumber)
{
Console.WriteLine("================================ FILE DETAILS =================================" +
"\nFile number: " + fileNumber +
"\nFile name: " + file.ExtractedFileName +
"\nFile type: " + file.FileType +
"\nReceived date utc:" + file.ReceivedDateUtc +
"\nFile size:" + file.Size);
//Don't fetch the content if the file is empty:
if (file.Size == 0) return;
Console.WriteLine("================================ FILE CONTENTS ================================");
DssStreamResponse streamResponse =
extractionsContext.ExtractedFileOperations.GetReadStream(file);
string streamContents;
using (StreamReader reader = new StreamReader(streamResponse.Stream))
Console.WriteLine(streamContents = reader.ReadToEnd());
DebugPrintAndWaitForEnter("===============================================================================");
}
To clean up, we call our new DSS client helper method:
dssClient.Cleanup(dssClient, instrumentListId, reportTemplateId, recurringScheduleId);
Full code
The full code can be displayed by opening the appropriate solution file in Microsoft Visual Studio.
Build and run
Don’t forget to reference the DSS SDK, and to set your user account in Program.cs !
Conclusions
This tutorial introduces some basic error handling, including the DSS API functionality to validate instrument list contents. A production ready program would have more extensive error handling, which is out of scope here as that is standard programming and not DSS specific.
We also saw how to wait for an extraction to complete, and retrieve the resulting data, which is the main purpose of interfacing with DSS.
Now move on to the next tutorial, which:
- Looks at how to handle partial and late data deliveries when requested intraday data is under embargo.
- Looks at all resulting extraction files (not only the data file).