| Last update | Nov 2023 |
| Environment | Windows |
| Language | Java (JDK 8), and some Python |
| Compilers | A Java compiler |
| Prerequisites | DSS login, internet access. |
| Source code | Download the DSS REST Tutorials Postman collection, the Java Code Examples and the Python samples from the Downloads tab. |
Tutorial purpose
This tutorial explains how to interact with the DSS REST API without using the .Net SDK. In other words, it gets you started for programming in the language of your choice. Even when programming with the .Net SDK, you might find some sections of this tutorial helpful, notably the best practices section.
This tutorial demonstrates how to create HTTP queries to request data from the API and retrieve data. This is done starting from pure HTTP queries, which can be copied from the C# example application (described in the Quick Start) or from the Postman collection (available in the Downloads tab). The aim is then to create the same queries in code.
As an example we shall program mainly in Java, using some public domain libraries to facilitate our work, but the principles demonstrated and explained here can easily be extended to any other programming language. To illustrate this, a few Python examples are also included.
Contrary to other tutorials which illustrate how to achieve a specific task (like retrieving a particular type of data), the aim of this one is to give you a feeling of the coding mechanisms you must master, before using them to achieve your own goals. For that reason the code snippets in this tutorial are shown slightly out of context, to illustrate specific coding concepts. To see this in context and action, refer to the samples available in the Downloads tab.
The purpose of this tutorial is to give you an understanding of the mechanisms, and how to get started. We shall not cover language specific libraries in any detail; please refer to their respective documentation to learn more.
Table of contents
- Additional details on the prerequisites
- Code installation
- Mastering the essentials
- Best practices, tips and work process suggestion
- Conclusions
Additional details on the prerequisites
A DSS user account (user name and password) is required to authenticate to the DSS server.
An internet connection is required to download the software, and run it, as it connects to the DSS server.
An installed copy of the Java JDK 8 is required to experiment with the Java code. Any Java compiler can be used. It is possible to compile and run the code using only the JDK 8 command line tools. You can also use a development environment. When building this tutorial we used the Eclipse Java Neon environment to make our life easier.
A Python interpreter is required to experiment with the Python code.
In the following we use small code snippets from a subset of the Java Code Examples, as well as a subset of the DSS REST Tutorials Postman collection. We also use code snippets of the Python samples. These are all available under the Downloads tab.
This tutorial assumes you have installed the C# example application by following the Quick Start, and know how to run it to see the HTTP requests. It also assumes you have installed and know how to use a REST API testing application like Postman, which is explained in the REST API Tutorials Introduction, as well as the REST API Tutorial 1 and the REST API Tutorial 2. If you have not yet gone through them, do it now before proceeding further.
Code installation
The following must be installed:
C# example application
Do not be mislead by the fact that this was written in C# !
Being able to run this application is extremely useful, because it contains many working examples which display the HTTP requests and responses. Being able to examine the actual HTTP message exchanges in context is a great way to learn what you need to create in your own program.
Install the example application, as described in the Quick Start. A binary version is available, making it possible to install and run it without a compiler.
Run the application (this requires a valid DSS user account). Try a few queries, to understand how the application works, and see where the HTTP requests and responses are displayed.
Postman
A REST client application is very useful to help you prototype and test queries before implementing them in your code, thus saving a lot of time.
We decided to use one particular REST client, Postman. This is by no means an endorsement of Postman, it is just an example to get you started. Feel free to use any other REST client you might prefer.
Install Postman, as described in the REST API Tutorials Introduction.
Import the DSS REST Tutorials Postman collection and environment, available under the Downloads tab (the environment is in the same zip file as the collection). The collection contains a set of tested queries, useful examples to get you started. They can also be used as starting points, to be modified for your own purposes. After opening a query, you can click on the down arrow to the right of the title of the request to see explanations and usage instructions.
The environment is required by the collection. Edit the environment:
- Set the "dss-user" and "dss-password" environment variables to a valid DSS account.
- Set the environment variable "user" to the same value as "dss-user", but without the double quotes.
Go through some of the REST API Tutorials, covering at least the REST API Tutorial 1 and REST API Tutorial 2, to become familiar with running queries in Postman.
Python
If you would also like to run python samples, you can download them, they are available under the Downloads tab, and follow the instructions in the included README files . Note: for HTTP the samples use the requests library.
Java
In this tutorial most code samples are in Java. If you would like to run the samples, you must install the Java JDK 8.
Download the Java Code Examples set, available under the Downloads tab. Copy the contents of the zip file in the directory of your choice. For the purpose of this tutorial we copied it into C:\Java:
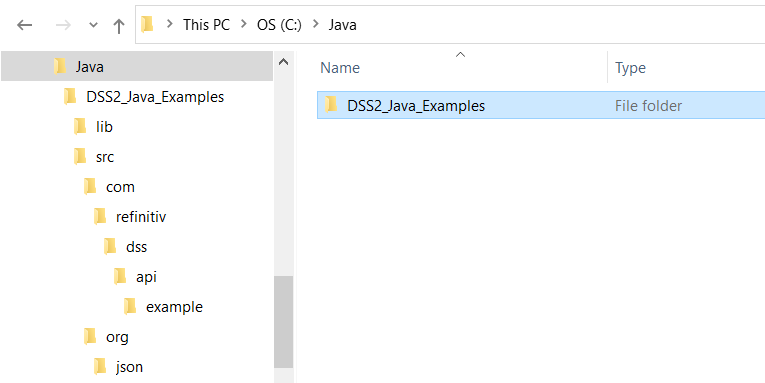
Note: the package includes two library subdirectories:
- lib contains common and HTTP libraries. For HTTP we took the Apache HttpComponents core and client packages.
- src\org\json contains JSON libraries.
These are popular third party public domain libraries, but feel free to use other ones if you prefer.
Running the samples from the command line
The JDK contains a compiler; you can therefore compile and run the samples in the command line:
> CD C:\Java\DSS2_Java_Examples\src\com\lseg\dss\api\example
> javac DSS2Token.java -classpath "C:\Java\DSS2_Java_Examples\src;C:\Java\DSS2_Java_Examples\lib\commons-codec-1.9.jar;C:\Java\DSS2_Java_Examples\lib\commons-logging-1.2.jar;C:\Java\DSS2_Java_Examples\lib\httpclient-4.5.3.jar;C:\Java\DSS2_Java_Examples\lib\httpcore-4.4.6.jar"
> java -classpath "C:\Java\DSS2_Java_Examples\src;C:\Java\DSS2_Java_Examples\lib\commons-codec-1.9.jar;C:\Java\DSS2_Java_Examples\lib\commons-logging-1.2.jar;C:\Java\DSS2_Java_Examples\lib\httpclient-4.5.3.jar;C:\Java\DSS2_Java_Examples\lib\httpcore-4.4.6.jar" com.lseg.dss.api.example.DSS2Token <username> <password>
Note the commands above specify the class path to include the required libraries.
Running the samples from a development environment
Using a development environment is more practical than typing in the command line. Our samples were developed and tested using Eclipse. With Eclipse you just need to create a new project and then import our Java sample code folders. Again, this is not an endorsement of a particular product; feel free to use the environment of your choice.
Mastering the essentials
The main programming skill you need to master, whatever language you use, is how to create and submit HTTP requests, and retrieve the responses. As the payload is JSON formatted, handling JSON is also part of the picture.
A quick and easy solution will often be found in public domain or other libraries, built specifically for this purpose.
This chapter shows you how this is done, starting from a functional Postman query, and coding it in your program. This is illustrated with some short Java and Python code extracts to get you started. For more detailed and in context samples, study those available under the Downloads tab, where you will find samples in several languages.
It is divided in 3 sections: Creating HTTP requests explains how to create requests, Submitting HTTP queries explains how to submit them, and Managing the HTTP responses explains how to manage the response.
The next chapter was written to help you understand how to make specific requests, where to find the available field lists, how to correctly define all parameters, and how to test. Experimenting using your own program can be tedious and time consuming, especially at the start of your project when your code does not display all the returned data, statuses and errors. To help you get to speed quickly, we give you some tips and suggest a work process.
Creating HTTP requests
Let us start by learning how to create HTTP requests with JSON content.
Our starting point shall always be the pure HTTP request, as executable in Postman (or seen in the C# example application). Our aim is to reproduce it in code.
Important points
There are several elements to take into consideration.
- The protocol: DSS requires HTTPS, so your HTTP libraries must support it.
- The HTTP method: most DSS queries use POST or GET. DELETE is also used occasionally.
- The endpoint URL: note that not all requests use the same one.
- The HTTP header: we must be able to add specific content fields.
- The HTTP body: we must be able to specify its content, which is in JSON format.
Important note: the API expects the contents to follow a certain structure, and order. It is currently essential to maintain the order of some elements inside the body of the request (to be specific, if there is an @odata.type element, it must come first). If the structure is wrong, or the order is not respected, the API call might fail, returning a 400 Bad Request HTTP status, and an error message that can vary, but will always start with Malformed request payload.
Authentication: a simple POST request in Postman
As a first example, let us start with the request for an authentication token. This query can easily be built and run in Postman. It is available in the collection, under Tuto-1a: User authentication.
The HTTP method is POST.
The endpoint URL is https://selectapi.datascope.refinitiv.com/RestApi/v1/Authentication/RequestToken
The header must contain this field: Content-Type:application/json
The body must hold the following JSON formatted content (replacing the values with those of a valid DSS account):
{
"Credentials": {
"Username": "YourUserId",
"Password": "YourPassword"
}
}
Note: the indents are useful for readability, but not required; the following body content will also work:
{"Credentials":{"Username":"YourUserId","Password":"YourPassword"}}
In Postman the query is submitted by simply clicking on the Send button.
Authentication: the same simple POST request in code (Java)
Let us now see how to code this. In this Java example we use some popular third party public domain libraries (the Apache HttpComponents core and client packages), but doing this in a different programming language will follow the same structure and similar principles. Details of the libraries are out of scope in this tutorial, for more information please refer to their documentation.
With the Apache HttpClient library, we first need to create an httpclient, which will serve for all HTTP interactions:
private CloseableHttpClient httpclient = HttpClientBuilder.create().build();
Then we define our new request, based on the desired method, using the endpoint URL:
HttpPost httppost = new HttpPost("https://selectapi.datascope.refinitiv.com/RestApi/v1/Authentication/RequestToken");
We add the header field to our request:
httppost.addHeader("content-type", "application/json");
After that we define the JSON formatted body for our request.
You might recall that we must maintain the order of the elements inside the body of the request. For that reason we usually create a JSONOrderedObject. In this particular case there is only one element (the Credentials object, which contains two fields), so we do not need to take any particular precautions and can use a simple JSONObject:
JSONObject TokenRequestBody = new JSONObject()
.put("Credentials", new JSONObject()
.put("Username", username)
.put("Password", password));
We leverage the chained method call facility provided by the library, which allows us to write more concise and readable code. The indentation we use clearly shows the message structure, just like it was in Postman. Programming the message body in this way makes it very easy to replicate in your code what you tested in Postman.
You can convert the JSON object to a string, and thus print the body to console:
System.out.println("Request String: "+ TokenRequestBody.toString());
This is very useful for debugging: if the request fails, you can copy this string into Postman and test it from there.
After that we convert the JSON string to a string entity, which is set as the HTTP body:
StringEntity requestBody = new StringEntity(TokenRequestBody.toString());
httppost.setEntity(requestBody);
The request is then submitted by executing it. Here we do it using a response handler (variants are described further):
ResponseHandler<String> responseHandler = new BasicResponseHandler();
String response = httpclient.execute(httppost, responseHandler);
Note that the token request API call returns a string; other calls will return results in a different format, like streaming JSON (more on this later). Handling this response to extract the token value is described further.
Authentication: the same simple POST request in code (Python)
Let us now see how to code this in Python.
In our example code we use the following imports to handle HTTP and JSON:
import requests, json
from requests import Request, Session
from collections import OrderedDict
We start by defining the endpoint URL:
urlGetToken = 'https://selectapi.datascope.refinitiv.com/RestApi/v1/Authentication/RequestToken'
We define the header field for our request:
header1 = {'Content-Type': 'application/json'}
Then we define the JSON formatted body for our request.
You might recall that we must maintain the order of the elements inside the body of the request. For that reason we usually create an OrderedDict. In this particular case there is only one element (the Credentials object, which contains two fields), so we do not need to take any particular precautions and can create our object directly:
tokenRequestBody = json.dumps({'Credentials':{'Password':passwd,'Username':username}})
You can print the body to console:
print('Request String: ' + tokenRequestBody)
This is very useful for debugging: if the request fails, you can copy this string into Postman and test it from there.
The request is then submitted, using the 3 parameters we just defined. It is now that we define the method:
response = requests.post(urlGetToken, tokenRequestBody, headers=header1)
Handling this response to extract the token value is described further.
Additional header fields in code (Java, Python)
The query we just saw requested an authentication token (also called session token), valid for a session of 24 hours.
Important: once we have our session token, we must save it in a local variable (see section 5.3.6), and add it as an additional header field to all other requests we submit to the API.
How can we create additional header fields for our request ?
In Java, after creating a new request, we simply add all required header fields, in a series of commands:
httppost.addHeader("content-type", "application/json");
httppost.addHeader("Authorization ", "Token " + sessionToken);
This Python example proceeds slightly differently, by defining the header with both fields:
header2 = {'Content-Type': 'application/json', 'Authorization': 'Token ' + myAuthToken }
An additional header is required when submitting asynchronous requests (click here to find out more about asynchronous mechanisms and why they can be very useful).
In Java:
httppost.addHeader("Prefer ", "respond-async");
In Python:
header3 = {'Content-Type': 'application/json', 'Authorization': 'Token ' + myAuthToken, 'Prefer': 'respond-async'}
GET and DELETE requests in code (Java, Python)
Some API calls use HTTP GET or DELETE requests. They are similar to POST requests except that they do not have a body.
In Java they are defined in a similar way to the POST requests, using respectively:
HttpGet httpget = new HttpGet(myEndPointURL);
HttpDelete httpdel = new HttpDelete(myEndPointURL);
In Python the method is defined when the request is submitted:
responseGet = requests.get(myEndPointURL, headers=header)
responseDel = requests.delete(myEndPointURL, headers=header)
A complex request body in Postman
Let us now look at a more complex request body in Postman, for an EoD (End of Day) data request.
This case contains most of the tricky points you can encounter when coding the body of a request:
- Several elements (we must ensure their order is kept, in particular the odata.type must remain in first position).
- Nested elements.
- A simple array of strings for the content field names.
- An array of objects for the identifier list.
- Objects with null values.
- A boolean.
This is the body of the request:
{
"ExtractionRequest": {
"@odata.type": "#DataScope.Select.Api.Extractions.ExtractionRequests.EndOfDayPricingExtractionRequest",
"ContentFieldNames": [
"Exchange Code",
"High Price",
"Low Price",
"Official Close Price",
"Open Price",
"Trade Date",
"Volume"
],
"IdentifierList": {
"@odata.type": "#DataScope.Select.Api.Extractions.ExtractionRequests.InstrumentIdentifierList",
"InstrumentIdentifiers": [{
"Identifier": "438516AC0",
"IdentifierType": "Cusip"
},{
"Identifier": "IBM.N",
"IdentifierType": "Ric"
}],
"ValidationOptions": null,
"UseUserPreferencesForValidationOptions": false
},
"Condition": null
}
}
The same complex request body in code (Java)
JSONOrderedObject EODExtractionRequest = new JSONOrderedObject()
.put("ExtractionRequest", new JSONOrderedObject()
.put("@odata.type", "#DataScope.Select.Api.Extractions.ExtractionRequests.EndOfDayPricingExtractionRequest")
.put("ContentFieldNames", new JSONArray()
.put("Exchange Code")
.put("High Price")
.put("Low Price")
.put("Mid Price")
.put("Official Close Price")
.put("Open Price")
.put("Trade Date")
.put("Volume"))
.put("IdentifierList", new JSONOrderedObject()
.put("@odata.type", "#DataScope.Select.Api.Extractions.ExtractionRequests.InstrumentIdentifierList")
.put("InstrumentIdentifiers", new JSONArray()
.put(new JSONObject()
.put("Identifier", "438516AC0")
.put("IdentifierType", "Cusip"))
.put(new JSONObject()
.put("Identifier", "IBM.N")
.put("IdentifierType", "Ric")))
.put("ValidationOptions", JSONObject.NULL)
.put("UseUserPreferencesForValidationOptions", false))
.put("Condition", JSONObject.NULL));
To maintain the order of the elements inside the body of the request, we create a JSONOrderedObject. Nested objects are also created using JSONOrderedObject. Arrays are created using JSONArray. As the order of the elements of the objects in the instrument identifiers array is not important, we can use a JSONObject instead of a JSONOrderedObject.
Again, we leverage the chained method call facility provided by the library, and use indentation to describe the message structure, just like it was in Postman. When looking at the code above, and comparing it to the request in Postman, their similarity is apparent. Now the advantage of programming the message body in this manner becomes obvious, you can see how easy it is to replicate in your code what you have in Postman !
Apart from defining string values, the code also illustrates how to define a null value and a boolean. An alternative way of setting a null value is simply not to define the element, i.e. to leave the entire line of code out, which is illustrated in the next example.
Value definition and comparison in the request body in Postman
The previous example shows how to define values of type string, null and boolean. This one defines values of type integer and date, and also a value range and a value comparison, all these for a Futures and Options Search request:
{
"SearchRequest": {
"FileCodes": null,
"CurrencyCodes": null,
"ExchangeCodes": null,
"StrikePrice": {
"@odata.type": "#DataScope.Select.Api.Search.NumericRangeComparison",
"From": 85,
"To": 88
},
"ExpirationDate": {
"@odata.type": "#DataScope.Select.Api.Search.DateValueComparison",
"ComparisonOperator": "GreaterThanEquals",
"Value": "2016-12-31T00:00:00.000Z"
},
"IdentifierType": "Ric",
"Identifier": "ED",
"PreferredIdentifierType": "Ric",
"UnderlyingRic": "ED"
}
}
It is also possible to define a numeric value comparison and a date range comparison.
The same value definition and comparison in the request body in code (Java)
JSONOrderedObject searchExtractJSONObject = new JSONOrderedObject()
.put("SearchRequest", new JSONOrderedObject()
.put("StrikePrice", new JSONOrderedObject()
.put("@odata.type", "#DataScope.Select.Api.Extractions.Search.NumericRangeComparison")
.put("From", 85)
.put("To", 88))
.put("ExpirationDate", new JSONOrderedObject()
.put("@odata.type", "#DataScope.Select.Api.Extractions.Search.DateValueComparison ")
.put("ComparisonOperator", " GreaterThanEquals")
.put("Value", "2016-12-31T00:00:00.000Z"))
.put("IdentifierType", "Ric")
.put("Identifier", "ED")
.put("PreferredIdentifierType", "Ric")
.put("UnderlyingRic", "ED")
);
In the previous example null values were explicitly defined. Here we use a second method: we simply do not define the first three null elements, and leave them out of the code.
Apart from defining string values, this code also illustrates defining an integer, a comparison operator, and a date (which is done using a string). The comparison operator is an enumerated field, documented here in the API Reference tree.
Generic side note: some request fields can accept several values whereas others will only take a single value (in that case, if you put several, the error message will clearly state that only one is supported).
Submitting HTTP queries
The preceding section explained how to create requests; now let us see how to submit them. Response treatment will be covered in the next section.
The Postman application handles this, you just need to click on the Send button and wait for the response to be displayed.
Code to submit a query (Python)
We saw above how to submit POST, GET and DELETE requests, but let us repeat it here for the sake of clarity:
response = requests.post(myEndPointURL, myRequestBody, headers=header)
response = requests.get(myEndPointURL, headers=header)
response = requests.delete(myEndPointURL, headers=header)
The method (POST, GET or DELETE) is specified when we submit the request. The response is returned in a variable.
Code to submit a query, without response handler (Java)
Depending on the libraries you use there might be several ways to do this. The Apache HttpClient library we use for our Java examples give us the possibility of using a response handler or not. The choice will obviously influence how the rest of the code is built, how the response status is checked, and how the response contents are retrieved.
In our samples we opted to choose the easiest solution, the one that would result in the simplest code. In some cases that meant using a response handler, in some cases not. You can choose to code differently, maybe even build your own response handler, based on your preferences.
With the Apache HttpClient library, the easiest way to retrieve both the HTTP response status and body is to avoid using a response handler. Without response handler, retrieving the HTTP response status or a header field is very easy to code, which is why our Java code samples sometimes use this method.
As we saw above, in Java the method (POST, GET or DELETE) is chosen when defining the request, by selecting the appropriate class. The code for submitting a request without response handler is the same for all 3 cases:
HttpResponse response = httpclient.execute(httprequest);
As stated previously, the format of the response depends on the API call we submitted. For example, a token request call or the creation of a schedule returns a string, a request for the list of valid field names returns a collection of string, whereas an On Demand extraction request will return streaming JSON. Knowledge of the call is therefore required. The HttpResponse we use here is appropriate for treatment of streaming JSON (more on this later).
Response treatment is covered in the next section.
Note: our Java code samples are not productized, their purpose is only to illustrate the interaction with the API. The code is limited to a bare minimum, is not optimized, and although the samples illustrate submitting a request with and without response handler, they do not include all the code required for a professional grade application. Please refer to the Apache HttpClient site for details on submitting requests, and choosing the methods that suit you best.
Code to submit a query, using a response handler (Java)
With the BasicResponseHandler delivered by the Apache HttpClient library, some operations like retrieving an element from a response are very easy to code, which is why our Java code samples sometimes use this method. Note that BasicResponseHandler only returns the response body for successful (2xx) responses. If the response code is >= 300, the response body is consumed and an HttpResponseException is thrown. You could write your own response handler to overcome this limitation.
This code is limited to the bare minimum: it declares a basic response handler, and then executes the HTTP request:
ResponseHandler<String> responseHandler = new BasicResponseHandler();
String response = httpclient.execute(httppost, responseHandler);
The response is returned in a string, its treatment will be covered in the next section.
Managing the HTTP responses
There are three things to take into account when managing the HTTP responses:
- The HTTP status code. It is important ! It tells us if the request succeeded or not. In some cases it delivers information on the data extraction on the DSS server: if it has completed we receive a status 200 OK, if it is still pending a status 202 Accepted is returned (for more information, see the asynchronous mechanisms description in the DSS help). The DSS REST help pages also contain information on the meaning of HTTP status codes.
- The header. Retrieving header contents is sometimes required. In the case of a 202 Accepted response, one of the header fields is the location URL, which we must save for further use.
- The body. It contains the returned data, or an error. As stated before, the format of the response depends on the API call we submitted; we could receive a string, a collection of string, or a streaming entity. The content is usually in JSON format, and can contain one or more elements. Here are some common ones (this list is not exhaustive):
- error: this element occurs alone. The error message is in the sub-element message
- @odata.context: an indication of the nature of the content
- value: an array of objects, containing the returned data (this is the usual case, see an exception below)
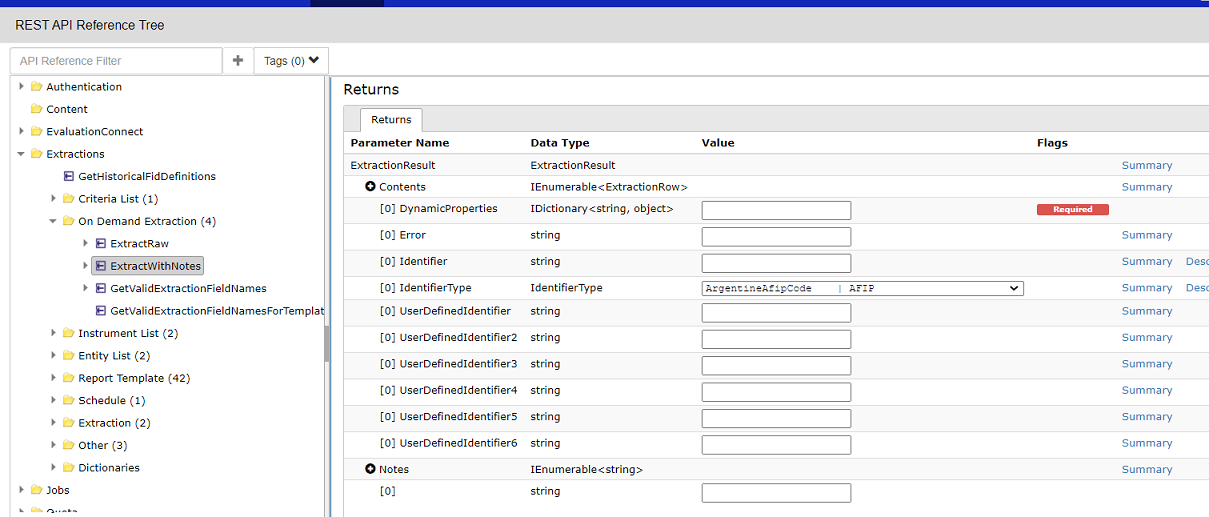
- Contents: an array of objects, containing the actual data (when using ExtractWithNotes endpoint)
- Notes: an array of strings, containing the extraction notes (when using ExtractWithNotes endpoint)
Code to check the HTTP response status code (Python)
The HTTP response code can easily be retrieved, used in a test or printed out:
statusCode = response.status_code
if statusCode == 401:
print('ERROR: authentication issue. HTTP response status: ' + str(response.status_code))
sys.exit(-1)
else:
Code to check the HTTP response status code (Java)
If you submitted your request without using a response handler, the HTTP response code can easily be retrieved from the response, used in a test or printed out:
int statusCode = response.getStatusLine().getStatusCode();
if (statusCode == 401) {
System.out.println("ERROR: authentication issue. HTTP response status: " + statusCode)
} else {
…
If you used a response handler, there is more to code, please refer to section 1.1.8 of the Apache HttpClient Tutorial.
Code to retrieve an HTTP response header element (Python)
As an example, here is how we can retrieve the value of the location URL from the header, using as key the header field name (for the location URL the header field name is “Location”):
locationUrl = response.headers['Location']
Code to retrieve an HTTP response header element (Java)
If you submitted your request without using a response handler, it is easy to retrieve a field from the response header. As an example, here is how we can retrieve the value of the location URL from the header:
Header[] headers = response.getHeaders("Location");
String pollURL = "";
if (headers.length > 0) pollURL = headers[0].getValue();
result = response.json()
data = result["value"]
Retrieving an element of interest will fail if the element does not exist. To avoid that you must structure the workflow of your code using the HTTP response status, and your knowledge of the expected content.
To illustrate this, here is a simple example where we handle the result of an authentication request. If the HTTP response status code is 200 then the token is the value of the element called value. Any other HTTP response means an error occurred:
if statusCode != 200:
print('ERROR: Get Token failed with HTTP status code: ' + str(statusCode))
sys.exit(-1)
else:
result = response.json()
myToken = result["value"]
return myToken
Code to retrieve an HTTP response body element (Java)
The format of the response depends on the call you submitted, and its handling must be adapted accordingly.
For instance, a request for an authentication token will return a string, which we save in a variable called response. The string contains a JSON formatted message, which we first decode, after which we can retrieve the element(s) of interest using as key the body field name. For the case of the authentication request, the data is a single string value, making it very easy to extract the session token:
JSONObject jsonResponse = new JSONObject(response);
sessionToken = jsonResponse.get("value").toString();
Let us now see how to handle streaming JSON content, which is returned by an On Demand data extraction request. We submitted the request without using a response handler, and retrieved the response in variable response, of format HttpResponse. The code is a bit more involved, because here the response contents are inside a streamed entity. To deliver large data sets, DSS uses streaming (chunked transfer encoding). This is for performance, to reduce response times and support very large payloads. For more information see streaming JSON in the help section of the DSS site.
We use a buffered input stream reader to read all the lines of the response:
StringBuffer result = new StringBuffer();
BufferedReader rd = new BufferedReader(new InputStreamReader(response.getEntity().getContent()));
String line = "";
while ((line = rd.readLine()) != null) { result.append(line); }
For more detailed information on entities, please refer to chapter 1.1.4 of the Apache HttpClient Tutorial.
After that we can convert it to a string, which contains a JSON formatted message, which we must first decode:
JSONObject jsonResponse = new JSONObject(result.toString());
We then retrieve the element(s) of interest, in this case the notes file and the data, using as key the body field name:
JSONArray notes = jsonResponse.getJSONArray("Notes");
JSONArray data = jsonResponse.getJSONArray("Contents");
Retrieving an element of interest will fail if the element does not exist. To avoid that you must structure the workflow of your code using the HTTP response status, and your knowledge of the expected content. The following extract of one of our Java code samples illustrates this:
switch (statusCode) {
case 200: // if the status code is 200, then a response is available now
BufferedReader rd = new BufferedReader(
new InputStreamReader(response.getEntity().getContent()));
StringBuffer result = new StringBuffer();
String line = "";
while ((line = rd.readLine()) != null) { result.append(line); }
JSONObject jsonGetResponse = new JSONObject(result.toString());
String extractionStatus = jsonGetResponse.get("Status").toString();
System.out.println("Extraction ready? : " + extractionStatus);
reportExtractionId = jsonGetResponse.get("ReportExtractionId").toString();
System.out.println("ReportExtractionId: " + reportExtractionId);
break;
case 400:
System.out.println("ERROR: HTTP status 400. Request content is malformed, cannot be parsed.");
break;
case 401:
System.out.println("ERROR: HTTP status: 401. Authentication token is invalid or expired.");
break;
Managing asynchronous HTTP responses
Some API calls, like On Demand extractions, use an asynchronous data delivery mechanism. This is due to the fact that extracting large data sets might take time, and results will not necessarily be delivered directly. The basic workflow to follow is the following:
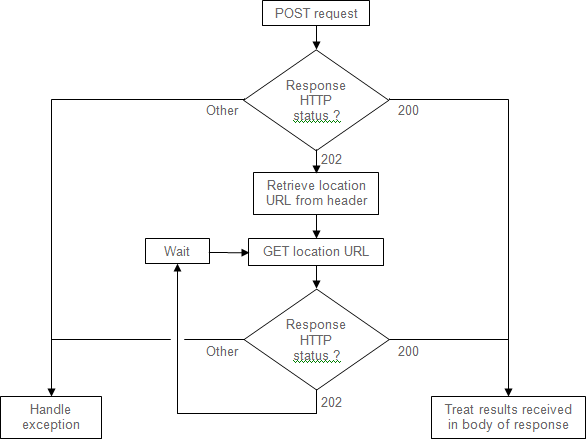
This diagram is a very short and simple illustration of the workflow. For more details on the asynchronous mechanism, refer to the Async page in the DSS help.
For a code sample, you can refer to any one of our Java samples for On Demand extractions, available under the Downloads tab.
Best practies, tips and work progcess suggestion
Once you have mastered submitting HTTP requests and retrieving the responses, the next skills to develop are how to build specific queries, and how to debug them.
Building queries using the API calls implies you must first understand what list of parameters they take, and find out which parameters are enumerable and which values they can take. When creating a report template or making an On Demand data request, the list of available field names must also be determined. You also need to know the format of the response (string, streaming JSON, etc.).
Debugging failing queries is greatly facilitated if you can see the entire returned result, including the HTTP status code, the returned headers and the returned body. Being able to quickly modify any element of the query and resubmitting it immediately is also a great advantage and time saver.
This chapter is divided in 3 sections: Understanding API calls, the presentation of a Work process for efficient coding and debugging and a Troubleshooting FAQ.
Understanding API calls
This can be achieved by using the API Reference tree, determining available field names for extractions, and studying code samples.
Using the API Reference tree
The API Reference tree is hosted in the help pages of the DSS web site:

There are several ways to search for the API call you want to submit:
- Typing in the API Reference Filter box, top left. As soon as you type, related suggestions appear, they can be selected using the mouse. Pressing the Enter key applies the filter, which appears to the right of the Tags box. Multiple filters can be applied, for instance Extract and Raw. Filters can be removed by clicking on the x inside each listed filter.
- Selecting tags using the drop down box top left. When no tags are selected, the display shows all possible API calls. When one or several tags are selected, the API calls in the display only include those corresponding to the selected tag(s). Simultaneously selecting all three tags standard, tick-history and tick-history-vbd will limit the display to the most typical API calls available only to TRTH customers, entitled to tick history data. Selecting the common tag will limit the display to calls available to both DSS and TRTH customers.
- Browsing through the API reference tree using the left column menu.
Once you have found the API call, click on it in the left column menu, to display its description in the main pane. Here it is an extraction request, which varies depending on the data type, so as an example we selected the EndOfDayPricingExtractionRequest in the dropdown in the first line of the parameters section:
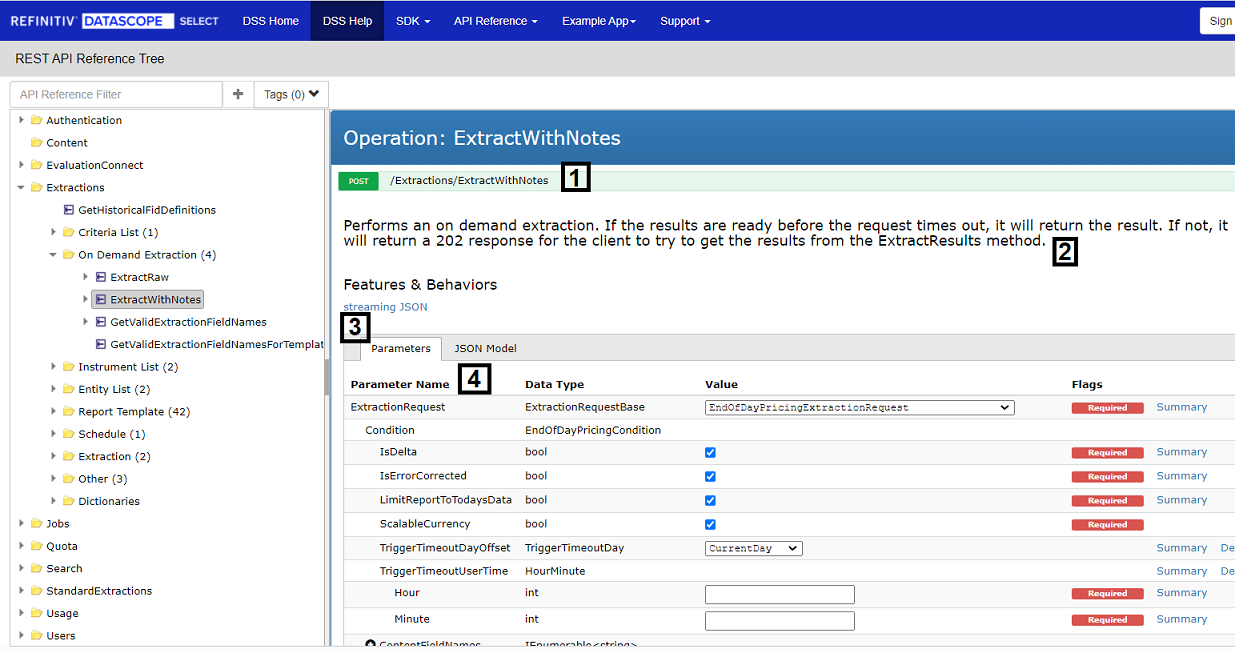
You will find:
- The HTTP request submission method and the endpoint.
- The format of the response. Click on the link to get an explanation.
- If data delivery uses specific mechanisms, like asynchronous delivery, server driven paging, or streaming JSON. Click on eventual links to get an explanation.
- The list of parameters, with their name and type. The indentation shows their nested structure. For enumerable variables, a drop down displays the list of possible values. A flag states if the parameter is required or optional. In the illustrated case, changing the value of the first parameter (the type of extraction) will update the contents of the screen, to update the list of parameters accordingly.
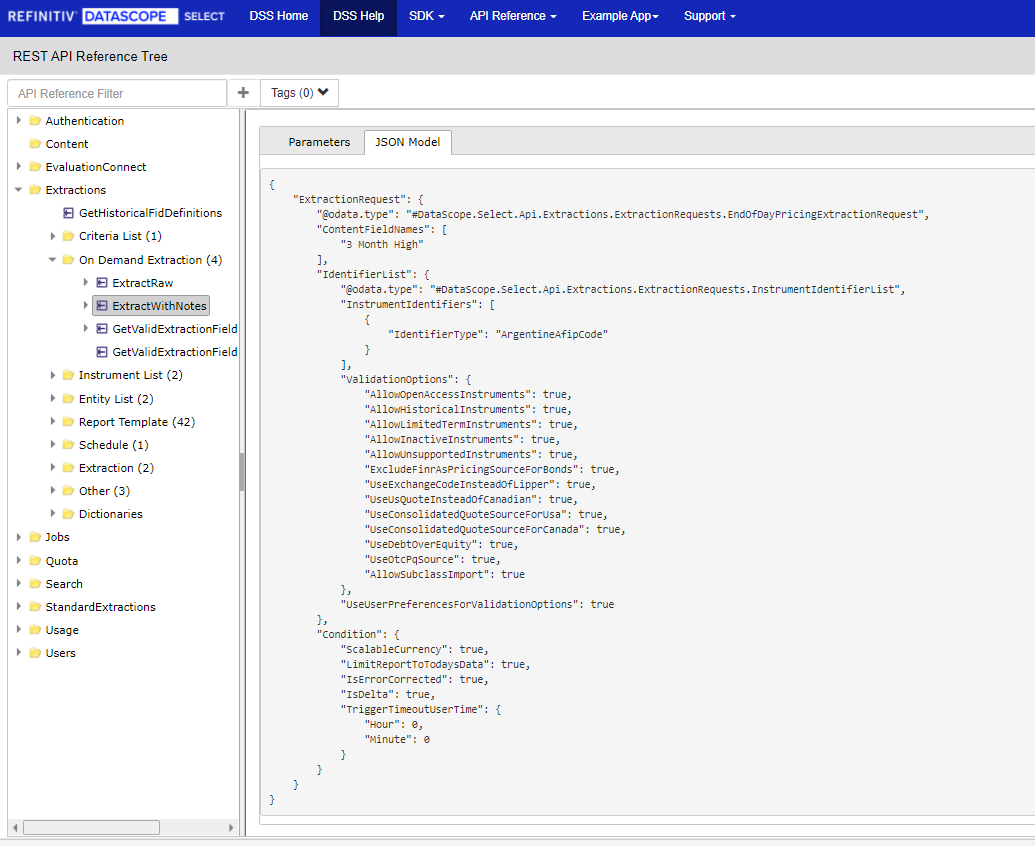
Clicking on the JSON model tab will display the corresponding request body in JSON format, which can easily be copied into Postman to run it:
Back to the Parameters tab, scrolling down in the main pane you can see the description of the response contents:
Further down there are several C# code samples. Select the one you want using the dropdown box (some samples have several steps that can be selected using another dropdown). Then click on the HTTP tabs to display the HTTP request and corresponding response:
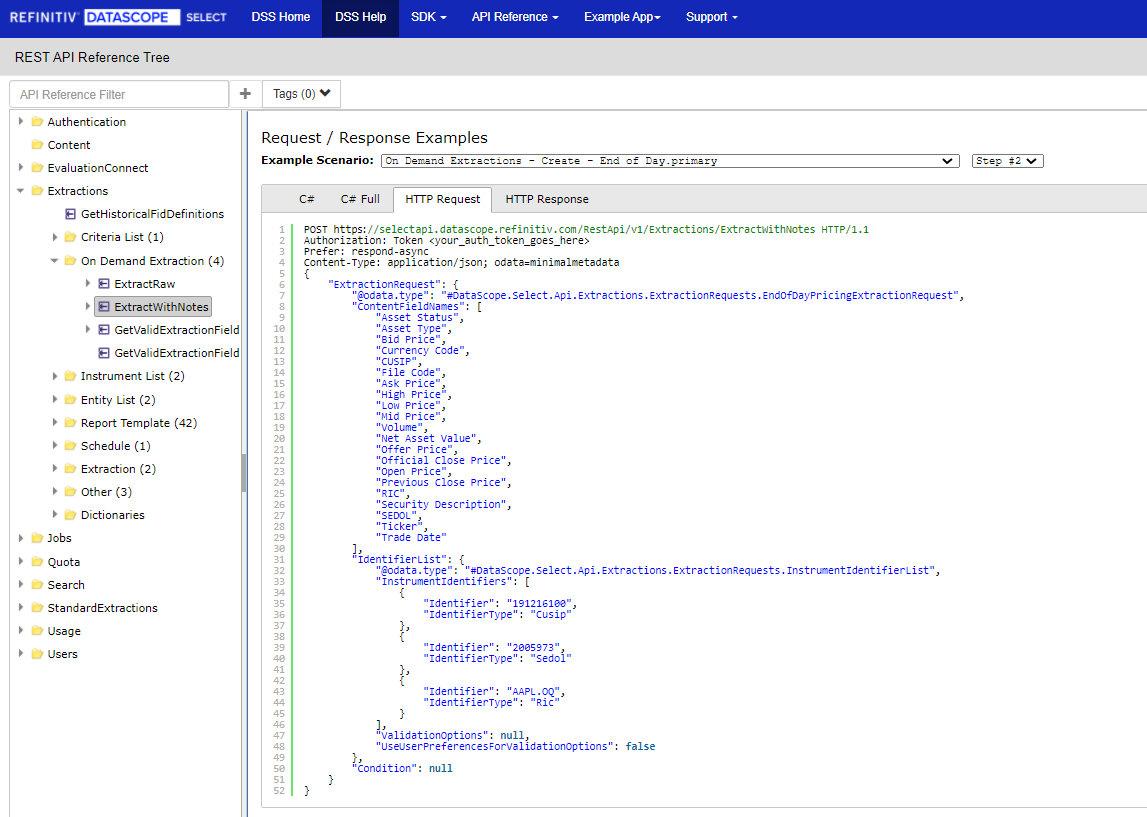
Note: these samples are the same that you will find in the C# example application, described in the Quick Start. That application also allows you to run the samples, and display the HTTP requests and actual responses.
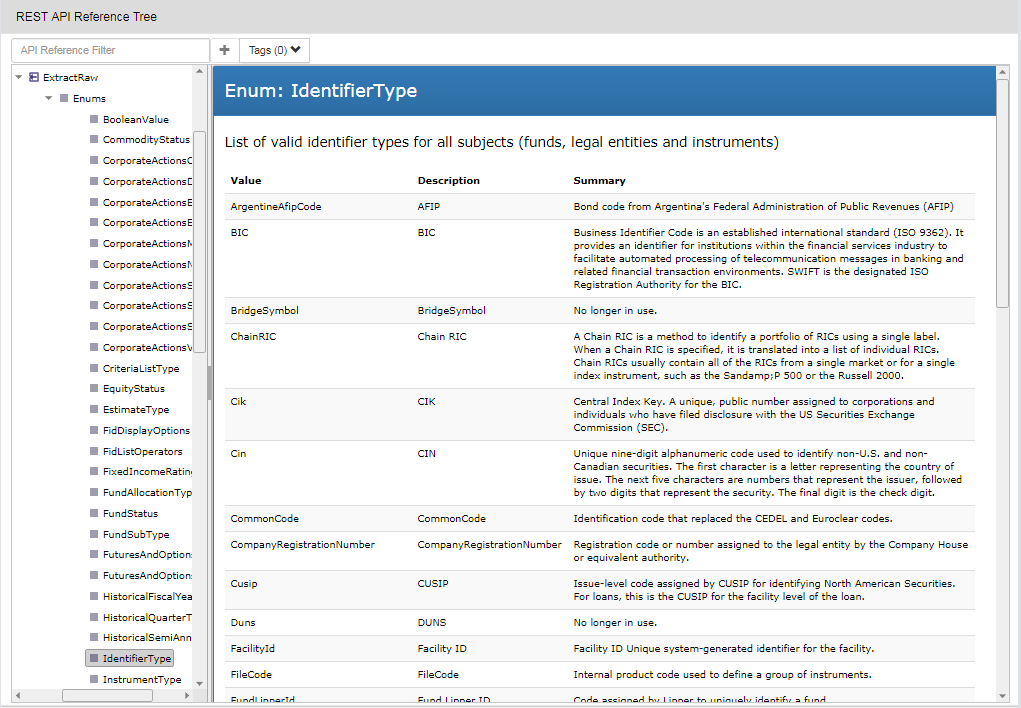
The API Reference Tree is rich in information; it is worthwhile spending time browsing through it to discover the details of the API calls. As a last example to illustrate this, you can also find details on enumerated fields. For instance, here is the description for the IdentifierType enumerated field:
Determining available field names for extractions
When making an On Demand extraction request, or creating a report template, you need to know which field names are available. There are several ways of determining this.
If you are unsure of the extraction you want to use:
1. Use the DSS Data Content Guide. In tab Field Descriptions, filter the Field Name column to find what you are searching. You can also use the Description column to refine your search. This method allows you to find which extraction(s) deliver the field(s) you are interested in.
If you know which extraction you want to use:
2. Use the API Reference tree, as explained above.
3. Run an API call to retrieve the list of available fields for a particular extraction. The returned result contains the field code, field name, a description, the field type (number, text, date) and a group (which might be empty). The type of data extraction (in this case End of Day pricing) is specified as a parameter in the endpoint URL. All REST API Tutorials that describe a data extraction, starting with the second tutorial, explain the appropriate calls. You will also find them in the Postman collection. As an example for an End of Day data On Demand extraction, the call is an HTTP GET request to this endpoint:
https://selectapi.datascope.refinitiv.com/RestApi/v1/Extractions/GetValidContentFieldTypes(ReportTemplateType=DataScope.Select.Api.Extractions.ReportTemplates.ReportTemplateTypes'EndOfDayPricing')
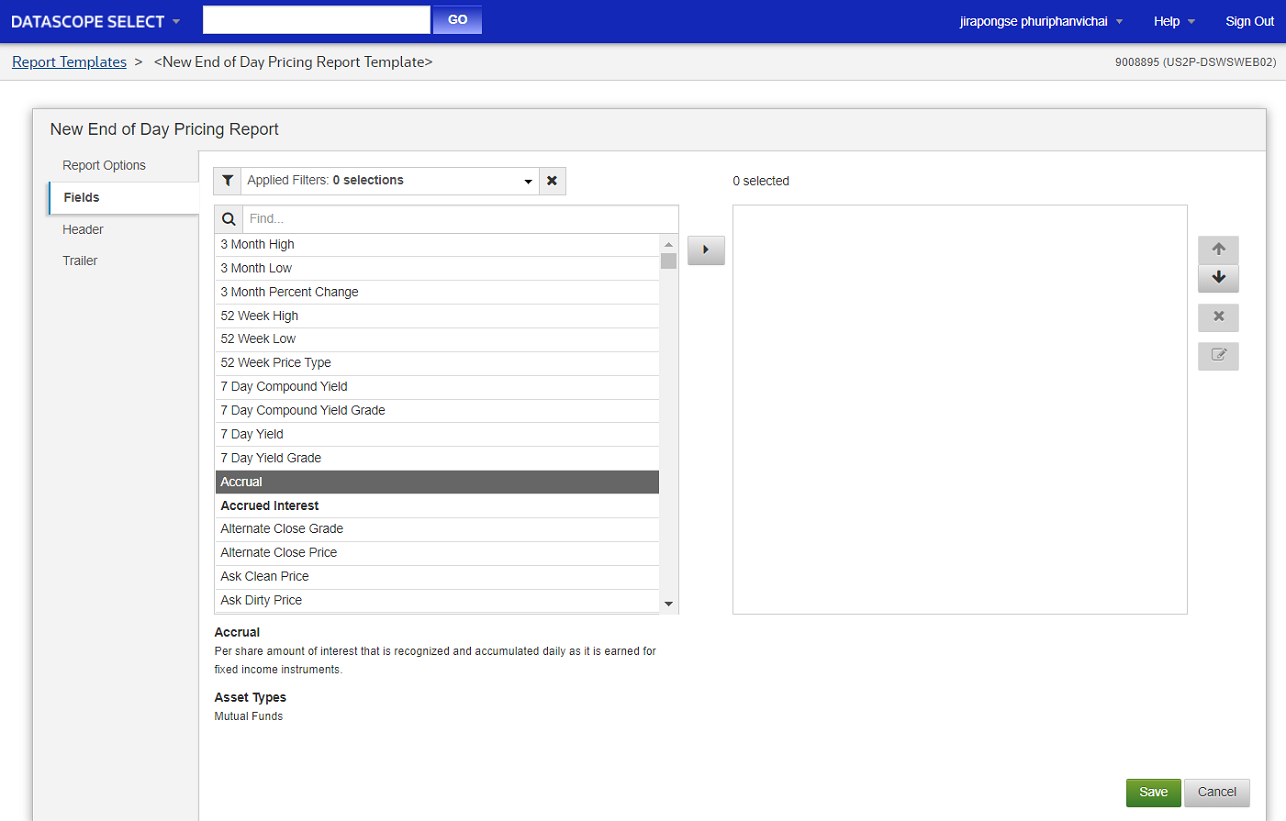
4. Manually create a report template in the DSS web GUI, and browse the list of fields. The advantages of using the GUI are that you can:
- Scroll easily through the list.
- Apply filters (they apply to asset classes).
- Search by typing part of the name of the parameter.
- See a short description by selecting a specific field in the list.
HTTP and code samples
Looking at working samples, and experimenting with them, is a great way to learn. You will find samples in several places:
- In the API Reference tree there are C# code samples and the HTTP requests / responses, see above.
- In the C# example application there are C# code samples and the HTTP requests / responses, see the Quick Start.
- Under the Downloads tab there are C#, Java and Python code samples, and a Postman collection.
Note: if your DSS account does not have all the required permissions, some of these samples may fail.
Work prcess for efficient coding and debugging
Experimenting using your own program can be tedious and time consuming, especially at the start of your project when your code does not display all the returned data, statuses and errors. To help you get to speed quickly, here are some tips and a suggested work process, which uses a 3 phase approach:
- Understand the API call.
- Understand what will be returned, in all conditions.
- Code.
It relies heavily on the use of Postman, or any similar application to test REST APIs.
Here are the details of our suggested approach:
- Find out which API call you need to use. You can discover that through code samples, which have the advantage of showing the call in context, through the documentation or the API Reference tree.
- Study all the inputs for the API call. Use the API Reference tree as your reference. Code samples might use only a subset of all the parameters. This helps you get the most out of each call.
- Create the API call in Postman. The coding is very quick, especially as you can copy and paste HTTP query bodies from the API Reference tree, the C# example application or other code samples. Debugging is easier in Postman than in a program, for several reasons:
- It is very easy to edit the structure and contents of the query, by simply typing in Postman.
- The returned HTTP status code is displayed immediately.
- You can easily access the returned headers.
- Whatever is returned in the body, be it data or error messages, will be immediately and entirely displayed.
- The error messages will give you precise pointers to where errors lie.
- Study the response in Postman. The data will show you what to expect, its structure and content. This helps you define how your code must manage the received data.
- Test various inputs of your call in Postman. It is easy to change parameters to see what they influence, and thus enhance your knowledge of the call and tune your queries to receive what you need.
- Define the field names list using Postman. Experiment with field names to find which ones return the data you want. Use several instruments covering the range of asset classes and data venues you will be using. At this point you can decide if you want to separate requests by asset class, to limit the number of fields containing null values. Try to reduce the field list to the strict minimum, to minimize your bandwidth usage and the amount of returned data your code will have to manage. This will reduce your workload and maximize performance.
- Test error conditions in Postman. Think about what inputs might go wrong in your workflow. Are you reading instrument lists from an external source ? Can you guarantee that all inputs will always be correct ? Test what is returned if some of your inputs contain unexpected or null values.
- Start coding. It is useful to output the string that contains the HTTP body to the console during the debugging phase. In case of issue, the string can easily be copied into a Postman request; running that request will give useful indications as to where errors may hide. It is useful to output the HTTP status of each response to console, this helps in identifying the cause of unexpected results.
Troubleshooting FAQ
This list is not exhaustive, but will help you solve some common issues.
Issues covered in this FAQ
- I received a 401 Unauthorized HTTP status
- I received a 403 Forbidden HTTP status
- I received a 400 Bad Request HTTP status, the error message starts with Validation error
- I received a 400 Bad Request HTTP status, the error message starts with Malformed request
- Where can I find a description of all possible HTTP status codes ?
- I made an intraday request, the extraction Notes say it was embargoed
- The result of a request does not contain data for all instruments
Issues and solutions
I received a 401 Unauthorized HTTP Status
Solution: this error is due to an authentication issue. There are several cases where it may occur:
- If you receive this in response to a request for an authorization token, it means the username and/or password are either missing from the request body, or invalid. You must use valid DSS credentials.
- If you receive this in response to a different request then:
- If the error message is: Invalid Authorization Token it means the authorization token in the header is either invalid or expired (it has a 24 hour lifetime). Request a new token and include it in the header.
- If the error message is different, it will explain what is wrong. The authorization element might be missing from the request header, or the token could be empty.
I received a 403 Unauthorized HTTP Status
Solution: this error is due to a permissioning issue. Depending on your DSS subscription, you can be entitled to different types of data. If you receive a 403 it means your DSS account does not allow you to run this particular request. If you believe this should not be the case, contact your sales representative.
I recieived a 400 Bad Request HTTP status, the error message starts with Validation error
Solution: this error means that the web service could not successfully parse the body of the request, its structure is not what is expected for the endpoint URL you used. Check the rest of the validation error text; it is usually quite clear about what caused the error. Typical causes:
- Required body elements could be missing, or there are superfluous body elements. Check the contents carefully, referring to the API Reference tree. Compare the query to an existing working sample, in the Postman collection or in the C# example application.
- Some parameters can take multiple values, but others can only take a single one. Example: a search request accepts multiple exchange codes, but only one currency code.
- Some parameters require values within a specific set. Example: an exchange or currency code must be one of the set of official ISO codes.
- You attempted to create an item on the DSS server (instrument list, entity list, report template or schedule) with a name that already exists.
I recieived a 400 Bad Request HTTP status, the error message starts with Malformed request
Note: this issue might occur systematically, or randomly.
Solution: there are several possible causes for such an issue:
- The structure of the body of the request is not what is expected for the endpoint URL you used. There can be several reasons for this to happen:
- The endpoint URL could be erroneous.
- Required body elements could be missing, or there are superfluous body elements. Check the contents carefully, referring to the API Reference tree. Compare the query to an existing working sample, in the Postman collection or in the C# example application.
- A syntax error in the body of the request. Inspect the request carefully; look for missing brackets, double quotes, typos in field names, etc.
- The order of the elements inside the request body was not respected. This is likely the problem if the issue occurs randomly. There can be several reasons for this to happen:
- Not using a method that preserves the order of elements inside an object. Ensure you use the appropriate method. With the Java libraries we use in our samples, it means using JSONOrderedObject instead of JSONObject. In Python we use OrderedDict from collections.
- The implementation of the JSON library. Some libraries will simply not preserve the order of elements. If you find out that is the case, you must change library.
Where can I find a description of all possible HTTP status codes?
Solution: a description is available in the DSS help pages.
I made an intraday request, the extraction Notes say it was embargoed
Solution: data is embargoed, i.e. its delivery is delayed, if you request intraday data for instruments for which you do not have the appropriate permissions, which may vary per data provider (exchange, etc.). Embargoed data will be available to you, but only after the embargo delay, which can vary per data provider. If you made a request for several instruments, you might receive a partial delivery, depending on your DSS general preference settings under the Reports section. For a detailed explanation of embargoes, and how DSS handles them, study the entire .Net SDK Tutorial 4, in particular (but not only) this section. If you believe your data entitlements should be different, contact your sales representative.
The results of a request does not contain data for all instruments
Solution: there are several possible causes, investigate using the following:
If you requested intraday data, and the extraction Notes state that data was embargoed, see the previous FAQ item.
Another cause is that instruments in your list might have been discarded. Reasons for discarding instruments:
- Because there are too many. There are limits to the number of instruments you can request in a data extraction, these limits depend on the type of data you request. The DSS best practices and limits document and the DSS site list the values of the extraction limits for each data type. Note that if you use file codes or chains, these will be expanded, resulting in longer instrument lists. The diagnosis is easy using the extraction notes, they will contain a message, of which here is an example: WARNING: Instrument count (75000) > TNC limit (50000) -- extra instruments ignored (TNC stands for Terms and Conditions, for which the limit is 50000).
- Because some were not found (because they are invalid or have expired), or duplicated. When you add instruments to an instrument list on the server, check the response. It contains the number of valid instruments, and an information message for each instrument not found (these are not added to the list). In the following example 2 instruments out of 3 were not found; the first one expired, the second is invalid:
{
"@odata.context": "https://selectapi.datascope.refinitiv.com/RestApi/v1/$metadata#
DataScope.Select.Api.Extractions.SubjectLists.InstrumentsAppendIdentifiersResult",
"ValidationResult": {
"ValidInstrumentCount": 1,
"OpenAccessSegments": [],
"StandardSegments": [
{
"Code": "E",
"Description": "Equity",
"Count": 1
}
],
"ValidationDuplicates": [],
"Messages": [
{
"Severity": "Info",
"Message": "CSP, 438516AC0 (not found)"
},
{
"Severity": "Info",
"Message": "RIC, JUNK (not found)"
}
]
},
"AppendResult": {
"AppendedInstrumentCount": 1,
"AppendDuplicates": []
}
}
When submitting an On Demand request instrument validation is done automatically, no messages are delivered in case of issue. You can check the extraction Notes which mention the number of valid instruments in the input list, it looks like this: Input List (1 items). If the list you sent contained more instruments, it means some were discarded.
If you want to explicitly validate instruments prior to using them, and get a detailed list of which ones are invalid, you can use this API call:
POST https://selectapi.datascope.refinitiv.com/RestApi/v1/Extractions/InstrumentListValidateIdentifiers
Body:
{
"InputsForValidation": [
{
"Identifier": "438516AC0",
"IdentifierType": "Cusip"
},{
"Identifier": "JUNK",
"IdentifierType": "Ric"
},{
"Identifier": "IBM.N",
"IdentifierType": "Ric"
}
],
"KeepDuplicates": false
}
The response will look like:
{
"@odata.context": "https://selectapi.datascope.refinitiv.com/RestApi/v1/$metadata#
DataScope.Select.Api.Extractions.SubjectLists.InstrumentsValidateIdentifiersResult",
"ValidatedInstruments": [
{
"Identifier": "IBM.N",
"IdentifierType": "Ric",
"UserDefinedIdentifier": "",
"UserDefinedIdentifier2": "",
"UserDefinedIdentifier3": "",
"Source": "NYS",
"Key": "VjF8MHgwMDAzZGQwMDEzNzlkNDYwfDB4MDAwM2RjMDA0YTAyNGZkOHxOWVN8RVFRVXxFUVRZfE9EU0h8RXx8SUJNLk58MDA3Nw",
"Description": "INTERNATIONAL BUSINESS MACHINES ORD",
"InstrumentType": "EquityQuote",
"Status": "Valid"
}
],
"ValidationResult": {
"ValidInstrumentCount": 1,
"OpenAccessSegments": [],
"StandardSegments": [
{
"Code": "E",
"Description": "Equity",
"Count": 1
}
],
"ValidationDuplicates": [],
"Messages": [
{
"Severity": "Info",
"Message": "CSP, 438516AC0 (not found)"
},
{
"Severity": "Info",
"Message": "RIC, JUNK (not found)"
}
]
}
}
Conclusions
You should now have a better understanding of how to access the DSS REST API programmatically, whatever language you might have chosen, and how to move your project forward.
As a next step, we very strongly recommend that you read through all the help pages on the DSS site, and study all the key mechanisms which cover important underlying concepts that might impact your workflow.
It is also very useful to go through the tutorials, and run them, they deliver a lot of information.
Download and run the examples available under the Downloads tab, where you will find samples in several languages.