Screening automations can be built out and supported a number of ways. The Tutorials section has step by step examples of real-time Flows, and the Documentation section covers tips on designing your processes along with options for data migration and building automations using Scheduled Apex Jobs.
This quick start aims to give developers tips on the components that can be used to build automations, the variables that can be passed in these, and the field updates that can trigger processes. It should be used as a resource guide when building out your processes.
Initiating Screening
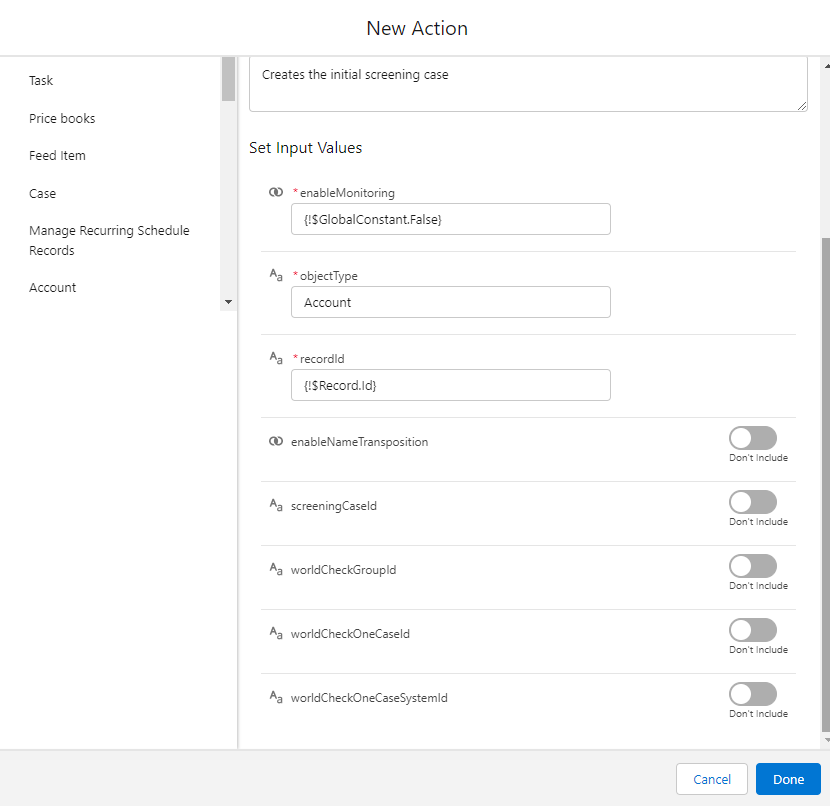
The package contains an Apex Action called "Automate Screening" which can be used in Flows. This Apex Action contains a number of variables that can be set depending on the use case that you are trying to support. These variables can also be set using custom Apex.
VARIABLE |
COMMENT |
USE CASE |
||
CREATE |
UPDATE |
|||
enableMonitoring |
Sets the Ongoing Screening Enabled flag to either TRUE or FALSE |
Mandatory |
Mandatory |
Leave blank |
objectType |
Specify the object you are screening. ‘CONTACT’, ‘ACCOUNT’ ‘LEAD’, ‘CUSTOM OBJECT’, or ‘KYC_Screening_Case’ for ‘skinny case’ process |
Mandatory |
Mandatory |
Mandatory set as: ‘KYC_Screening_Case’ |
recordId |
Specify the Salesforce ID of the record you are screening |
Mandatory |
Mandatory |
Leave blank |
worldCheckGroupID |
The ID of the World-Check One Group you wish to screen the record against. If left blank it will screen against the group setup in the Screening Setup Wizard. |
Optional |
Optional |
Leave blank |
enableNameTransposition |
True or False. Name Transposition is useful if you do not know the word order of the name you are passing. Enabling this to true will screen the name with all variants of the word order e.g. John Doe or Doe John. Setting this may increase your hits in World-Check One. Relevant for Contacts/Individuals only |
Optional (contact/individual only) |
Optional (contact/individual only) |
Leave blank |
screeningCaseId |
The Salesforce ID of the screening case. Setting this variable tells the system which case to update. |
Leave blank |
Mandatory |
Mandatory |
worldCheckOneCaseId |
The World-Check One equivalent ID of the record which appears in the World-Check UI. Setting this variable tells the system which case to update. Can be found in the Screening Case object: Case ID: tr_wc1__Case_Id__c |
Leave blank |
Mandatory |
Mandatory |
worldCheckOneCaseSystemId |
The World-Check One backend ID used by in the API integration. Setting this variable tells the system which case to update. Can be found in the Screening Case object: Case System ID: tr_wc1__Thomson_Reuters_Case_Id__c |
Leave blank |
Mandatory |
Leave blank |
Use case explanation:
Create = What fields are required when populating a case
Update = What fields are required when updating an existing case
Skeleton Case = Only relevant for existing clients of World-Check One who wish to import existing cases from World-Check One into Salesforce as a one time data load. See Skeleton Case for more information.
As an example: this is all you need to populate to create a case from the Account object with Ongoing Monitoring switched off:
Ongoing Monitoring
What is Ongoing Monitoring?
Ongoing Monitoring (OGS) allows you to screen a Case continuously and automatically against the delta of change in the World Check One Database. For example, if you screen a record ABC Bank today you may get no matches in World-Check One; however, in a few weeks or months ABC Bank may be added to the World-Check One database. By setting the record for Ongoing Monitoring (OGS) you will be alerted to this new match. You will also be alerted to any changes on existing matches that may require your review based on the Update Categorization classification range you have selected in World-Check One.
How does this work?
Any Screening Case with the “Ongoing Screening Enabled” flag set to TRUE will be screened in World-Check One against the delta of changed records (e.g. new records added, or existing records updated since the record’s last screen date). The frequency of Ongoing Screening can be defined at the group level within World-Check One as daily, weekly, monthly or semi-annually.
Within Salesforce, a daily Apex Job “Tr_ongoingMonitoringBatchProcessor” runs that fetches the updated records from World-Check One.
For detailed information about OGS please refer to the OGS FAQ guide in the documents section.
How can I set OGS in Salesforce?
The “Ongoing Screening Enabled” flag can be set to TRUE in Salesforce in several ways:
- Immediately upon the creation of your Screening case by setting the input value of “enableMonitoring” to be “True” in in the "Automate Screening" Apex action.
- Via a field update to the field tr_wc1_Monitoring_Enabled__c
Use Case: A Screening Case is created early in your processes, but you only want to set the case for Ongoing Screening TRUE once the Customer has fully onboarded and the status of the Account has changed to 'Active'
- Manually via the UI using the “Ongoing Screening” button
- Manually from within the Case matches view
- In bulk via data job (note a limit of 1000 records per data job exists)
Considerations
Your organisation will be contracted for a specific number of Ongoing Screens, depending on your contractual limits it may make sense to only set your active customers for Ongoing Screening.
Archiving and Deleting
Review the data management section for full information about safely archiving and deleting cases in Salesforce.
Archive.
It is possible to automatically Archive Screening Cases, once Archived the system will automatically disable Ongoing Monitoring for the record and it becomes read only. To do this using Flows the value for the field Archival Status (tr_WC1_Archival_Status_c ) should be changed to "ARCHIVED" all uppercase. It is possible to change the Archival Status for multiple records at once with a limit of 1000 records per data job.
Identify Group Ids
It is sometimes necessary to know the ID of the Group you are sending records to be screened against in World-Check One. Groups are created and configured directly in World-Check One and should be configured first. Help on how to do in World-Check is available online in the topic “Reducing False Positives”.
To identify the Group ID in Salesforce you will need to:
- add the button/Quick action “Get Group Info” to the Screening Case Layout on the Screening Case custom object and save the page layout.
- navigate to a screening case record and click this button to retrieve the Group Ids. Once identified this button can be removed from the page layout.
- copy the Group IDs that you want to use and save them locally
TIP. Group IDs are unique to the World-Check One environment they are from. If you have both a World-Check One Pilot site for testing and World-Check One Production site, then the group IDs will be different in each environment. You will need to swap out the Group IDs you have configured in Salesforce manually when you move to production.
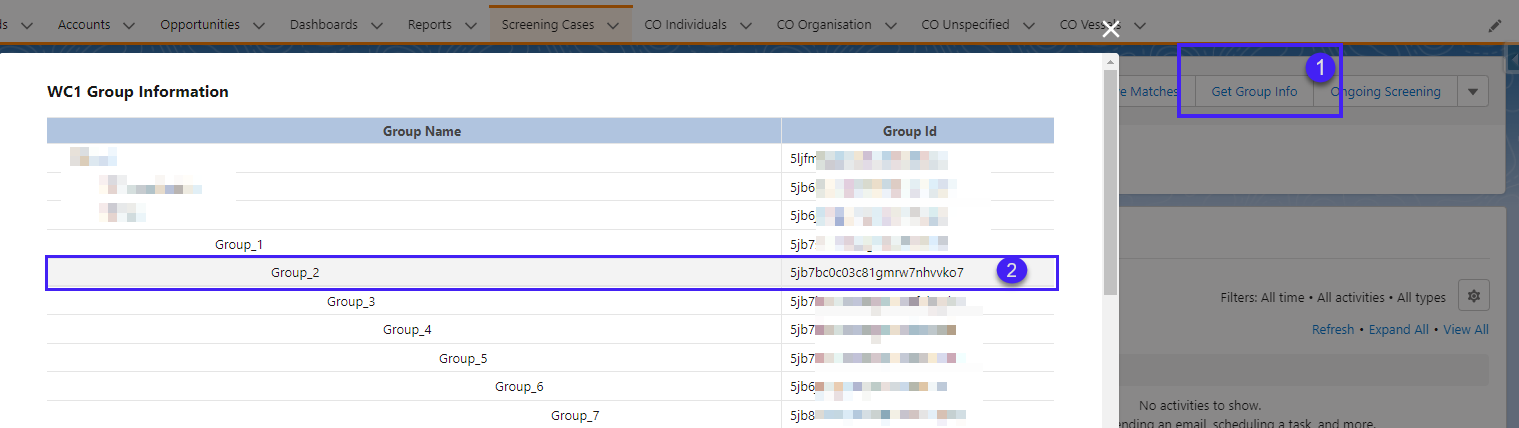
The field Group ID can also be pulled into Screening Case reports, but it will only return the Group Id for groups that have cases associated in Salesforce.
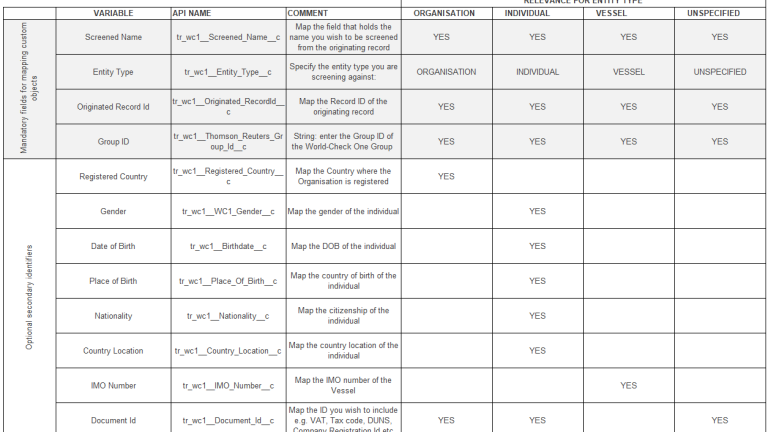
Custom Mapping
Customer Risk Screener provides out of the box field mapping for the Account, Contact and Lead objects. One name field can be supported per object using the out of the box mapping. If you need to support the screening of multiple fields per object, screen records from custom objects, or support 'Person Accounts', then custom mappings will need to be created and maintained. Full steps on how to configure this can be found in the Tutorials section.
To achieve this, you will need to pass variables to the correct fields in the screening case object. The fields differ depending on the entity type being screened e.g. date of birth is not relevant for the entity type 'Organisation'.